Leonardo da Vinci was the first to learn how to draw a full-length human correctly. His drawings are highly realistic, thanks to his study of anatomy and figure proportions. If you know the basic rules, you can easily create a full-length pencil sketch of a human.

Drawing tools
Drawing a human figure in pencil (sketches of people require preparation and knowledge) requires the following tools before you start drawing:
- pencil;
- an eraser that will allow you to remove unnecessary elements quickly and efficiently;
- a sheet of paper as a canvas. This can be a page from a drawing pad or notebook, A4 paper.
Pencils
Beginning artists are advised to spend a few hours deciding on pencils. It is worth considering: simple pencils differ in their degree of hardness.
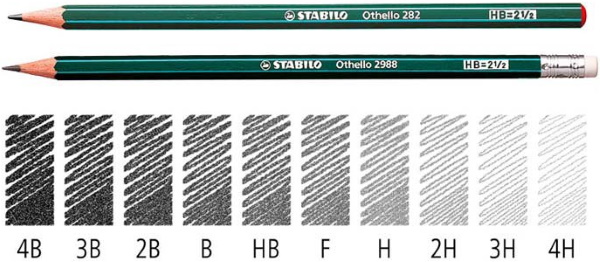
There are several systems for indicating hardness, the most common being the European scale. According to the generally accepted standard in Europe, 3 letters and numbers (from 2 to 8) are used to mark pencils. They indicate hardness or softness, as well as their degrees.
For example:
- If there is a letter "B" on the body of the pencil, then its lead is soft;
- The letter "H" marking means that the pencil lead is hard;
- a pencil lead marked "4B" is 4 times softer than a pencil lead marked with only the letter "B";
- a pencil marked "2B" is 2 times softer than a tool marked "B";
- The softest pencils are designated by the combination of symbols "8B". The same applies to the degree of hardness. As the number next to the letter "H" increases, the lead becomes harder;
- The 6H pencil is 3 times harder than the 2H tool.
There is also a designation of pencils in which both letters are combined. The body may have the marking "HB". It indicates that the tool is both hard and soft at the same time. It is called "hard-soft".
Less common is the letter "F" on the bodies of pencils produced in European countries. It means that the lead of such a pencil has a medium tone between hard H and hard-soft HB.
A similar system is used to mark pencils produced in Russia. However, instead of Latin letters on the body, there may be Russian ones - "M" and "T". M indicates softness, and T - hardness. Otherwise, domestic manufacturers have the same as in the standard European system: numbers from 2 to 8 and the designation of a hard-soft pencil with the combination "TM".
Hard and soft pencils are usually used to create a sketch. They are good for drawing the base and creating shadows. If you need to create an accent or draw darker lines, it is better to take a pencil 2B, 3B or even softer.
Paper
Beginning artists usually use simple office paper or school notebook sheets for their paintings. However, the more responsibly you approach the choice of paper, the easier it will be to work with the material, and the better the images will turn out.

It is important to consider 3 main characteristics of paper sheets:
| Characteristic | Description |
| White | In offices, the whitest paper is used. It is not suitable for serious drawings, but is acceptable for sketches. |
| Density | Paper density is measured in grams per square meter. Any artist will prefer to use a thicker paper, knowing that it is resistant to damage. The denser the material, the more you will have to pay for its purchase. The optimal option is to purchase paper sheets with a density of 100 to 200 g per sq. m. It is recommended to check how well the sheet will withstand erasing pencil lines with an eraser before purchasing. |
| Grain | On grainy paper, drawings are more voluminous. However, for sketches and drawings, it is better to choose sheets with the lowest degree of graininess. |
It is also worth keeping in mind that paper is divided into 2 main types:
- office paper. It is the whitest, its disadvantage is that the sheets are too thin. You need to be careful when using an eraser on it: under pressure it can quickly deteriorate;
- writing paper. It has a good density, often has a yellowish tint. It is inexpensive, traces of the lead are easily erased, but the main disadvantage is that the lines are barely noticeable.
Ready examples
Sketching a human figure may require, in addition to pencil and paper, the presence of works by other artists. Even better - instead of looking at finished images, watch the process of drawing professionals directly.
The main secret of success when drawing a human figure with a pencil is realism and naturalness. By carefully observing how people stand, sit, walk and move, you can notice many features and apply them in creating drawings.
Master classes
The main task that a beginner should set for himself is to learn how to draw a person in full growth correctly, observing all proportions. If you achieve this goal, further work on drawing a person in any poses will be simplified.
A man in full growth
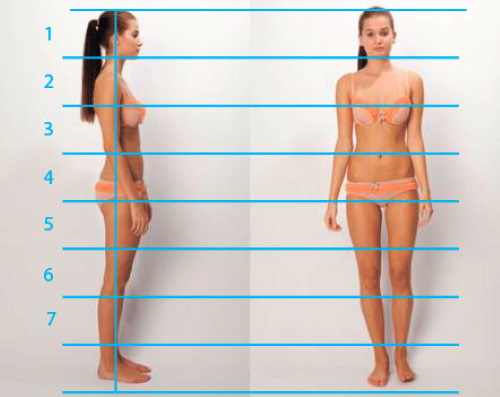
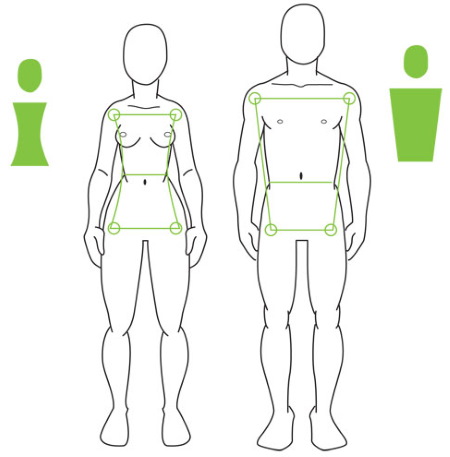
Anyone who wants to draw people well needs to remember the digital ratio - "1:7". This is the relationship between the head and the full height of any representative of Homo Sapiens. This does not apply to all cases, but to most.
There are, however, some exceptions:
- these proportions are not exact. For example, if the head height is 25 cm, this does not mean that the full height of such a person is exactly 7 times greater and is 175 cm. 1:7 is an approximate ratio. The height of a person with a head height of 25 cm may differ by several cm from the figure of 175 cm. For example, it may be 180 cm;
- in the tallest people the ratio of head to total height reaches 1:8;
- The height of the head and the height of the body change differently as a person grows older, and therefore the proportions of a child differ from those of an adult. In newborns, this ratio is 1:5, in older children - 1:6.
All this must be taken into account when creating a drawing.
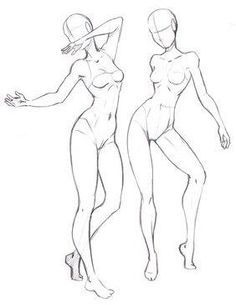
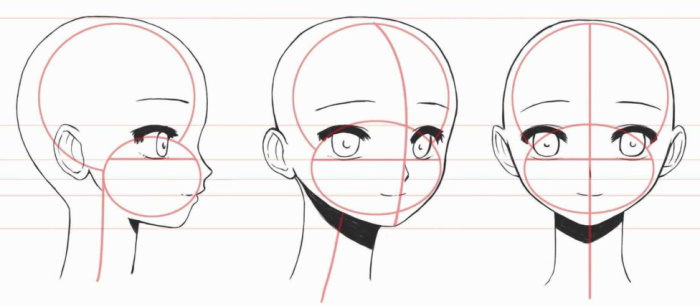
The human figure in pencil (full-length sketches of people always start with the head) is done in the following stages:
- Draw the head at the top of the sheet in the center. Its shape is oval.
- Draw the neck. It can be represented as a square.
If you plan to depict a thin person, the thickness of his neck should be 2 times less than the width of the head. For example, if the head in the drawing is 4 cm wide, the thickness of the neck should be 2 cm.
If the artist wants to depict a fat person, the width of the square representing the neck in the drawing can be equal to the thickness of the head. In the above case with a 4 cm head, the neck will also have a thickness of 4 cm.
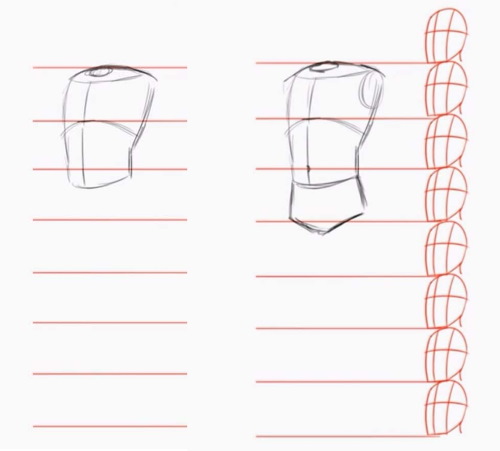
- Draw a human chest. Here it is necessary to take into account the person's gender. A man's chest should be twice as wide as the height of his head. For women, this figure is reduced to 1.5 times the height of the head.
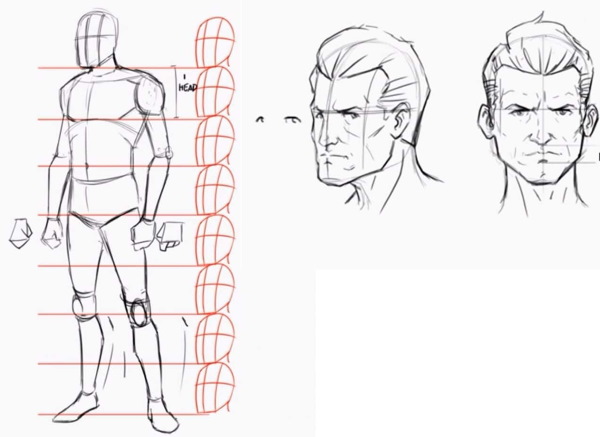
- According to the rule mentioned at the beginning of this lesson, it is necessary to divide the height of a person into 7 parts (8 if he is very tall and 5 or 6 parts if he is a child). The most convenient way is to draw a vertical line down from the head and mark several strokes on it. Adjacent strokes should be located at a distance from each other equal to the height of the head.
- After drawing the schematic of the head, neck and chest, mark the location of the waist. It is located approximately in the center of the 3rd segment out of 7.
The waist, regardless of gender, is wider than the head. This applies even to those with a "wasp" waist. The segments are counted from the head, which is the 1st segment. Further down the vertical line are the 2nd, 3rd and subsequent segments. The lower part of the torso occupies a place on the border of the 3rd and 4th segments.
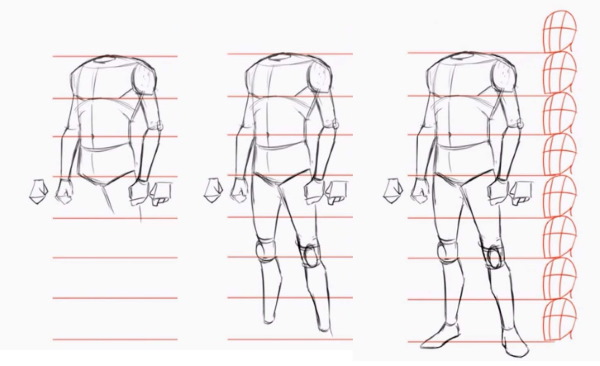
- The kneecaps, each of which is represented by a circle, are placed in the area of the 6th – penultimate segment.
- Place the ankle joint, which connects the foot and the shin, slightly below the center of the lowest segment. The artist should remember that the size of a person's foot is slightly smaller than the height of his head.
- Proceed to drawing the upper limbs. In this case, the person simply stands at full height, and his arms are lowered. In this case, the elbows are at waist level. They should be represented as circles.
- Place the wrists slightly above the bottom of the torso. The wrist joints should also be represented by small circles.
- Add the lower part of the arms - their hands. Each of them should be the same length as the distance between the chin and the center of the forehead. You need to aim for the hands to end up hanging just below the bottom of the torso.
It is worth remembering: the proportions of the upper limbs remain the same for all people: whether a woman or a man, a representative of the Caucasian race or an African American.
If everything was done correctly, you should have a complete schematic drawing of a person. Now you need to make it more realistic.
To do this, the main lines are made smoother, and everything that was used only as auxiliary components is removed with an eraser. The vertical line and the strokes applied to it, dividing the body into 7 segments, are subject to removal.
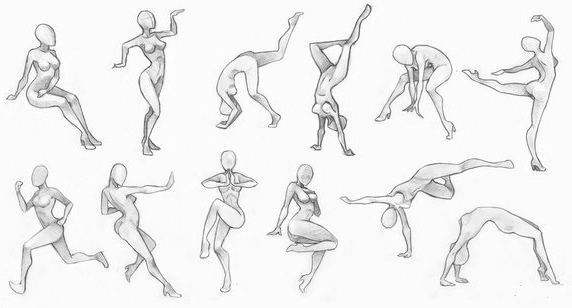
Man in motion
A human figure in pencil (it is best to sketch people after studying the basics of anatomy) in motion can be done if you start with a wireframe model that already has the desired pose.
The stages of drawing are as follows:
- Draw the head. The head, represented by a circle or oval, should be at the top of the sheet, and the distance from it to the left and right edges of the canvas should be approximately the same.
- Draw the basis of the frame - the spine. The entire spine should be represented by one vertical line that starts from the head and goes down. The length of this line should be approximately equal to 2 heads.

- Considering that the spine line reaches the base of the lower limbs, draw a long horizontal line in their place. The legs will start from it.
- Mark the shoulders with a horizontal line located on the spinal column.
- From the line indicating the shoulders, draw lines for the arms. The person in this example has his arms bent at the elbows, which should be indicated in the drawing.
At the elbow joint, the line changes its direction. One hand can be slightly raised, and the other placed on the belt. When schematically depicting a person in motion, the hands can be represented as simple ovals.
- Start working with the lower limbs. Considering that the person is standing, they go as solid lines from the pelvis to the bottom edge of the paper sheet. You can change the direction of these lines at the location of the knee joints.
Each of the 2 lines representing the lower limbs should end with a foot. When drawing a wireframe model, the foot can be represented by a simple horizontal line. There should be 2 such lines in the drawing.
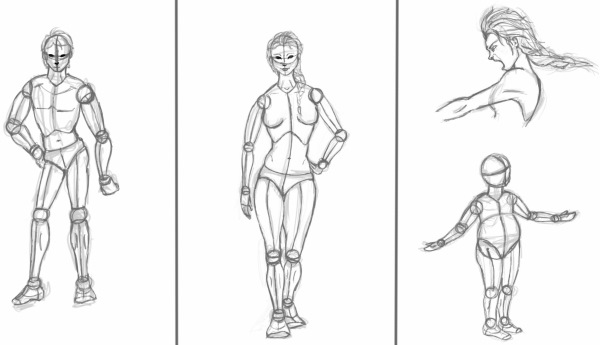
- Give volume to the resulting human frame model. To do this, it should be turned into a so-called hinge model. With its help, it will be possible to understand the conditional presence of volumes in the human body. Draw circles in those places where all the lines of the previously drawn frame connect. These circles are called hinges.
- All lines are enclosed in ovals. They will show the approximate location of volumes in the human body.
- Under the horizontal shoulder line, on the spine at 2/3 of the height from the pelvic line, draw a large oval, which will indicate the chest.
- The pelvic line is also enclosed in an oval, but only of a smaller size. It will indicate the location of the pelvis.
- Replace ovals and circles (joints) with cubes and parallelepipeds. All ovals in the figure should be replaced with rectangular bars.
- The circles that are located at the joints should be increased or, conversely, decreased depending on the dimensions of the cubic figure.
- Having understood the principle of distribution of the main volumes of the human body using the example of the cubic model, move on to the linear drawing. All that needs to be done at this stage is to smoothly outline the existing model, represented by cubes. The result should be the contours of the body.
- Outline the clothes and draw the face in detail, as well as the feet and fingers.
- To give the drawing a finished look, tone it. This technique will reveal the volumes of the body and the texture of the wardrobe elements, and also indicate the lighting.
- When applying the tone, make short strokes with a pencil. Then, relying on the location of large areas of light and shadow on the previously created cubic model, apply the tone of the drawing. This will form the volume of the human body.
Tennis player
A pencil drawing of a man (sketches of people participating in sports are considered difficult to make) playing tennis and trying to hit a ball flying towards him is depicted as follows.

| Stage | Description |
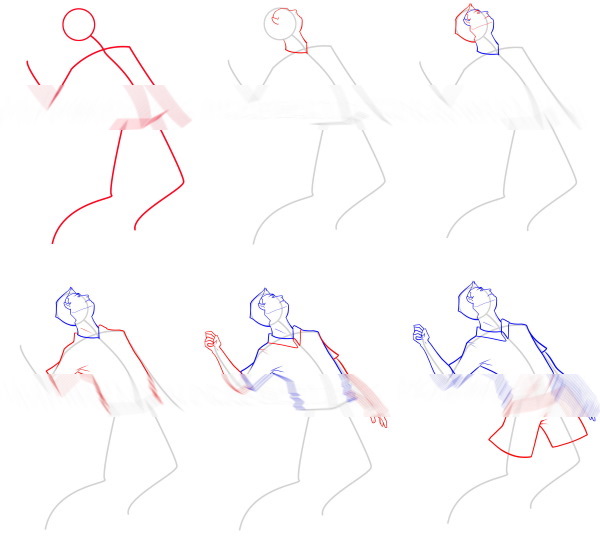
| Linear designation of the athlete's frame | It is necessary to outline the bend of his body and lower limbs. The legs should be half-bent, while the tennis player himself leans back. His right hand is thrown back and throws the racket |
| Drawing a face | It is necessary to emphasize the movement. This can be done by turning the head so that it is turned almost frontally and thrown back |
| Finishing up small elements | The details of the face are being refined, the shape of the head is being completed, and the hairstyle is being formed. |
| Drawing a T-shirt | When a person moves, there are changes not only in the body, but also in the clothes. Here, the folds that appear when the tennis player's back bends must be added |
| Working with the upper limbs | The athlete holds a racket in one hand, while the other should involuntarily reach forward |
| Detailed drawing of shorts | They also become deformed, following the position of the lower limbs. It is necessary to emphasize the curves on the shorts. To do this, draw a line that should go in the direction of the leg |
| Leg work | They should be completed according to the framework that was outlined in stage 1.
It is important to remember that the feet should also have their own bend, since the tennis player's feet are positioned on half-toes. |
Dancing couple
One of the most complex drawings of people in motion is a dancing couple.
The work can be divided into 4 main stages:
- Designation of the figure represented by the dancers. With the help of such a scheme of work, it will be easier for the artist to set the movement.
- Work in the sketch technique and simultaneous outlining of all body parts. You need to schematically depict the position of body parts, filling the composition.
- Drawing all the details. In this case, it is necessary to rely on the drawing that was made in the previous stage. Almost all parts of the body change, so none of the details should be left without attention. It is important to accurately draw the position of the upper limbs, feet, folds on the clothes.

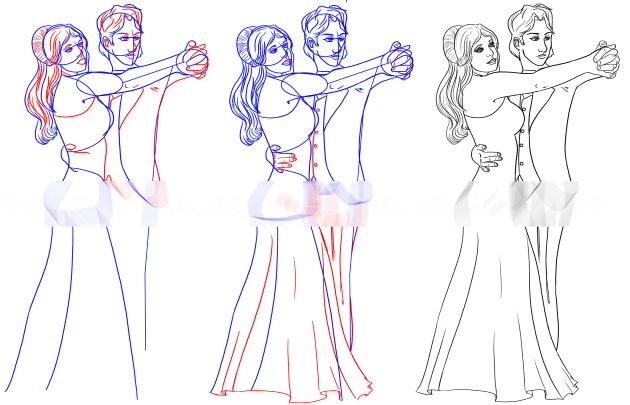
- Conveying movement through the use of rough, sweeping strokes.
Children on the move
Using the basic techniques discussed above, you can try drawing two children running forward, holding hands. These will be a boy and a girl, each holding a bouquet of flowers. On the left is a girl, holding flowers in her right hand, and on the right is a boy holding a bouquet in his left hand.
The work of drawing such a picture can be conditionally divided into 3 stages:
- Designate the frames within which the entire composition will be located. In this case, it is convenient to use circles and ovals to form figures.
Children run forward, so when drawing it is necessary to remember the main distinctive features of the body position of a running person. The body should be tilted forward. The upper limbs move in different directions. As for the lower limbs, one leg should be raised.
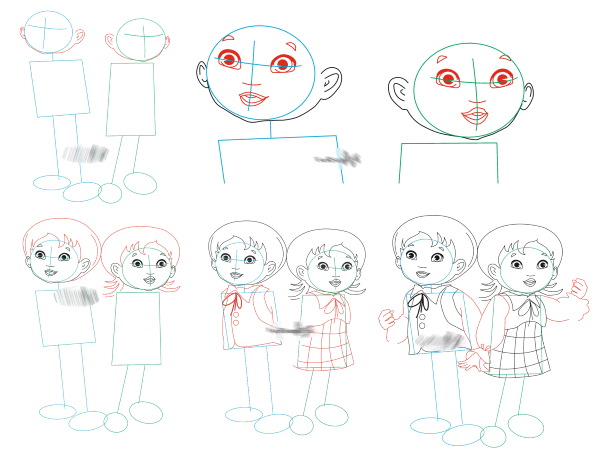
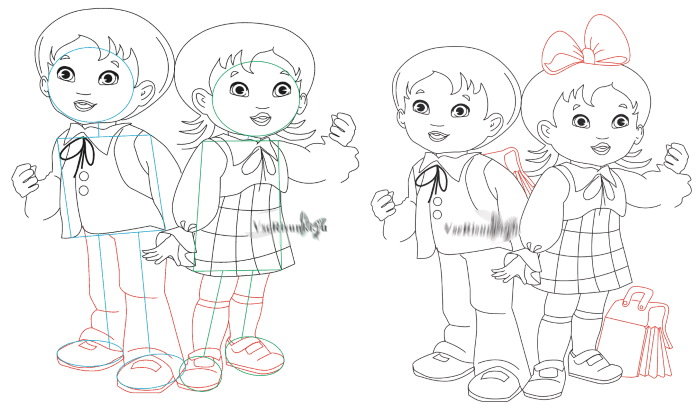
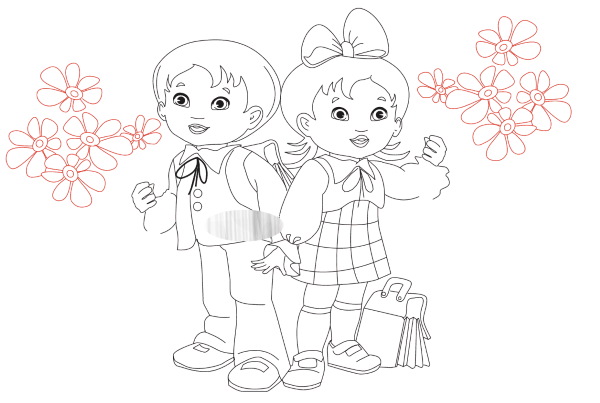
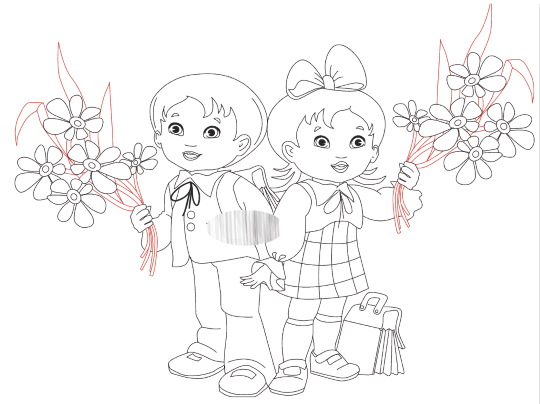

- Draw the children's clothes. Don't forget that they change when they move. The boy should have folds under his knee joints, and the girl should have the hem of her dress fluttering. The fabric is stretched on the knee of the leg that moves forward.
- Erase the auxiliary lines, then clean up the drawing and apply the necessary strokes.
It is also important to remember the facial expressions of both characters and the position of their hair. They should also convey movement.
Useful tips
To draw people correctly, you need to practice regularly. Books on drawing, sketching and anatomy will help.
Also recommended:
- pay attention to details, individual parts of the body;
- choose a favorable angle for the figure's location;
- experiment with poses;
- develop observation of the characteristics of people and other artists;
- look for an individual style;
- practice a lot and often;
- believe in yourself.
Drawing a human figure can be considered the highest level of artist's skill. This work is not easy, but if you learn how to correctly sketch a person in full growth in statics and master the basic knowledge of anatomy, the work of drawing moving people in different poses will be significantly simplified.
To improve your sketches every day, you need to constantly develop your pencil skills.
Video about drawing
Human figure in pencil: