Knitting is a fascinating activity that requires attention and perseverance. The result is the creation of beautiful products that will replenish the wardrobe of the craftswoman, her family and friends. Anyone can learn to create various patterns, such as "Stars". The main thing is to follow the knitting patterns and choose the right threads.
What is knitted with the Stars pattern?
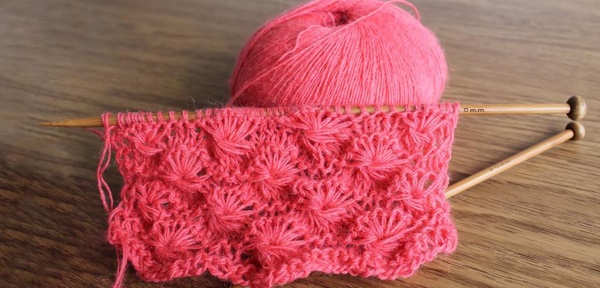
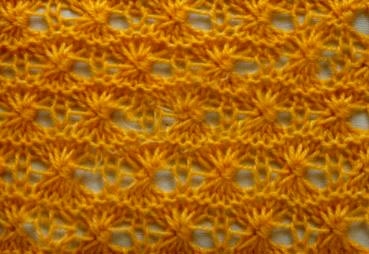
The knitting pattern "Stars" (its pattern is used to create children's and adult clothing) looks especially beautiful on sweaters, jumpers, and coats. The pattern looks like snowflakes, and the technique is simple. Items knitted with this pattern practically do not stretch and retain their shape when machine washed.
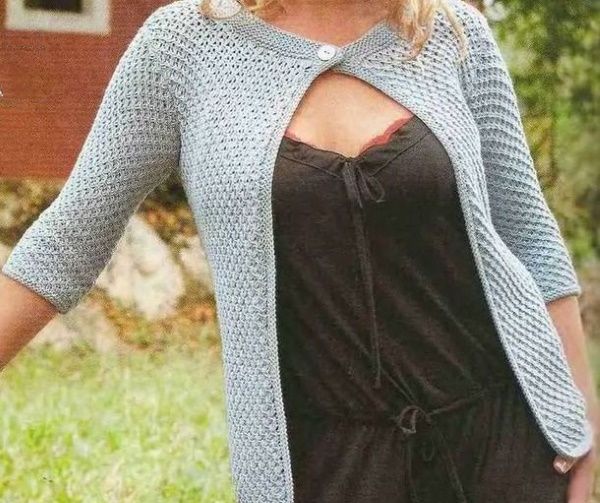
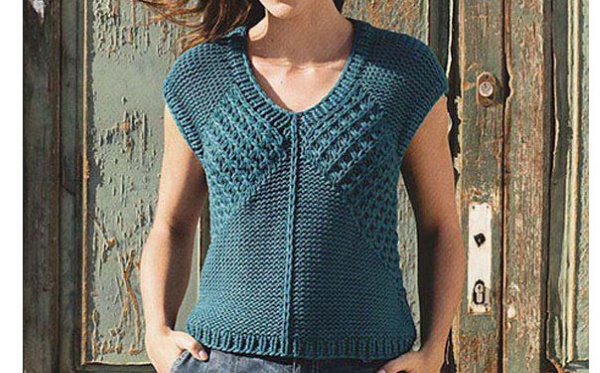
When creating products, the pattern is used when you need to knit a warm and beautiful hat, scarf, snood, sweater or cardigan, as well as bedspreads and blankets, decorative pillowcases or fashionable bags.
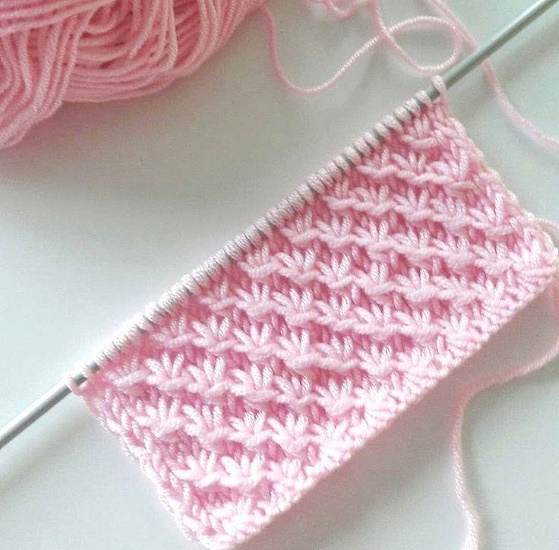
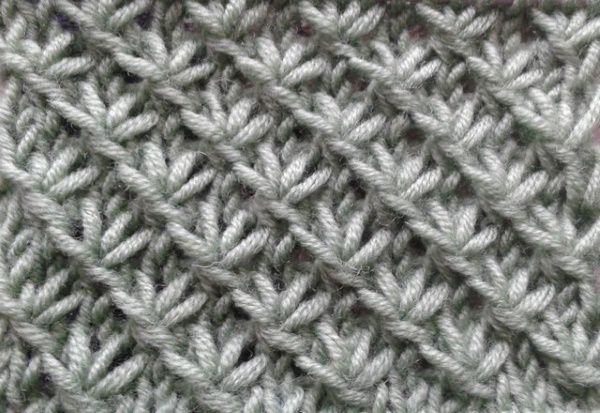
The pattern is distinguished by its openwork knitting and is made according to the scheme. The yarn over gives the pattern lightness and airiness. The result is a dense textured fabric that looks interesting. It is comfortable to wear such products, the item does not stretch much during long-term wear and washing.
Knitting that uses several different colored threads will look interesting.
What yarn is suitable?
This structural and relief pattern makes the product spectacular. However, to get an exclusive thing, you need to choose the right threads for work.
Experts recommend using yarn from:
- cotton;
- flax;
- wool.
The threads should be fleecy and voluminous: this will allow you to create a clear pattern of stars on any fabric.
 It is not recommended to use for such knitting:
- mohair or boucle: the pattern will come out blurry and unclear;
- colorful melange threads: they will distract attention, and it will be difficult to see the beauty of the knitting behind the brightness of the colors;
- thick threads: this pattern will give the product more volume.
To understand how correctly the yarn has been selected, you should knit a test sample and subject it to heat treatment., having washed it beforehand. By how well the structure of the pattern is preserved, it will become clear how correctly the threads and knitting needles have been selected. If the pattern turns out to be too dense or loose, then the knitting needles need to be replaced.
For example, when using thick knitting needles, the fabric may turn out soft and shapeless, while when using thin knitting needles, it may turn out hard and not very flexible.
Master class on knitting stars
The knitting pattern for the "Star" pattern is accessible, so even a needlewoman with no experience in knitting can learn the technique. The main thing is to understand the sequence of front and back loops and work strictly according to the pattern.
The "Star" pattern is one of the simple but effective ways to create knitted fabrics. However, you need to practice first to be confident in your abilities.
Having mastered this technique and its variations, you can create original items for your wardrobe. The pattern is not used when creating items for women, children and men.
Knitting option 3 of 3
This design is good for creating children's clothes:
- jumpers;
- sweater;
- hats.
It is made on the principle of a twisted elastic band of 3 loops by 3, where the pattern in the form of stars is arranged in a checkerboard pattern.
To do this, first make a base: knit about 2 rows with a regular garter stitch, then start working on the pattern. It consists of 4 rows, the main one of which is considered to be the 1st. The rest are knitted according to the pattern: on the front side there will be front loops, and on the back side - back loops.
When calculating the loops, you need to take into account that their number will be a multiple of 4 and +1 for the symmetry of the pattern being created. In addition, you need to add 2 loops for the edge.
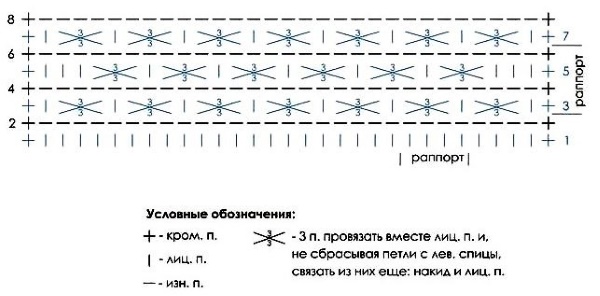
There are 4 rows vertically in the pattern. Each of them begins with removing the 1st edge loop and ends with tying the back edge with the wrong side. As a rule, these actions are not prescribed in the pattern.
The pattern creation scheme is as follows:
- 1 row – front;
- 2nd row – purl;
- in the 3rd row, the knitting of the star begins: 1 front st, *then from 3 sts, 3 sts are knitted, 1 front st*. Then the row continues with a segment from * to * until the end;
- in the 4th row and the remaining even rows, all loops are knitted purlwise;
- in the 5th row, 3 front loops are made, *from 3 sts. knit 3 sts., 1 front loop*. From * to *, repeat up to the last 2 loops, 2 front loops.
For beginner knitters, it is important to understand that in the work, 1 front loop is knitted through 3 loops for the lower segment. At the same time, the loops themselves are not removed from the left knitting needle. After that, a yarn is made and another 1 front loop is knitted. Only then can 3 knitted loops be removed from the left knitting needle and knitting continues according to the pattern.
The next rapport, consisting of the same 4 rows, is made with an offset. The changes begin in the 1st row. This time, 3 loops out of 3 at the beginning of the row, immediately after the edge. Then 3 persons are made and the algorithm continues to the end of the row.
Option 5 out of 5
The knitting pattern "Stars" (its diagram in variation 5 of 5 assumes a set of loops, multiples of 6 + 2 edge loops) in this version has the following steps:
- 1st and 2nd rows are knitted with front loops.
- In the 3rd row, after removing the edge loop, knit 5 loops out of 5, grabbing all 5 loops at once behind the back wall, and knitting them without removing them from the left knitting needle. Next, make a yarn over, then a knit, a yarn over, 2 knits, repeat everything to the end of the row. At the end, knit the edge of the purl loop.
- The 4th row is made with purl sts.
- The 5th and 6th rows are knitted.
- In the 7th row, the pattern shifts: 3 persons, * then 5 of 5 and 1 persons.*. This is done until the end of the row. At the end, 3 persons and an edge are knitted.
- Row 8 is knitted with purl stitches.
- The work is repeated from the 1st to the 8th row.
Option with elongated loops
This pattern is used to knit shawls or summer sweaters or blouses. For work, the number of loops taken is 6 + 1 more for symmetry. For an even edge, 2 edge loops are taken into account.
The scheme of actions is as follows: 3 yarn overs created inside the 1st loop: the 1st needle is inserted into the loop on the left needle and, after wrapping it with thread three times clockwise, is pulled out onto the right one, removing the knitted one.
 If you need to knit from 5 loops, then the scheme of action is as follows: drop 5 loops with yarns from the left to the right knitting needle, you will get 5 elongated loops. They need to be put back on the left side of the knitting and knit all the dropped loops together, with the front side behind the front walls.
In this case, the loops themselves are not lowered, but picked up and knitted:
- 2nd loop for the back wall;
- 3rd - for the front;
- 4th - behind the back;
- 5th - again behind the front.
This makes 5 out of 5 loops.
On the front surface
The knitting pattern "Stars" (the diagram will be a stockinette stitch, which is connected to the star pattern 5 of 5) on the stockinette stitch consists of 10 loops + edge loops and 5 repeating rows.
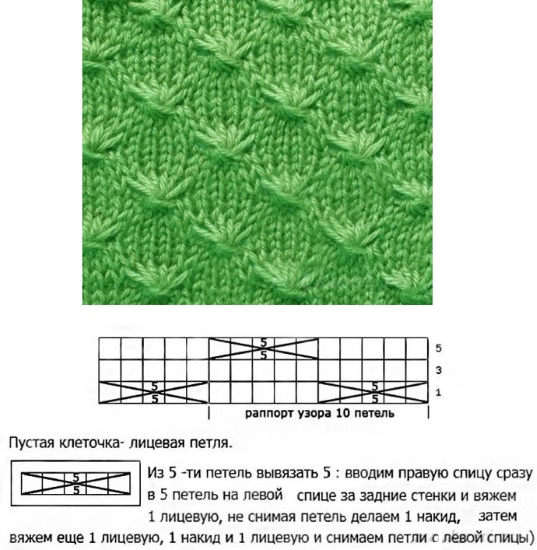
The algorithm of operation is as follows:
- 1 row: *knit 5 knit stitches from 5 sts.* Repeat from * to *, until the very end of the row;
- The 2nd and subsequent even rows are knitted purlwise;
- The 3rd row is knitted;
- 5th row: *5l., from 5 and knit 5p.* Repeat the segment from * to *;
- Row 7 – all knit stitches.
The work is repeated from the 1st to the 8th row inclusive.
On the reverse side
This pattern is done differently than the usual stars. Extended loops are used, from which a long loop is knitted. For work, loops are taken in multiples of 10, adding 3 more for symmetry and 2 for the edge.
First, knit the basic row: 3 front, then 7 back, and again 3 front, after:
| Row | Description |
| 1st | 3 purl, *then from 3 loops make 3 loops (front, then yarn over and front again), 1 front, from 3 loops knit 3 loops and 3 purl.* |
| 2nd | *3 persons, and 7 out.*, 3 persons. |
| 3rd | 3 purl, *2 knits, from 3 loops 3 loops (knit, then yarn over, and knits), 2 knits, 3 purl*; |
| 4th | *3 persons, 7 out.*, 3 persons. |
Until the end of the work, you need to repeat this pattern from rows 1 to 4.
With harnesses
Loops are multiples of 6 loops + 2 edge loops and 1 for symmetry.
The description of the pattern execution is as follows:
- The 1st row will be purl. All stitches in it are knit stitches;
- 2nd row: 1 knit, *5 knit, all with 3 yarn overs, 1 knit*. repeat from * to * in all rows;
- 3rd row: 1 knit, *5 sts are removed to an additional knitting needle, after dropping the yarn overs, wrapped twice with the working thread and transferred to the right side without knitting, then 1 knit is performed.*;
- The 4th and 6th rows are knitted;
- 5th and 7th rows – purl.
The segment is repeated in the 1st row.
Color version
This method is created according to the knitting principle described above, but after finishing the first segment from the 1st to the 8th row, the thread is changed.
Openwork version
To create an openwork pattern, 5 elongated loops are used.
Scheme takova:
- 1st row – knit as an auxiliary face stitch;
- 2nd row – 1 purl, then – repeat 5 times: 1 purl and yarn over, then 1 purl;
- 3rd row – persons, yarn overs are dropped to obtain 5 elongated loops. From them an asterisk is made, alternating yarn overs and persons. At the end 1 persons and 1 final edge;
- 4th row – at the beginning 4 purl, then sequentially 5 purl with a yarn over and 1 purl, at the end 3 loops are purl;
- 5th row – first 3 persons., then – 1 persons. and 5 loops., from which the star is drawn (5 out of 5). At the end of the row make 4 persons. and a purl edge.
The work is repeated from the 2nd to the 5th row inclusive.
Practical application of the Star pattern
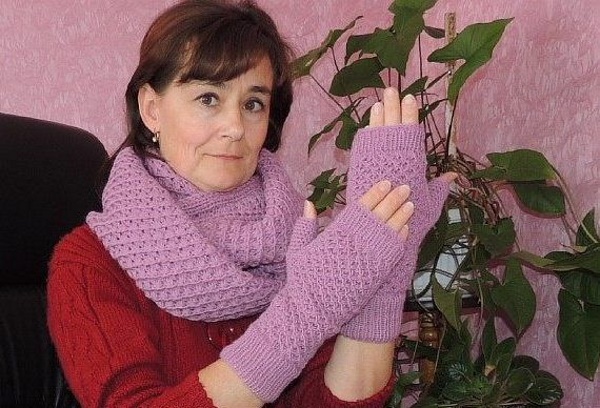
Many fashionable wardrobe items can be knitted using the "Star" pattern. Hats, snoods, sweaters will become favorites for the whole family if they are made with love. Also, any fashionista will be happy to wear a handbag or scarf made using this technique. If desired, you can master a simple knitting pattern and knit your favorite things with your own hands.
Scarf, snood
Snood or snood scarf are fashionable accessories that are hard to do without in the cold winter. One of the models of this scarf is knitted with straight needles using the "Star" pattern and then sewn end to end. The approximate size is 140 cm in length and 38 cm in width.
You can use simple threads. You will need about 500 g. Description of work: the basis is made up of loops of the "Stars" pattern according to the 3 out of 3 scheme.
Bonnet and booties
Basic knitting: 1 to 1 elastic and “Star” using the 3 out of 3 method.
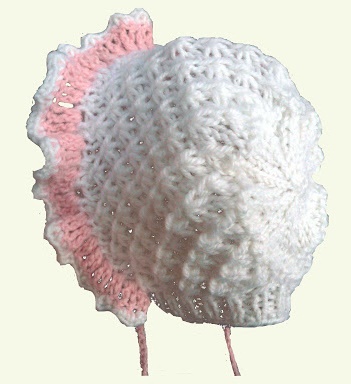
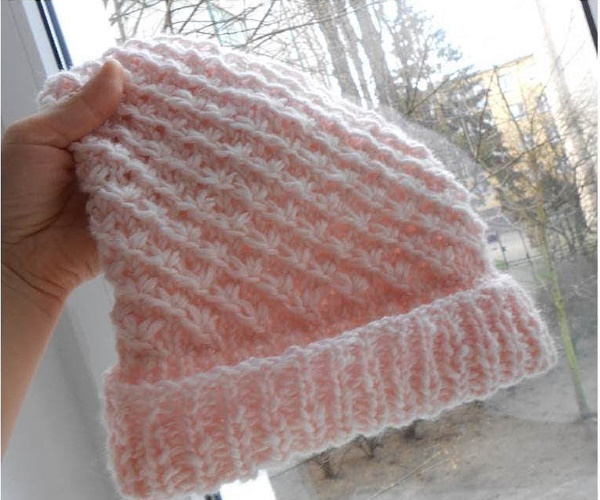
Baby hat
To work you will need 50 g of semi-woolen white yarn, some pink thread for decoration, as well as knitting needles No. 3 and hook No. 3.
 The knitting stages are as follows:
- Cast on 55 stitches and knit 6 rows with a rib pattern.
- Row 7: knit purlwise, adding 10 stitches evenly distributed across the row.
- When you have 65 stitches on your knitting needles, start making the stars.
- Using the usual 3 out of 3 pattern, knit 20 rows.
- Make the crown of the hat. For this, it is better to take circular knitting needles No. Make one circle with purl loops, simultaneously decreasing 5 of them. Then knit with the front surface. The decrease occurs with 10 wedges, knitting in every 2nd row together 5 and 6 loops 10 times.
- In the 9th row from the beginning of the decrease, leave 10 loops on the knitting needles, pull them together and sew so that the seam is on the inside.
- Crochet the frill of the hat with white yarn. As a decoration in the 7th row, crochet 2 double crochets with pink yarn. At the end, tie the ties.
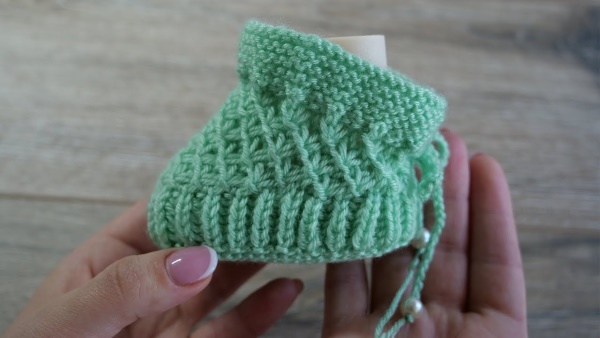
Booties for babies
The product uses an elastic band and a star. They can be decorated with beads.
The work is carried out as follows:
- Start from the middle of the sole. To do this, knit 40 cast-on stitches with garter stitch.
- Starting from the 3rd row, add 4 loops in every 2nd row. Additions are made in the broaches. To avoid holes, twist the constriction and knit.
- In the 3rd row: edge stitch, 1 increase knitwise, 18 knits, 1 increase knitwise, 2 knits, 1 increase knitwise, 18 knits, 1 increase knitwise, at the end do 1 edge stitch.
- From rows 4 to 12, knit all stitches.
- In the 5th row: edge, knit, 1 knit increase, 18 knit, 1 knit increase, 4 knit, 1 knit increase, 18 knit, 1 knit increase, 1 knit at the end and edge.
- In the 7th row: edge, 2 persons, 1 persons increase, 18 persons, 1 persons increase, 6 persons, 1 persons increase, 18 persons, 1 persons increase, the last 2 persons and edge.
- In the 9th row: edge, 3 persons., 1 persons. increase. loop, 18 persons., 1 persons. increase., 8 persons., 1 persons. increase., 18 persons., 1 persons. increase., at the end of the row 3 persons. and edge.
- When there are 56 loops on the knitting needles, the creation of the sole is finished. Now the knitting is divided into 3 parts. The side ones will be knitted with a "Star", and the middle one - with a 2x2 elastic band. Moreover, the elastic band should end and begin with a front loop.
- Having knitted the pattern up to the 13th row, make decreases. To do this, 3 decreases are made in each odd row. Even ones are knitted according to the pattern.
- The 18th, 19th, 20th rows are knitted, and then work with a 1x1 elastic band. Knit 24 rows like this.
- Close the loops and sew the seams from the inside using a special knitted stitch.
- Turn the product right side out and sew to the end.
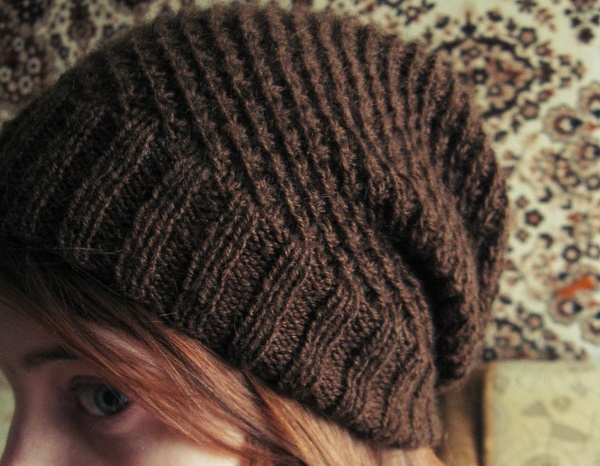
Cap
The knitting pattern "Stars" (its diagram is simple and accessible to beginners) is used in knitting hats. To do this, you will need to prepare circular knitting needles No. 4 and 150 g of yarn made of wool with acrylic.
For work, cast on 99 loops on the knitting needles. It is better to choose the classic version of the scheme 3 loops out of 3 as the main pattern. It is important to follow the loop multiplicity of 4 + 3 for centering the pattern. Considering that knitting is circular, there will be no edge loops here.
At first, the work is knitted with an elastic band to a height of 2 cm. This peculiar headband will ensure a tight fit at the bottom if the model is intended for the warm season. You can do without a fixing elastic band.
An elastic band will have to be made if the product has a cuff. In this case, its length will be longer so that it can be made without compromising the overall length. The elastic band should stretch well, so it is preferable to choose the classic English elastic band for the cuff.
Then you can move on to the main pattern: you will have to knit in a circle, so the pattern is slightly modified.
To work, you need to follow the following scheme:
- 1st row – 3 persons. are knitted from 3 main loops, then persons., everything is repeated until the end of the row. It should end with an asterisk;
- Row 2 and all subsequent knit stitches are knitted as knit stitches;
- 3rd row – 2 persons, then start knitting a repeating segment of 1 asterisk and 1 persons. The last loop will be persons;
- from the 5th row, knitting continues according to the pattern from the 1st row.
When the height of the hat reaches the desired size, decreases begin. To keep the pattern uniform, instead of stars, 3 persons. together are knitted, then another 1 persons. After the 1st decrease, all loops are knitted 2 by 2 for several rows. The remaining ones are removed on a separate thread and pulled tightly. Then the thread is tied tightly, and its end is tucked inside.
The finished product should be moistened before wearing and dried well on a towel in the shade.If you need a hat for winter, you can sew a lining on the inside, knitting it from thin threads using the front surface.
Sweater
For work you will need about 400 g of medium-thick yarn and 3.5 and 4.5 mm knitting needles. The blouse panels are knitted with a double elastic band. Knitting is done according to the pattern you like. The main pattern is "Star". The drops on the armhole, neck and shoulders can be calculated based on a pre-knitted sample.
Having mastered the simple technique of knitting the "Stars" pattern, every needlewoman will be able to replenish her wardrobe with fashionable things and please her loved ones with practical gifts. The main thing is to strictly adhere to the patterns when working.
Video on the topic: how to knit a snood with a Star pattern
How to quickly knit a snood with a star pattern: