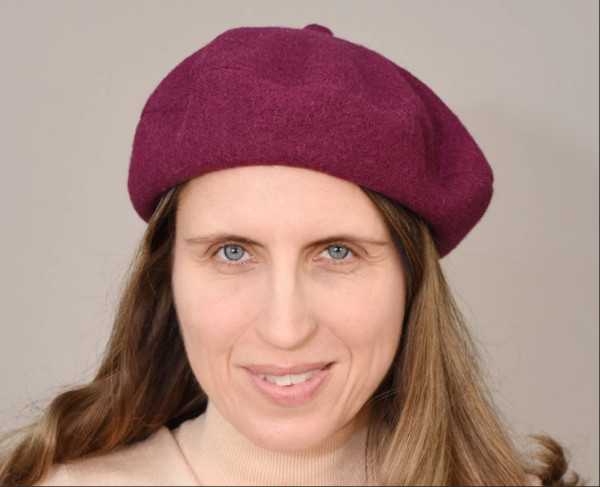
Beret - this is a headdress, which can be sewn by hand from various materials, such as wool, acrylic and felt. Leather and suede are also used. For the first attempts, it is best to choose inexpensive fabric, so that you can freely experiment and not be afraid of mistakes.
Necessary tools and materials
When sewing a beret, you will need various tools and materials:
| Materials and tools for sewing | Brief description |
| Textile | For a demi-season beret, you can use felt, a woolen material that holds its shape well and protects from bad weather. You can also consider mohair, the soft wool of the Angora goat. Mohair is fluffier and pleasant for the skin. Drape, leather and suede are suitable. Berets made of corduroy, velour and velsoft will be pleasant and warm. Fabrics such as wool yarn or its combination with acrylic are suitable for a winter beret. They provide warmth and comfort, and also hold their shape well. Fur is also suitable - a warm, noble material that gives the owner status. Felted thick knitwear is often used. A light summer beret can be made of cotton or silk. Cotton is hypoallergenic, pleasant to the body, breathable and does not cause overheating. Silk has a smooth surface, gives the headdress shine and effect. |
| Threads | Their color should match the fabric. This will avoid contrasting seams and preserve the aesthetic appearance of the product. |
| Ruler and tape measure | They help in working with hat parts, ensuring accurate measurements and even seams. |
| Tailor's scissors | They must be sharp and of high quality to easily cut the fabric without damaging its structure. |
| Safety pins or clips | They help to fix the pattern on the fabric and connect the elements before their final fixation. |
| Sharpened chalk or soap | Needed for marking fabric and further sewing work. |
| Hand needle | Necessary for working with small areas. |
| Machine needle | For example, you will need No. 65, 70, 75, 80 and 90. |
| Sewing machine | With its help, you can quickly and efficiently sew a product. It has different settings and functions, which allows you to adapt it to different goals and tasks when creating a product. |
| Overlock | Ensures neat finishing of edges and prevents fabric from unraveling. |
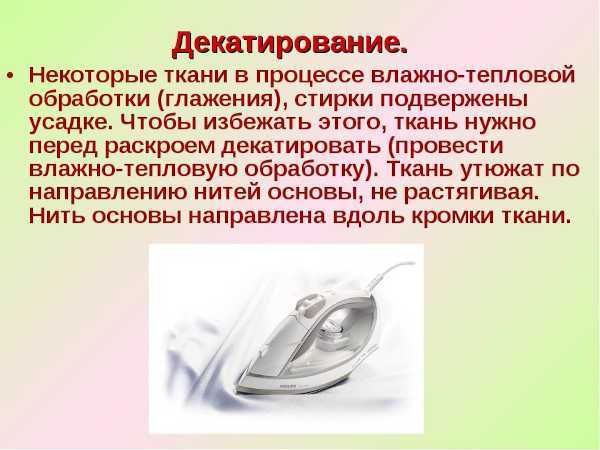
Features of decatizing fabrics for berets
Wool, pile, knitted natural fabrics are recommended to be subjected to wet-heat treatment, which is called decatization, before sewing the product. This process allows you to prevent shrinkage of the finished product, stabilize the dimensions of the material and avoid distortions during further processing.
The most common materials that require decatization are:
| Type of fabric | Recommendations |
| Angora fabrics | It has a fine pile and delicate texture, so it needs to be decatized to maintain its shape and volume. |
| Mixed fabrics with acrylic | After wet processing, such materials become softer and more flexible. |
| Felt | It has a tendency to shrink and requires careful decatization. |
Decating is recommended before sewing leather, suede, mohair products. These materials also tend to shrink after washing and can be deformed during processing. Velvet, velour, and velsoft are always prepared. Drape requires especially careful handling.
One of the ways to decatize fabrics is to wash at a low temperature and then iron without strong pressure. It is recommended to use conditioners for better smoothing.
When sewing from felted dense cotton fabrics, as well as from silk, decatizing is usually not required. However, there is a possibility of shrinkage. In this case, you can iron through the fabric.
Ironing, ironing, ironing
Wool may shrink when ironed, so you need to follow the iron temperature settings indicated on the product label. Iron through a damp cloth. Avoid prolonged contact of the iron with wool.
Pile fabrics such as angora should be ironed on the "one" setting, in the direction of the pile. It is also better to use gauze. The temperature for ironing acrylic fabrics with the addition of natural fibers should not exceed 150 °C and with preliminary moistening. It is better to use the "steaming" function.
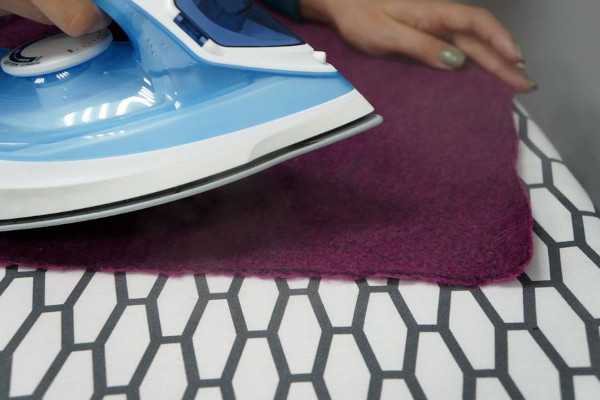
Wool felt should be ironed through a cloth, and felt with synthetic fibers - from the reverse side. Steaming should not be used. A backing should be provided under the iron to prevent burning. Often only a light treatment with a damp towel is required to smooth out small creases.
To iron mohair, you need to use a thick layer of fabric or a special ironing net. The iron should be warm, not hot. Drape is ironed at a minimum temperature and steam is not used.
To avoid lint loss, use cotton cloth for ironing. In general, the drape does not wrinkle much, so you can do without straightening it.
It is prohibited to use an iron to process items made of felted dense knitwear. It is not recommended to iron leather fabric. If necessary, you can use a special system for vertical steaming.
When processing suede fabric, avoid using a hot iron. It is best to use a steam ironing method. Ironing velveteen fabric is only possible from the inside and through cotton fabric. Velvet can become shiny, so it is necessary to use the minimum temperature setting.
It is not recommended to iron velour. In case of extreme necessity, it is ironed with a non-hot iron along the pile through the fabric from the reverse side. Velours do not require ironing. If it is necessary to iron it, then it is necessary to use the minimum temperature mode.
Fur requires steaming, and the fabric should be kept at a distance from the steam source. Ironing should be very delicate. Fur should not be ironed in the direction of the nap.
Cotton materials require careful ironing to remove creases and folds. They darken when exposed to high temperatures, so use a warm iron.
To make ironing easier, wet the fabric with water from a spray bottle or use the steaming mode. If the material is very dry, you can use damp gauze or thin fabric. If necessary, you can use different types of starch.
To iron natural silk, you can use the steam function or treat the material with a slightly damp cloth. Avoid contact of a hot iron with the surface of the silk. To preserve the shine, it is recommended to use a cold iron.
Master classes for beginners
To create a quality beret, you need to take a number of measurements:
| Indicator | How to measure |
| Head circumference | Measured with a tape measure along the line above the ears and the most convex part of the back of the head. |
| Beret height | The measurement is important for calculating the amount of fabric and determining the shape of the headdress (for example, a high-waisted or low-waisted model). It is taken from the crown of the head to the desired point on the forehead. |
| Beret width | Required to determine the dimensions of the finished product. The tape runs along the top of the head from the forehead to the back of the head through the temples. Depending on the style, at least two measurements are taken - in the center and above the ears. |
| Head diameter | Equal to the circumference divided by 3.14. |
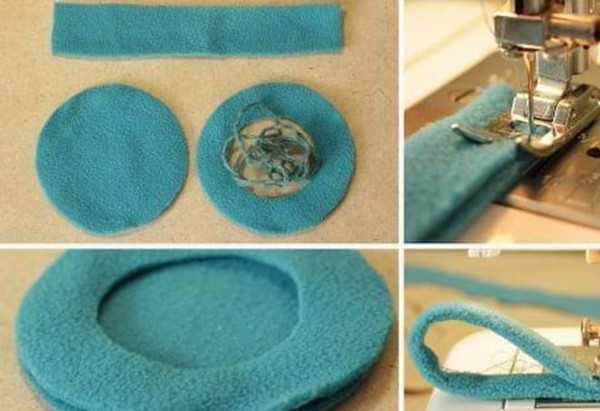
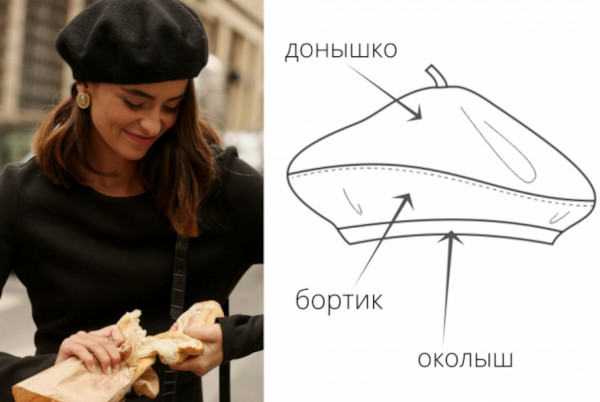
With sides, bottom, lining, without band
You can sew a beret with your own hands by following the steps of the master class:
- Prepare the fabric.
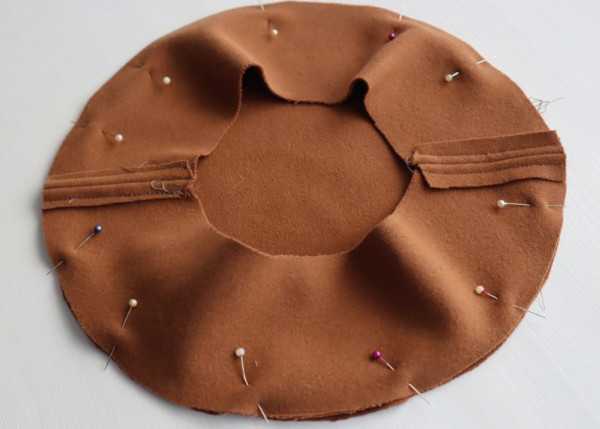
- Make a paper pattern using a template from 2 identical pieces. The lining is cut out according to the shape of the beret bottom with an allowance of about 2 cm on all sides.
- Transfer the pattern onto the fabric, having folded it in half beforehand. Cut out the beret pieces, taking into account seam allowances of 1 cm.
- Sew the 2 halves of the beret along the bottom edge from the inside with small stitches. The seam should be close to the edge. Secure the thread. A smooth brim will ensure a symmetrical shape of the beret. First work with the side where the outer part of the product will be, and then with the inner one. To get a solid brim, connect the parts together. It is better to temporarily secure each seam with several stitches before overcasting - this will make it easier to pass through on a sewing machine or overlock.
- Iron the resulting seam. Check the quality of the stitching. The edges and seams should be carefully ironed on both sides so that they do not crumble during use.

- Cover the lower part of the beret with the outer side of the lining (hem) and the front side of the main fabric. The lining fabric is tacked to the wrong side of the sides. Fix, stitch. Iron all seams through a damp cloth.
- Iron the entire item.
With folds, bottom and band, without sides and lining
You can sew a beret with your own hands if you follow the recommendations from the master class:
- Carry out preliminary processing of the fabric - decatizing.
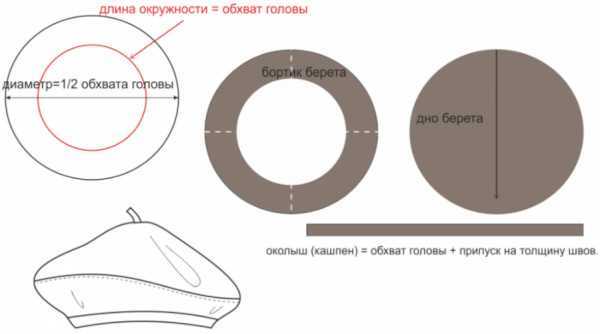
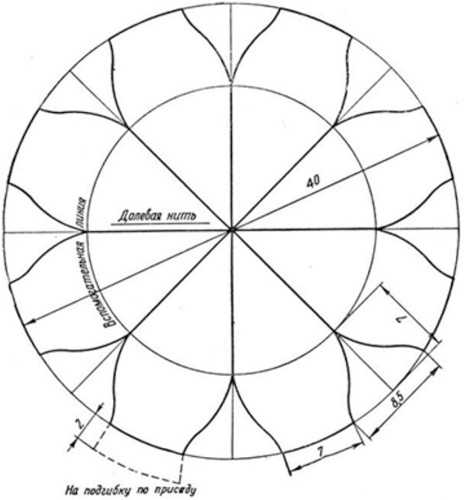
- Make a template on paper that will match the size of the head. The approximate diameter of the "bottom" is about 45 cm. Cut out the details for the base and band.
- Place the prepared templates on the fabric face down and trace the contours with a sharp pencil. Cut out the overcast parts: the base blank, the band ring. If the fabric is napped, it is better to cut it with teeth so that the nap does not crumble. Seam allowances are 1 cm.
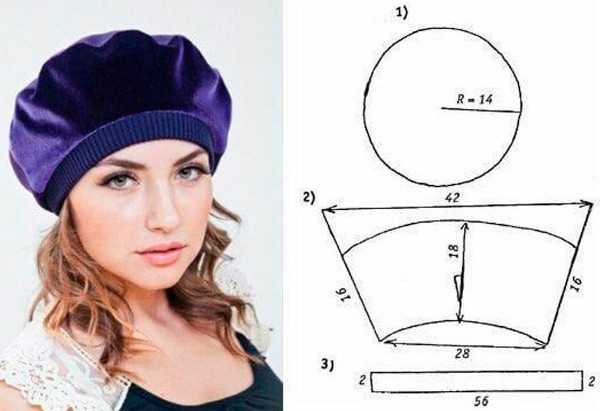
- Sewing into a ring of band. Fasten into a ring, stitch. Fold the edge inward along the wrong side by 1 cm, iron or fix with a machine stitch.
- Place the bottom edge of the base on a flat surface. Secure with pins, smooth out the seam with an iron through gauze.
- Fold the workpiece inside out and secure with pins or a basting stitch. Measure out identical small folds along the entire edge of the lower part of the workpiece to form the bottom. There can be from 5 to 8 folds. This depends on the diameter of the fabric cut and the desired fluffiness of the finished product. The diameter of the bottom should be slightly larger than the circumference of the head.
- Place the band ring on the front side of the bottom, baste around the circumference. Bend the bottom and baste so that the diameter of the band matches the opening.
- Sew along the marked lines of the beret base contour.
- Iron the finished product.
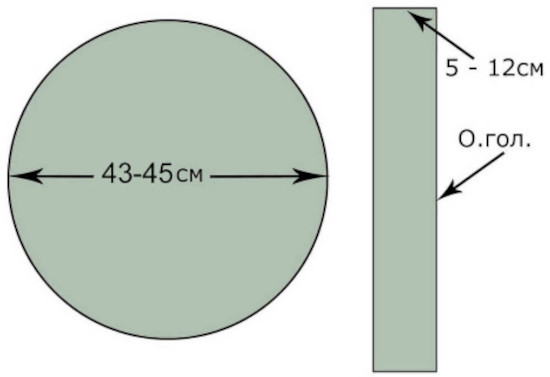
With bottom, sides and band, without lining
To sew a beret, you will need a few simple steps:
- Carry out decatization.
- Lay the fabric on a flat surface. Select the sizes of the parts of the future beret. Draw and cut out the pattern elements, leaving a small allowance for seams. Use only the wrong side of the fabric.
- Cut out the details of the future hat strictly along the contour. The finished cut includes 2 details for the sides, a solid bottom, and a detail for the band.
- Connect the sides with a machine stitch, sewing along the contours from the wrong side.
- Iron it.
- Place the bottom face down on the side pieces and secure it with a neat seam. It is advisable not to make any other seams on the bottom after it has been securely secured to the base. Treat the edges of the seams at the open part of the product so that they do not fray. You can use a braid.
- Iron out the seams.
- Sew the band. You will need to process the seams on the inside of the band to increase the elasticity and wear resistance of the product. This step also helps improve the appearance of the circular seams from the inside.
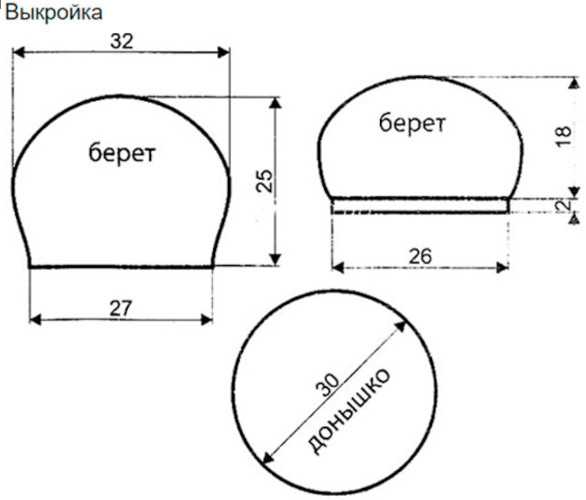
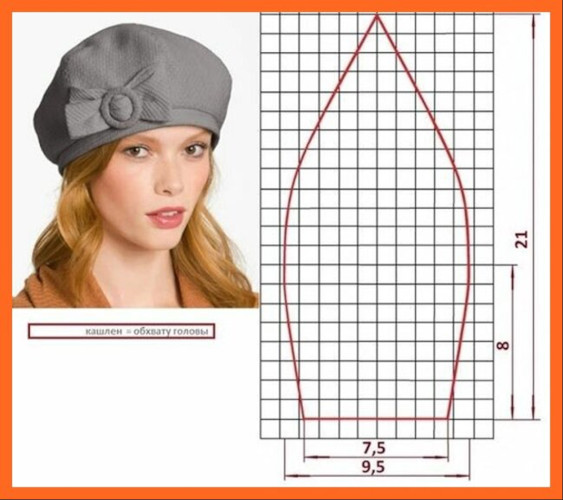
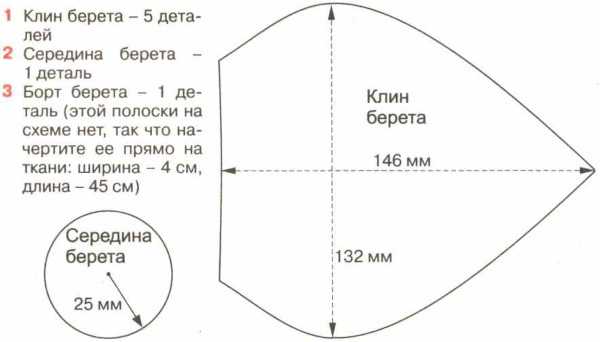
The pattern for making a women's beret with your own hands is shown in the picture. - After ironing, secure the seam to the wrong side. Carefully ironed seams are strong and durable.
- Connect the lower part of the band to the main piece.
- It is recommended to iron the material while it is damp so that it holds its shape better.
- Ironing the entire product.
With a bottom, band, sides and lining
To obtain a product of the correct shape, it is important to use seam allowances: at least 0.5–1 cm on each side (the seam width depends on the type of fabric chosen).
You can sew a beret with your own hands if you follow these steps step by step:
- Decat the fabric to prevent shrinkage of the finished product.
- Construct a pattern using measurements (for this you will need paper, a ruler, and a pencil).
- The pattern is transferred onto the fabric and the details are cut out.
- The side pieces are sewn together to form a single piece.
- Iron the stitched areas thoroughly.
- The bottom is sewn to the side, forming the base of the headdress. It is important to ensure that the parts of the product do not become skewed when processing the seams.
- Iron the resulting piece along the joint.
- Use a sewing machine to form a piece for the inside of the beret from the lining with an allowance. Sew the lining to the inside of the beret.
- Iron the seams joining the lining and the upper part of the beret.
- The band detail is sewn separately. Process the seams.
- Iron.
- Sew the band to the main part of the headdress in a circle.
- Iron the beret. If desired, you can use decorative elements for decoration.
From a circle with a lining, without a band, sides and a bottom
You can sew a beret yourself if you follow these steps:
- Decating.
- Mark the outline of the future beret on the fabric and cut it out.
- Proceed to cutting out the lining, which needs to be stitched along the seams. If the size needs to be adjusted, you can adjust the beret at this stage, since the product cannot be changed later.
- Sew the sides together to form a single whole. The seams should be barely noticeable and located on the outside of the product.
- Iron the finished seams of the damp beret from the inside or outside, depending on the type of fabric.
- Perform the lining work by sewing the lining on the inside of the beret using a machine.
- Carefully iron the finished beret. Inspect the ironed product for defects, turn it inside out and check the quality of the inner seams and linings.
Made of wedges with lining and band, without sides and bottom
You can sew a beret with your own hands if you follow the processes that include several stages:
- To prevent shrinkage of the finished product, decatize the fabric.
- Depending on the chosen beret model, there should be 2 parts: the main part and the band.
- Cut out the beret pieces according to the prepared pattern. Leave allowances for seams and final finishing of the pieces of at least 1 cm.
- Sequentially sew all the main part parts to each other around the circumference, forming a border. To prevent the fabric from fraying, you can lay a temporary finishing stitch.
- Iron the seam in the middle between the side pieces. This will help prevent the pieces from shifting and ensure the fastening is strong.
- Sew the lining inside the beret from the wrong side of the main piece.
- Sew the band pieces together, ensuring the edges fit snugly.
- Iron all seams, including the seams of the inner and outer bands.
- Sew the band to the side, having previously secured it with pins or clips
- Ironing the finished product.
Tips for Beginners
To make a beret on a sewing machine, beginners are advised to carefully follow the step-by-step instructions.

There are general recommendations that will help improve the quality of work:
| Stage of work | Comments, recommendations |
| Preparation | Make a detailed sewing plan: from cutting the fabric to the final processing of the finished product. This will help to avoid surprises during the work and speed up the sewing. Study the main seams that will have to be used to make the headdress. Practice laying the lines to ensure their accuracy and reliability. |
| Cutting out the fabric | Choose a fabric that is suitable in density, color and texture for the beret. Transfer the drawing to the fabric, observing all dimensions. Draw the contours with a pen with ink that disappears from the iron or chalk so that they are clearly visible. |
| Sewing | Fix the fabric in the machine and start working from the wrong side of the product to better control the process. Make sure that the parts are sewn evenly. Avoid frequent stitches, otherwise the material will stretch and distort. Overcast the edges only after checking all the edges, which should be neat. |
| Decor | If necessary, you can make decorations, for example, attach a cockade or other decorative elements. If you plan to add decorations, make loops or attach buttons in advance. |
| Checking and correction | Adjust the product if necessary. Even small inaccuracies can ruin the headdress. In addition, you cannot pull the fabric when trying on a finished beret, this can affect the quality of the stitching. |
| Final processing | Check the quality of the product, and then process the seams and edges. It is important that all the lines look aesthetically pleasing. When working with sharp scissors, you can easily damage the finished product. |
Creating a high-quality and attractive beret requires the craftswoman to be attentive and accurate. However, it should be remembered that each fabric has its own sewing, processing and cutting features that require an individual approach. Only in this case will the product created with your own hands become truly unique and inimitable.
Video about women's beret
How to sew a beret in an hour with your own hands: