The hood began to be worn separately from clothing due to fashion trends. Headdress could ruin your hair, and a scarf did not always match your outfit. At first, they came up with the idea of wearing a balaclava on your head instead of a hat, but this model did not suit every girl.
Recently, people have started wearing a kapar (or bonnet), which can be sewn according to a pattern.
Necessary tools and materials
To sew a hood yourself, you will need thick fabric and lining.

To work you need threads, needles and skins.
- Fleece fabric is suitable for lining.
- Wool or thick fleece can be used for the main piece.
- Cotton fabric up to 1 m will be needed for autumn hood options.
- Buttons and lace fasteners are needed for fastening.
- Scissors, cotton threads and needles are needed if you don’t have a sewing machine.
- The markings should be done using pins and chalk.
- A meter or ruler is needed to measure parts.
- Paper is needed to make patterns.
- Fur can be used for decoration if desired.
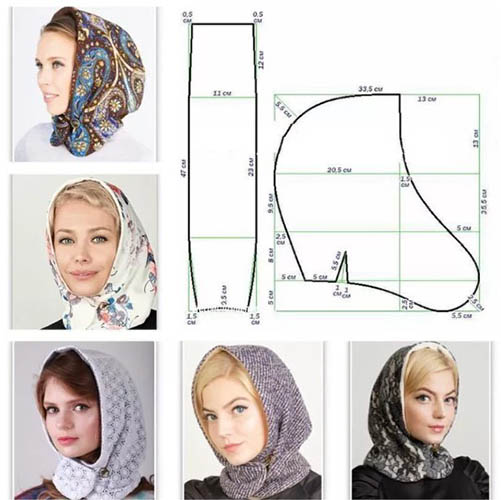
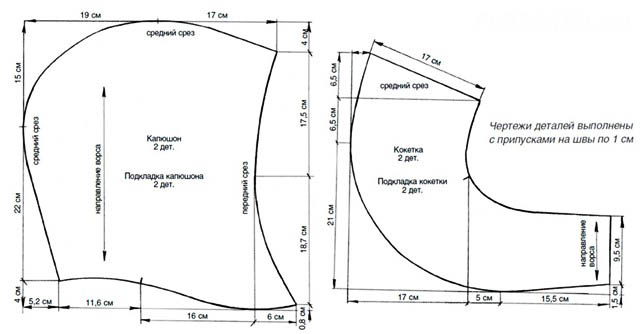
It is easier to sew a hood on the head instead of a hat using ready-made patterns. But to create and change the sizes of the parts, you first need to take measurements. This will help to best cut the fabric, sewing a product of the required volume. Detailed patterns are presented below.
Schemes with description of works for beginners
Before you start cutting the fabric, you need to take the correct measurements.
- The head circumference should be measured above the eyebrows so as to cover the back of the head.
- Depth - the measurement will depend on the width between the temporal lobes.
- Height - it all depends on fashion.
- The pattern can be made using the calculation principle or the grid method.
| Calculation method | It involves taking measurements provided that the shape of the hood is correct and close to a geometric figure. Its parts will have clear lines and correct angles. This applies to cylinders, triangles and more. The entire pattern is divided into geometric figures, and then the fabric is cut. Scans are only needed if the back and front parts differ in the plane. In this case, seam allowances are added, edits and shrinkage are made. The stretchability of the fabric along the shared plane should be taken into account. |
| Grid method | All seam lines need to be transferred to the hood shape. This can be done with chalk. The axial lines are drawn every 3-4 cm and alternate with dots. After transferring the drawing, you need to mark the distances between the seams. All lines should be smoothly connected to the main and new dots. For this method, you will need thick cardboard or wooden blanks. |
At home, it is best to use the calculation method:
- head circumference - 56 cm;
- AM is the distance from the point at the base of the skull on the occipital part to the point on the crown, 18 cm;
- MV is the distance from the crown to the lower hairline, 16-17 cm;
- MU - the distance from the crown of the head to the point of the earlobes, 22 cm;
- AU is the distance from the earlobe to the point at the base of the skull, 12-13 cm.
The average parameters can be used as a basis for creating a pattern.
By grid method
The master class includes only the basic sewing of a hood using the mesh method.
- The fleece piece of fabric needs to be folded in half.
- The resulting triangle must be cut off from the rest of the material.
- The same triangle needs to be cut out of the lining fabric.
- Both triangles need to be connected together, leaving an indent of 2 cm on the lining. The remainder can be cut off.
- The fabrics need to be secured with pins and stitched by machine or by hand.
- The edge of the lining should be folded inward twice to avoid basting or finishing the edges.
- Then you need to cut out another piece. To do this, you need to measure the circumference of the head from the crown to the chin and the height from the back of the head to the forehead. Both of these points A and B need to be marked on a new piece of fabric.
- You need to add 4 cm to point A.
- Add 6 cm to mark B.
- The new dimensions make it possible to make a semicircle.
- Next, you need to connect the parts by taking the pieces by the middle.
- The edges need to be stitched and sewn.
- Having marked 4 cm from the edge, you need to make a zigzag stitch.
- You need to insert the lace into the drawstring.
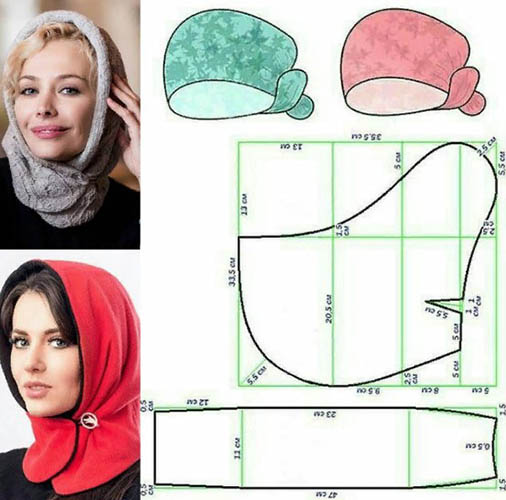
The hood on the head instead of a hat according to this sketch can be decorated with fur. The autumn version is better with a collar. To sew it, you need to turn the piece inside out. Along the edge, you should make a seam with a blind stitch. The edges of the lace must be secured with fasteners. The hood can be fastened with a button or snap.
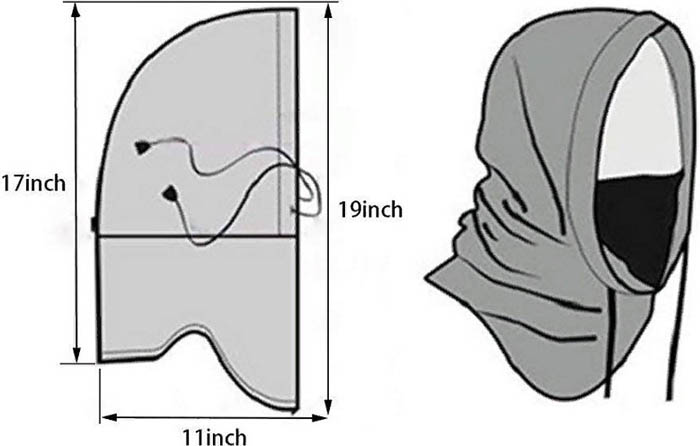
With a scarf
This model is presented in three sizes at once. The smallest one is intended for children up to 8-10 years old. The average size is suitable for teenagers, and the largest one is for those who like loose-fitting clothes and hats.
It is best to sew from warm winter fabrics.
- The selected pattern size must be transferred to the fabric and the pieces cut out.
- Then you need to cut out two blanks for the inner and outer parts.
- For the outer part, you can choose bologna fabric, and for the inner part, a warm lining like fleece or thin wool.
- For this pattern, start the scarf by folding the two pieces face to face.
- The edges need to be swept and stitched, leaving an indent of approximately 1-2 cm from the edge.
- There is no need to stitch the top edge, as the piece should be turned through the opening to the front side.
- Next, you need to connect all the hood parts and add the lining.
- The hood should be joined with the right sides facing inward, and the lining should be joined with the outer sides facing outward.
- The part with the rounded shape needs to be sewn together, and 1-2 cm should be left for allowance.
- Next, you need to insert the double part of the inner part into the outer part of the hood. Both parts should be sewn face to face.
- The bottom of the hood does not need to be stitched. The ends of the scarf should be placed there with the right side facing up.
- To turn the piece inside out, you can leave 10-12 cm on both sides.
- Now you can turn everything right side out and pull out the ends of the scarf.
- The remaining parts can be sewn together with a blind stitch, leaving a gap for additional stitching.
It is advisable to steam the finished product so that all the creases and seams are even. As a rule, a winter hood is sewn from double lining fabric, which can be insulated or quilted with synthetic padding.
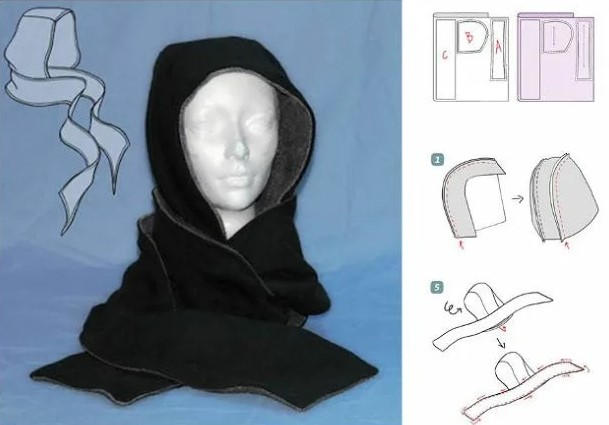
With a solid collar
Some hood models can be sewn from two mirror parts, as well as with a strip between them. It should be cut out separately, which makes the product with an anatomically correct shape. For an even more comfortable fit, you can make darts at the junction of the neck on both sides. In such cases, the hood is sewn into the base, like a collar.
This model can be one-piece without unnecessary seams. Additionally, a fastener is inserted, but most often you can do without it. Another option is a hood, which is cut as an element of a turn-down collar. It can be sewn from a single piece of fabric, or from several parts.
A hood with a removable part is sewn together with the bar to which it is attached. Along the lower seam of the bar, the part is sewn to the base of the hood. If you use the model instead of a hat, the bar should be equipped with slits for fastenings. Snap buttons and buttons with loops are best suited. To ensure that the model fits well on the head, half of the detachable zipper is additionally sewn in.
This model will require about 0.5 m of fabric for the outer part of the hood. The same amount will be needed for the lining without a double layer. To form the pattern, you need to take all the measurements that were indicated in the article above.
Additionally you will need:
| VPM | Height from shoulder to crown - the size will allow you to make the hood looser if the indicator is larger. |
| OG | The depth of the neck depends on the depth of the cut. |
| VG | The larger the neckline, the looser the base will be under the hood. |
| P.S. | The shoulder cut should be increased if the height of the product is small and the hood is pulled tightly onto the crown. |
Next, you need to transfer all the dimensions onto tracing paper or cardboard, creating the pattern yourself:
- At the bottom left, you need to mark point A, and then connect it with a straight line on the right to a new point.
- Then you should draw a straight line upward and close the line with another mark.
- Having retreated 3 cm from the last point, you need to mark point A1.
- From point A1 you should step back 1-2 cm and mark point A2.
- The existing part of the neckline cut must be duplicated in accordance with the length of the neckline according to the pattern.
- The resulting length will be identical in size to the parameters of the neckline from the back. The shelf will be the same in length.
- The obtained data must be added up.
- From point A2, you need to draw a line in a straight line to the segment that connects to point A.
- To the obtained data you need to add 2 cm and mark point C1.
- From A2 you need to step back as many cm as the neckline has on the back. You need to add 1-2 cm to the value and draw a line. This will be the new point D.
- From this point, draw a line perpendicular to the dart up to 10 cm.
- Then from point D you need to step back 1-2 cm on both sides, and then connect the marks. This segment will be called A2C1.
- A2C1 needs to be drawn diagonally upwards.
- From A1, you need to step back upwards the height that, according to measurements, is 3-4 cm more than that which is used for covering the part.
- The height drawn from point A to this line will be called point B.
- From here you need to step back a third of the OG according to the measurements and additionally shift the line by 4-5 cm. This will make the width of the hood larger.
- From point C, you need to draw a new point 3 cm down through the previous line.
- Using a new point, you need to decorate the highest section of the hood with trim.
- A line should be drawn from it to connect them with point C1.
The resulting concave line will serve as the junction of two seams. On a hood with a fastener and collar, the seams should be made invisible. This depends on how correctly the pattern is constructed, and how all the dimensions of the collar are taken into account.
With clasp
A hood on the head instead of a hat should also have a fastener that matches this model and cut. On the pattern, you need to extend the seam line where the dart is supposed to be. Along this length, it is enough to set aside the required length from point C1 to point C2. You can draw a line at an angle to display the height of the fastener.
The neckline on the back can be deepened by a few cm so that the line remains drawn to KK1. The resulting horizontal line, previously drawn to the shoulder K1K2, should remain unchanged.
Next you need to take some measurements to add the neck fastener:
- The OG parameter needs to be increased by 4 cm along the shoulder cut line. Then you need to immediately set aside the neck parts to the increased shoulder width measurement.
- It is necessary to draw a BG line from the neck to the cut.
- The stitching line will be located in the direction towards the hood from the AB cut along the neckline.
- The line to point AB is equal to line K1K2.
- From point A, you can restore a line that runs perpendicular to the hood stitching line. It should be straight and run to an equal measurement relative to the height from the neck to the crown.
- At the new point, you need to indicate the letter B, retreating 4 cm with a margin.
- From point B, a line should be drawn perpendicularly towards the head circumference line. It should be equal to ⅓ of the head circumference with a margin of 5-6 cm. This joint will have point C to the right of the cutting line.
- This point can be lowered to the mark on the bottom line by 2-3 cm.
- The hood line will be drawn through points A and C in the form of a curve.
- From point B, you need to draw a line perpendicularly upward to the desired collar height. As a rule, this parameter remains within 2-3 cm.
- The same value must be drawn from point G to the right so that it is symmetrical with the new mark in G1.
- Next, you need to create a contour from two points G and G1 to form a new neckline. It should be extended by 2 cm.
- The end of the line needs to be smoothly turned upwards to create a curved edge at point C.
Next you can sew the parts together:
- Darts need to be stitched on the outer parts of the hood.
- Then do the same on the inner parts of the product.
- All darts need to be ironed from the inside and smoothed out from the outside towards the sides of the hood.
- All the details of the outer part of the hood must be folded with the right sides facing each other, sewn together, and then stitched.
- The same must be done with the remaining parts of the inner hood.
- The allowances need to be ironed, and in the places where they are rounded, they should be cut for ease of turning.
- Both parts of the product must be folded face to face and pinned together.
- Afterwards, you should sew the hood and mark the edge.
- You need to sew a neckline to the hood and add a fastener with a placket.
The hood is ready, and now you can sew the fastener according to the pattern.
Secrets for Beginners
A hood on the head instead of a hat can be sewn using ready-made patterns or designed independently. When cutting out your own sketch, problems may arise, the solution to which few people know.
Typically, people are faced with excess fabric, lining that fits poorly, and numerous folds.
- To prevent the back side from forming folds, you need to reduce the size of the lining by a few cm.
- The measurement of the neck width from the back side will make the hood more comfortable when worn with warm clothes. SHGRL is not indicated in the finished patterns.
- The jersey or fleece fabric will fit well if you remove all the allowances. Then the smaller piece will fit well inside the main hood.
- The fabric on the insulation will always be larger than the fabric for the lining. Conversely, if insulation is used for the lining, the fabric for the hood should be made smaller. Then allowances will not be needed.
- Sewing technologies do not always take into account the design size of the product. Many details need to be recalculated.
- The seam allowances in the corner pieces need to be cut off. This will allow you to turn the inside part of the inner hood without creases.
- It is necessary to cut the allowances after processing the seams so that there are no additional folds even when reducing the size of the inner part of the hood.
- Creating a drawstring is not just a pretty lock and a folded edge. The drawstring in the drawstring requires additional fabric to fold the edge.
- To make the fastener, you will need a strip. It can be prepared as a separate part according to the pattern, or left as part of the general pattern.
These points will help to create a pattern that is suitable for forming blanks and sewing different models of hoods. Taking into account the head sizes and indicating the correct values, you can create a model to which you can then add a zipper, collar or placket to create a single-piece headdress.
The hood can be sewn using ready-made patterns, but they will not contain precise calculations and data. Such models sit well on the head, but to correct the shape and fit, it is better to design the pattern yourself. To wear such an accessory instead of a hat, it is advisable to take into account all the nuances before constructing the pattern.
The presence of a collar, strip details and exhibitions make the hood more comfortable and practical. If desired, a separate hood can be turned into a removable one by attaching a zipper to it. Such a detail will highlight the fashionista and match with outfits that previously did not fit a standard hood.
Video about making a hood