Volumetric letters can be a decoration for a photo shoot or any holiday. It is easy to create a composition in the form of initials, an abbreviation or a whole inscription with your own hands. You need to prepare the appropriate materials with tools, and also use simple instructions for creating spatial figures.
What can you make three-dimensional letters from?
Volumetric letters can be made with your own hands from almost any material. However, glass, plastic or metal structures are difficult to make without special equipment, so at home it is recommended to use:
| Material | Features of selection |
| Tree | Wooden figures are considered more durable and strong, unlike letters made of other materials. If the structure is additionally treated with a special impregnation, the product will not be afraid of rain and other aggressive atmospheric precipitation. |
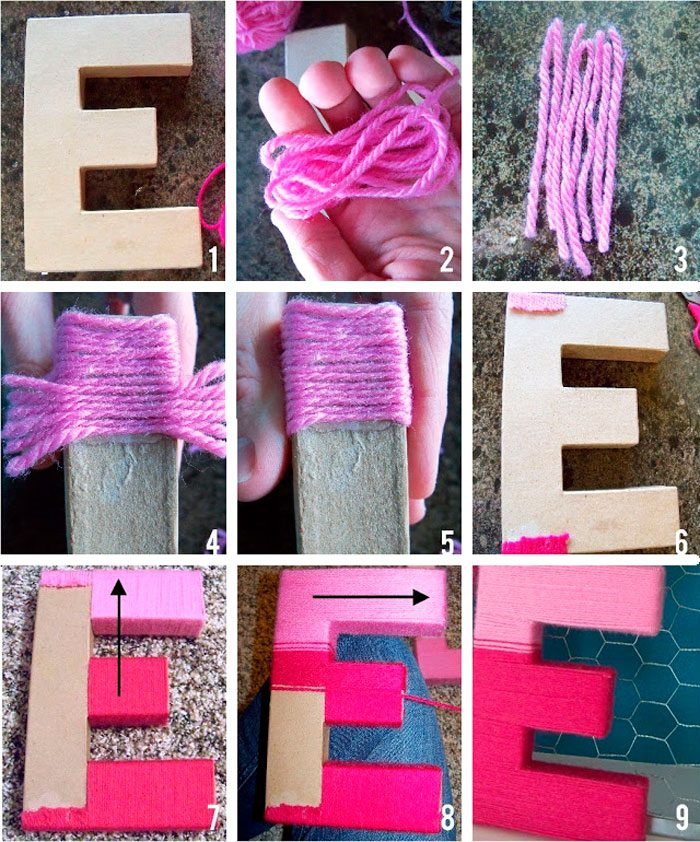
| Cardboard | It is considered the most accessible frame for the design of such structures. The finished elements of the figure must be glued together to create one integral composition. To decorate the resulting product, you can use napkin pompons, paper flowers, acrylic paints or colored threads. |
| Styrofoam | It is considered a lightweight material, and at the same time it can be used in almost any conditions, which is considered the main advantage of foam plastic. |
| Textile | Such figures can be used as toys or sofa cushions. To decorate the structure, you can use any fabric material from which you will need to cut out letter blanks and join them together. The finished structure must be stuffed with padding polyester. |
Three-dimensional letters can also be created from plaster, cement or wine corks.
How to decorate?
To decorate ready-made three-dimensional figures, it is permissible to wrap the letters with thick threads, glue them with artificial flowers, beads, packaging or multi-colored sheets.
Also suitable for decorating the structure:
- satin ribbons;
- bows;
- beads;
- glitter;
- small stones;
- shells.
Volumetric letters made of paper

From cardboard and napkins
Volumetric letters can be created with your own hands from a cardboard sheet, decorating the figure with napkins. This design is suitable for decorating a children's party and a wedding celebration.
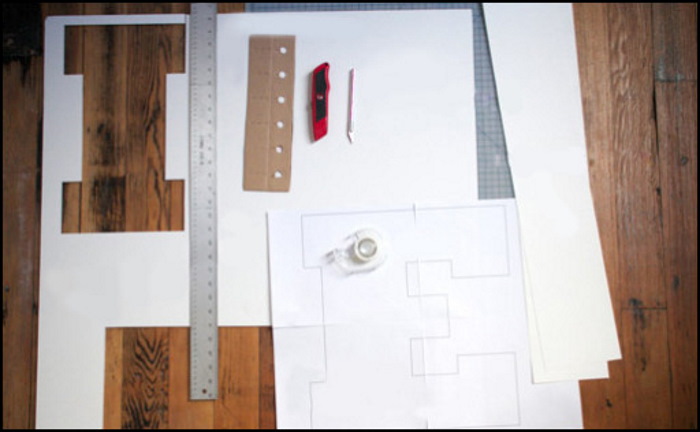
Necessary materials with inventory:
- scissors with glue and stapler;
- a thick sheet of cardboard for the base;
- napkins.
Step by step description:
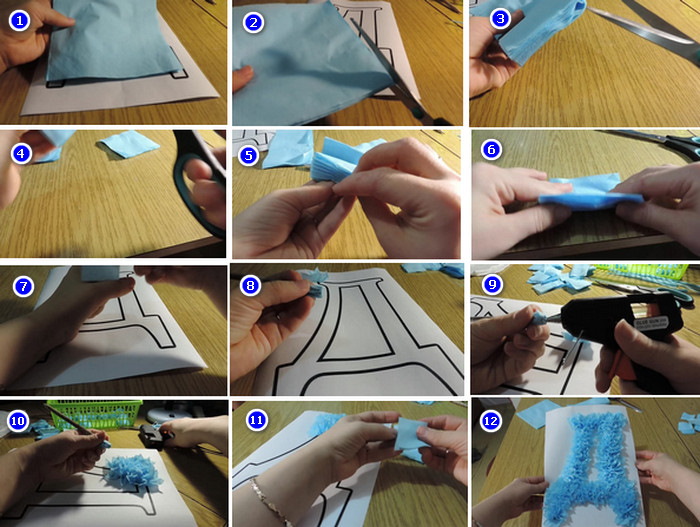
- Make flowers from napkins by first cutting the material into 2 parts, then putting the pieces together and cutting again.
- Stack the resulting squares and secure them in the center with a stapler. Give the blanks a round shape by trimming the edges.
- Press each layer together to form petals. The more layers you have, the fluffier the flower will be.
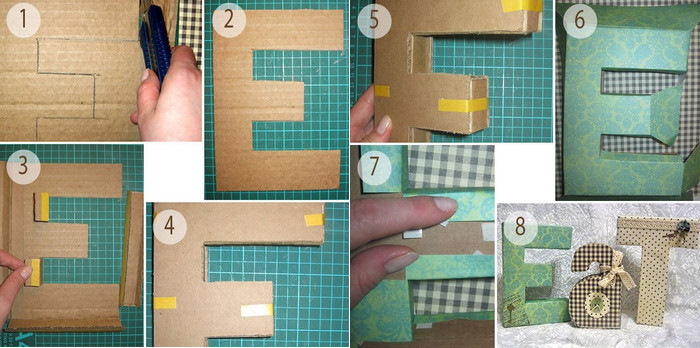
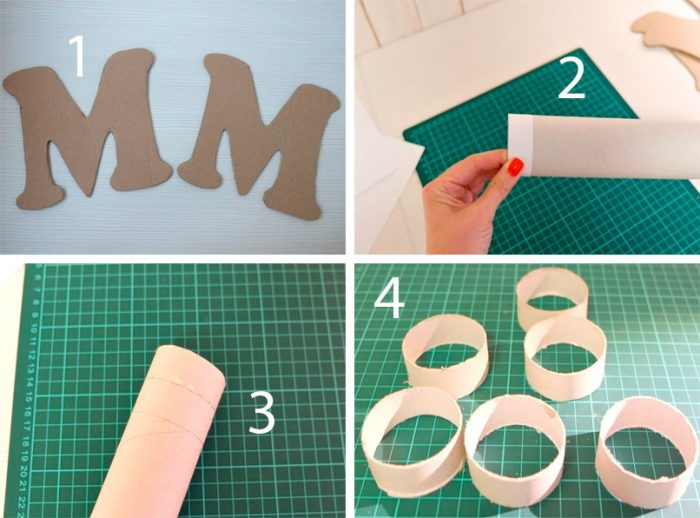
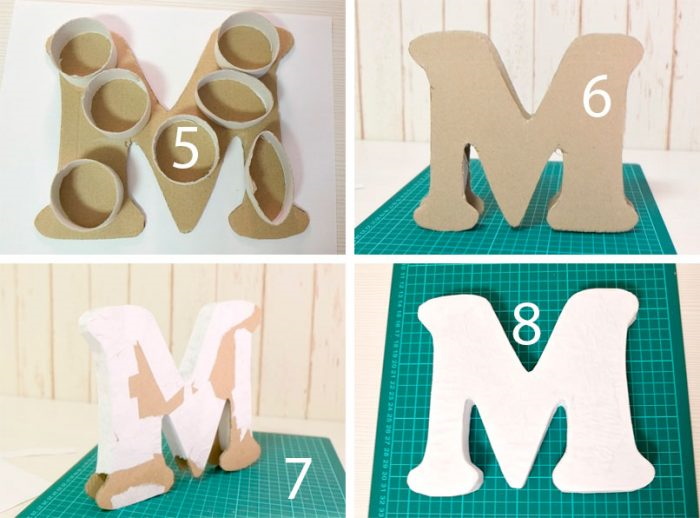
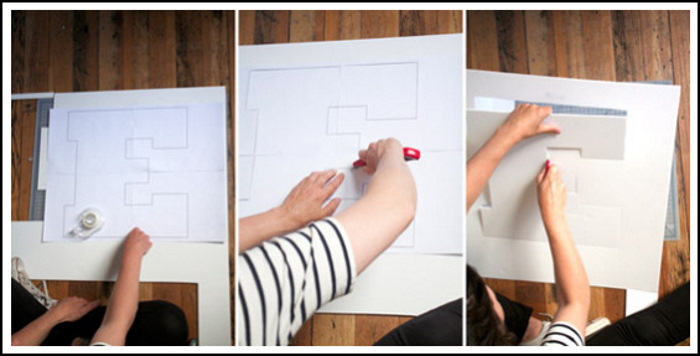
- Create a cardboard frame by drawing the required letter on the material. It is acceptable to use a template if you cannot draw it yourself.
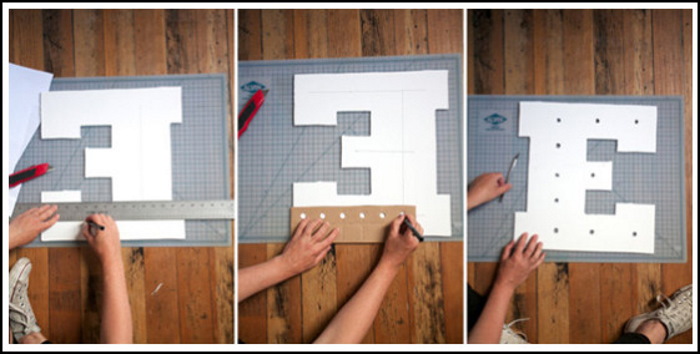
- Using a stationery knife, if the cardboard sheet is very thick, or scissors, cut out the drawn letter. Make 2 identical parts.
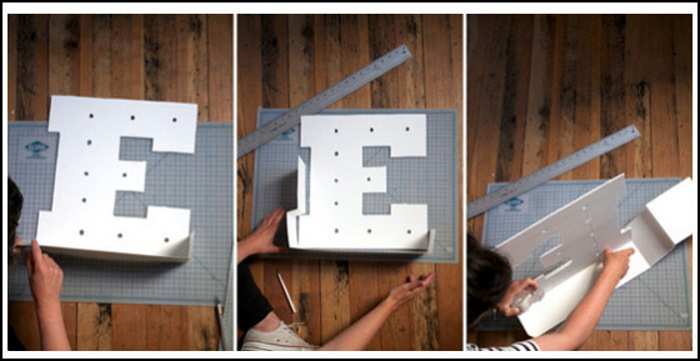
- For the side walls, make blanks. Using adhesive tape, attach the side walls to one piece, which can be cut into small pieces for ease of gluing.
- Perform similar manipulations with the second part.
- Fix the napkin flowers to the cardboard base with glue, pressing the blanks near the base, under the penultimate petal. This is necessary to avoid crushing the flowers.
Made of polystyrene foam
Volumetric letters from foam plastic have many advantages, because the material is inexpensive, it is comfortable to interact with and the figure will hold its shape for a long period of time. At the same time, creating such a structure with your own hands will be much easier than making a cardboard frame.
Required materials and tools:
- brush with acrylic paint;
- PVA glue;
- foam sheets;
- marker or pen;
- fine-grained sandpaper;
- a sharp knife with a ruler;
- thick paper sheet;
- thin sheet of parchment or newspaper.
Foam sheets can be purchased at any hardware store. The shape must be selected based on the required thickness. If the appropriate material is not available, it is recommended to glue several sheets together.
Step by step instructions:
- Make a template on a sheet of paper to make it easier to correct mistakes, because it will be difficult to do on foam. Transfer the finished sample to a foam sheet. For convenience, divide the material into pieces that correspond to the parameters of the blanks.
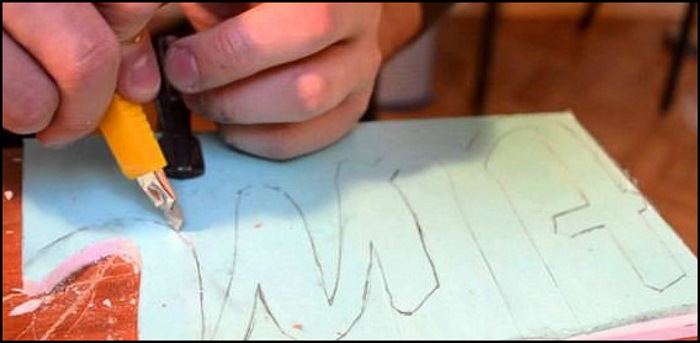
Do-it-yourself volumetric letters made of foam - Using a stationery knife, cut out the structure from the foam. For even cutting, additionally use a metal ruler, moving the blade along it. Due to this, the knife will not move in the wrong direction.
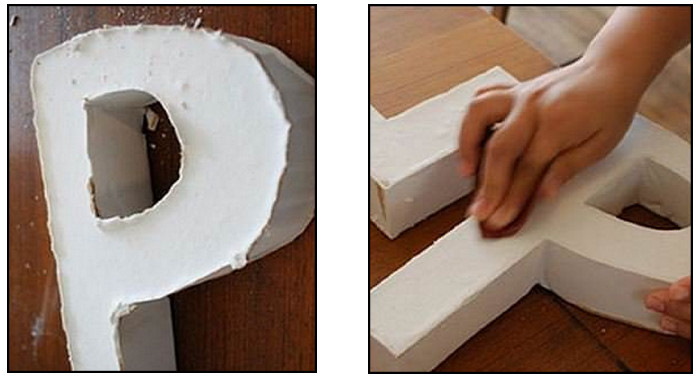
- Sand the edge of the cut with fine-grained sandpaper to obtain a uniformly smooth surface. Remove unnecessary material scraps with a brush.
Do-it-yourself volumetric letters made of foam - Proceed to decorating the figure. Tear a thin sheet of parchment or newspaper into small pieces. Grease the blanks with glue and fix them on the structure.
- Once the decoration is complete, set the structure aside to allow the glue to dry completely. Do not prime the surface.
- When the glue dries well, paint the structure in the required acrylic color. If the layer is transparent, reapply the paint. Apply the second layer after the first one has completely dried.
From foil
Volumetric letters made by hand from fabric or napkins cannot match all interiors. In this regard, decoration for a celebration or photo shoot can be made in an unusual technique, using aluminum foil.
Required inventory with material:
- aluminum foil;
- glossy or matte varnish for decoupage;
- pencil with PVA glue and eraser;
- glue gun;
- black shoe polish;
- soft fabric material with a foam sponge;
- scissors with toothpicks;
- a thick sheet of cardboard.
Method of creation:
- To give the structure volume, cut out a letter from a thick cardboard sheet. Do not wrap the figure with additional paper. Use a pencil to draw any ornament with curls, leaving small gaps between the strips for applying foil.
- If you can’t make a straight line right away, erase the sketches with an eraser and repeat the pattern.
- To make the drawing three-dimensional, use hot glue, which will create a thick layer after hardening. Carefully apply glue to the workpiece along the drawn lines and leave until completely dry. If desired, you can apply a second layer of glue to make the ornament more three-dimensional.
- It is necessary to place dots among the lines. However, do not place them at close range, so that there is space for applying the foil.
- Cut a piece of aluminum foil that will completely hide the structure. If the width of the material does not correspond to the size of the figure, visually divide the structure into 2 parts, cutting 2 pieces of foil for each blank.
- It is not recommended to wrap the structure with pieces of foil, because after a while the edges will start to peel off. The material can be applied to the figure with the glossy or matte surface facing up.
- Coat the structure with PVA glue, thoroughly greasing the recesses around the ornament so that the material is firmly fixed in these areas. Apply the foil to the figure and press it against the curls. Carefully fold the edges into the inner part of the cardboard.
- Do the same with the back side of the structure. However, do not wrap the excess parts along the edge of the cut, just cut them off.
- To add texture, use shoe polish, applying the composition with a soft cloth to the image. Press the foil slightly. If a lot of cream was applied, remove the excess with a cloth before the composition dries.
- Apply a thick layer of varnish used for decoupage over the cream composition using a foam sponge. This composition will fix the cream on the structure, giving the composition an even texture.
It is recommended to start with the facade of the structure. When the composition is completely dry, you can move on to the other side. Thanks to this, the ornament will not be smeared from the foil.
Before using the volumetric structure, the varnish must dry well. This may take approximately 3-4 hours, relative to the applied layer of the composition.
Shoe polish can be applied to a flat surface or exclusively to a convex image. As a result, you can get 2 figures that will have different textures.
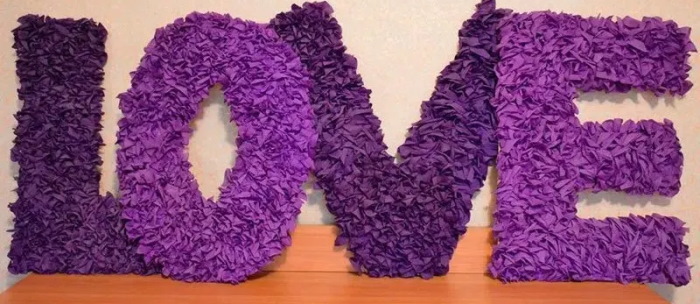
Made of fabric
Volumetric letters can be made with your own hands from fabric material, using the finished composition as sofa cushions. This technique is often used to create the word Love.
Necessary tools and materials:
- pins with a tape measure and a ruler;
- pencil with paper sheets;
- cotton fabric in white and red shades;
- holofiber or synthetic fluff for filling;
- sewing machine with thread and scissors.
Step by step description:
- Draw the letters LOVE on sheets of paper. Transfer the finished figures in 2 copies onto red fabric and make patterns, leaving an allowance of 1 cm.
- Cut 7 cm wide strips from the light fabric for the side walls, where 5 cm is the width and 2 cm is the allowance, leaving 1 cm on each side.
- To form the letter L, fold the blanks with the outer parts, leaving 5 cm free on the sides. Stepping back 1 cm from the edge, sew up the lower section of the figure. When approaching the corner, make notches to create an even corner.
- Sew the side piece to the detail, leaving 4 cm free so that the piece can be turned inside out.
- Attach the second part of the letter L, making marks with a pencil on the side parts opposite the existing corners. This will make it possible to make the structure even.
- Attach the piece, pinning it in place and making cuts near the corners so that the material does not shift. Sew the second piece, leaving 4 cm for turning.
- Fill the structure with stuffing, sewing up the opening using a blind stitch.
- To form the letter O, connect 2 parts of the figure together and make pencil marks every 2 cm on each piece inside and outside. Additionally, make marks on the side walls of the inner and outer circles.
- Make cuts according to the marks applied. Matching the marks and leaving 4 cm for turning, stitch the outer circle on one side.
- Sew the inner circle on one side. Stitch the edges of the inner circle strip, creating a tube shape.
- Sew up the free section of the outer circle.
- Turn the structure inside out, pinning the inner circle and sewing the opening with a blind stitch by hand.
- Fill the figure with stuffing, sewing up the opening using a blind stitch.
- Sew the remaining letters in the same way.

With backlight
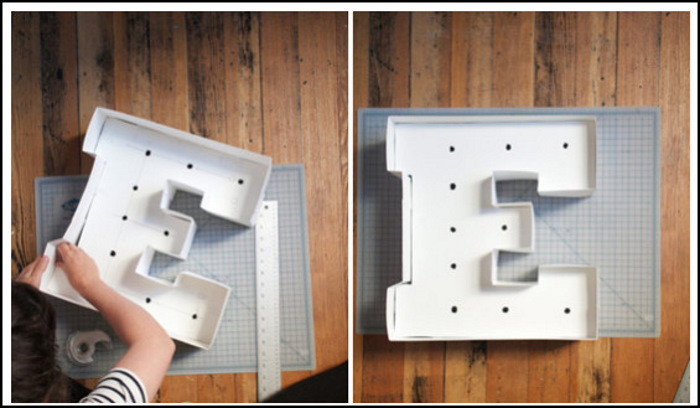
A thick cardboard sheet can act as a frame for volumetric figures with various decor. The design with backlighting looks original and unusual. For this, it is permissible to use a garland or create lamps yourself, connecting them with a wire.
List of tools and materials:
- spray paint and a brush with PVA glue;
- garland and a large box;
- stationery knife with scissors, ruler and hole punch;
- a box made of cardboard material with a thick sheet of paper;
- marker or pencil with narrow tape.
Method of registration:
- Select the letter or inscription you want to make. Calculate the dimensions for the blanks. If you cannot depict identical figures on the sheet, print out the letter.
- Transfer the template to a cardboard sheet and cut it out. To get a straight line without creases and folds, use a scalpel or a stationery knife. The cuts should be straight.
- Prepare all the figures at once, placing them in turn. On each structure, using an industrial hole punch, make identical and even holes for the lamps. Make enough holes so that when the lights are off, you can recognize which letter is illuminated.
- To add volume to the structure, use thick, non-transparent paper. Cut the sheet into 5 cm wide strips, wrapping each figure in the cut paper. Place the cardboard sheet lengthwise in the middle of the strip. Grease the edges of the structure with glue and apply paper, setting the workpiece aside to dry.
- At the bends, join the parts very closely so that the lighting does not pass through the holes.
- Use aerosol paint to paint the structures. This product will quickly mask the folds and will spread evenly over the surface. First, install the structure in a box so that there are no traces of paint around. It is advisable to spray the composition in a ventilated room or outside, because the paint has an unpleasant smell and can fly into dust.
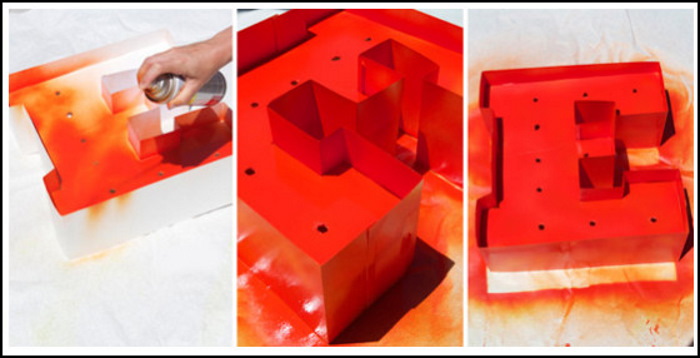
- Paint the figures on each side and leave until completely dry and there is no longer any smell of the paint.
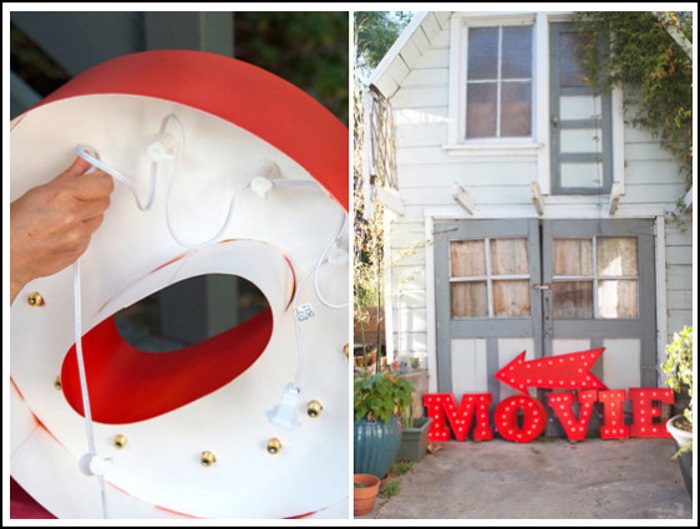
- Place the figures in order on a flat surface, because a ready-made garland is used for illumination. In this regard, start assembling the phrase with the first letter. Install the lamps from inside the structure, fixing the wire with tape.
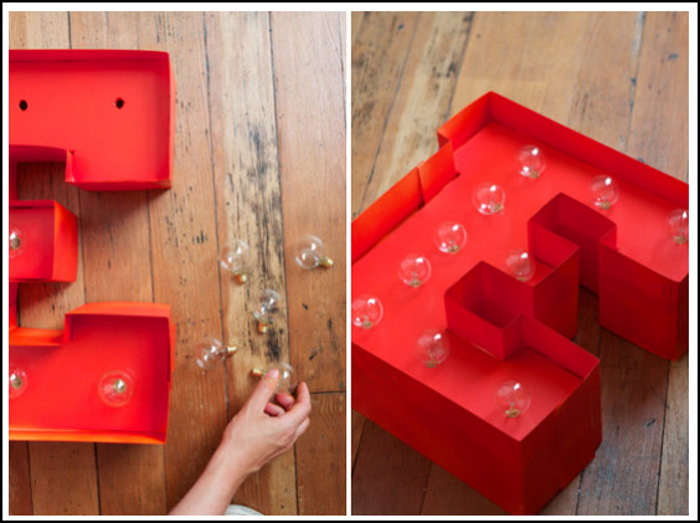
- Place the new blank next to the first figure and arrange the light bulbs in a similar manner.
If you need to create a distance between phrases, it is recommended to unscrew several lamps and pull the wire.
From cardboard and flowers
Three-dimensional figures with artificial flowers can be stored for a long period of time, using them to decorate a room for a holiday.
List of materials with inventory:
- spray paint;
- cardboard figure;
- artificial flowers;
- glue gun;
- scissors.
Step by step description:
- If you have a ready-made cardboard figure, carefully cut out the top section of the letter.
- Paint the structure on each side and leave to dry or wrap it in corrugated paper.
- Divide the artificial flowers into inflorescences by cutting off the buds from the stems. Turn the parts over and coat them with glue, fixing them to the base of the structure. Press the bud with your hands to harden the glue. If the inflorescence is shorter in height than the width of the side wall of the figure, cut it off.
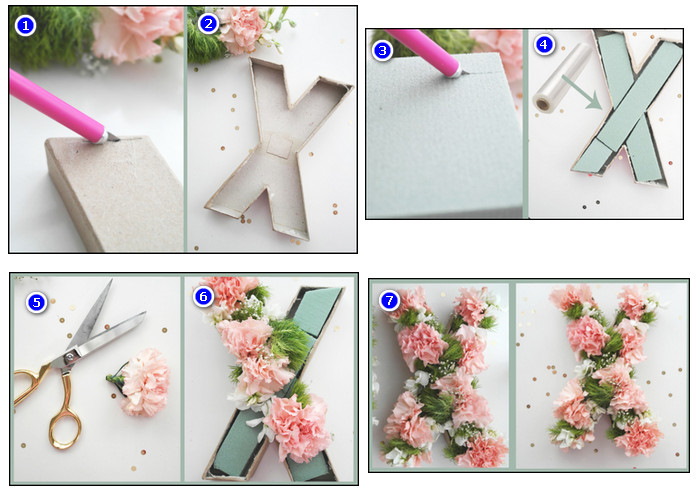
It is recommended to start gluing the decor from large flowers, placing buds with a smaller diameter between them. Free space can be decorated with branches and supplemented with foliage.
Volumetric letters are suitable not only for decorating a festive event or photo shoot, but also as a composition in a home interior. At the same time, it is easy to create spatial figures with your own hands. For this, letters can be made from foam, cardboard sheets or fabric, decorated with flowers, colored paper, bright lighting or napkins.
Video on how to make 3D letters and numbers from napkins
To make volumetric letters from napkins you will need:
- thick cardboard;
- scissors;
- ruler;
- pencil;
- napkins;
- hot melt glue;
- gouache;
- brush.