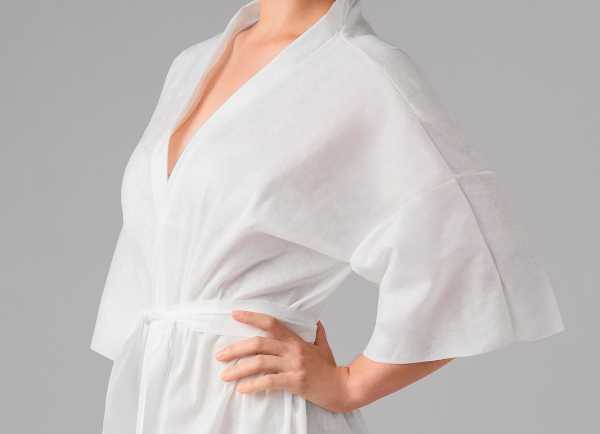
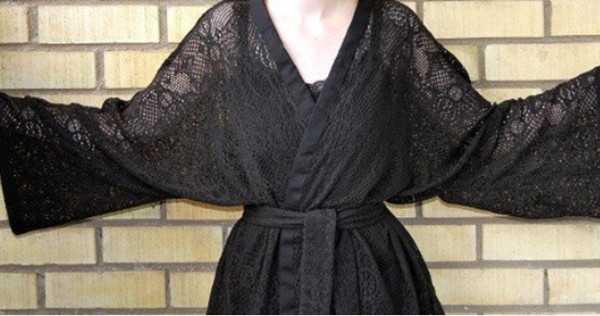
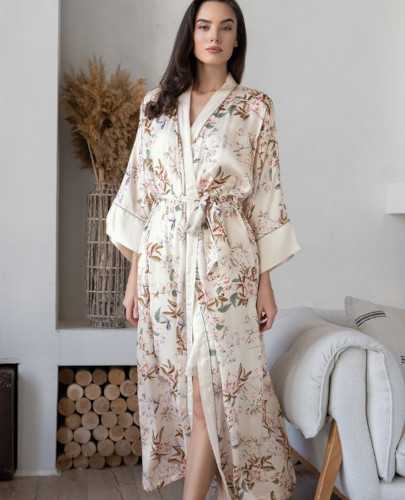
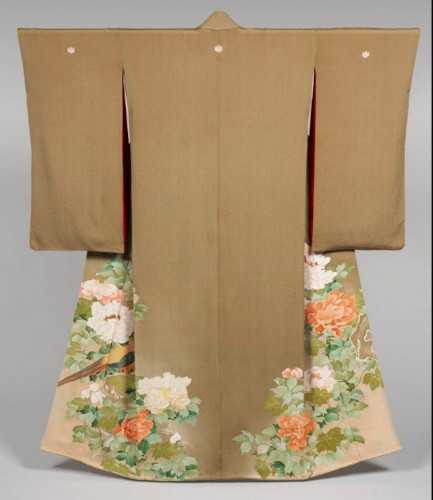
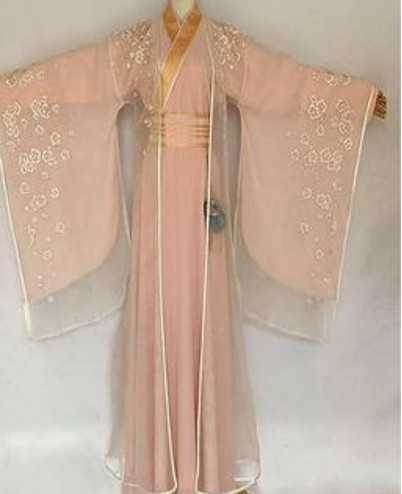
Women's kimono robe - it's an item of clothing, which can be made of various materials. It is a loose garment, reminiscent of a kimono in cut, with or without a belt, often with a wrap-around design and long sleeves.
A women's kimono robe can be sewn according to individual measurements.
Necessary tools and materials
To sew a kimono robe, you will need the following tools and materials:
- Tools:
- sewing machine;
- scissors;
- pins;
- measuring tape;
- chalk or pencil for marking.
- Materials:
- fabric for kimono robe;
- sewing threads;
- buttons or fasteners for the robe (if provided).
You may also need the following to create decorative elements:
- lace;
- braid;
- tapes and other materials.
The choice of fabric for a kimono depends on several factors:
| Factor | How it affects, features |
| Seasonality | For the cold season, denser fabrics such as wool are suitable. For the warm season, lighter ones such as cotton or linen. |
| Occasion | For special occasions, you can choose more expensive and luxurious fabrics, such as silk. For everyday life, practical and comfortable materials are suitable. |
| Style | For informal occasions, fabrics made from chemical fibers can be used. |
Silk has a noble shine, it is strong and durable. However, such fabric requires delicate care and can also be quite expensive.
| Types of silk | Brief description, features |
| Tsumugi | This is a fabric that is made from raw silk threads. It has a natural luster and can be used to create elegant and sophisticated kimonos. |
| Rintsu | It is a type of silk that has a smooth and shiny surface. |
| Habutae | This is a patterned fabric. It can be used to create decorative elements on a kimono robe. |
| Sha | This is a silk fabric with diagonal weave. It can be used to make kimonos because it has a smooth surface and shine. |
As an alternative to silk, you can consider other natural fabrics:
| Name of fabric | Brief description |
| Cotton | It absorbs moisture well, allows the skin to breathe and does not cause allergies. Cotton kimono robes can be of different colors and thicknesses. |
| Flax | This fabric also has good air permeability and hygroscopicity. Linen can be a great choice for summer kimono robes. |
| Viscose | It is an artificial fabric, but it is made from natural raw materials - cellulose. Viscose is pleasant to the touch, does not electrify and can be dyed in bright colors. |
For a modern kimono, you can also use other fabrics, such as soft and cozy velour or flowing satin. The choice of fabric depends on your preferences and the style of the robe.
Master classes for beginners
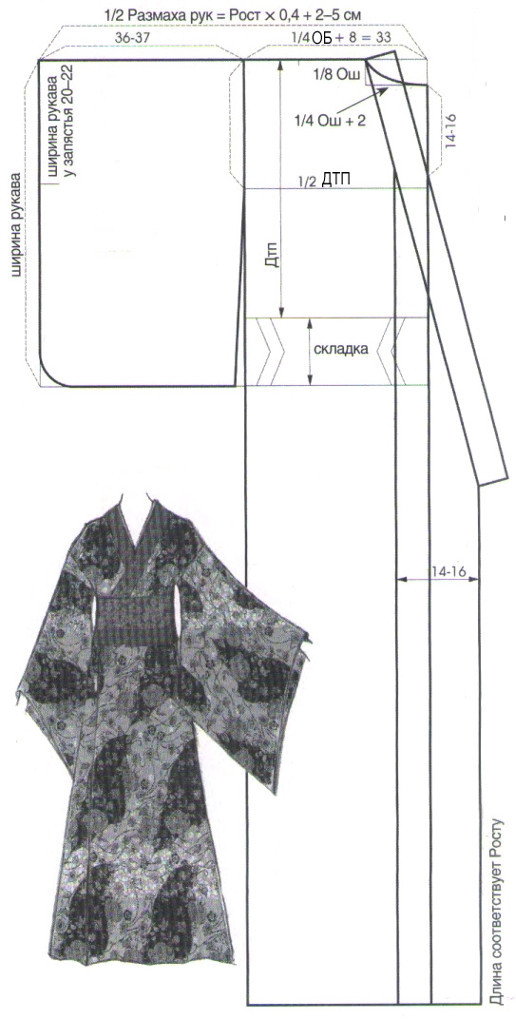
The cut of the kimono robe has a linear-rectangular shape. The width at the back is about 60 cm. This allows you to create a free and comfortable silhouette that does not restrict movement.
The shelves of the kimono robe may have an allowance for a smell. This allows you to adjust the depth of the smell depending on your preferences and the features of your figure.
Triangular wedges are optional. They can be sewn from the waist to give the silhouette additional volume and freedom. The bottom of a traditional kimono is located above the feet. This provides comfort and freedom of movement. However, modern models can be very short.
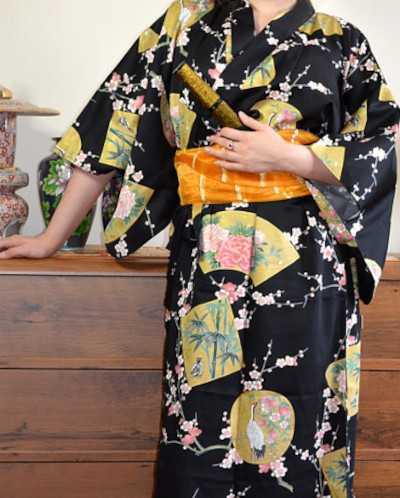
The kimono robe wraps from left to right. This is a traditional method that gives the product a special charm and elegance.
The collar is made from a rectangular piece of fabric. It reaches the waist or sometimes the hem. The collar should stand out from the neck at some distance to ensure comfort and freedom of movement.
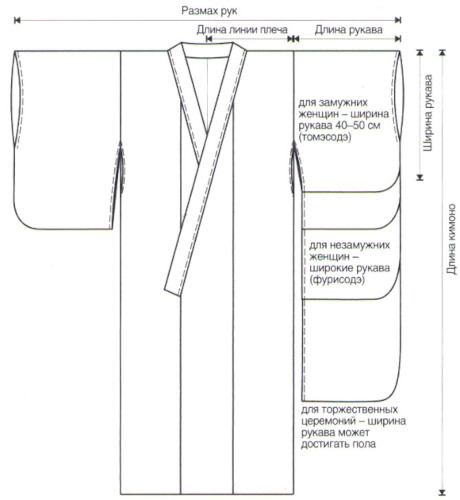
The width of a kimono sleeve can vary:
- Tomesode worn by married women are usually about 40-50 cm wide. This is the most common type of sleeve used in everyday life.
- There are several varieties of furisode, a long kimono with wide sleeves. Each of them has its own width:
- kofurisode - 75 cm;
- chufurisode - 90 cm;
- ofurisode - 105 cm.
Kimonos with such sleeves are more formal and are used as part of a wedding outfit or for participation in traditional celebrations.
The obi belt is part of the kimono. Today, it has become an element of the exclusively female wardrobe.
There are different types of obi belts:
- The standard width of a fukuro obi belt is 27 cm and the length is 4 m.
- The maru-obi belt is wider - about 65 cm in width and 4 m in length.
The obi is tied in a special way, forming a knot, which is a separate art:
- The traditional knot is called a taiko. It is tied using a cylindrical pillow and an obi-scarf (obiage), and a cord (obi-jime) is tied on top. This knot is most often worn by married women.
- Unmarried girls prefer the fukura suzume knot, which resembles a bow.
Wearing an obi symbolizes elegance and femininity. The belt has become not only a symbol of Japanese culture, but also a universal fashion accessory that allows you to emphasize the character and individuality of the owner.
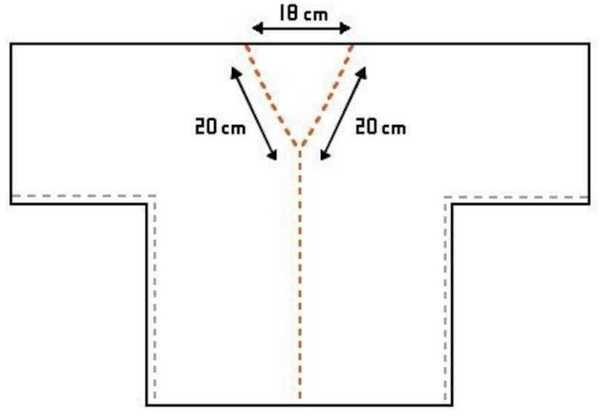
One-piece short T-shape with narrow sleeves
You can sew a kimono using a master class with a detailed description of the process:
- Decatize the fabric before cutting.
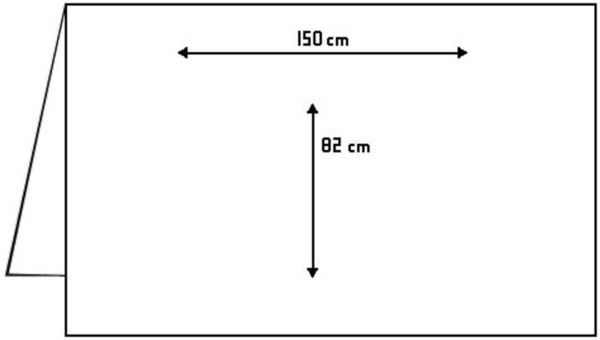
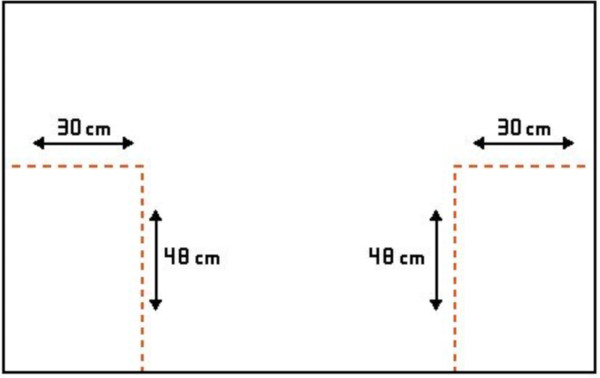
- The fabric is folded in half and formed into a T-shape at the top along the bend. Mark the central slit for the wrap. The upper and lower sleeve lines and cut off a strip for the bias binding. Leave 1 cm seam allowances on all parts, except for the bottom of the sleeves and the bottom of the garment - there are 2 cm allowances.
- The details are placed on the fabric, outlined with chalk, and cut out with scissors or a cutting knife. It is important to accurately outline the detail to prevent mistakes when sewing.
- The bias tape strip is folded in half and ironed. Hems are made on both sides inward and ironed again to fix the shape. The finished collar is placed inside the bias tape and secured with pins. The parts are stitched and ironed.
- The side seams of the sleeves are pinned, stitched and ironed.
- The folded edge of the sleeves is ironed 1 cm on each side. The prepared parts are pinned and sewn together. The edge is processed with a hem stitch.
- The side seams are connected with an iron using pins, after which they are sewn and ironed.
- The edges of the product are folded by 1 cm and ironed from the front side. The parts are connected with pins and connected on a sewing machine. The seam is processed to the width of the allowance.
- The belt is cut out, the seam is processed into a hem and joined with overcasting. The belt is checked, ironed and processed along the edge.
- The product is ironed through a damp cloth, starting with small parts and ending with large ones. All areas are ironed separately with pressure so as not to stretch the fabric.
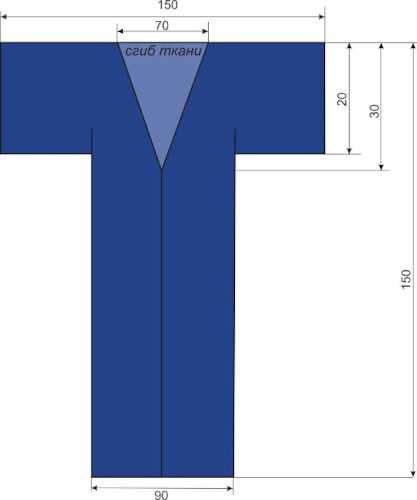
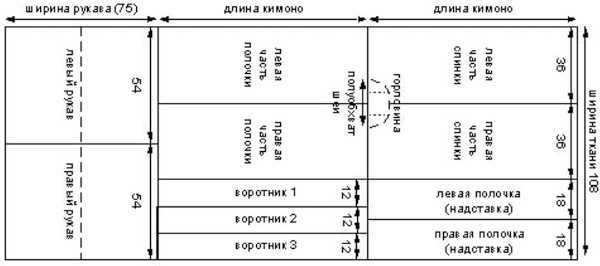
One-piece long T-shaped tomesode sleeve
You can sew a kimono using the master class described here, which describes in detail the process of creating a robe from a single piece of fabric:
- Mandatory decatization.
- The robe fabric is folded in half and a T-shaped pattern is made along the fold of the material. A slit is made for the wrap. A strip is cut for the bias binding for the collar. Seam allowances are 1 cm, except for the bottom of the sleeves and the bottom of the garment (2 cm).
- The fabric is laid out on a table or other flat surface. The robe pieces are cut out according to the pattern.
- The bias tape strip is folded in half, ironed and folded inwards on both sides. Using pins, the collar is placed inside the bias tape, stitched and ironed.
- The darts are overcast to the bottom of the garment and the fabric is ironed. This is necessary so that the wrap area looks neat and does not crumble after processing.
- The hem of the sleeves is pinned so that the cuts are located inside the sleeve, machine stitched and ironed with a steam iron.
- Measure and mark the fold line of the sleeves. Fold the edges twice along the fold line. Secure with pins or dressmaker's clasps. Stitch along the marked fold and overcast, simultaneously tucking to form an even flat seam. Using an iron and ironing board, smooth the seam, giving the sleeves their final shape.
- Having secured the seams with pins, connect them, providing an even allowance. To do this, it is necessary to make sure that the fabric is distributed correctly on both sleeves. Sew the seam. First from the front side, and then from the back side, carefully iron it.
- The bottom edge of the robe is folded inward and secured with pins so that an even hem is formed. The hem is stitched by running a line between it and the main edge of the garment on a sewing machine. Stitching is necessary to secure the hem, which will ensure its safety and strength after further processing stages. The fold line and seam are ironed. This will give the garment its final appearance and ensure that the work is done neatly.
- To do this, sew the belt parts together, having previously adjusted them to each other. Turn it right side out. Iron the turned belt, giving it the correct shape and ensuring a smooth surface. It is necessary to ensure the correct iron temperature so as not to damage the fabric.
- The final step is the final ironing of the robe. This procedure is carried out using a damp ironing pad. The iron should have the right temperature, which depends on the type of fabric. It is important not to overheat the iron to avoid unwanted deformation or damage to the material.
With a one-piece back, long with narrow sleeves
You can sew a kimono in the steps presented in the master class, developed for beginning tailors:
- Decating to prevent shrinkage during subsequent washing.
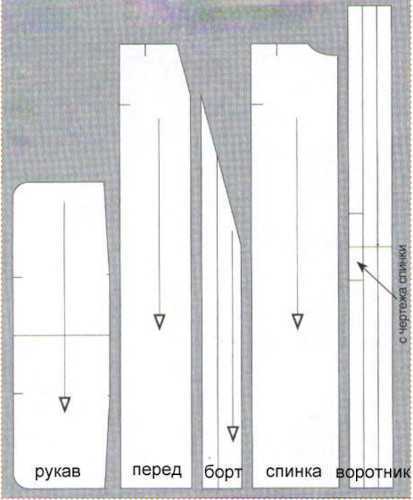
- The pattern is shown in the photo below. This model has a one-piece back and narrow sleeves.
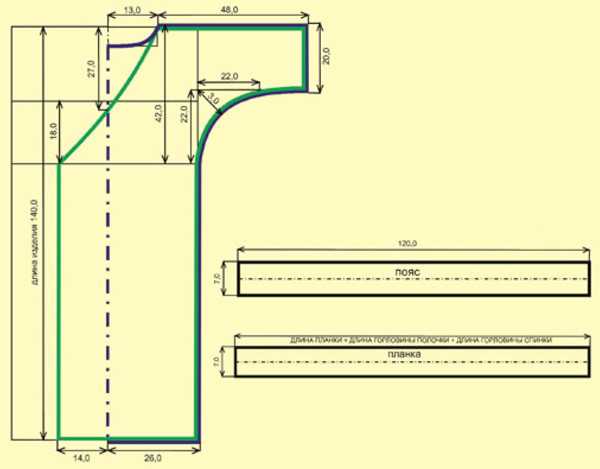
If a woman's size is large, the kimono can be made larger:
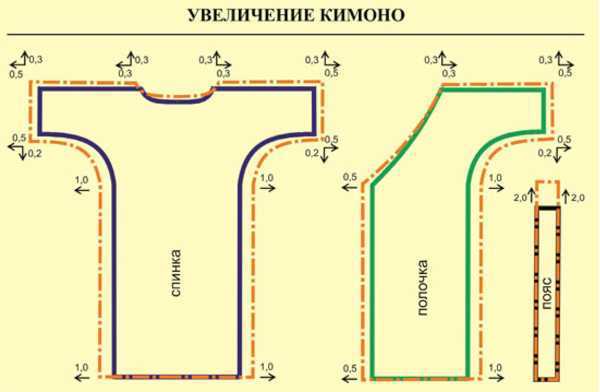
- Lay the fabric on a flat surface and transfer the pattern pieces. It is necessary to take into account the seam allowances indicated in the figure:
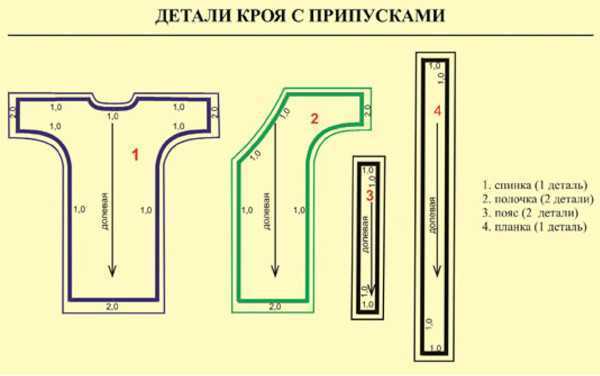
Women's kimono robe. Pattern. - Connect the shoulder seams, using sewing pins to secure. Stitch. Press.
- Proceed to joining the side seams, using pins to ensure a tight fit of the side seam. Stitch and press on one line. At the waist level, 2 holes should be defined on each side, intended for the belt.
- Fold the bottom of the sleeves inwards by 1 cm, secure with pins and stitch. The stage is completed by ironing.
- The lower edge of the sides is framed, turned inwards, and secured with pins. The element is stitched and ironed.
- The placket is ironed in half along the center line. A finishing stitch is made on the front side. Hems are made on both sides of the placket and pressed. The collar is placed inside the placket, where it is securely fastened with pins. The finished element is stitched and pressed.
- Fold the bottom edge of the robe twice by 1 cm, secure it with pins and stitch. Iron the finished edge.
- The belt is made by stitching together 2 pieces of fabric folded at the edges. Turn inside out and iron.
- Perform final ironing of the entire product.
Modern Kofurisode
You can sew a kimono with kofurisode sleeves, for this you need to follow the steps:
- Carry out fabric decating.
- Make a pattern. The neckline is cut out when the back is sewn along the middle seam. Add a 2 cm allowance for the hem to the length of the kimono, the remaining details are given in the figure with seam allowances. The back and front consist of 2 parts. Belt: width 10 cm, length 2 m.
- Cut out the pieces using the patterns.
- Fold the sleeves in half and pin them together. Sew the sleeves, making sure the seams are even. Iron the sleeves.
- Fold the bottom of the sleeves on each side by about 1 cm, pin it and sew. Iron the finished edge.
- Connect the 2 parts of the back along the middle seam. Pin the resulting parts together and sew them together. Ironing will strengthen the seam and provide a smoother surface of the fabric.
- The back should be sewn to the front along the shoulder line. It is necessary to watch how the back fabric lies under the collar in front. The seam should be located close to the fabric of the front part. Ironing the seam will give it strength.
- In the folded form, the sleeves are sewn to the front and back parts of the product. The seam should go from the edge of the shoulder down. Iron, giving the desired shape and a neat appearance.
- The robe placket is folded in half and ironed along the fold. The fold itself should be located strictly in the middle. Hems are made on both sides inward. The placket is ironed. The collar is placed inside the placket and secured with pins. Overcasting and ironing are performed. Finish the stitching on the front side of the placket. Iron.

- The bottom of the robe is folded 2 times by 1 cm. Pinning, stitching and ironing will ensure a neat and tidy appearance of the bottom of the product.
- The belt is sewn and turned inside out. Ironing makes the belt ready.
- Carefully ironed kofurisode gives it a flawless appearance, giving it the status of a traditional garment.
With tomesode sleeves
Step-by-step master class on sewing a kimono robe with tomesode sleeves:
- Decat the fabric to avoid shrinkage after the first wash of the finished product.
- Cut out the back and front of the garment, laying out the pieces on the fabric so that the direction of the grain line matches the direction of the cutting.
- Cut out the back neckline after the back seam is complete.
- The back and front consist of 2 parts.
- The belt should be 10 cm wide and 2 m long.

- Cut out the pattern pieces taking into account the selected seam allowances. It is recommended to hem all cuts except the sleeves.
- Sewing is done similarly to the previous master class. Only the pattern is different.
Chufurisode with wedges (sides) for plump women
A kimono with wedges (sides) is suitable for full-figured women.
You can sew a robe using the steps below:
- Carry out the decatization process.
- The width of the fabric is 110 cm, which is used to create the front and back of the robe. The length is measured from the shoulder line to the bottom edge of the robe. The shoulder line measurements are used to determine the sleeve sizes. The length of the collar is 3 times longer than the length of the robe - this allows you to create a voluminous and stylish collar. The belt is 30 cm wide and 4 m long and can be changed.
- The dressing gown pieces are cut out. Any changes in the cut must be taken into account before sewing begins.
- Fold the sleeves in half, pin, stitch and iron to give them an even shape.
- Fold the bottom edge of the sleeves 1 cm twice, pin and stitch, iron to secure.
- Sew 2 parts of the back along the middle seam, using pins to fix it, stitch the seam and iron it.
- Sew the back to the front along the shoulder lines, carefully iron the joint.
- Connect the front and back parts of the robe with the sleeves. To do this, sew the folded sleeves to the front and back parts, starting from the edge of the shoulder. Under each sleeve, continue the side seam to the waist. Iron the seam for strength and smoothness.
- From the waist, add wedges (flaps) on the side seams, ironing them.
- Connect the side seams using pins to secure them, stitch all the seams and iron them.
- Iron the placket in half. Fold the hem on both sides inwards and iron. The collar is placed inside the placket and secured with pins, stitched and finally ironed. A finishing stitch is made on the front side of the placket.
- Fold the bottom of the robe twice by 1 cm, pin it, stitch and iron.
- The belt is sewn, turned inside out and ironed.
- Final ironing. At this stage, it is important to maintain the shape and quality of all previously performed operations.
Festive with figured sleeves
The step-by-step master class includes the following stages:
- Decating.
- Based on the patterns shown in the photo below, create patterns on the fabric.

- The details of the robe must be cut exactly along the cutting lines and according to the sizes. It is necessary to take into account seam allowances of 1 cm, and for the bottom of the product and sleeves - 2 cm.
- Pin the pieces together, sew, and iron to one side.
- The backs are connected to the front along the shoulder line of the piece and the shape of the future robe is obtained. The robe is turned inside out and ironed from the inside.
- Fold the lower edge of the sleeves twice by 1 cm. Pin and stitch along the seam. Turn the sleeves inside out, iron them from the inside and connect them to the main part of the robe.
- Iron the strip in half. Make folds on both sides inwards and secure with pins. Stitch along the perimeter and iron. On the front side, for decorative purposes, make a finishing stitch.
- Fold the bottom edge of the robe twice by 1 cm and stitch.
- Sew 2 halves of the belt, fixing the ends. Turn inside out and straighten along the contour. The seam can be secured with pins before ironing. Iron the belt.
- Final ironing of the finished product.
A women's kimono robe, sewn with your own hands, can be a wonderful addition to your home wardrobe. Such clothes provide freedom of movement and comfort, are versatile and easy to combine with other items of clothing.
Video about kimono robe
How to sew a kimono robe yourself: