Foam plastic is an excellent raw material for creating beautiful and functional things made by hand. Crafts made from this material are light and moisture-resistant. Foam plastic is easy to cut and give it the desired shape.
Where to get polystyrene foam for crafts
Craft stores sell various foam blanks. You can buy round balls of various diameters or a whole sheet, but the cost of this material is high. If you need a lot of foam, you can find it in boxes from household appliances or computers.
Craftswomen do not hesitate to ask for help from store personnel, because they are likely to have unnecessary material in their warehouse. To perform large works, you can buy a large sheet in a hardware store. They sell foam plastic of different thickness and grain size, which is much cheaper than in specialized craft stores.
Subtleties of working with the material
Foam plastic crumbles a lot, so kitchen knives, scissors or a razor are not suitable for cutting it. A knife designed for cutting paper copes well with the task. All cutting movements should be done to the side, away from you, because the knife can slip off at any moment, or a piece of foam plastic can crack and fall off.
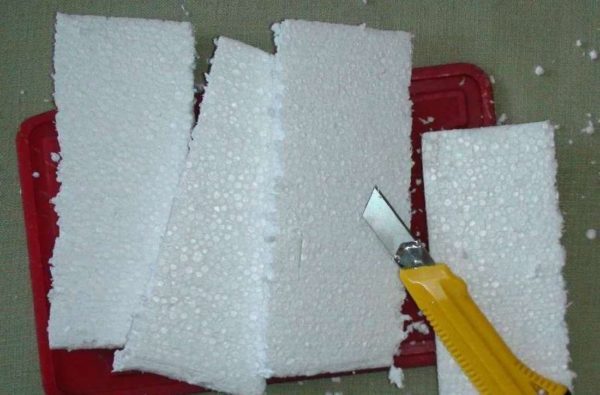
To cut a large piece from a thick and fine-grained sheet, it is permissible to use a hacksaw for wood, with small teeth. With this tool, the risk of injury is reduced to zero. Knives are not suitable for wide material, because they will get stuck and quickly become dull, they will have to be sharpened after each cut meter.
An electric jigsaw is also used. With its help, the foam plastic is cut quickly and neatly. The main thing is to follow safety rules and hold the foam plastic sheet. Some craftsmen cut the material with a grinder. This requires very thin diamond discs. The cut is even, the foam plastic does not crumble.
To cut out complex and large figures, use a nichrome thread. It is heated by connecting both ends to a transformer. If you need to cut foam plastic lengthwise, then the surface of the work table is tilted at an angle, and the material is cut under its own weight, sliding down.
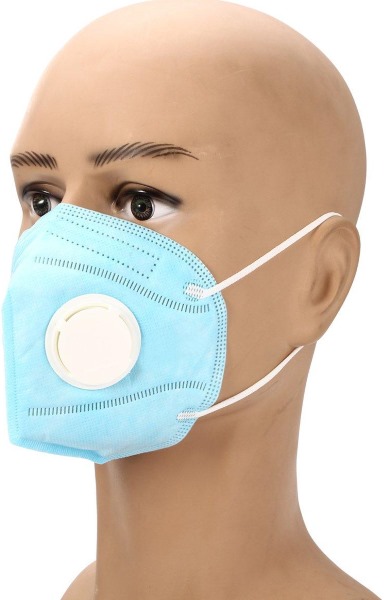
It should be remembered that heated foam plastic smokes heavily and releases toxic substances, so you need to take care to protect your respiratory tract before working.
To glue the blanks together, you need a suitable glue. You cannot use glue containing acetone or benzene. These substances dissolve the surface. There is glue for foam ceiling tiles that will not damage the structure and will securely fasten it to the other part. You can use mounting foam.
The main thing is to stock up on solvent for tubes so that they do not get clogged. There is also foam glue, especially for polystyrene foam, but it has a low ability to hold the material. It is only suitable for fastening thin and light parts. Crafts made of polystyrene foam are painted with water-based paint or gouache.
Do not use aerosol, canned, enamel or other paints containing solvents. If the craft is going to be outside, then you can use facade paint, but only on a carefully primed surface, without chips or scratches.
Necessary tools
To make any form from foam plastic you will need:
- stationery knife;
- marking pencil;
- special glue;
- water-based paint or gouache;
- sponge or brush;
- ruler or tape measure.

The cutting tools you need depend on the thickness and density of the material.
Options for crafts for the site
For a vegetable garden or a garden, you can make figures from foam plastic. They will decorate paths between beds, flower beds or a recreation area.
Bird on a tree
To decorate trees on the site, you can make bird figures with your own hands. To do this, you need to draw a template on paper, and then transfer it to a sheet of foam. For a bird larger than 30 cm in length, thin material is not suitable. At least, the sheet thickness should be 1.5 cm. The figure is cut out with a sharp stationery knife.
This can be a flat drawing or a three-dimensional figure, if you cut out the wings and tail separately. Now all the parts are glued together. In order for the figure to decorate the tree as long as possible, the foam is primed in 3 layers. Each layer should dry well. After drying, they begin painting. They apply regular facade paint, and then varnish.
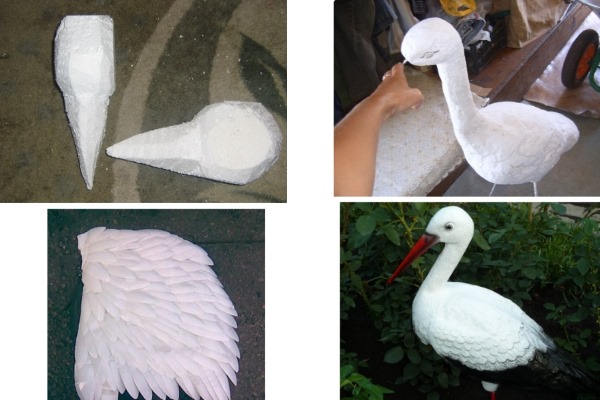
It will not be washed off by rain and will not harm the material, because it is protected from impact by a thick layer of primer. The dried figure is attached to the tree with wire or nails.
Frog
For the stencil, you can use the image of a cartoon character, for example, "The Traveling Frog". Fine-grained, dense foam plastic is suitable for the work. The drawing is transferred to the material and carefully cut out with a stationery knife. All irregularities and burrs are removed with sandpaper. Now you need to prime the workpiece and paint it.
After the paint dries, apply a layer of transparent varnish. It is convenient to use spray varnish. The main thing is that there are no untreated areas. To fix the frog to the ground, use thick wire. Carefully put the figure on one end, stick the other into the ground. If you want to place the craft on stones, near a pond, cement will do.
Crocodile
Styrofoam may not be the only material for creating DIY crafts.
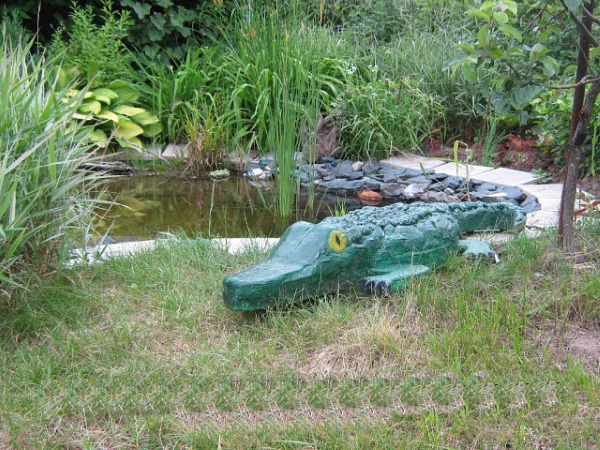
To make a large crocodile, you will need:
| Material | Quantity |
| Styrofoam | About 4 sheets 100x100 cm |
| Plastic bottles | 25-30 pcs. |
| Self-tapping screws | 100 pcs. |
| Cling film | 2 rolls |
| Scotch | 1 reel |
| Whatman | 1 pc. |
| Glue for foam plastic | 1 bottle |
| Stationery knife | 1 pc. |
| Scissors Paint in spray cans White paint Screwdriver | 1 pc.
2 cylinders of red and green color 100 ml 1 pc. |
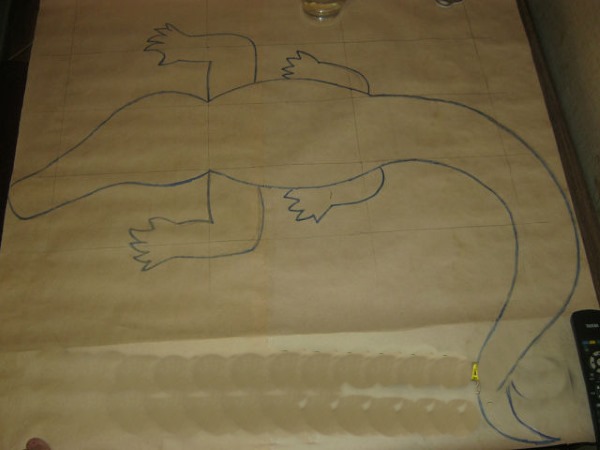
Draw a silhouette of a crocodile on a piece of Whatman paper. Make a base and frame out of polystyrene foam. Uneven material, like household appliances, of any density will do. The main thing is to cut out the body with the head, tail and paws. All parts are glued together. Then shape the polystyrene blank by sharpening it with a knife. It is necessary to clearly outline the eyes, nostrils and toes.
The workpiece is tightly covered with cling film and tape, if necessary. The film should cover the entire surface. This is done in order not to waste time on puttying and to protect the foam from the effects of spray paint. The base is ready, it remains to add small details.
To protect against abrasion, the entire belly of the crocodile is covered with plastic from bottles, which is attached with screws. The upper part is covered with plastic scales. Strips about 5 cm wide should be cut from the bottles and cut into teeth. The strips are attached with screws, starting from the tip of the tail.
The blanks must be placed on top of each other, and the teeth must be positioned so that each new row covers the gap between the previous teeth.
The crocodile's teeth are attached in a similar way, with screws. There should be wire on the belly below, with which you can fix the figure on the ground. Plastic is also inserted into the mouth.
A 5-liter bottle, without a bottom or a neck, cut lengthwise, will do for this. The eyes are made with plastic from the rounded parts of the bottles. After the scales have covered the entire body of the crocodile, you can paint it.
It is more convenient to apply paint from a spray can - there will be no smudges. The body is painted green, the open mouth is red. The teeth are painted separately with white paint, with a brush. When the craft dries, you can decorate the garden with it.
Decorative items for interior
DIY crafts made from polystyrene foam can serve as decoration and add zest to the interior.
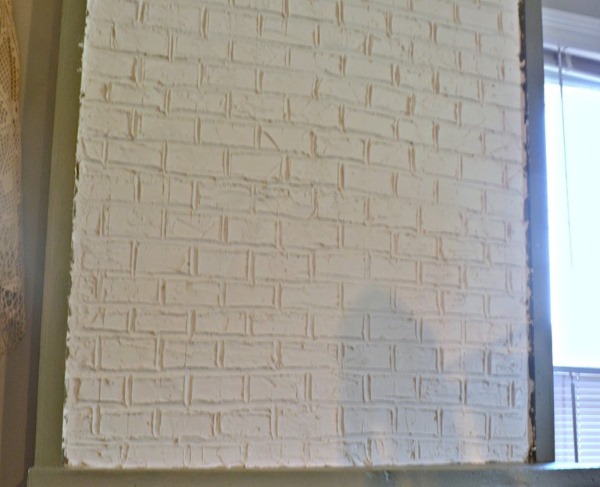
Imitation brick on the wall
A brick wall is a fashionable way to visually change the space in a room and add originality to the home environment. For this purpose, various panels are sold, both from solid materials and foam, and simple wallpaper with a suitable print. It will be cheaper to make foam bricks yourself.
To do this you need:
- stationery knife;
- sheets of foam plastic no more than 1.5 cm thick;
- pencil;
- ceiling tile adhesive;
- laser level.
Important note: the walls must be level.
If there are noticeable waves and pits on the surface, do not glue the brick. It will emphasize all the irregularities, they will become even more noticeable. For the convenience of cutting bricks, you can make a template out of cardboard, which is then simply traced on the foam, without making markings each time. Usually the size of decorative brick is 25x6 cm.
The first stage is cutting the bricks. When the required number is cut, you can add texture: cut the chamfer on all sides, make the surface rough. A metal brush can be useful here, press it on the brick and make grooves. You can also imitate pits and chips with a soldering iron.
Before gluing the brick, the walls must be treated as before painting. Remove old wallpaper, wash and degrease the surface. Use a laser level to mark the wall so that the rows of bricks are even. Start work from the lower right corner of the wall.
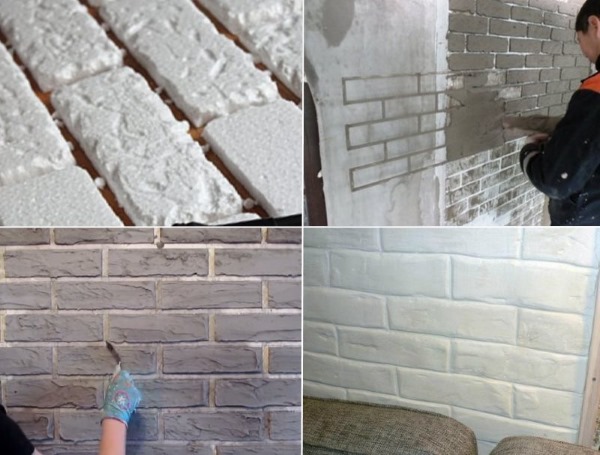
The seam between the bricks should not exceed 1 cm in width. When the wall is completely ready, the bricks need 24 hours to stick to the wall more tightly. After that, they are painted with water-based paint.
Letters for wall or shelf decoration
Foam plastic with a thickness of 1.5 cm or more is suitable. It is better to use equal sheets bought specifically for the craft in a hardware store. Using a ruler and a felt-tip pen, draw the outlines of the letters on the foam plastic. Then they are cut out with a stationery knife and all the unevenness is removed with sandpaper.
The basis for the letters is ready, its design is limited only by imagination. You can paint it with bright colors or stick rhinestones all over the surface. Such letters are decorated with artificial flowers. Store-bought flowers will do, or rather heads that have been cut off, leaving a piece of the stem. They are stuck into the foam.
You can make flowers from corrugated paper yourself. To make the letters glow in the dark, glue a regular Christmas tree garland to the edges, or an LED strip.
Frames for paintings and photographs
DIY crafts made from foam plastic are made not only from smooth sheets and material from boxes. Foam plastic ceiling plinths are suitable for creating a frame for photographs or paintings. They are already decorated with figured patterns or lines. This means that you do not have to invent anything new.
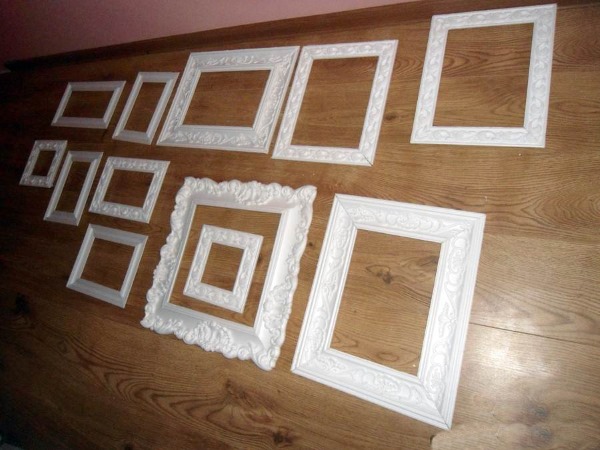
You only need to cut the plinth into 4 parts: 2 by width, 2 by height. Then carefully glue them together and attach them to the picture. You can decorate the walls with frames only, without photos.
Designers use this technique to create a contrast between the color of the wall and the frames. The frame can be filled with more than just a picture. The frame is glued to the wall, and several paper butterflies are placed inside, which are also attached to the wall.
Volumetric drawing on the wall
Flat figures are cut out of polystyrene foam and painted in different colors. They are used to decorate walls in apartments, for example, for the kitchen you can cut out several shapes in the form of muffins, buns, teapots and stick them on the wall above the table.
To decorate the living room, you can glue circles and rings of different diameters and colors to an empty wall.
In a child's room, you can decorate the headboard of the bed with foam letters, spelling out the child's name, or cut out his favorite cartoon characters.
Useful crafts for home
DIY crafts made from polystyrene foam can be not only decoration, but also quite functional things.
Bean bag chair
To make such a chair you will need:
- 2 types of fabric (for inner and outer cover);
- sewing machine;
- needles, threads, scissors;
- Styrofoam balls.

Foam balls are used to fill boxes with frameless furniture during transportation. You can buy them, or you can ask sellers in furniture stores. First, a pattern is made. Components: bottom and 6 wedges. An inner bag is sewn from thick fabric, where the balls are then poured. Do not tamp the filler too tightly.
The inner cover should change shape freely. Then sew the upper cover from a beautiful fabric that matches the color and texture of the room's interior. Here you need to sew in 2 zippers so that the cover is removable. When it gets dirty, just take it off and wash it. The chair turns out light and comfortable.
Casket
For the box, you can take foam boxes, which are used to pack mobile phones. In parcels from China, the goods are also packed in such boxes. They already have a lid, and there are no joints. The structure is solid and smooth. All that remains is to remove the unevenness with sandpaper and decorate.
Pincushion
This craft will be useful for families with small children.
To make a safe pincushion you will need:
- a small jar with a wide neck and a screw-on lid;
- foam glue;
- a piece of foam;
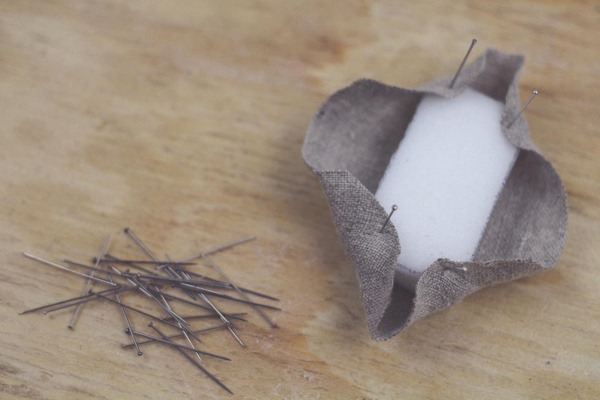
A round piece of foam is carefully glued to the inside of the lid, where the needles will be stuck and the lid will be screwed on. This way, the needles won't spill out and you can put small buttons in the jar. The main thing is to cut out a foam circle smaller than the diameter of the lid.
Crafts from foam plastic for kindergarten
DIY crafts from foam plastic are made together with children for creative competitions in kindergarten.
Fishes
To make the fish you will need:
- cardboard;
- stationery knife;
- glue;
- scissors;
- gouache and brushes;
- eyes for toys.
The outline of the future fish is cut out of cardboard. Small circles are cut out of thin foam plastic (ceiling tiles will do). They will play the role of scales. Fins and a head are cut out separately. The blanks are glued to cardboard, painted with gouache. Finally, eyes are glued on.
House
For the house you need:
- smooth foam;
- glue or toothpicks to hold the pieces together;
- paints;
- knife;
- pencil;
- ruler;
- cardboard.
Using a ruler, draw two side walls of the house on the foam. Then the front and back walls. For convenience, you can draw the walls with an angle where the roof will be attached later. You need 2 rectangles for the roof. When all the details are cut out, small details are worked out. You can squeeze grooves in the form of tiles on the roof.
A knitting needle or the back end of a brush will do for this. Windows and doors are cut out on the walls. The walls are glued together; toothpicks can be used if the foam thickness allows. They need to be stuck into the ends of the side walls up to halfway, and then carefully connected to the side walls. The structure is glued to the cardboard.
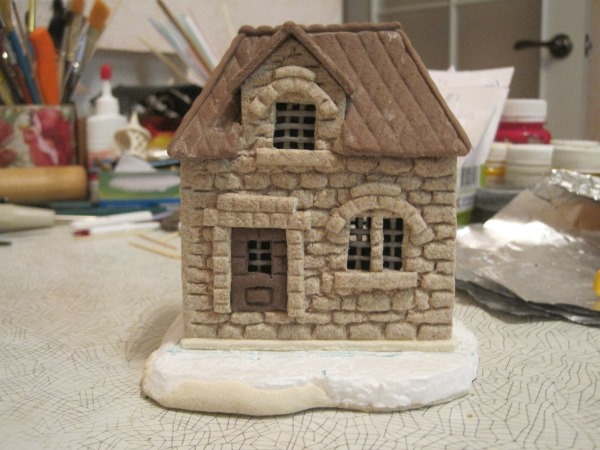
The bottom is decorated with cotton wool or moss. Shutters are cut out of the scraps and carefully glued to the sides of the windows. When the house is fully assembled, it is painted with bright colors.
Snow Queen's Castle
To assemble the castle, you need to cut identical cubes from foam plastic, approximately 2x2 cm. Cardboard is used for the base. You need to draw markings on the cardboard: a fence, towers and other details. The towers are assembled in a circle, foam plastic cubes are glued to the cardboard at the same distance. The gap should be at least 1 cm. The second row is made of "bricks", placing them not on top of each other, but shifting them.
The cube needs to be glued with its edges to the two lower ones, leaving an empty space in the middle.
So, row after row is laid out until the tower reaches 7-10 cm in height. Separately, in the same way, the upper part of the towers is assembled. It should be narrower than the bottom, so the rows are reduced by 1 cube. The upper part is carefully glued to the lower one. For the roof, take blue cardboard and make a cone out of it. Carefully glue it to the foam construction.
The fence is assembled in a similar way. It is not necessary to make it a perfect square; round "pillars" can be laid out in the corners. The courtyard inside is decorated with old cut DVDs and deer figures, which are also cut out of foam.
New Year's crafts
Before the New Year celebration, you need to stock up on polystyrene foam, because it makes good New Year decorations, both for the home and for the tree.
Christmas tree decorations
Round blanks, which are sold in craft stores, are perfect for making New Year's balls. One of the options for decorating such a ball is decorating it with shiny sequins. They are glued over the entire surface of the ball or pinned with safety pins.
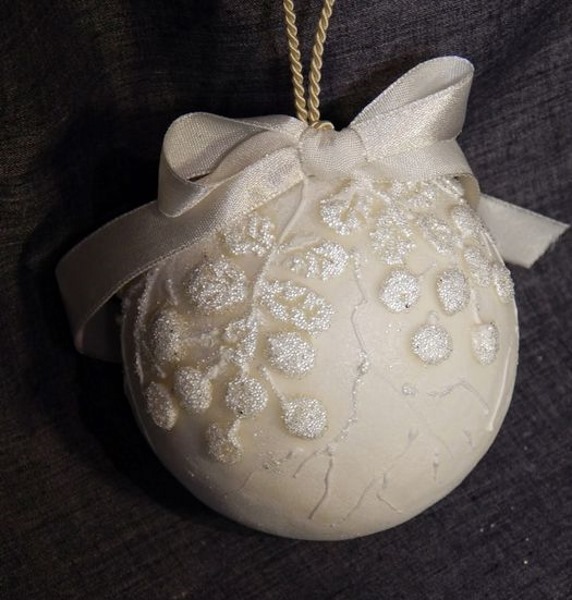
The round blank can be designed in different ways:
- paint in one color;
- paint with paints;
- coat with glue and sprinkle with glitter;
- use decoupage technique for decoration.
Some craftswomen also cut cotton swabs and stick them into the ball, after dipping them in paint or glitter.
Snowflakes
To make snowflakes, you need a ceiling tile. Draw the outlines on the back side, then cut them out with a sharp stationery knife. Make a hole closer to the edge, through which you thread fishing lines or glittering tinsel. The Christmas tree decoration is ready. Snowflakes made in the same way are glued to windows or walls using double-sided tape.
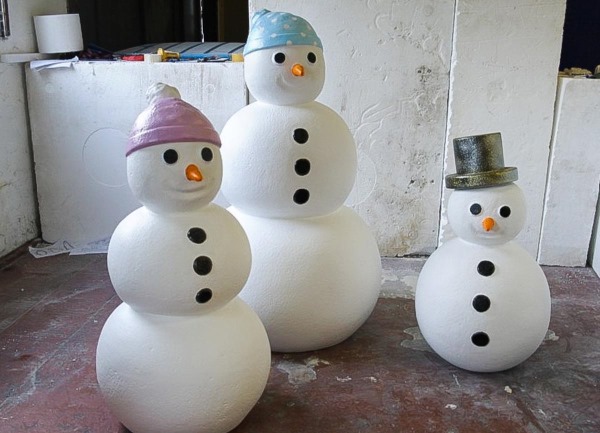
Snowman figure
To create a stable figure, you need foam plastic with a thickness of at least 5 cm. Draw the snowman's cone on it and cut it out with a sharp knife or electric jigsaw. Sandpaper is needed to remove all the unevenness. After careful sanding, the details are worked out. You need to draw the contours of the eyes, hat, buttons.
In the place where the nose should be, make a 2 cm deepening. From the scraps, with a stationery knife, carve a cone in the shape of a carrot. Glue is dripped into the deepening, and the "nose" is inserted. Now the figure is painted. The back side can be left untouched and invite guests, on New Year's Eve, to write memorable congratulations with colored markers.
Don't throw away scraps from crafts, they can also be useful. For example, when cutting out blanks for volumetric letters, the remains of foam plastic are crushed and become filler for a bean bag chair. The main thing is to show imagination and ingenuity, then you will be able to update the interior of your apartment and summer cottage with your own hands.
Article formatting: Anna Vinnitskaya
Video about fakes from foam plastic
Interesting ideas on what crafts you can make from foam plastic with your own hands:
https://youtu.be/8PfNZdHgKMQ
Original crafts... only photos are missing. It is not always possible to understand what is being done just by the description. I was interested in the Snow Queen's Castle, but there are no photos... too bad.