Bead weaving — is the art of creating various items, including keychains. In this process, it is important to follow certain principles that ensure the strength and durability of the finished product.
Schemes with description of works for beginners
First of all, you need to prepare the necessary materials, such as beads, wire, clasps. It is important to choose the right beads that match the design of the product. The wire for the base should be strong enough so that the finished product does not deform when used.
The clasp can be in the form of a carabiner or a ring, depending on the master's preferences. Next, the keychain design is developed. Here, various weaving patterns can be used, taking into account the shape and size of the future product.
When weaving, it is worth starting with the basic elements. This can be a simple knot or loop, on the basis of which the main part of the keychain will be woven. It is important to be careful and monitor the uniformity of the wire tension so that the product turns out symmetrical.
After completing the main part, you can move on to decorating the keychain with additional elements, such as beads, ribbons or rhinestones. Do not overload the product, otherwise it may lose its harmony and lightness.
To give the finished product a finished look, you can decorate the clasp. It can be decorated with beads or ribbon to match the keychain.
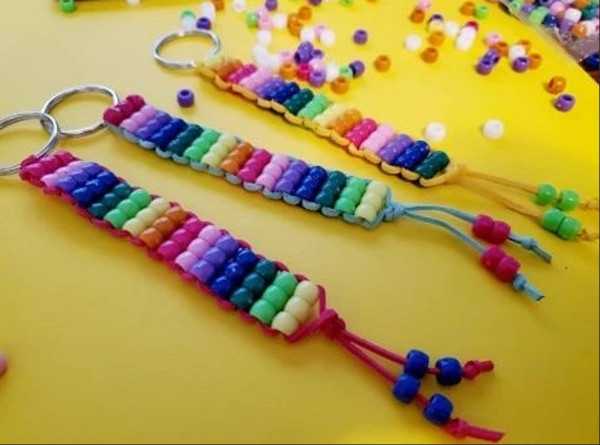
Simple striped keychain
A beaded keychain can be very simple, but at the same time bright and beautiful.
To create such decoration you will need the following materials and tools:
| Name of tools and materials | Brief description and features for the master class |
| Large beads | 8 flowers of the same shape and size. The colors are selected so that they harmoniously combine with each other and form a pleasing to the eye ornament. Do not choose too contrasting colors: alternating black and white stripes will create a visual effect of shimmer, while calmer color transitions will create an even, smooth weave. |
| Thin cord | It will be the basis of the keychain. It should be strong enough and hold its shape well. It is important that the cord is not too thick, otherwise, when weaving, you will get rough knots that will look untidy. |
| Scissors | for cutting cord and working with beads. When choosing them, it is important to pay attention to the quality of the metal and the sharpness of the blades. |
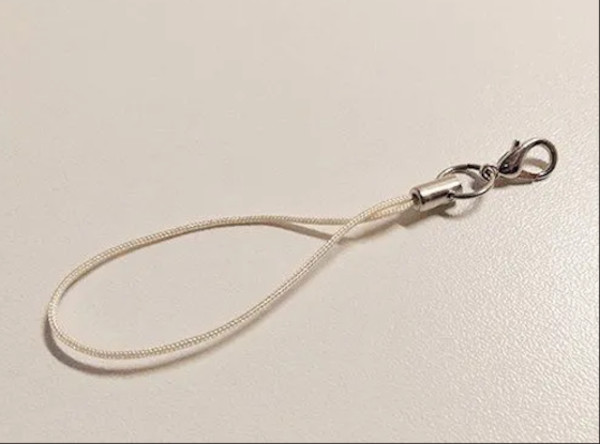
| Carabiner or key ring | Used instead of a lock. Attach it to one side of the finished product. Such a product is suitable for everyday use and will harmoniously complement the style. A special lock is also often used - it gives the product reliability and durability. |
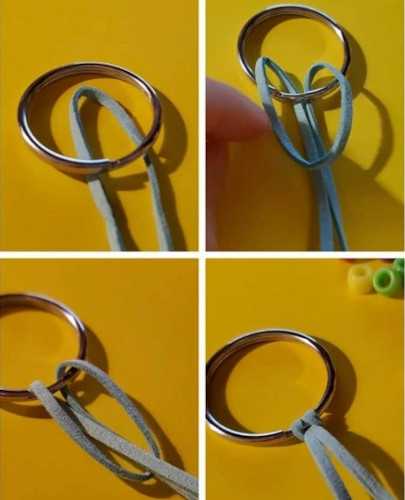
The process of making a keychain:
- Cut 100 cm of cord. Fold in half. Fasten the resulting loop to the key ring. This is the base of the keychain.
- Creating a pattern. On each end of the cord, string 3 beads of the same color. Thread another cord through them so that it goes in the opposite direction. Pull the ends tighter to securely fix the beads. It turns out that each end of the cord passes through 3 beads and comes out on their back side.
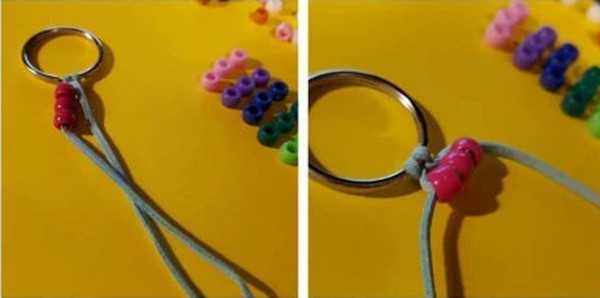
- String 3 more beads of a different color onto each cord, thread the 2nd cord through the back side of the beads. Tighten.
- Repeat the previous steps until the loop is covered with a row of beads. In each of them, it is recommended to change the colors of the beads and the direction of the 2nd cord, which is threaded into the finished rows. This cord should be pulled as tightly as possible - the strength of the finished product will depend on this.
- When all the rows are completed, tighten the cords again and tie them into a knot so that it is close to the last row of beads.
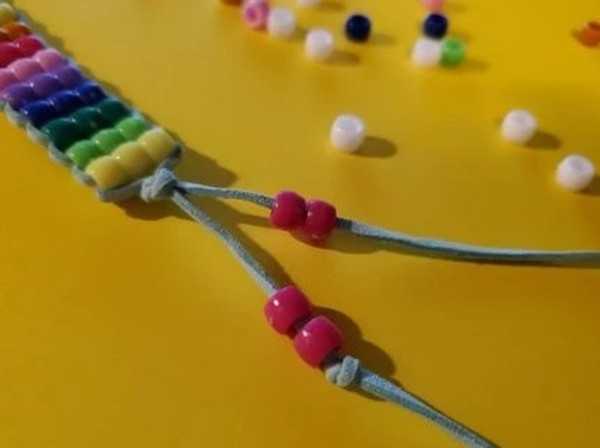
- Put 2 beads on each end of the braided cord, preferably of the same color that the product is already filled with. Tie knots under the beads and cut off the excess ends of the cord.
Orange slice
For the master class you will need tools and materials:
- Matte opaque beads of 2 colors: white, orange of the same shape. This will allow you to create a voluminous bracelet that conveys the shape and feel of an orange slice. Medium-sized beads will be convenient for beginners.
- Fishing line or monofilament is used to create the base and secure the product.
- Scissors are needed to trim the ends of the fishing line or monofilament after finishing the work.
- Beading needles help secure a row of beads when creating a keychain design.
- A carabiner or ring allows you to hang keys on the keychain.
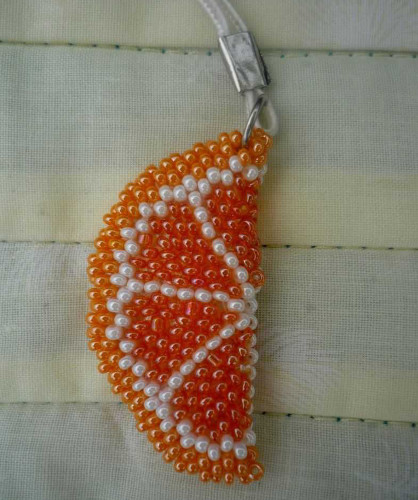
The beaded keychain "Orange Slice" can be woven as follows:
- Before starting work, prepare the necessary materials. Decide on the size of the slice.
- String 7 white beads onto the fishing line. Make a loop, connecting the threads through the last bead. This is the basis of the future "slice".
- 2nd row. Through 1 bead of the previous row, weave 1 orange bead in the new row. As a result, 1 bead is “suspended” on these 2 points. The technology requires attention and precision, you need to evenly distribute the stitches.
- 3rd row. Weave 1 white bead through the connection point of the previous row, repeating the initial weaving.
- 4th row. Weave in 2 orange beads.
- 5th row. Alternate 1 orange bead and 1 white one, as when weaving the initial rows. Performed in accordance with the described technology.
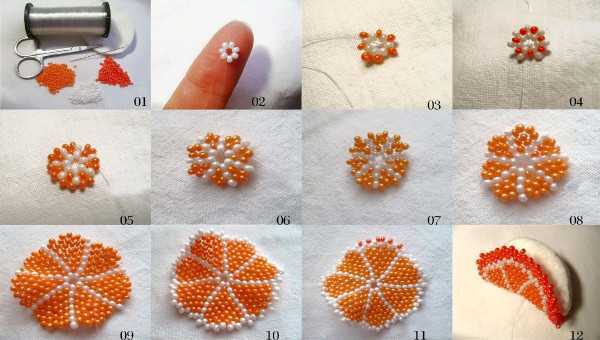
- Row 6. Weave in 1 orange bead.
- Row 7. Alternate 2 orange beads and 1 white one.
- Repeat the sequence of rows 7 and 8. The pattern is brought to the required size. Row 10: 4 orange beads are woven between the white beads. The number of orange beads can be changed to diversify the appearance of the slice, for example, insert 3 or 5 orange beads between the white ones. This step may differ from the previous and subsequent ones if you want to add variety.
- Add 2 white rows, placing them in a circle. This will give the product a finished look. Each new row begins and ends with a white bead.
- Add orange beads around the circumference of the piece.
- Secure the end of the fishing line. This will help hide it and give the product a finished look.
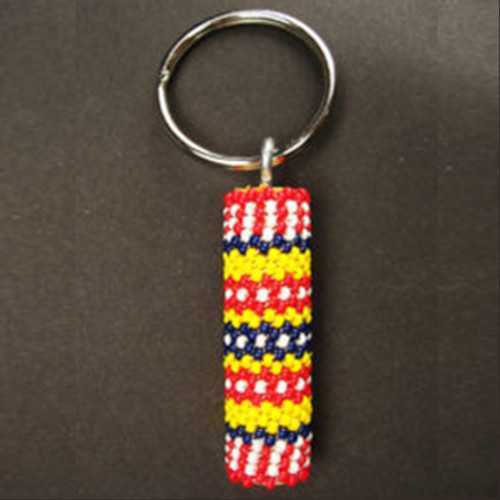
Peyote stitch
To create a keychain you will need several materials and tools:
- Empty spool of thread. This material will become the basis for the future keychain and will give it the necessary stability and strength.
- Beads of 4 colors: red, yellow, white and blue. It is recommended to use beads of the same shape and medium size. The color combination will allow you to create a bright and rich design of the keychain.
- Beading needles are necessary for making holes in the base and securing beads to it.
- Threads will be used to fasten the elements together. Pay attention to the strength of the threads and the ease of working with them.
- Eye screw and key ring will be used as pendants and fasteners for the keychain so that it can be worn, for example, on bags.
Step by step weaving process:
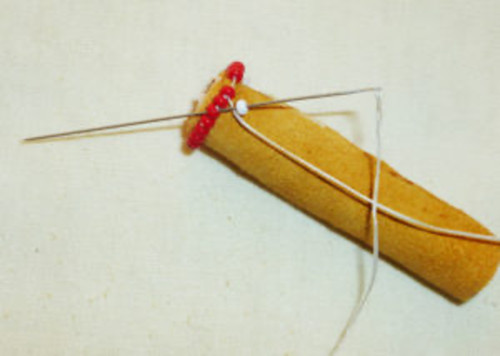
- Tie the thread around the spool.
- String an odd number of red beads onto the thread to form the 1st row. It should be enough to cover the entire circumference of the future keychain.
- Go into the 1st bead to complete the 1st row.
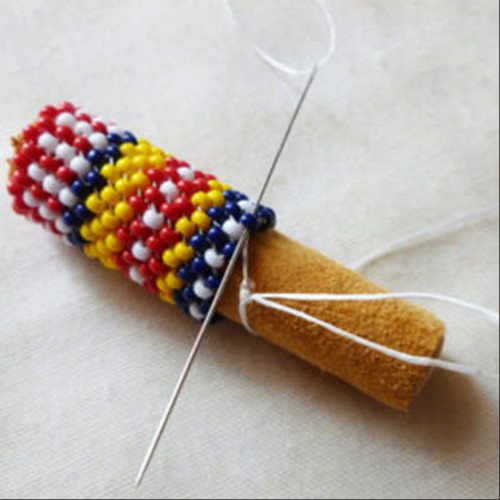
- For the 2nd row, alternate 1 element of red and 1 white bead. Put the red bead on the needle and pull it to the end of the thread.
- Pass the needle with the beads on it through the 2nd bead of the 1st row and through the 3rd bead of the 2nd row. This will create a peyote stitch at the intersection of 2 rows.
- Press the new bead firmly, gently pulling the thread. Monitor the density and uniformity of the weaving when creating each stitch.
- Weave all the remaining rows according to this principle, adding 1 bead per row and passing the thread through the corresponding ones of the previous row. Repeat the process until you have completed making a keychain of the desired length.
- To ensure the symmetry of the ornament relative to the center of the keychain, weave its lower part in the opposite direction. The outer beads in the first and second rows should match at the end of the weaving.
- Secure the remaining thread by tightly weaving it into the fabric and passing it through several beads. It is recommended to insert the thread into the beaded fabric, passing it through at least 10 beads. Cut off the remaining thread with scissors.
- To secure the keychain, tighten the eyelet screw that will serve as the base for the key ring or pendant. Attach the key ring to the eyelet of this screw.
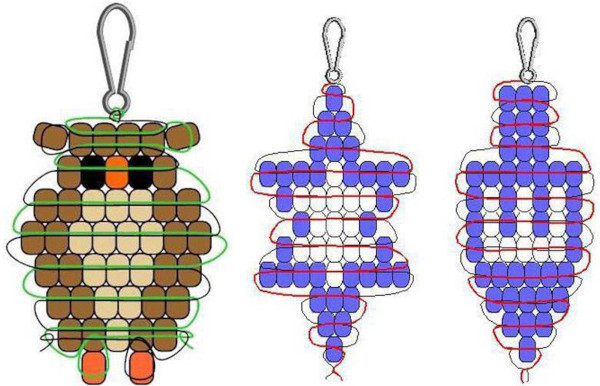
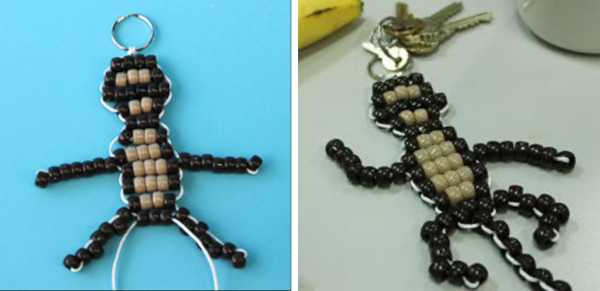
Monkey
The beaded keychain "Monkey" is created using the following materials and tools:
- Beads of 3 colors: brown, beige and black. All beads should be of the same shape, medium or large size.
- The thread for beading must be strong, capable of withstanding the weight of the beads.
- The beading needle differs from the usual one in that it has a sharper end.
- Scissors are a tool that allows you to cut the thread and remove its ends.
- Craft glue is used in this case to secure the monkey parts together.
- A carabiner or key ring is also needed since a pendant will be attached to the keychain.
To create this accessory, you need to follow a number of steps:
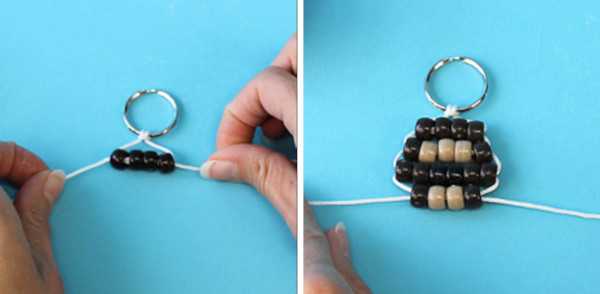
- Cut a 1.5 m long thread and make a knot. This will be the base of the keychain.
- String 4 brown beads onto the left thread, which will form the monkey's head.
- Pass the right thread through the beads from the other end.
- Tighten the strings to secure the head.
- 2nd row. On the left thread make a combination of beads: 1 brown, 3 beige and 1 brown. Duplicate points 3 and 4.
- On the 3rd row, add 2 brown, 2 black and 2 brown beads to the left thread. The black ones form the eyes. Turn the brown elements outward to make the ears.
- Row 4: Make 1 brown, 2 beige and 1 brown. Repeat combination of steps 3 and 4.
- Row 5: Add 3 brown beads. Repeat steps 3, 4.
- Row 6: Repeat the combination of elements made in step 7.
- Row 7. Similar to step 5.
- For the monkey's arms, string 7 brown beads onto the left thread.
- From left to right, pass the left thread through the first 6 beads.
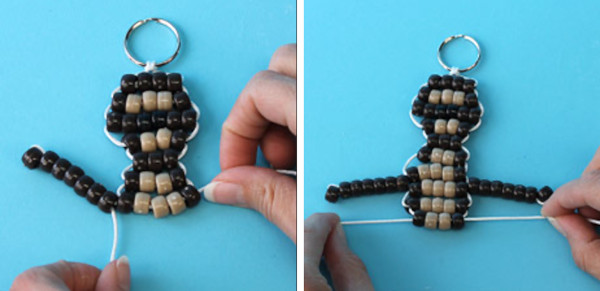
- Pull the thread tight.
- Repeat combinations from steps 11-13 to create the right hand.
- Duplicate point 2 twice.
- Repeat step 7.
- To create the left leg, repeat step 11. Pass the thread through the 2nd bead and the last 4.
- Pull the thread tight.
- To form the right leg, duplicate steps 17-18.
- On the left thread, string 3 brown beads onto the left thread, completing the row. Repeat the combination of actions from steps 3 and 4.
- For the tail, string 1 brown bead on the left thread, pass the right thread through it. Repeat the action 5 times.
- Tie the ends of the thread and cut off the tails.
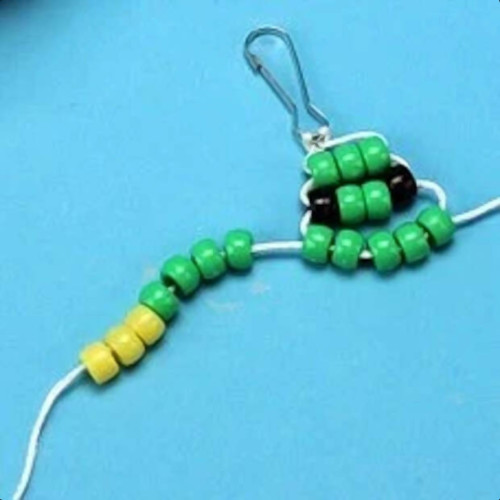
Frog
To create a stylish and bright frog keychain, you will need a few simple materials and tools:
- Beads of 3 colors: green, yellow, black. Should be the same size - medium or large.
- Thick thread about 1.5 m long, which can be transparent or used to match the color of green or black beads.
- PVA glue. The choice is due to its versatility and availability, as well as the ability to reliably hold the elements of the product without deformation or marks after drying.
- Quality scissors with well-sharpened blades will make working with the material much easier and ensure that all stages of weaving the keychain are carried out accurately.
- Carabiner or key ring are used to hang the keychain on your keys or bag. The carabiner will allow you to adjust and fix the length of the keychain, ensuring its comfortable and safe use. In addition, it will perform a decorative function.

The beaded Frog keychain can be made as follows:
- Cut a 150 cm long thread. Wet the ends with PVA glue and twist between your fingers. Let it dry. This will help secure the ends and prevent them from unwinding during the process of weaving the keychain.
- Fold the thread in half and secure it to the ring. Add 3 green beads to one end of the thread. Thread the 2nd end of the thread through them and tighten. This step forms the basis for the frog's body and head.
- For the 2nd row, string 1 black bead, 2 green beads and 1 black bead onto one end of the thread. Pass the 2nd end of the thread through all the beads in the opposite direction. Tighten. You will get a parallel row.
- Create the 3rd row from 5 green beads.
- To make the frog's front legs, string 4 green and 3 yellow beads onto the left end of the cord.
- Pass the end of the thread back through all 4 green beads. Tighten.
- Repeat on the other side.
- Finish the frog base with the 4th row of 5 green beads. They should be located parallel to the 3rd row.
- Create 2 rows of 6 green beads. These will be the frog's chest and abdomen. The result will be a frog's body with 2 pairs of legs.
- Make 1 row of 5 green beads.
- Make the back legs using the same principle as the front ones: use 5 green beads.
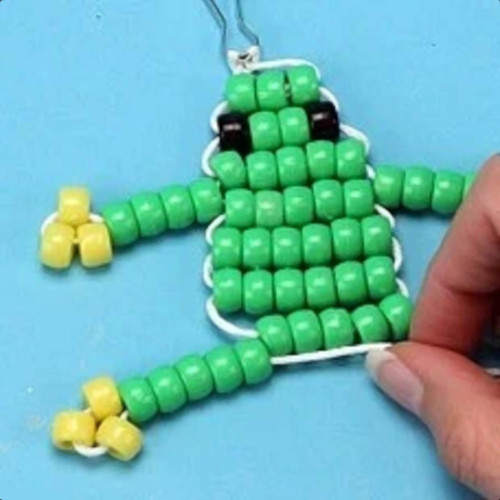
- Fasten the ends of the thread and hide them in the beads.
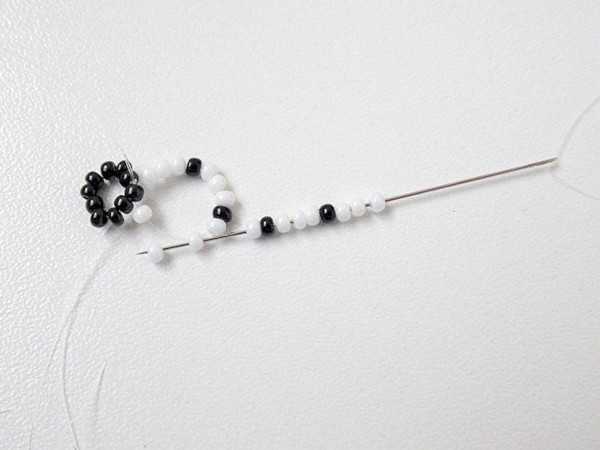
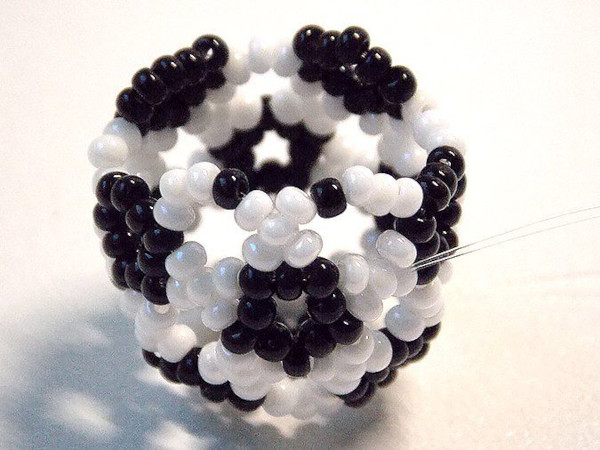
Openwork ball
The beaded keychain "Openwork Ball" will require a certain set of materials and tools:
- Beads. Two colors are used: black and white. The beads must have the same shape, and be the same size - medium or large.
- Monofilament. This is a thin fishing line or strong thread for beading.
- Scissors. A pointed tool for cutting materials such as monofilament or fishing line.
- Carabiner or key ring. This accessory is used to attach a keychain to your keys or bag.

Step by step detailed weaving process:
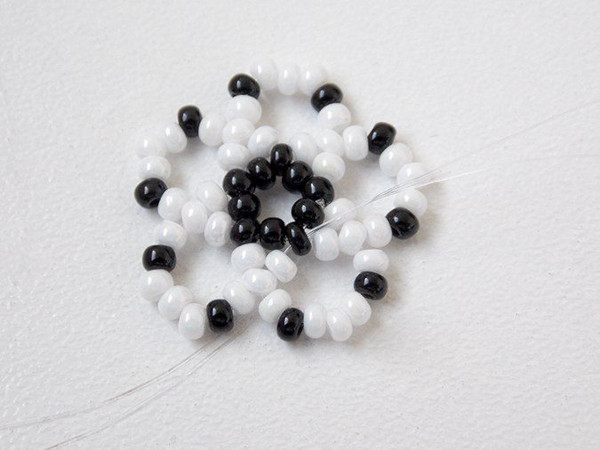
- Cut off a monofilament of approximately 1.6 m. Align the ends. Weaving is planned on a double monofilament, so the working length should not be less than 80 cm.
- String 10 black beads. Tie a knot, leaving a 5 cm end. Pass the thread through the initial bead.
- String 3 white, 1 black, 3 white, 1 black, 3 white. Pass through the black of the previous row, 2 of the current row.
- String 3 white, 1 black, 3 white, 1 black, 1 white.
- String 1 white. Pass through 3 adjacent beads of the current row, 1 of the previous one.
- String 3 white, 1 black, 3 white, 1 black, 1 white. Pass through the white of the previous row.
- String 1 white. Close into black of the current row.
- String 1 white. Pass through the white of the previous row.
- String 1 white, 1 black, 3 white, 1 black, 1 white. Pass through 1 white of the adjacent row.
- String 1 white. Pull. Exit from the nearest black.
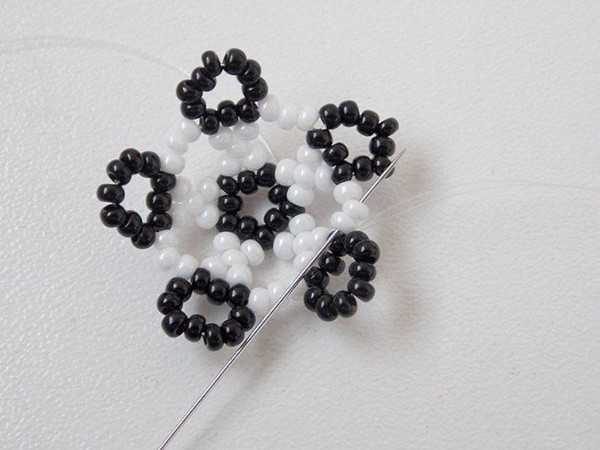
- String 7 black. Pass through 1 black.
- String 1 black. Close. Pass through 3 white and 1 black.
- String 1 black. Fasten.
- String 7 black. Pass through 3 adjacent black.
- Repeat the manipulations, creating a full row of black circles. Exit the white row.
- String 1 white. Pass through 1 bead of the black circle.
- String 3 white, 1 black, 3 white. Pass through 1 black of the adjacent black circle.
- String 1 white. Close. Exit from the nearest white.
- Repeat the steps, creating all the white circles in the row. Pass through 1 black, 2 white of the previous row. Pass through 1 white, 1 black, 2 white of the current row.
- String 1 white. Pass through the central black.
- Thread 1 white. Pass through 1 white.
- String 1 white, 1 black, 3 white, 1 black. Close.
- Bring the thread to the black edge.
- Repeat the steps, completing the entire row of circles. Exit from the nearest black one.
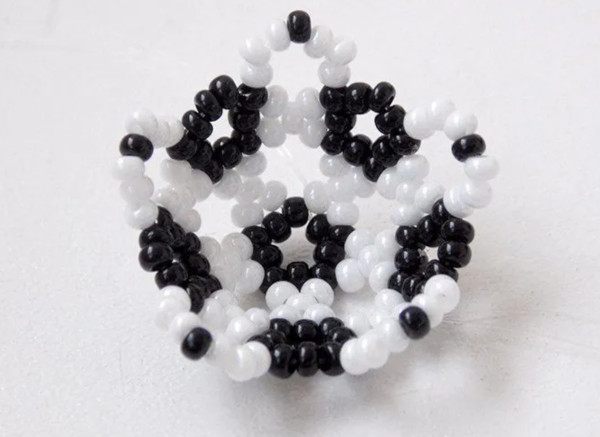
- String 1 black. Pass through the black of the previous row.
- String 5 black. Pass through 1 black.
- String on 1 more black. Close. Go through the beginning of the circle and 3 white.
- Repeat the manipulations, creating a full row of circles. Exit from the central white one.
- Thread 1 white. Pass through 1 black.
- String 3 white, 1 black, 3 white. Enter the black from the adjacent circle.
- String 1 white. Close. Go through the beginning of the circle: central white, 1st white, 1 black. Enter the black circle. Exit from the penultimate bead.
- String 1 white. Enter into white.
- Thread 1 white. Pass through black.
- String 3 white, 1 black, 3 white.
- String 1 white. Enter the beginning of the circle – into the black bead.
- Repeat 2 times. Exit from the central black.
- Thread 1 white. Pass through the center white.
- String 1 white. Enter the black of the next circle.
- Thread 1 white. Pass through the center white.
- String 1 white, 1 black, 1 white. Enter the central white of the opposite row.
- String 1 white. Pull up.
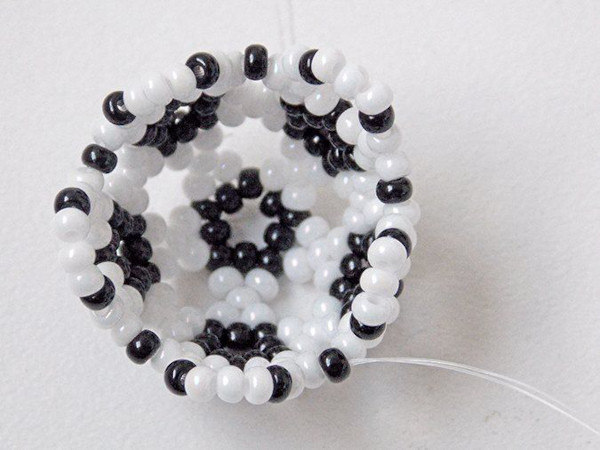
- Pull together all the black circles. Additionally, string 1 black bead between them.

- Tie a knot at the tail. Pass the ends of the thread through several beads.
- Insert the nylon thread into the cylinder, creating a loop. Burn the ends of the thread, otherwise it will unravel. Tie a knot. Insert the knot into the cylinder. Place a connecting ring in the hole, onto which a carabiner is put.
Bead weaving does not require any special skills or equipment. It is enough to show patience, accuracy and creativity. The finished keychains can become an original decoration or a gift to loved ones.
Video about beaded keychains
How to make a Corgi keychain from beads: