Folding colored paper strips is the basis of an entertaining activity called iris foldingDue to the availability of materials and simplicity, the technique is easy to master for small children and exciting for adults.
What is iris folding
Iris folding originated in the Netherlands. The handicraft technique involves folding colored strips of paper into a spiral. The applique is made using a template attached to the back of the cardboard base. Externally, the elements of the craft resemble a camera shutter.
In addition to paper, you can use strips of fabric. The picture will acquire a spectacular look, can be used in interior decoration or as a gift. Iris folding (for children, simpler templates are used) is a skill similar to meditation. Careful and patient gluing of colored strips of paper relaxes and distracts from everyday worries.
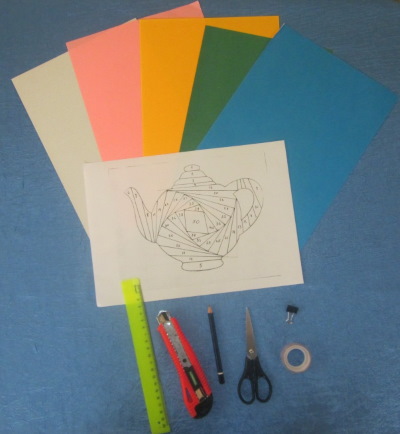
Tools and materials for working on crafts
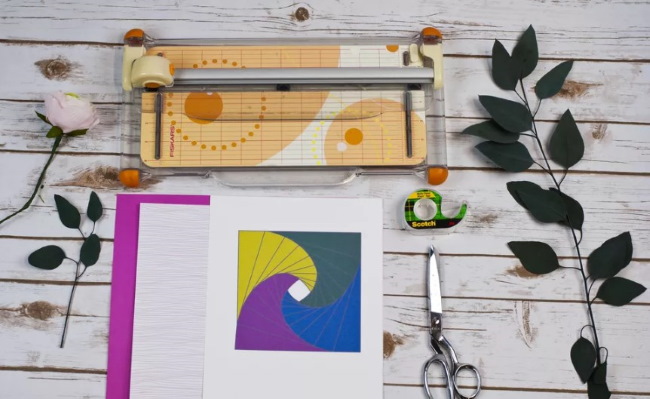
For work you need ordinary things that can be bought in any office supply store:
- colored paper;
- cardboard for the base;
- scissors;
- glue or office tape;
- pencil and ruler;
- paper clips;
- stationery knife;
- paper cutting base;
- decor.
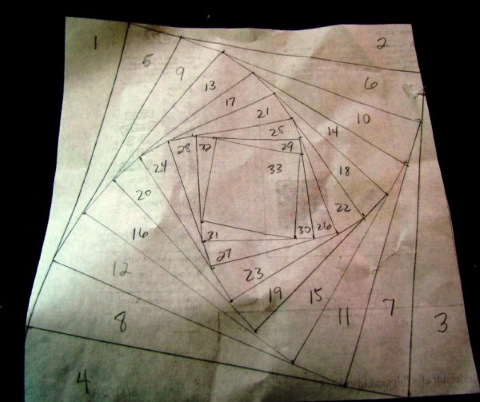
To create a craft, you will need a template. You can print it out or create it yourself. Even a beginner can make simple square and triangular templates. More complex templates – polygonal and filling patterns for complex drawings – are work for “advanced” craftsmen.
Master class for children
The master classes below can be used for children's creativity. As is known, children's applied activities contribute not only to the development of work skills and attentiveness, but also develop personal qualities and adaptation of children in society.
Making templates
Iris folding for children and adults is a creative activity based on the use of templates. The table below provides a description of how to independently create basic paper applique patterns.
| Template name | Construction order |
| Square |
|
| Triangular |
|
| Round |
|
Iris folding from paper
The most accessible type of craft is iris folding from paper strips.
All products correspond to the general scheme, only the design, its size and the design of the work with additional paper details or decor change.
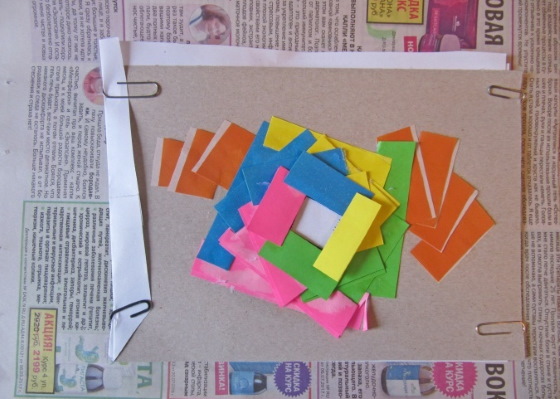
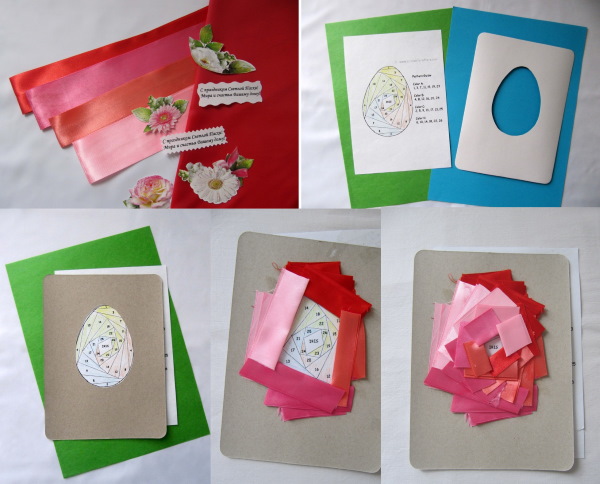
The order of work on creating a craft in the style of iris folding from paper:
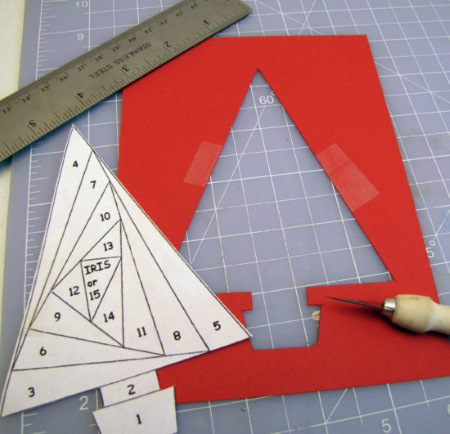
- Select a drawing, transfer it onto cardboard, and cut out along the outline.
- Turn the cardboard over. Place a template underneath it on the back (front side). It can be printed or drawn by hand.
- The template can be secured to the table with tape or, by folding the edge of the sheet with the template, you can secure it with paper clips to one edge of the cardboard.
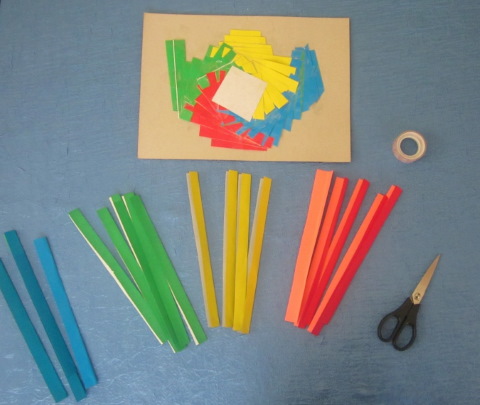
- Cut strips from colored paper. Crafts that combine harmonious colors that match in shade look beautiful. The width of the strip folded in half should correspond to the width of the template step. If the step is 1 cm, then the strip should be 2 cm.
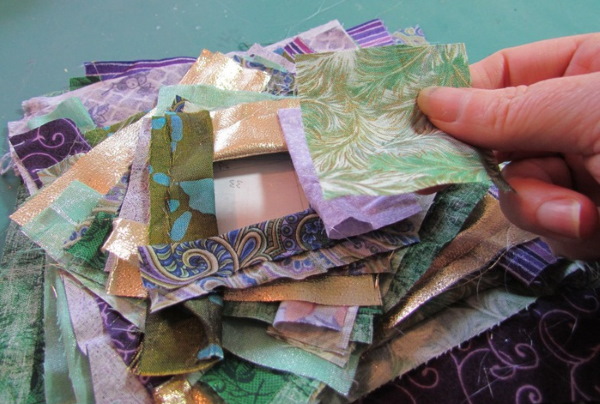
- Bend the strips in half and start pasting the template in a circle, starting from the outer edge to the center. Place the strips with the fold toward the middle, and apply glue to the short edges. You can fix the paper with tape.
- Also cover the middle square with colored paper.

- Remove the template from the cardboard, turn the base of the craft over. Glue the back side with cardboard or paper of the same size as the base.
- If necessary, add decorative elements or details made of colored paper to the front side.
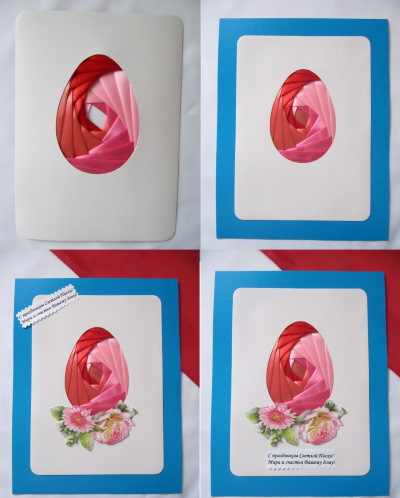
In this style, you can make a card by folding the cardboard in half and making an applique on the left half.
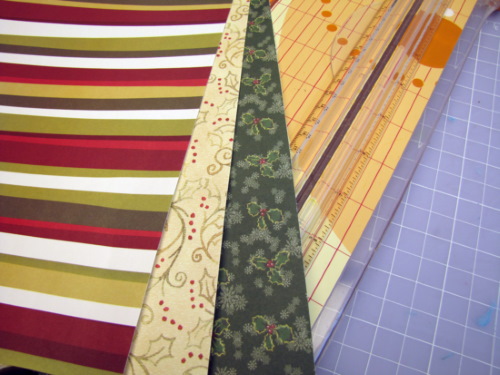
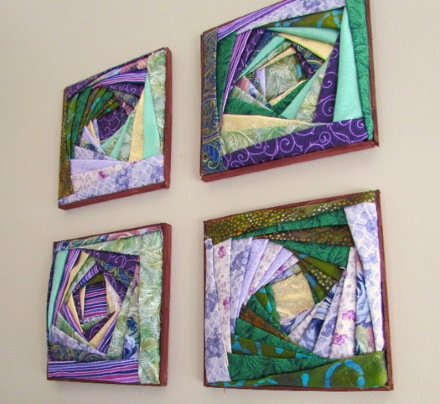
Made of fabric
Rainbow folding of fabric strips resembles patchwork. It looks noble if you choose beautiful fabric scraps. For work, take the same tools and materials as for paper iris folding, only replace the colored paper with fabric strips.
Work execution scheme:
- Make an outline of the image on the cardboard. To make the edges of the cardboard look even, you can glue colored paper over the surface of the cardboard and bend its edges inside the outline of the drawing. Fix the paper fold with glue on the inside.
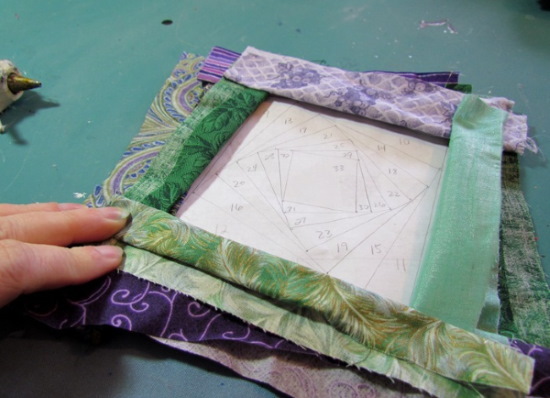
- The selected pattern (circle, triangle, square) is fixed firmly to the base using paper clips or tape.
- Cut strips from the fabric, fold them in half and iron them. Start gluing the fabric according to the pattern from the outer edge to the center.
- After finishing gluing the strips, glue the back side with cardboard.
When planning to make an interior item in the iris folding style, you need to take into account the following nuances:
- Choose dense fabrics with spectacular textures. Satin and velvet materials are good choices.
- If the fabric is thin, place paper or thin cardboard of the same size inside the strips.
- Do not tape the template to the base, this may damage the front side of the product. It is better to do this: glue the template to the table, put cardboard with a cut-out outline on top and also tape it to the table.
- If the finished product is planned to have a counter-clockwise spiral, then the template is constructed clockwise.
Ideas for beautiful crafts using rainbow folding technique
Iris folding, or rainbow folding, is an art accessible to children and adults. How to make beautiful crafts, cards and souvenirs is described below in master classes with step-by-step diagrams.
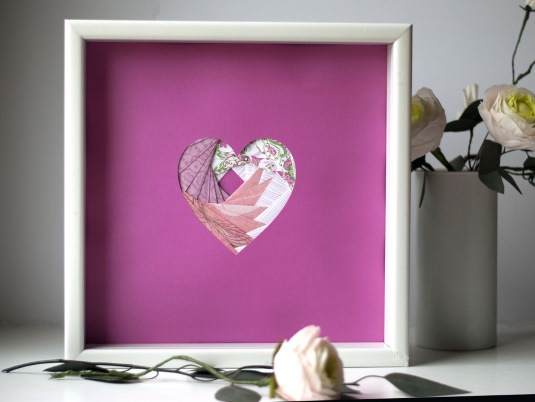
Heart
Using this technique, you can make a postcard, for example, for Valentine's Day, celebrated in February.
To work you will need:
- paper of different shades of red;
- triangular template;
- cardboard;
- a sheet of golden paper;
- hearts in the form of wooden decoration, in the form of rhinestones or cut out of paper;
- glue, tape;
- scissors.
The sequence of application:
- Transfer the heart image onto the cardboard and cut it out. If the work is done as a postcard, fold the cardboard in half and cut out the image on the left half.
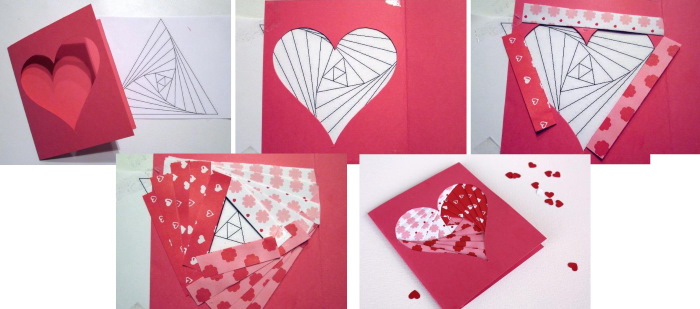
- Cover the front side of the cardboard with gold paper. Cut out a heart on the paper, 5-7 mm smaller than the one on the cardboard. Make cuts along the inner edge, fold the paper inside the cardboard blank and glue it with glue on the back side.
- Draw or print a triangular template with a step of 1 cm. Secure it to the base with paper clips.
- Cut 2 cm wide strips from paper. Fold them in half.
- Start laying out the pattern from the outer edges in a spiral, moving towards the center. Consistently alternate 3 shades.
- Cover the inner square with any color.
- Remove the template from the base. Cover the back side with cardboard covered with gold paper.
- On the front side, using glue, attach the heart-shaped decoration.
Kettle
This applique can be made from paper or fabric. There are options when the spout and handle of the teapot are glued as additional paper parts to the front side of the craft, or are made in the style of iris folding.
To make individual elements in the applique idea, you should transfer the drawing to cardboard, but do not cut out the spout, handle and lid. Cut them out of colored paper and glue them to the front side of the base. Then the work is done according to the usual scheme.
To create a stylish teapot inlaid with an artificial gemstone, you will need:
- Printable teapot design and square template.
- Paper in mustard, white, dark grey and burgundy colours with prints.
- Cardboard.
- Square rhinestone in a metal frame – 1 pc.
- Scissors, glue, tape.
Progress of work:
- Cover the cardboard with burgundy paper.
- Cut out the outline of the teapot on cardboard, excluding the handle, spout and lid. Cut these elements out of mustard-colored paper and glue them to the cardboard in the appropriate places.
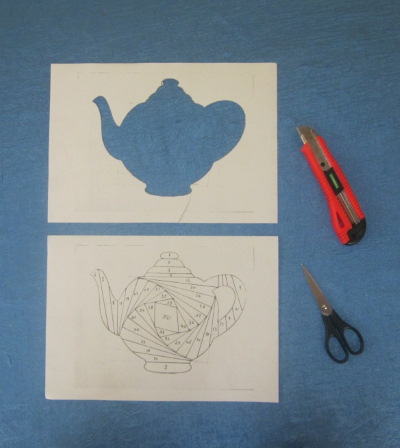
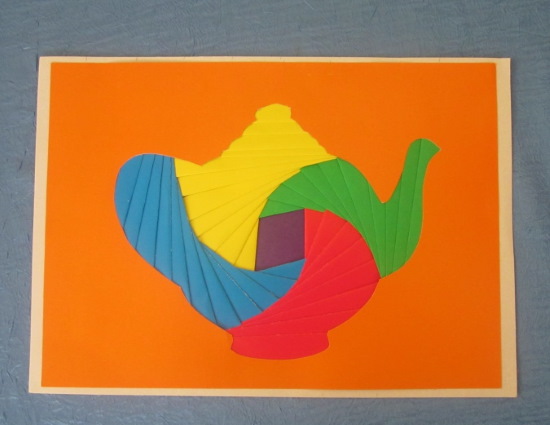
- Use paper clips to secure the template to the base.
- Strips cut from colored paper should be glued in a spiral in the following order: mustard, burgundy, white, black.
- Cover the central square with white paper with a black pattern.
- Remove the template. Glue the acrylic stone to the central square on the front side.
Animalistics
Iris folding (simplified images are suitable for children) in the form of animal images can have complex fillings. But any creative person can do them if you print out a ready-made scheme.
Often, ready-made templates are numbered and letters indicate different colors. If you slowly glue the strips according to the numerical and letter designations, you can create an impressive work. For children's creativity, schematic images of animals, birds and insects and standard templates are used.

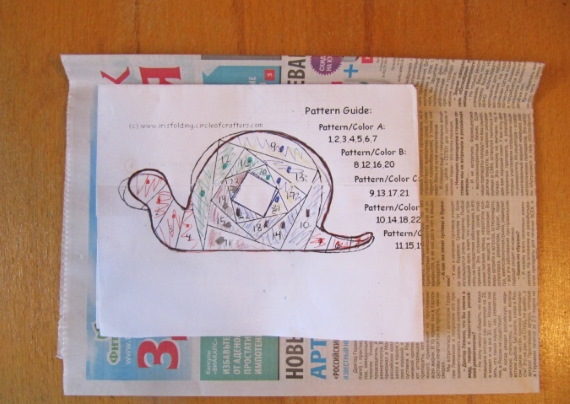

Examples of bright works for children:
- Snail. The snail's body is made as an applique on cardboard, the shell is made in the style of rainbow folding on a square template. Bright color combinations are used in the work. The front side is decorated with stickers in the form of flowers, butterflies and the sun.
- Fish. The outline of the fish is completely transferred to cardboard and cut out. The work is carried out according to the square template scheme. Contrasting colors are used for the applique, alternating them in a circle (1 row - red, 2 row - golden).
- Elephant. For older children, you can print out a ready-made scheme, which is more complex than usual. The work will take more time, but the result is worth it. For creativity, use paper in blue shades. The center can be decorated with a beautiful picture in Indian style.
Floristics
Similar to the animalist, patterns for children's crafts should be made in a simplified form. Most children do not have perseverance, and they will not be able to spend a long time on the craft. For preschoolers, it is recommended to prepare cardboard with a cut-out outline and colored stripes in advance.
What can you do with children in the Iris folding style:
- Tree leaf. It can be done in an autumn or summer style, using the corresponding paper colors. Suitable templates would be a square and a triangle. For a maple leaf, you can print out a pentagon pattern. Primary school children can make a craft in the form of a branch with several leaves.
- Flower with stem and leaves. For younger children, the leaves can be made as an applique, and schoolchildren can be asked to perform all the elements using the rainbow folding technique. For the bud, use any templates and colors, and the leaves can be made using a simple parallel overlap of stripes.
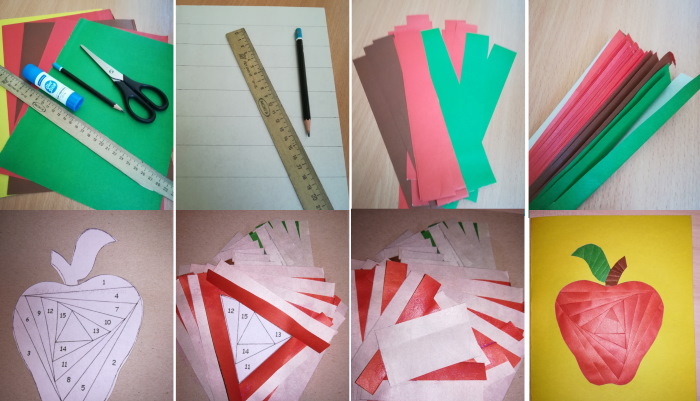
- Apple. The pattern is suitable for small children. The square or triangle templates correspond to the outline of the apple. The work uses bright paper colors and various textures, such as velvet or satin. The work is decorated with paper flowers and butterflies.
Toys
Any kid would be happy to make his favorite toy out of paper: a car, a doll, a teddy bear, and hang such a picture on the wall of his room.

To do this, you need to prepare the materials:
- drawing of a favorite toy;
- a template that matches the contour of the image;
- paper, the same color as the toy;
- decorative stickers to decorate the picture;
- frame.
Method of preparation:
- Take some colored cardboard or cover it with pretty paper.
- Draw the outline and cut it out.
- Cut colored strips from paper that, when folded, correspond to the width of the template step.
- Attach the template to the cardboard and start gluing the strips.
- After gluing the colored paper, remove the template and decorate the front side of the picture with decorative elements.
- Insert the picture into the frame.
Postcards
Hand-made postcards are more fashionable than ever.
You can prepare a gift in the style of rainbow folding for any event: birthday, International Women's Day, Defender of the Fatherland Day, New Year, Christmas, Valentine's Day and Easter.
To make a postcard, you need to take into account some nuances:
- For the postcard, use thinner cardboard or special thick craft paper.
- Select the size of the image to match the size of half of the folded sheet of cardboard, leaving space along the outline for gluing the paper to hide the back side of the work.
- If the colored paper filling is large enough to cover it, you can use a sheet of the same size, glued with double-sided foam tape.
- For postcards, it is appropriate to use decorative paper with prints and different textures.
- When decorating a postcard, use additional decoration of the outlines with metallic markers and acrylic paints.
- Rhinestones, beads and other decorations can be glued using double-sided tape.
- To create a presentable look, trim the edges of the card with decorative scissors.
Postcard design options:
- Easter Bunny Postcard. It is made on thick craft paper, with a light blue rectangle glued to the front side. The outline of the rabbit is filled in according to a square template, with beige paper with a floral print.
The middle square is covered with blue holographic paper. On the left side, two narrow strips of corrugated paper with small bows are glued for decoration. A bow is made of the same paper on the rabbit's neck.
- Postcard "Ladybug". You can make this option as a birthday present. The craft is made in contrasting combinations of red and black colors. Black paper with a small polka dot pattern is glued to the front side of the card.
In the middle, there is an applique of a ladybug on a square template with alternating black and red spirals. The inner square is also made in red and black. Small black circles are glued to the red spiral. The head and antennae of the beetle are made as an applique. The postcard is decorated with an inscription on a red rectangle glued to double-sided foam tape.
- Postcard "Christmas bell". It is made in delicate colors on white mother-of-pearl paper. The bell figure should be filled with strips of printed wrapping paper in Christmas shades. The ring and tongue of the bell are made of silver paper. The edges of the card are pasted over with the same color. Silver and gold stars are used as decoration.
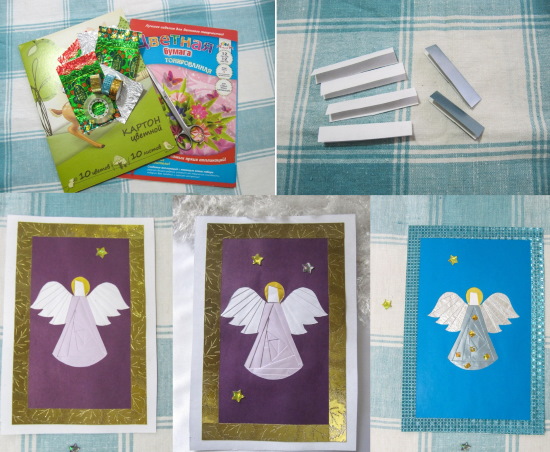
New Year gifts and decorations
Iris folding for children in the form of Christmas tree decorations is another fun activity. A Christmas tree decorated with toys created by children will bring them double joy.
To do this, it is enough to cut out figures of different shapes on cardboard, the size of a Christmas tree decoration, lay them out with colored and shiny stripes in different combinations, glue the back with another sheet of cardboard and cut out the toys along the contour, leaving an edge of 5 - 7 mm, glue a loop of thin tape.
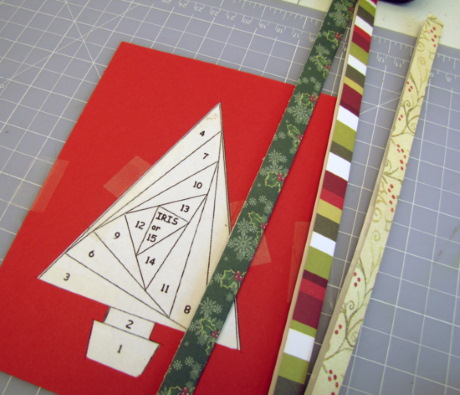
Rainbow folding can be used to make gifts. For example, you can create a Christmas tree-shaped panel from gold and green fabric scraps.
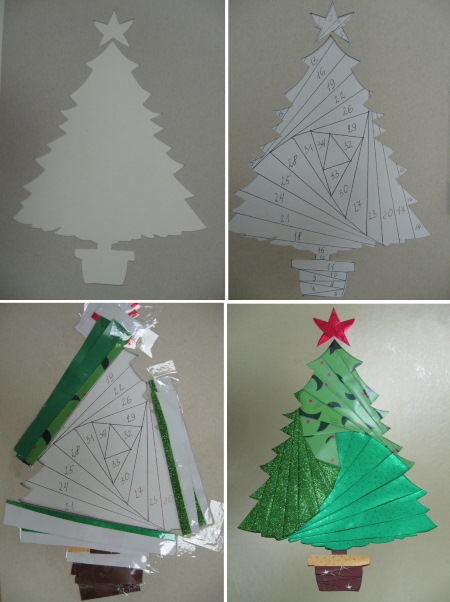
For work you will need the following materials:
- A cardboard base decorated with glitter and artificial snow with a cut-out outline of a Christmas tree. The size can be different, from A4 to A3.
- Stripes of fabric in gold, green and green-gold colours.
- Cardboard for fabric reinforcement.
- Silver braid.
- Triangular shape template.
- Glue, tape, scissors;
- A frame of the required size (depending on the size of the craft).
- Decor in the form of deer, gift boxes, bows and bells.
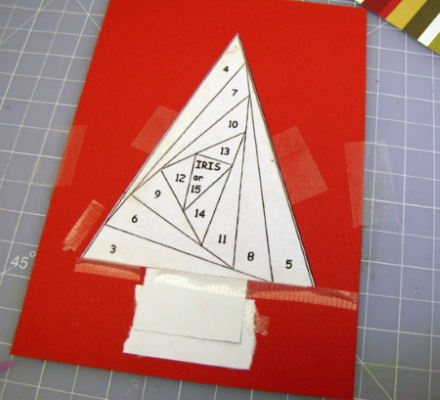
Instructions for implementation:
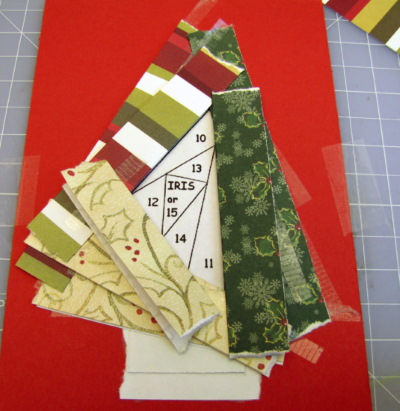
- You need to attach the template to the base and lay out the strips of fabric in a spiral, alternating colors in a circle. The result should be spirals of 3 colors.
- Make the central square from gold fabric and decorate it with glitter or rhinestones.
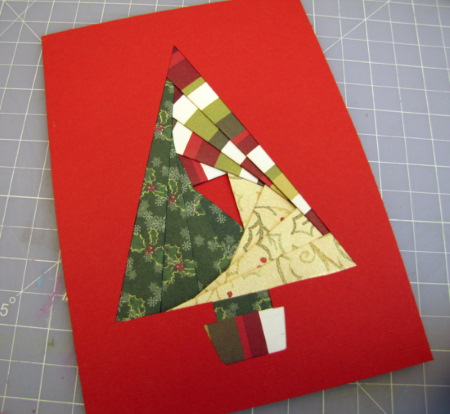
- Cover the back side with a sheet of paper.
- Glue the deer decoration onto the front side. Glue the star onto the top of the tree. Place gift boxes and bows underneath.
- Decorate the edges of the painting with braid.
- Place the panel in a frame without glass.
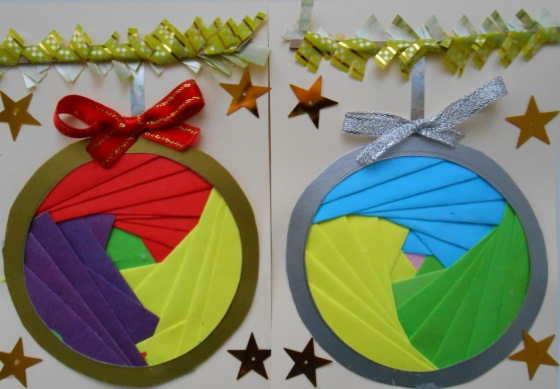
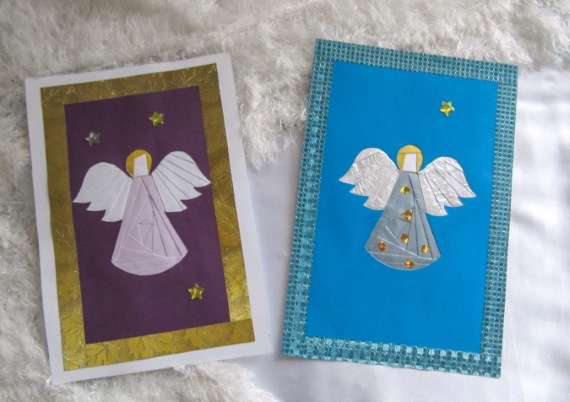
Children can make cards in the iris folding style with thematic images: Christmas tree decorations, gift boxes, a Christmas angel, a snowflake, a bell, a boot, a symbol of the New Year in the form of an animal.
Crafts in the style of iris folding are interesting for both children and adults. Having taught the child the basic techniques of execution, he will quickly master them and soon learn to create creative gifts himself.
Video about iris folding technique
Iris folding for children: