Good old plasticine will help you decide what useful and interesting things to do with your child. Making animals from plasticine is a pleasant pastime that will benefit children's development. Think up with your child what kind of animal you want to make and get to work.
How to choose the right plasticine
Psychologists claim that working with plasticine has a positive effect on a child's development. These activities have a positive effect on thinking, improve memory and attention. They also develop fine motor skills of the hands, as a result of which the child learns speech faster and uses imagination during creative games.
To make the work process productive and enjoyable, parents need to choose the right plasticine.
It should be purchased in accordance with the child’s age and the purpose of using the plasticine.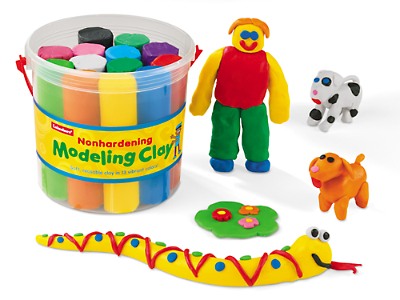
Modern manufacturers have created new types of plasticine:
- you can boil it and get an eraser;
- plasticine that changes color when exposed to sunlight;
- the modeling material is similar to a rubber bouncy ball;
- fluorescent plastic;
- plasticine as a magnet.
For modeling animals, it is better to choose two types of plasticine: soft (it is more convenient to use for drawing) and hard (it will produce hard figures).
When choosing plasticine, it is necessary to take into account some criteria:
- plasticine should not be brittle and stick to the skin;
- it needs to be flexible and easy to soften with children's fingers;
- greasy colored stains do not remain after using good quality plasticine;
- it is necessary to choose plant-based products (traditionally, the composition includes clay powder with the addition of wax, petroleum jelly, and fatty components);
- Chemicals such as thickeners and solvents, as well as artificial colors and flavors, should be avoided;
- plasticine based on latex, gluten and petroleum products causes allergies in children;
- high-quality plasticine with no pungent odor, acidic colors, it is pleasant to the touch.
What you will need for work
To make the sculpting process enjoyable and painless, you need to have all the necessary tools and components at hand.
In addition, it is necessary to choose a comfortable place for such work:
- it should be sufficiently illuminated, preferably so that the light, as when writing, falls from the left side, or if the child is left-handed, then from the right;
- The height of the chair and desk should correspond to the child's height.
- If you work together, with your baby on your lap, make sure you are both comfortable.
- The hands should have enough free space for any manipulations with plasticine; the more free space for hand movements in the creative process, the better.
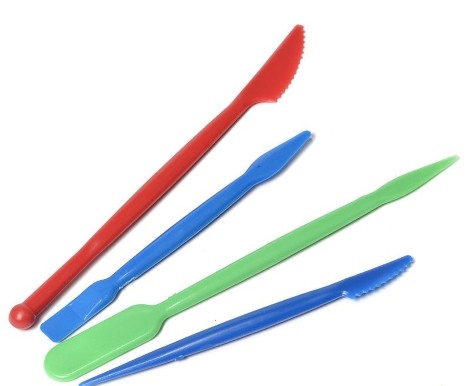
For the process of modeling animals from plasticine, children will need:
- Plasticine set.
- Special board for modeling.
- Several blank sheets of A4 paper.
- A special stick - a stack, for more comfortable use of plasticine.
- Pictures of an animal, or step-by-step instructions before your eyes.
- Wet wipes or a bowl of warm water and a towel to clean your hands.
Modeling with plasticine: getting started
If a child encounters this material for the first time, first you need to introduce the baby to the properties of plasticine, show how to interact with it, what can come out of it. Depending on age, a child can hold attention on the same thing for different amounts of time. For the first time, the optimal time for modeling or getting to know the material will be 10-20 minutes.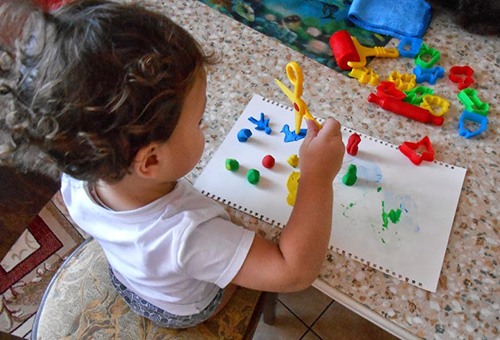
To arouse and maintain interest, it is better to finish the process a little earlier, when the child experiences positive emotions and is fascinated by the activity, than later, when he is no longer interested and is tired. After all, in this case, the child will be left with an unpleasant aftertaste, and the process of this creative, enjoyable activity itself will be associated with fatigue and boredom.
Show your child the following manipulations with plasticine, and then suggest repeat them independently under your supervision and readiness to come to the rescue if necessary:
- Warm up the plasticine in your hands and demonstrate that it then becomes softer and more pliable, making it easier to work with.
- Remember it in your hands, roll it into a ball, flatten it, connect different colors together, tear parts of one color into different components, put together different figures consisting of one and several colors.
- Show that plasticine sticks to hands and that it needs to be washed off after work with water or at least a damp cloth. Demonstrate that if you take a dry cloth or a sheet of paper with such a hand, for example, they will stick. Explain that to prevent this from happening, it is necessary to wash off the remains of plasticine from the skin.
- Invite your child to do the same manipulations under your supervision.
What animals can you make from plasticine with your own hands
In fact, you can choose any animal from plasticine, even an imaginary one, if you have enough imagination, diligence, time and, of course, plasticine. To make the manufacturing process easier, the best option would be a step-by-step instruction in front of your eyes, especially if each new stage is described with detailed instructions and shown in a separate photo.
Animals made of plasticine for children are an entertaining modeling option that will captivate both parents and children.
In addition, it will help develop the child's fine motor skills, while simultaneously engaging his cognitive, learning processes, because while making this or that animal, the child will simultaneously study how this animal is structured. Choose the animal, bird, fish you like and start making.
Plasticine Zoo How to Make Any Animal in 15 Minutes
There is nothing complicated about modeling plasticine animals. It is enough to mold the first few figures, then your hand will get the hang of it, and the process will go much faster. A good helper in modeling with plasticine together with a child can be the book by Marya Novatskaya "Plasticine Zoo: How to mold any animal in 15 minutes".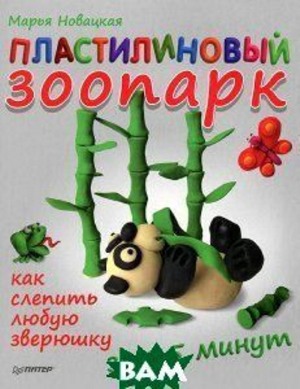
The book presents sixteen animals from different continents, which a child could see with his own eyes when visiting a real zoo with his parents or on an excursion. Delighted by learning something new, a child will, of course, want to meet the animals he saw again, and parents can give him such an opportunity by creating his own zoo from plasticine at home.
Unlike the real prototype, in the home zoo there are no cages and restrictions on feeding or petting animals, the baby can play with animals and study them absolutely freely, which will give a range of positive emotions and captivate for a long time.
Plasticine Pets
If your child loves and adores an animal that lives in your home, then he will definitely be delighted with the idea of sculpting his favorite from plasticine. In addition, for children, the creative process itself is much more important than the result. With a little practice, you can sculpt any animal from plasticine: a cat, a dog, a mouse, a chicken, a goose, a goat, a cow, a pig, any animal that lives near you.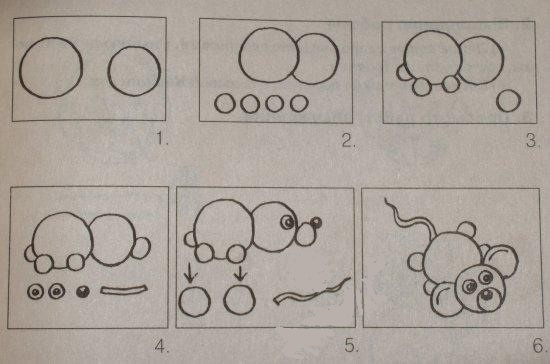
How to sculpt a mouse:
- Warm the plasticine in your hands.
- Roll 2 medium sized balls for the body and head.
- Next, roll 4 small paw-shaped balls and connect the pieces together.
- Make a ball-shaped protrusion on the muzzle, a small ball-shaped nose, 2 ear-shaped discs by flattening 2 rolled balls.
- Make eyes by connecting 2 small balls with 2 smaller balls.
- Connect the eyes, ears, protrusion and nose to the entire structure.
- Roll up the tail rope and attach it to the body.
- The mouse is ready.
Master class on making a cat
A cat is an animal that walks by itself, which does not prevent such a freedom-loving creature from being a favorite of most children. Offer your child to make a cat out of plasticine, he will definitely like this activity.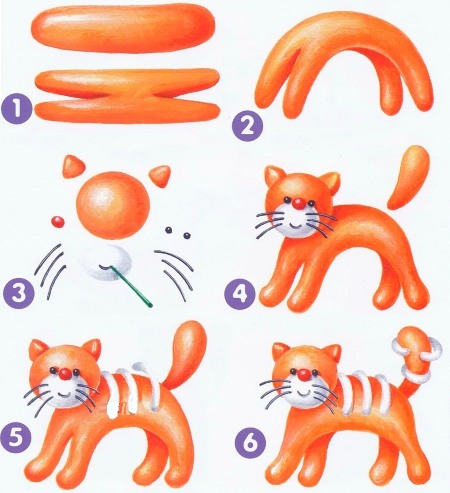
Execution:
- Warm up the plasticine (of different chosen colours) in your hands until it becomes soft.
- Roll out the oval body and use a stack to separate the ends of the oval into 4 legs, as shown in the picture.
- Bend the resulting figure so that it stands on its paws.
- Roll a ball for the muzzle, roll a round protrusion for the muzzle from a different color, a small ball for the nose and 2 balls for eyes also of a different color, triangles for the ears and 6 thin sausages for the whiskers. Connect all the head parts one by one.
- Connect the head and body, draw a mouth on the muzzle using a stack.
- Roll a sausage-shaped tail, thickening towards the end, and attach it to the cat's body.
- Make 5 sausage strips and attach 3 to the cat's back and 2 to the tail.
- The cat is ready!
How to sculpt ponies and horses from plasticine
Execution:
- Heat up the plasticine and roll it into a ball.
- Divide into 2 equal parts and roll into a long sausage.
- Now divide each of them into 6 parts. It is important that they are approximately equal.
- Let's make the head. To do this, roll out a small oval from one sausage, and make a nose and jaws stretched forward from it, leaving the back of the head more massive.
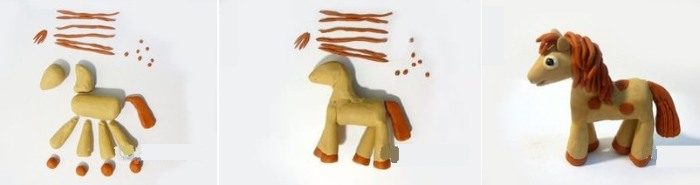
- From the first and second cylinders we sculpt a neck in the shape of a crescent.
- We connect 4 sausages into one body.
- From the remaining 4 sausages we make legs, thinner ones closer to the body and thicker ones towards the floor. We mold hooves from small pieces of plasticine of a different color.
- We firmly connect all parts of the horse together.
- We sculpt the ears, tail and mane, using circles of black and white plasticine we make the eyes, and cut out the nostrils with a stack.
- We attach the finished parts to the horse.
- We put the horse on a board, bend its legs as if it were walking. Using a stack, we make stripes on the mane and tail, or we make these parts from separate strips.
Wild animals made of plasticine
Children are naturally inquisitive and eager to explore the world around them, and their attention will surely be drawn not only to the animals that you see every day around you, but also to representatives of the wild. Modeling with plasticine will help satisfy the need for knowledge and brighten up the evening. Model whatever your heart desires: a tiger, a lion, or a giraffe.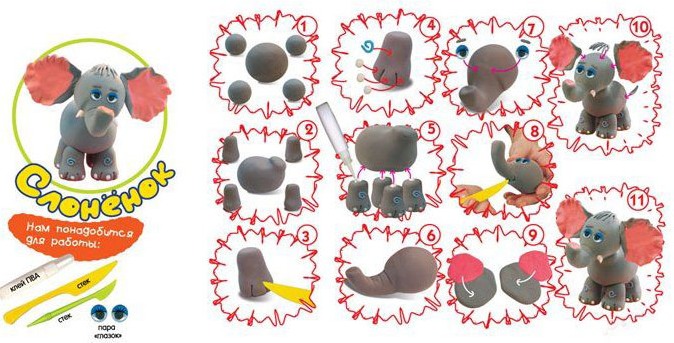
The big elephant will require the most plasticine!
Lion from plasticine. Step-by-step modeling lesson
The king of all animals, the plasticine lion is a great opportunity for children to stretch their fingers with a creative activity.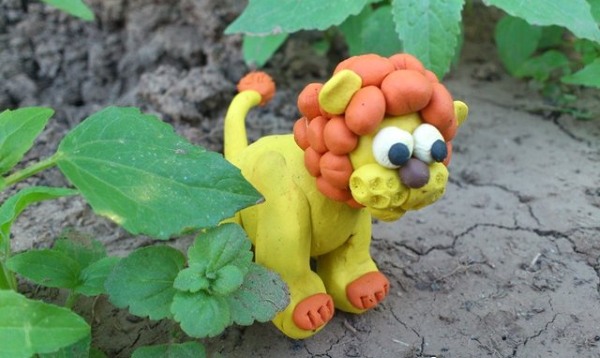
To make a lion you will need the following:
- Choose 3 pieces of plasticine of different colors from which the lion will be made. For example, brown, yellow and orange will do.
- Make an oval body out of yellow.
- Using the same color, mold 4 legs and connect them to the body.
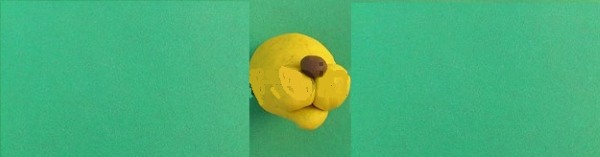
- Start sculpting the head: make it slightly oblong. From two small yellow balls, form and stick on the cheeks. From a small brown ball, make and attach the nose.
- Make the lion's eyes by attaching brown or black pupils to the white eyeballs.
- Form an orange mane from small balls, gluing them around the lion cub's muzzle. Fill the entire back of the lion's head with mane balls.
- To connect the head to the body, take a match and put the finished head on one end, and stick the other end into the body so that the match is firmly stuck in it.
- Make a tail for the lion cub, attaching an orange tassel to its tip. Also make orange tips for the lion cub's paws with three or four dashed fingers.
- Make round ears for the lion from yellow plasticine.
- The lion is ready!
Plasticine sea animals
Plasticine sea animals are a great way for children to learn about underwater creatures. 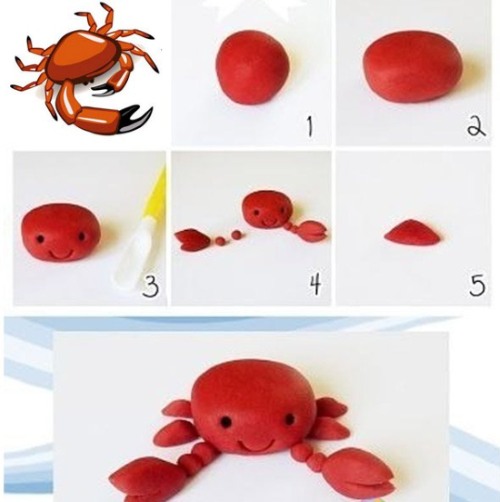 The aquatic world is diverse and interesting: not only fish live there, but also octopuses, seals, crayfish, turtles and dolphins.
Sculpting an Octopus: Step-by-Step Instructions
To mold an octopus, you need to follow the step-by-step instructions:
- Form a circle and several long sausage-like legs of the same color for the octopus' body.

- Glue round tentacles of a different color onto the legs, drawing check marks on them with a pencil to make them more similar to a real octopus.
- Make the octopus' eyes from white eye sockets and black pupils.
- The octopus is ready! You can put some small object in his hand to complete the image, for example, a toy chest or a bottle.
How to make a hedgehog from plasticine
It's quite easy to make a cute hedgehog:
- Roll a ball out of brown or grey plasticine, making a muzzle.
- Separately mold the ears, eyes, and tip of the nose. Connect the parts.
- Simulate needles on the body by stretching the plasticine with your fingers.
- You can also use seeds for needles.
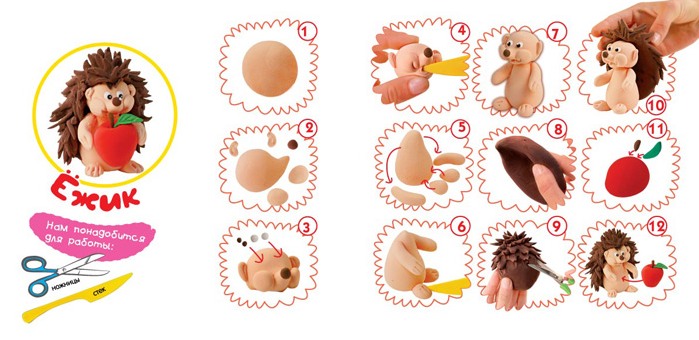
The older the child, the more complex and detailed the hedgehog will be.
Making a plasticine turtle
To make a turtle, just follow these 5 steps:
- Form a circle from a piece of plasticine, divided in half.
- Shape and attach a round head with an elongated neck of a different color to it.
- Use the same color to make the paws and tail.
- Add sea pebbles or plasticine circles to the turtle shell.
- Make her eyes and mouth from a pink arc.
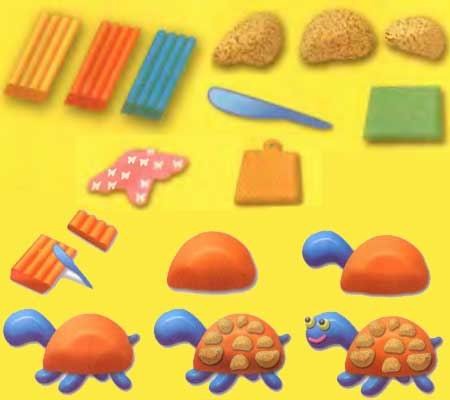
And to make it look like the real thing, you can decorate its shell with small shells instead of plasticine parts.
Peppa Pig from plasticine
Often children are fascinated not only by real animals, but also by cartoon characters. A reason to tear themselves away from the screen can be an offer to make their favorite character with their own hands from plasticine.
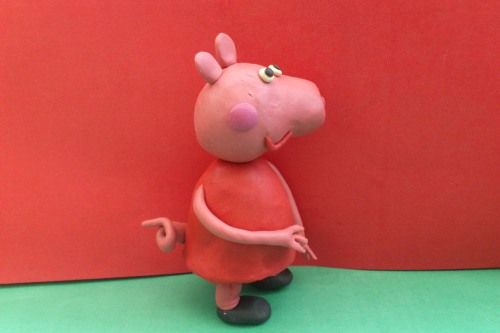
To create Peppa Pig you need to do the following:
- Make 2 balls: pink and red.
- Form the hem of the dress by placing the red ball on the board and pulling out the flat side with your fingers.
- Make a small hole on top.
- Draw a wide nose into the pink balloon and glue the eyes on top.
- Make the snout and mouth using thin red plasticine beads.
- Attach the ears to the top of the head.
- Connect the head to the body.
- Make the arms and attach them to the body.
Snake: step-by-step modeling
Execution:
- Select a piece of plasticine to work with and roll it into a ball.
- Place it on the board and press it down with your palm. Start rolling the ball into a sausage shape, the same length along the entire length, but leave the head more dense and round.
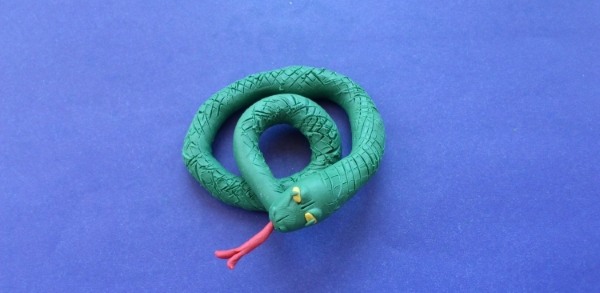
- Make eyes for the snake and use a stack to shape the nostrils.
- Scratch the snake's back with the drain, thus creating scales.
- To complete the look, attach a long tongue that forks at the end to the snake's head.
- To make the snake look natural, bend its body as you wish.
Basic secrets and techniques for working with plasticine
Plasticine is not tricky in its use, but still, there are several secrets that will serve you well when working with it:
- Before you begin, make sure you have all the necessary ingredients on hand, including warm water or wet wipes to clean your hands. This will also help prevent different colors from mixing together when sculpting from different pieces of plasticine.
- Having chosen to sculpt a particular plasticine animal, find a photo of what the final result should look like and step-by-step detailed instructions.
- Warm up the plasticine in your hands before sculpting – this will make it softer and more pliable.
- When you are finished working, be sure to separate the different colors, as the plasticine is warm from your hands, and in the box it will harden and it will be difficult to separate it from another color without tearing a separate piece.
There are many options for what kind of animal you can make out of plasticine with your children.
The main thing is that everyone enjoys the process: both the parent and the child. To do this, you should ask the child who exactly he would like to mold and give him a choice, for example, by showing different pictures of finished crafts. Such a free and exciting creative process will bring joy and benefit to all its participants.
Video: Animals from plasticine for children
Simon the Cat from Plasticine, Master Class:
How to mold a caterpillar from plasticine, watch the video: