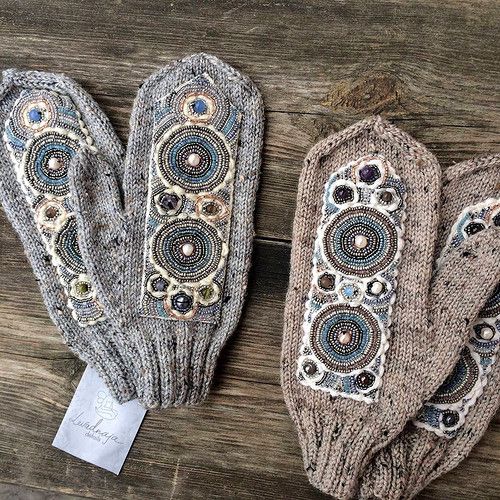
Hand embroidery on mittens for beginners is relevant when they want to make warm things stylish, unique and beautiful. Most often, they choose patterns in the form of snowflakes, spruce, New Year's toys, animals, fairy-tale characters or plants.
Necessary tools and materials
Embroidery on mittens is done on different materials; beginners are recommended to use ready-made mittens or gloves, mittens. The technique is determined in advance. This can be satin stitch embroidery, stitches and short seams. Knots are also used.
In some examples, embroidery techniques are combined to create a striking and unique pattern. The main motif is embroidered with thicker threads, while secondary details are embroidered with thin floss or marked with beads and beads.
It is also taken into account that embroidery adds volume to the finished product, so the mittens will not turn out too flat. Ready-made patterns are used or they are made independently, taking into account the symmetry of the patterns on 2 mittens.
They embroider using different materials.
| What you will need | How to choose |
| Threads | Cotton or wool. They try to choose threads that will match the finished knitted product in shade and texture. Woolen ones give additional volume to the product. |
| Ribbons | It is used when it is planned to add elements in the form of flowers to the embroidery. |
| Felt, felt, synthetic padding | They are used as a basis for the design and additional volume of embroidery. They try to choose a material that matches the color of the threads. If thick threads are chosen and additional volume is needed for embroidery, a layer of foam rubber is added. |
| Beads, sequins | Choose a material without shiny coating and paint, otherwise the paint will come off after snow or during friction. Products with bead or sequin embroidery are recommended to be cleaned with dry cleaning or dry cleaning. |
Schemes with description of works for beginners
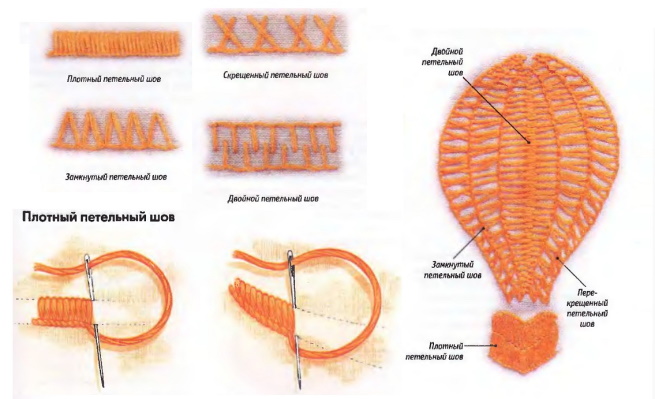
Embroidery on mittens for beginners can be done in any technique. It can be satin stitch, loop stitches, cross stitch. Also used are satin stitches, satin stitch with overlay, etc.
Recommendations for beginning craftswomen:
- If you want the threads to stand out against the background of the knit stitches of the mittens, use a satin stitch or a spread stitch.
- If you choose the cross stitch technique, the mittens should be knitted closely and evenly, and openwork knitting should be excluded.
- Loop embroidery is used to create a basic embroidery pattern. This method is suitable for beginners and those who do not know how to create a pattern while knitting a product.
- Beads, beads or rhinestones are used in any technique, adding beads to the threads.
- Embroidery patterns are either ready-made or created independently. Ready-made patterns are also combined.
Crosswise
Cross stitch on knitted items is done on canvas, which is placed under the item for convenience so that the embroidery pattern does not shift. It is more convenient to work with this technique on items made from felt or fleece, since the pattern lies more evenly.
 |  |
It is not recommended to use water-soluble canvas, especially if you are working with felt gloves. You can choose any pattern scheme at your discretion - a ready-made one from the Internet or one you have created yourself.
The following tools will be required for this process:
- mittens;
- rare canvas;
- embroidery needles;
- floss threads.
The embroidery is done in the following order:
- Using small stitches, sew the canvas to the mittens in the part where you are going to do the embroidery.
- The pattern from the diagram is calculated for each cell of the canvas and embroidered, focusing on the drawing. When they start cutting the threads, they do this only on the back side, especially if they are working with threads of the same shade.
- When the embroidery is finished, the canvas is taken out from under the embroidery, pulling it out thread by thread. It is recommended to start removing threads from the transverse stripes, then proceed to the longitudinal ones.
Satin stitch with ribbons
This pattern is recommended to be done on mittens with a face knit, so that the embroidery pattern is laid evenly and stands out on the base of the product. The colors of the floss can be changed to any others, if desired, as well as the composition of the sketch, taking it as a basis.
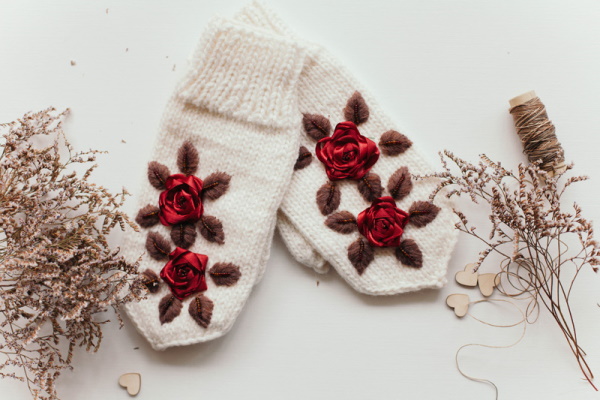
The process uses:
- white mittens;
- floss threads (brown color);
- satin ribbons (burgundy color);
- felt (to match the color of the floss);
- embroidery needles.
 |  |
 |  |
 | |
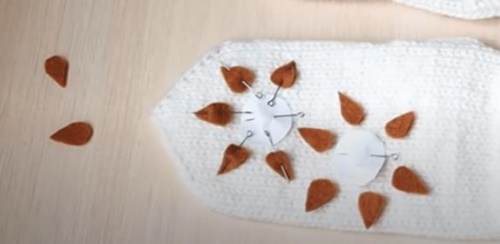
Embroider in the following order:
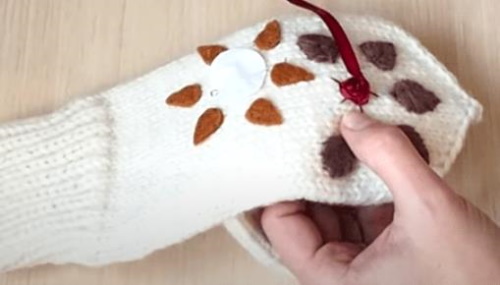
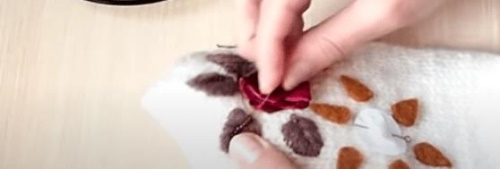
- On the mitten, mark the center of the flower with a paper circle. Cut out 9-10 petals from felt and place them around the marked cores. Attach the petals and core with pins.
- Each sheet is stitched from the center to the edges so tightly to each other that the felt layer is completely covered. The stitches are arranged in 2 rows from the middle, since beads or beads are sewn on there.
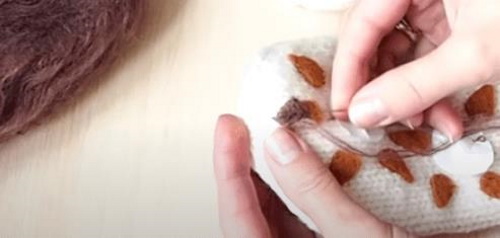
- From the center, mark the base of the flower with large stitches. Make 5 stitches to which the ribbons will be attached.
- Hook the ribbon onto the threads, skipping one each time to create the appearance of a petal. Move from the center to the edges.
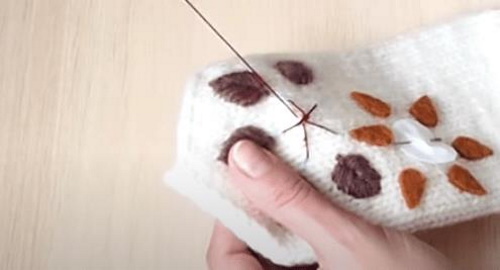
- The middle of each leaf is embroidered with a line of beads. Several beads or beads decorate the rose petals.
- Repeat the pattern on the second mitten, maintaining symmetry.
With woolen threads
Embroidery on mittens for beginners using woolen threads requires taking into account some nuances.
 |  |  |
 |  |  |
This:
- the pattern from woolen threads is more voluminous than with other types of threads;
- when working, do not unwind long threads so that they do not get tangled;
- Additional volume is achieved by placing a layer of synthetic padding under the embroidery.
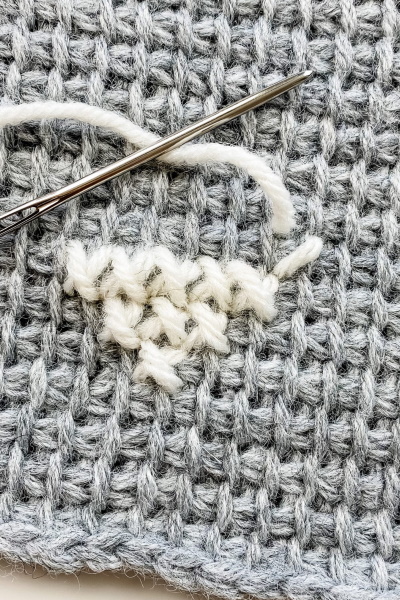
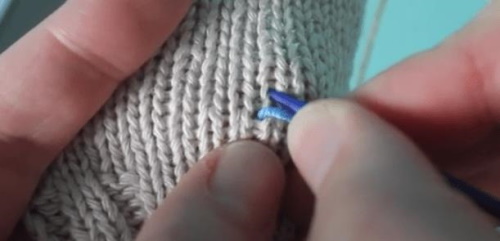
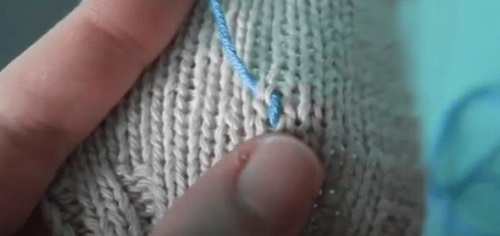
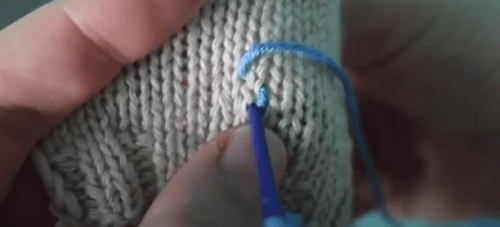
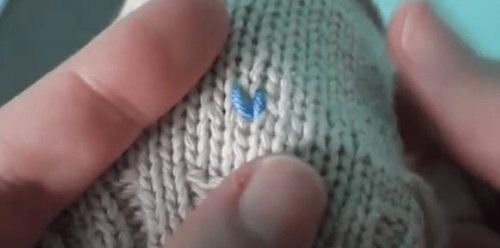
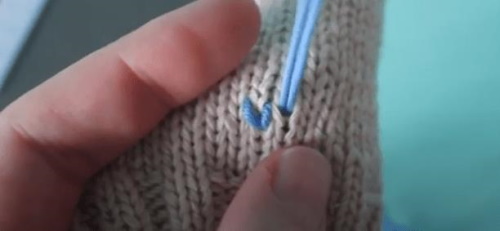
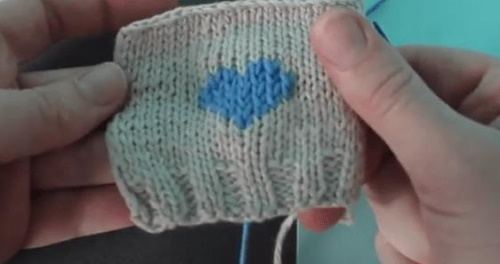
The embroidery pattern with woolen threads is made with satin stitch or loops. The first method is considered more difficult due to the need to maintain tightly fitting stitches, otherwise the base of the product will show through. Beginners are recommended to embroider on loops, then the thickness of the embroidery thread will correspond to the woolen thread of the product and overlap it.
The patterns are embroidered on the loops using a knitted stitch, following the algorithm:
- The needle with the woolen thread is brought out to the front side of the product.
- The next stitch is made in the direction of the knitted thread of the mitten (up and to the right).
- On the back side, the needle is moved to the left and threaded through to the front side.
- Lead the stitch along the front side to the right and down, and pass it through to the back side.
- The result is a design identical to one cross stitch on any embroidery pattern.
- Next, embroider the pattern according to the embroidery scheme, repeating the previous algorithm.
- The finished pattern is superimposed on a base with a small volume. The example shows a simple pattern in the form of a heart, but it can be replaced with any other, focusing on the fact that the size of the pattern and the product match.
With beads
Winter gloves or mittens can be embroidered without threads, creating a pattern using only beads.
For this you will need the following parts:
- beads of black, pink and silver colors (colors can be replaced);
- large beads;
- faceted mother-of-pearl beads.
The pattern is embroidered, observing the symmetry of the design on 2 items. To do this, make a mark or use a stencil.
Step by step:
- A large bead marks the core of the design on the front side of the mitten or glove.
- String 5 beads and place them tightly around the large bead. To prevent the row of beads from sticking out, return to the back side and re-sew the last 2 beads in the row.
- Continue embroidering a row around a large bead, stitching through another 5 beads (or another missing number), each time stitching through an additional 2 last beads.
- The second circle is made with beads in the same way as the previous one.
- Separately sew on a faceted bead and surround it with beads in 1 circle.
- Between the two parts of the pattern, place beads in the form of inclusions. Place the pattern at your discretion. Add a few more large and faceted beads and trim with beads, as indicated above.
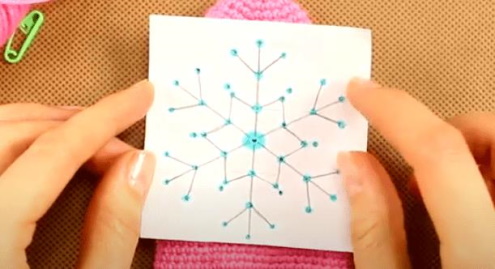
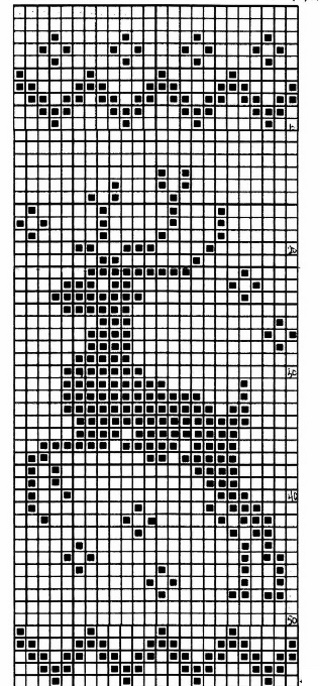
"Snowflake"
Snowflakes are most often chosen as a subject for embroidery. For this, different patterns for cross stitching or large stitches are used. It is recommended to choose thick woolen threads, since thin floss will not be visible against the general background of the product.
 |  |
 | 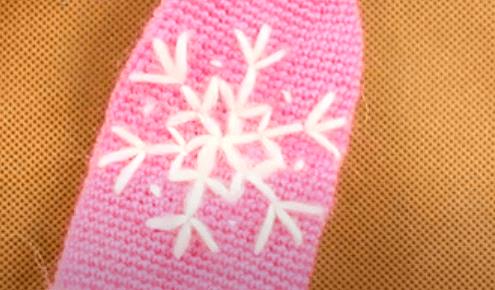 |
The embroidery process is as follows:
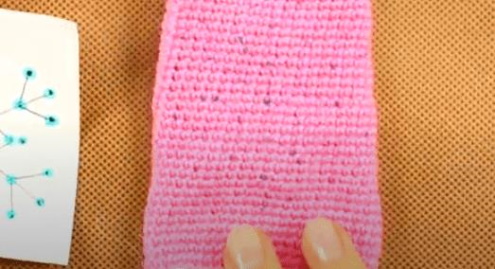
- In advance, select the desired sketch with an image of a snowflake that is suitable in size for the front side of the mitten.
- Using a marker, transfer the main points from the diagram to the mitten.
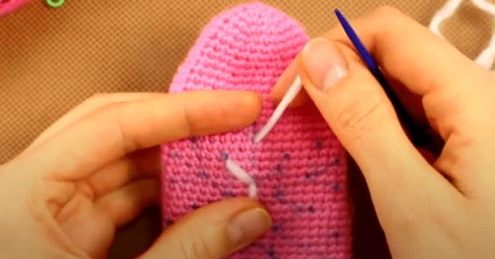
- From the back side of the mitten, begin to thread the needle and make stitches to the marked points. Make 1 stitch in 1 direction.
- Continue embroidering until the pattern is ready. If desired, add threads of a different color or complement the embroidery with beads or beads.
"Bullfinches and snowflakes"
Such patterns are depicted both on canvas as decorative embroidery, and on mittens, scarves, hats, receiving a set of accessories. For work you will need several shades of woolen threads or floss - red, orange, gray, blue, black and white. The shades are chosen at your discretion.
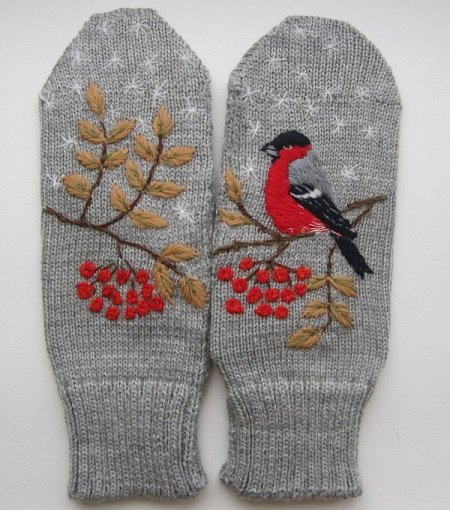 | 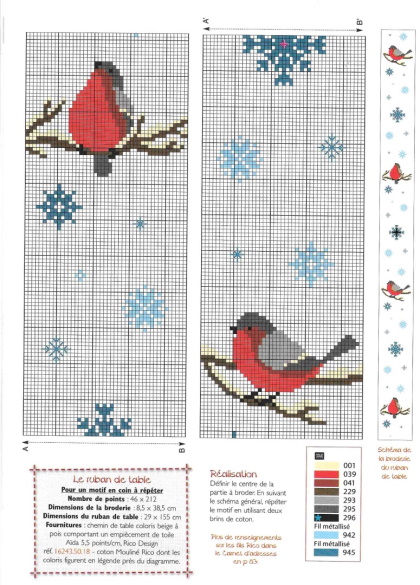 |
The diagram shows a pattern in the form of a bullfinch and snowflakes located at a distance from each other. If desired, this distance can be reduced so that all the elements fit on one area of the product. For snowflake embroidery, choose any of the proposed diagrams or replace it with another. The process will require only blue or gray-blue threads.
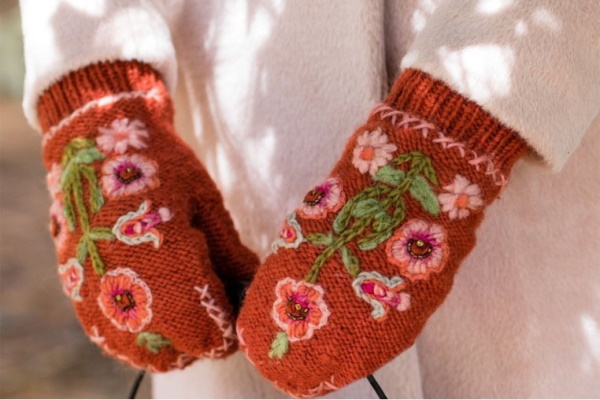
"Roses"
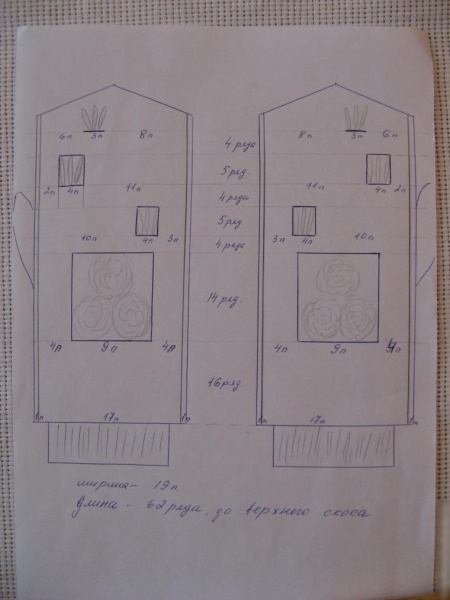
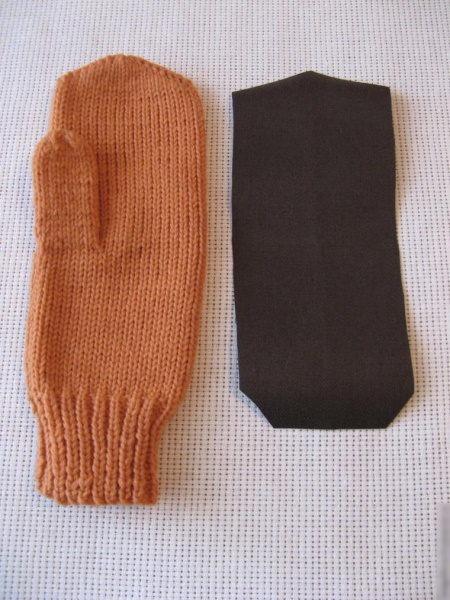
Embroidery on mittens for beginners in the form of rosebuds is distinguished by its uniqueness, since the pattern is made independently due to the different sizes of the product and its thickness.
The process will require:
- woolen colored threads;
- needles with a large opening for embroidery;
- a sheet of leather or eco-leather the size of 1 mitten.
Leather is used to prevent both sides of the knitted product from accidentally being sewn together. The mittens are applied to the leather and traced, then the resulting pattern is cut out. The process of embroidering the pattern can be made easier if the main points of the pattern are marked on the front side of the mittens before starting work.
 |  | 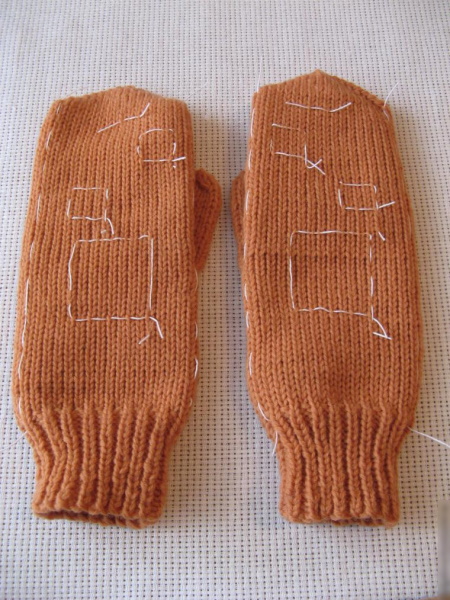 |  |  |
Let's get started:
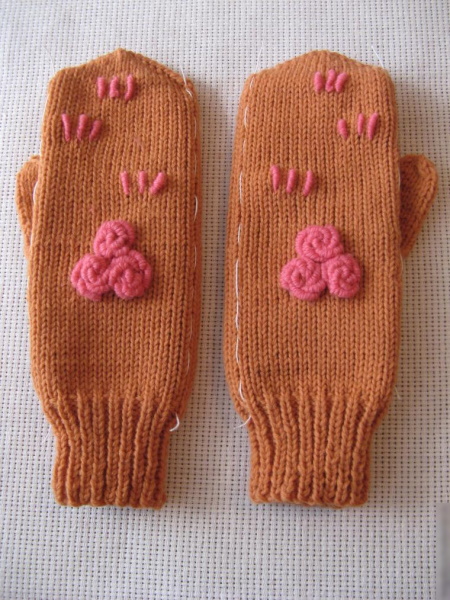
- The top bud is embroidered with pink threads. To make the pattern on the mittens symmetrical, the number of turns of thread at the corner is counted and these measurements are observed throughout the entire process of work. The thread is wound around the game and the curl is sewn in a circle, forming a bud. All other buds are sewn in this way.
- When the buds are finished, the flowers are embroidered. They work according to a similar pattern, but now they move in a circle clockwise. When all the roses are embroidered, the thread is secured and cut.
- Repeat the embroidery on the second mitten.
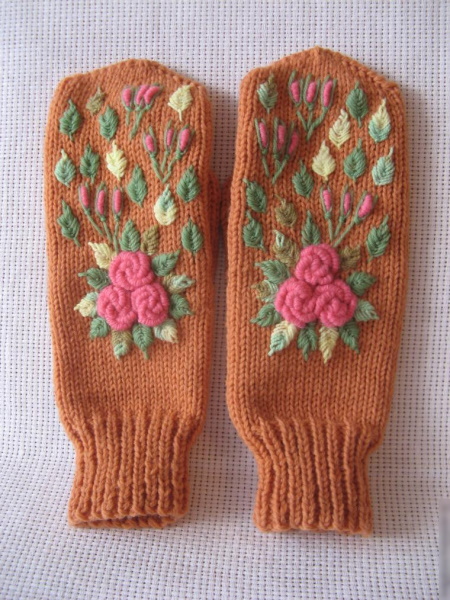
- Green threads are used to embroider green leaves near the buds, as well as greenery. Open buds are framed with leaves on all sides, and they are placed evenly. If desired, several shades of green can be added.
- Repeat the green pattern on the second piece.
- If desired, add beads or sequins to decorate the finished pattern.
"Owl"
Due to the limited space for embroidery on mittens, simpler motifs and techniques are chosen. To embroider an owl on the front side of the mittens, take a ready-made pattern for the cross-stitch technique or create your own sketch for satin stitch embroidery.
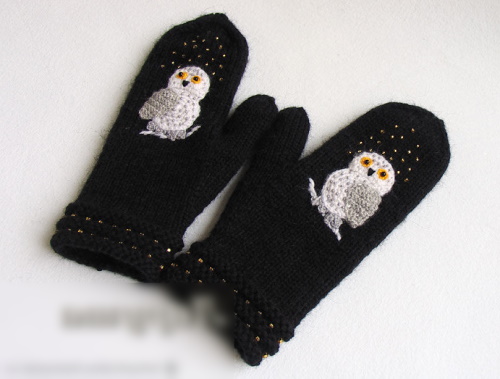
The drawing is transferred to both knitted items and embroidery begins. To make the owl image three-dimensional, thick woolen threads are used or a layer of padding polyester is placed under each piece.
Step by step:
- The outline of the owl's body, wings, branch and paws are marked with stitches using white or light beige threads.
- The body is filled with threads of the same color using vertical stitches in the satin stitch technique.
- The head is filled with stitches in the direction from the edges to the center of the head.
- With white or beige floss threads, use stitches to mark the outline of the branch and leaves, and with frequent stitches to fill the outline of the branch. It is not necessary to achieve complete overlap of the base with threads.
- Using grey, black or brown threads, make rare vertical stitches on the owl's body and head, imitating plumage.
- The eyes and beak are embroidered with yellow or gold threads. The pupil is depicted with black beads.
- If desired, add details to the drawing in the form of beads or depict them with thin floss threads.
"Rabbit"
For embroidery on children's mittens, not only winter motifs are used, but animals are also depicted.
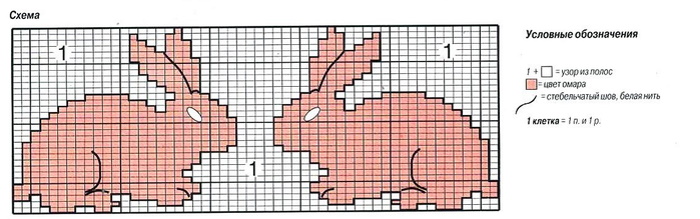
The diagram shows a mirror image of the design for use on a paired product. The embroidery is done using the "cross" technique. The color of the threads used is contrasting with the color of the knitted product.
If desired, add other embroidery elements to the design:
- snowflakes;
- plant motifs;
- flowers;
- scattering of beads or beads, etc.
"Fir-trees and deer"
Embroidery on mittens for beginners using the cross-stitch technique can depict classic winter motifs: fir trees, deer, snowflakes, etc.
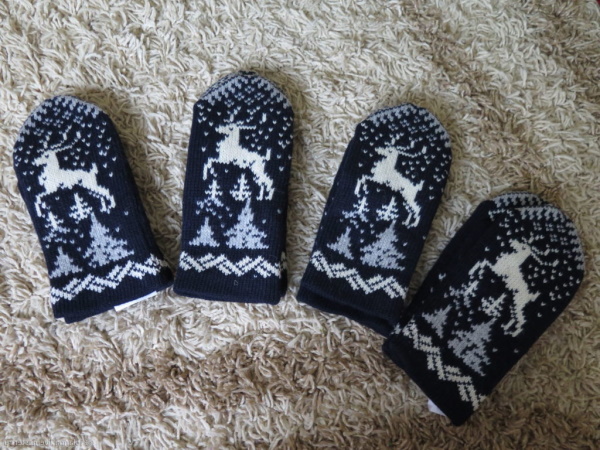
For embroidery, choose floss or wool threads in one color, contrasting with the main color of the knitted product, or use threads in the natural color of the characters and patterns (for firs - coniferous, for deer - brown, etc.).
To give the embroidery a festive look, it is supplemented with beads. They are sewn onto the Christmas trees, imitating the glitter of toys or depicting falling snow. The cross stitch pattern will take several hours of work. If desired, the pattern can be supplemented with any other elements: folk ornament, snowflakes, animals, etc.
Secrets for Beginners
Recommendations:
- To ensure that the pattern is symmetrical on both mittens, make a schematic outline of the main elements of the pattern on the diagram and transfer it with markers or other tools to the knitted items.
- The embroidery designs are applied to a water-soluble film and transferred to the mitten. The embroidery is done over the film, then the finished product is washed to remove the water-soluble base.
- Templates of the main elements of the sketch are cut out of felt, felt, leather or other materials, pinned to the knitted product and the pattern is embroidered with threads over this base.
- You can create a sketch of a design using a water-soluble marker directly on the knitted product, but not all thread textures will be suitable for this.
- To ensure that the product matches its intended purpose, it is recommended to choose a design motif (snow motifs for mittens, plant motifs for autumn items).
- To quickly master cross stitching on loops, mentally imagine that the product consists of repeating squares, like canvas.
To embroider a cross, start at the top right corner of the square and pull the thread through the front side to the bottom left corner of the square. On the back side, return to the top right point and return to the top left point, forming a cross-shaped design.
- Loop stitches are used to simplify the process of creating a pattern instead of knitting on embroidery. For embroidery, the same threads are chosen that make up the product so that the embroidered pattern overlaps the base and is uniform.
- Rococo technique is used for embroidery of flowers or bouquets. To do this, wrap the thread around the needle several times, pull the needle through them, press the turns to the product and pierce near the place where the needle comes out from the back.
- To create a double-sided pattern, use the double-sided satin stitch technique. To do this, stitches are made frequently and evenly, tightening according to the sketch.
- The ends of the stitches are masked with bead embroidery or beads.
- Choose any cross stitch or satin stitch pattern you like for embroidery on mittens, if the principle of the embroidery process on such items is understandable for beginners.
Video about embroidery
Embroidery on mittens for beginners: