When mastering the basics of knitting, you can try making socks, because it is quite easy to design the product yourself, and such a thing can be worn in everyday life. However, inexperienced needlewomen may face a problem with creating a heel.
Necessary tools and materials
Knitting the heels of socks requires a special approach to the choice of thread material. The yarn should have a stable shade, be hygroscopic, elastic, comfortable, durable and hygienic. The listed properties relate to the general requirements for the design of clothes with knitting needles.
Additional criteria for the thread material will depend on the purpose of the item:
- camel or sheep wool with nylon or polyamide is suitable for creating thick socks that are designed for low temperatures;
- for knitting gift home socks it is recommended to use velour, angora, mohair for clothes with weaves, braids, arans, as well as acrylic to create a jacquard pattern;
- to strengthen the toe and heel, it is better to use polypropylene or polyester sock yarn as an additive to the main threads, so that it is not twisted, fluffy and of different shades;
- Rabbit down with cotton yarn is suitable for children's clothing;
- Cotton yarn with synthetics is suitable for knitting summer clothes with an openwork pattern.
To knit socks, you need to use a special set of knitting needles, consisting of 5 pieces. The tools must be sharp at both ends. The length should be 20 cm, the diameter will depend on the thickness of the threads, but 3 mm knitting needles are often used.
The material of the needles will depend on the type of thread material:
| Tool | Yarn |
| Made of wood | Corresponds to silk, viscose threads, which are very slippery. |
| Made of metal | Suitable for acrylic and various wools. |
| Made of plastic | Plastic knitting needles are a versatile tool. |
The technique of knitting a sock heel requires the preparation of additional tools:
- to set aside loops at the knitting stage, you need to prepare a large safety pin or an additional knitting needle with 2 tips;
- when making braids and aran stitches, a shortened knitting needle with a notch in the center is needed to throw in the loops;
- to mark the ends of rows or the required number of loops, you will need plastic markers;
- to prevent the loops from slipping, you need to put tips on the pointed ends of the knitting needles;
- To distribute the yarn when creating a jacquard pattern, you will need a thimble with grooves.
Schemes with description of works for beginners
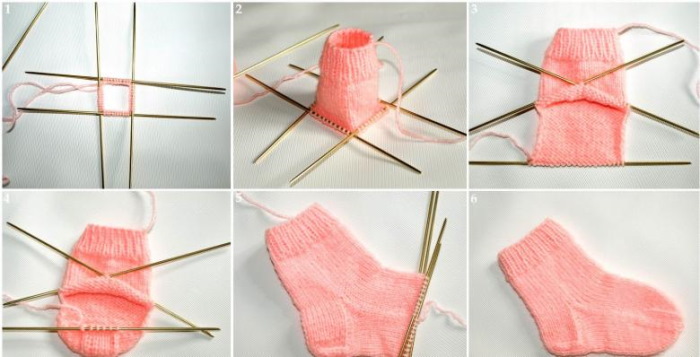
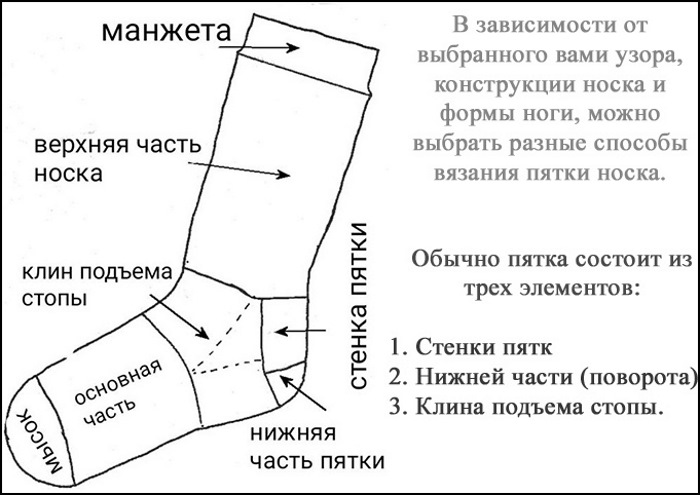
To knit socks with knitting needles it is necessary to correctly calculate the loops by studying the scheme of their increase and decrease. If mistakes are made at this stage of the process, the finished product cannot be worn, because the sock will not sit properly on the foot. There are several options for creating this item of clothing with knitting needles. Inexperienced knitters are advised to initially familiarize themselves with simpler techniques.
Straight heel
When the sock elastic with the ankle is formed on 5 knitting needles, you can start creating the heel. In this case, the elements need to be equally divided and knitted not on 4, but on 2 tools - 1 and 4. The remaining needles are not used in the process.
The front row is decorated with knit stitches, and the back row with corresponding elements.
Initially, you need to knit a part of the sock along the height. When the number of edge elements of the finished edge corresponds to the number of loops on one tool, it is permissible to start shaping the heel.
There are several parameters of the toe heel height:
- 5 cm – for women;
- from 6 to 7 cm – for men;
- from 3 to 4 cm – for children.
Step by step instructions:
- Once a certain height is reached, stay on the front row, moving on to a decrease inside the row to make the piece more voluminous. In this case, divide the total number of loops by 3. If it cannot be divided, add the remainder to the area located in the center.
- If there were 18 elements on the tools, there should be 10 in the middle, 9 on the sides. To decrease, make 1 row from the wrong side. Having knitted the row of the first part, proceed to the main area, in which the outer element is knitted together with the first element from the third half.
- In the front row, start working with the 3rd section, which will eventually be the first. The elements must be front. Knit the last element of the central section together with the first from the side area.
- Continue knitting until you have knitted a set of side sections with the last elements of the central area.
- When you have only the main piece on your knitting needle, finish creating the heel with a front row.
- Thread the edge of the knitted piece onto the tool, knitting in the round using 2 additional needles.
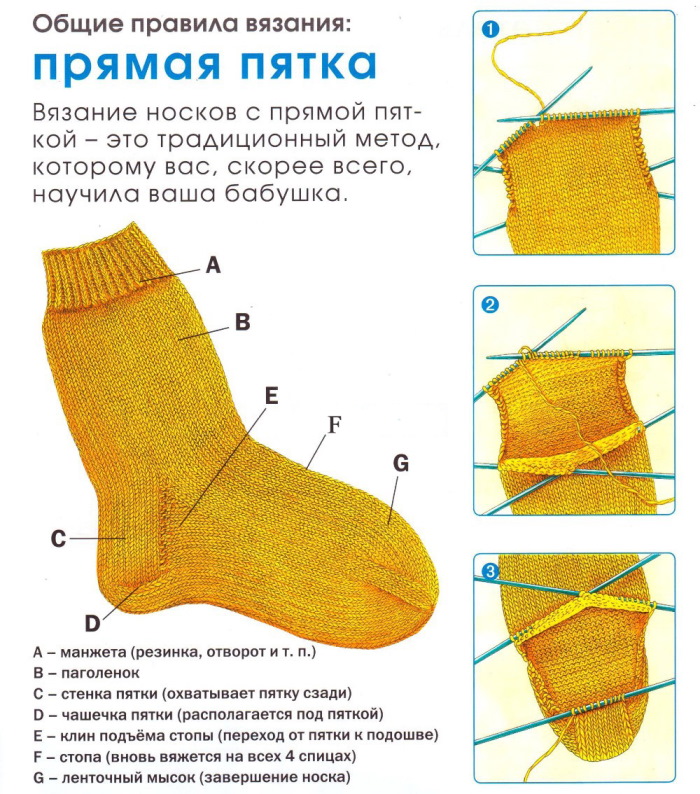
When the heel part is ready, the sock should be knitted in a circle. Unnecessary elements should be reduced at the end of the 1st and at the beginning of the 4th tool in every 2nd row, so that the same number of loops remains on all knitting needles.
Afterwards, you need to continue knitting in a circle with the front elements until the end of the little finger. Then you can start to shape the toe.
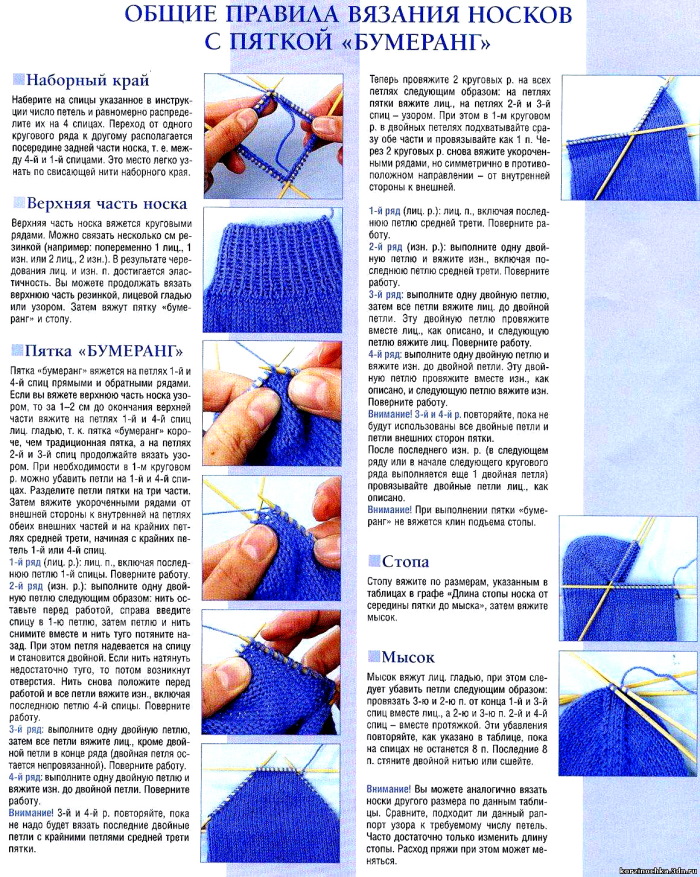
Boomerang Technique
Knitting the heels of socks with knitting needles can be done using the boomerang technique. As a result, the finished item will not have a wedge of the instep, unlike a straight heel.
The product must be created in a circle on 4 needles. When the elastic band with the ankle part is designed, the fabric must be divided equally, re-shooting ½ part on 2 and 3 needles.
Knitting option:
- In the working half, make the first row with face elements. In the 2nd row, make a double loop, pulling the yarn through the first. Knit a row ending with a double element.
- Without knitting, remove the double loops and tighten with working yarn. Perform the procedure until the number of elements that was initially is reduced by 2 times. This is considered the center of the heel. Continue working in the central area.
- Knit the purl row of the central section with the first double element. Turn the fabric, capturing 1 loop from each side tool.
- In the next row, the first element should be double. Form the front ones and make the outer loop, adding 1 new element on each side. In the next row, form the double elements as single ones.
- This technique is called turning. Initially, the elements of the central section are reduced by tightening, then added with the gradual use of side loops, which are located on previously unused needles.
- When the 4 instruments have the same number of elements with which the process began, the heel can be completed.
Further on, the garment is simply knitted in a circle without increasing or decreasing until the toe.
French knitting
The French knitting technique is similar to the design of a straight heel, because there will be 3 parts of the fabric when creating this garment. However, the central area will be smaller in size.
The heel must be knitted from a wall with a turning segment. To create a wall, you can use different patterns, for the turning part, stocking knitting is required.
The French knitting technique involves using only the sole loops. Their volume should be equal to the number of elements on the outer part.
Step by step instructions:
- Divide the elements saved for work into 3 segments. There should be an even number in the middle, an odd number on the sides and one increased by 1 unit.
- Initially, make 9 rows up in the center. Turn the fabric at a right angle, making a perpendicular rise on the left side.
- From the edge of the central section, knit a front row, using the perpendicular element. Turn the toe and make a yarn over, knitting a back row.
- Again, grab the second perpendicular element. From the two side pieces, lift the perpendicular elements until the height of the sides and the middle are the same.
- Once completed, switch to knitting using 4 knitting needles.
The "Klondike" technique
Knit the heels of the socks with knitting needles using the kerchief technique, which is characterized by the use of 3 parts of the sole. As a result, an angle is formed in the middle, resembling a kerchief.
Step by step description:
- Initially, keep ½ of the elements located on the sole side in the work. Transfer the remaining loops to 2 and 3 knitting needles.
- Using stocking stitch, knit a square to a height that contains a certain number of rows equal to the number of elements remaining in the center.
- Divide the work area of the product into 3 segments. There should be 1 more element in the middle than on the sides. Decorate the main part with stocking stitch, during which decrease 1 element on each side. Perform similar manipulations until the tools with the parts on the sides are empty.
- Once the heel cup is completed, begin to shape the instep wedge using the 2nd and 3rd knitting needle stitches and adding new stitches to them to create a certain height.
- The height dimension can be carried out individually.

Dutch heel
To create a Dutch-style sock heel, you need to cast on 72 stitches in row 1.
Step by step description:
- Divide the number of elements in the row by 4. With one knitting needle, knit the first quarter of the loops. Skip the outer quarter of the row to the other edge of the tool. These elements are intended for the heel.
- Divide the remaining two quarters on 2 knitting needles and leave them because they are intended for the instep. Never knit the first element for the heel part. Make rows with front and back elements in turn. The number of rows should be equal to the number of elements on the tool. The last row should consist of back loops.
- Turn the heel, create 22 front loops, perform a draw through with a turn. Knit 9 purl and 2 purl together elements, make a turn, knit 9 front loops, perform a draw through with a turn. Repeat the above steps until all elements are knitted. The last row should be decorated with purl loops.
- Knit back half of the elements, finishing the heel part. Move all the instep loops to 1 tool.
- Using an additional Visual Needle, knit the remaining heel stitches and 18 stitches on the side of the heel.
- Using the 2nd tool, knit the lifting loops.
- Using the 3rd needle, knit 18 elements on the side of the heel and the first half of the elements of the detail.
- Knit in the round until the end of the foot.
Stepped heel
Knitting the heels of socks with knitting needles can be done in the form of steps so that the finished product fits tightly around the heel. If the wall is created using a reinforcing pattern, the heel part will not be subject to abrasion.
Design option:
- Create the first part of the wall by knitting half of the rows with any pattern. The number of rows of the entire wall should be equal to half of the total number, and should also be rounded to an even number.
- The second step should match the first in height, but be smaller in the number of elements. To determine them, divide the total number of loops into 4 parts. If you cannot divide evenly, round down.
- 2 parts will be the central section of the turning heel, the edges will have 1 part each. Transfer the last parts to figured or auxiliary knitting needles or safety pins.
- Decorate the second part of the wall with elements from the central part. The height of the wall should be equal to half of the original loops.
- Knit the roundings using shortened rows.
- When the last row of the central section is knitted to the end, pull out the elements from the edge last rows, hooking them behind two walls so that large holes do not form. In a similar way, reach the loops that were thrown onto an additional tool.
- Place the outer raised element over the first one and pull it through the first one removed.
- Turn the fabric over, reaching the end of the row. Pick up the missing elements from the last ones, knitting together the last extended and the initial of the removed elements from this side.
- In a similar way, decorate the cup, using all available loops. To do this, knit together pairs of elements from the ends.
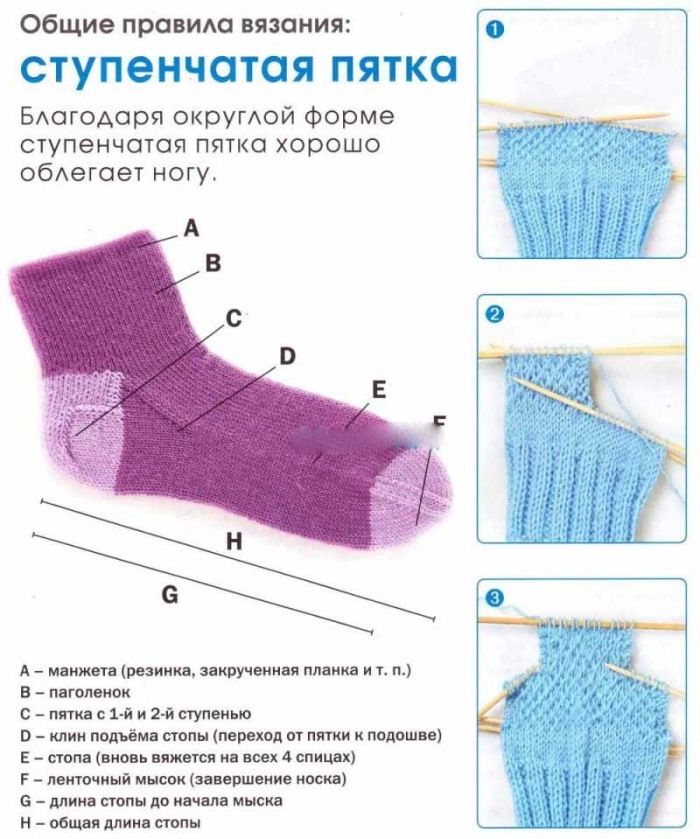
As a result, a stepped heel should be formed. Afterwards, you need to dial the missing number from the extreme edge elements, continuing to work according to the given pattern.
Secrets for Beginners
Secrets for Beginners:
- In order for socks to have a long service life, it is necessary to choose a strong, soft and pleasant to the touch beach for knitting. Such a thing can withstand any load and frequent washing.
- An elastic product is able to retain heat and also fits the leg well. For this, it is recommended to choose acrylic, mixed or woolen threads with the addition of synthetic yarn.
- Wool threads are suitable for knitting medical socks. The product is quite coarse and has a long service life.
- The heel can be designed on different knitting needles. Knitting can be done on 4 knitting needles or with circular tools. In this case, shortened circular knitting needles are available for sale. With the help of a circular tool, the product turns out more beautiful, while the joints will not stretch, the fabric will be even and solid.
- The heel, unlike other parts of the sock, is more susceptible to abrasion, so it needs to be reinforced. To do this, it is recommended to double the yarn used to decorate the product, or use mohair, silk or nylon thread, because it is stronger. It is also acceptable to use cord thread material used in shoe production.
- To create a sock heel, you can use garter stitch or the elastic technique.
- The heel can be knitted with threads that will differ in shade from the main part of the sock. It is also permissible to knit the product separately from the heel, subsequently connecting the 2 parts. Thanks to this method, you can remove the worn heel at any time, replacing it with a new one.
After mastering simple techniques of knitting socks with knitting needles, it is permissible to proceed to more complex patterns and different designs. The product, which was made of wool, can warm in the cold period of time and act as an alternative to house slippers.
The process of knitting heels will allow a beginner to gain experience. Thanks to this, it will be easier to master various methods of knitting collars, fronts and sleeves of clothing.
Video on how to easily knit a heel for socks with knitting needles
Learning to knit a heel. A detailed master class for beginners.