When knitting on 2 needles, socks are knitted with a seam or seamless, with a toe or with a rib and on circular needles. They start with choosing the right tools and material.
Selection of yarn and knitting needles
The quality of knitted products depends on the skill of the needlewoman and the correct selection of knitting needles and yarn.
Spokes
The selection of the knitting needle size in millimetres is important. The size is affected by the patterns that will be used for knitting and the thickness of the threads. It is recommended to have needles of different sizes. When choosing, pay attention to the working ends of the needles. Blunt needles are inconvenient to work with. Very sharp ones should also not be chosen, as they can ruin the product and leave damage to your hands.
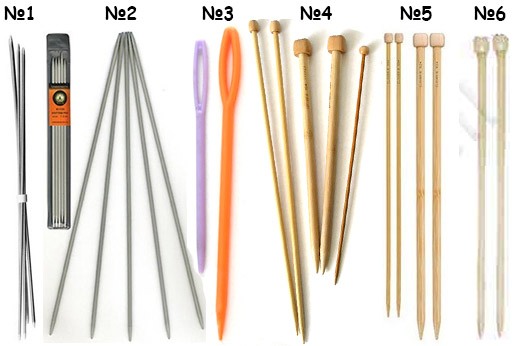
Material of spokes:
- Wooden knitting needles. Advantages: light and durable. Disadvantages: can leave snags.
- Plastic needles. Advantages: light, smooth surface. Disadvantages: fragile, can break.
- Aluminum knitting needles. Advantages: strong and smooth. Disadvantages: bend, may leave dark marks on light-colored items.
- Steel spokes. Advantages: reliable. Disadvantages: can be sharp.
To knit socks on 2 knitting needles, you should choose knitting needles with closed non-working ends, no longer than 20 cm.
Yarn
For hosiery, threads made from wool are selected, which hold the shape of the finished product, and the knitted pattern will be voluminous and distinct.
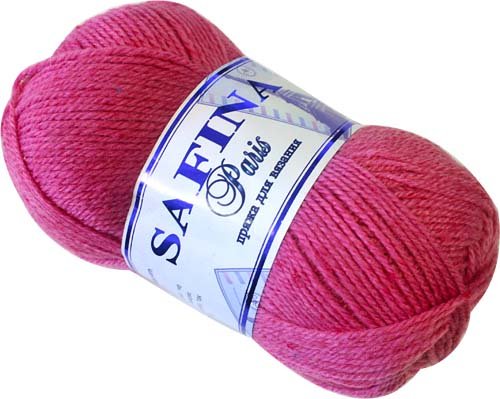
When choosing yarn, you need to read the information on the label, which indicates the purpose of certain threads. It is better to keep the label until the end of the work, because in the event that there is not enough yarn, the information will be useful when choosing additional skeins.
Beginner needlewomen should choose yarn with added wool, not too thick, and knitting needles number 3.
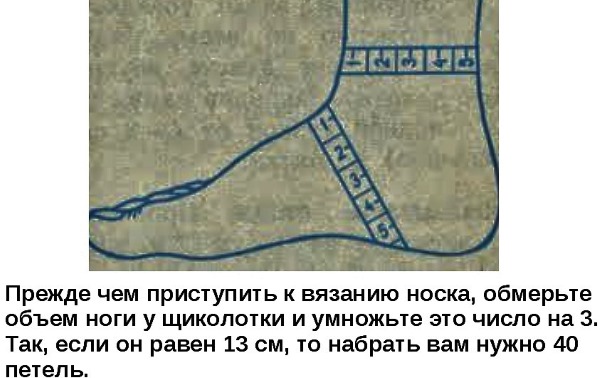
Sizing
Before you start knitting, you need to decide on the size. To ensure a good fit of socks, measure the instep height, lower calf circumference and foot size. There is a formula that calculates the foot size in cm (Y), which takes into account the shoe size (X): Y = X: 3 x 2.
When knitting, do not forget that:
- you need to count the loops carefully;
- the sock is formed from 4 parts: the sole, the heel, the shaft and the cuff;
- when decorating the product, yarn of contrasting colors is used, but at the same time of the same type, quality and thickness;
- the knitting density of the product must be uniformly the same;
- If wool or semi-wool yarn is used, the product may shrink after washing, so it is recommended to add extra loops.
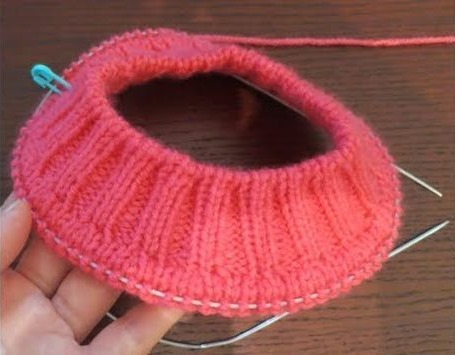
Knitting socks on 2 needles without a seam
Knitting socks on 2 needles without a seam is convenient because the cuff length can be made any, it depends on the amount of yarn. Knitting begins from the toe towards the top. You need to have an extra needle at hand.
Knitting technology:
- To start knitting you will need an additional short length of smooth thread.
- The threads are tied with a knot.
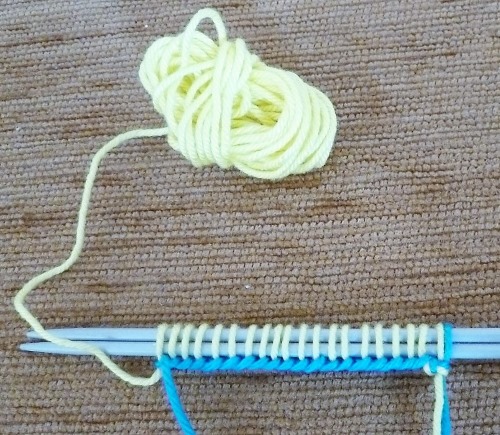
- To accurately calculate the number of loops, the necessary measurements are taken.
- In this model, you need to cast on ½ of the obtained number of loops on 2 knitting needles folded together. The loops are cast on with an additional thread. It turns out something like this.
- For knitting odd rows, use face loops, for even rows - purl. The row ends with an unknitted loop. Continue knitting until a third of the cast-on loops remain.
- Then they begin to increase, picking up the loops left unknitted one by one.
- To avoid holes forming after lifting the loops, do the following: knit the removed loop together with the side loop lifted onto the left knitting needle. As a result, the number of loops on the knitting needles should be equal to the original. A toe has formed.
- Now the loops marked with an additional thread are added to the work. They are picked up and transferred to an additional needle. The thread has done its job, it is removed.
- Further knitting forms a "pipe". This happens in the following way: the front loop is knitted from the front knitting needle, the next one, from the additional knitting needle, is removed, and the working thread should be in front of the work. The last loop of each row is made purl. It will form as if 2 canvases.
- The next row begins with a slipped stitch, then the alternation of the previous row is repeated. The stitches of the near fabric are knitted as faces, and the stitches of the far fabric are slipped without knitting. The thread must always be in front of the work. It turns out that in each row only half of the stitches are knitted.
- To knit the heel, use an additional knitting needle, slipping every second loop onto it.
- The heel is knitted from the loops remaining on the needle, using the same method that was used to knit the toe.
- After knitting the heel, all the loops must be transferred to one knitting needle, and knitting, similar to knitting the foot, continues until the elastic band.
- Knitting the elastic: remove the 1st loop, then alternate: 1 front and 1 removed, 1 back and 1 removed. Each next row is knitted as follows: the removed loops are knitted, and the knitted ones are removed. All rows are knitted the same way. The front loops are knitted behind the front wall. For 2 knitted rows, the fabric is added only by 1.
- Having knitted the elastic to the desired height, the loops are closed using one of the available methods.
- When closing the loops in the usual way, you need to make sure that the edge of the sock does not tighten. This method consists of knitting 2 loops at once with the front one. The knitted loop is returned to the left knitting needle and is again knitted together with the next front one, this continues until there is 1 loop left in the work.
- Then the thread must be cut, leaving a small tail, and pulled through the last loop. This method of closing loops is suitable for beginner needlewomen. Experienced needlewomen use closing loops on an elastic band using a needle.
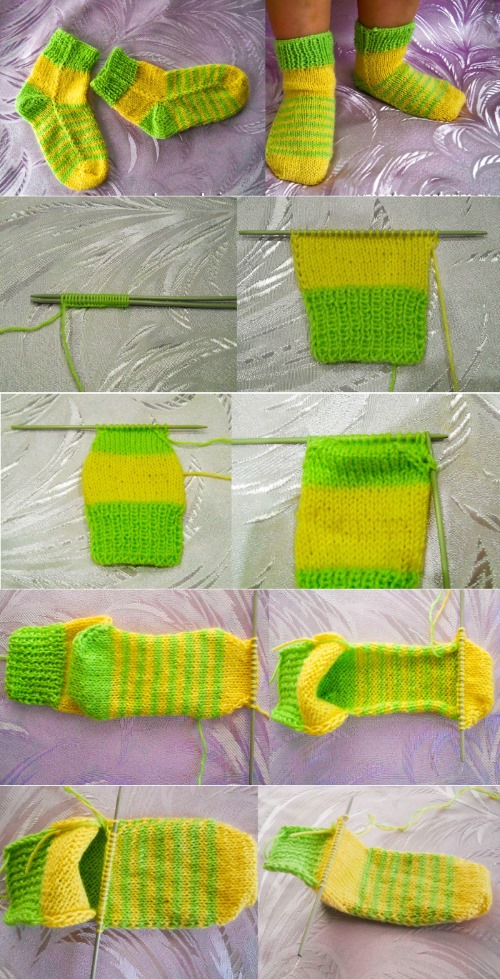
Knitting baby socks on 2 needles
The yarn for children's socks is natural, bright and soft, capable of retaining heat. Socks are decorated with various decorative elements.
The method by which the product will be knitted is chosen at discretion. The main thing is the correct calculation of loops according to the formula given above. For an accurate calculation, a sample is knitted. The proposed socks are knitted on knitting needles No. 3, from the elastic to the toe. The option is seamless.
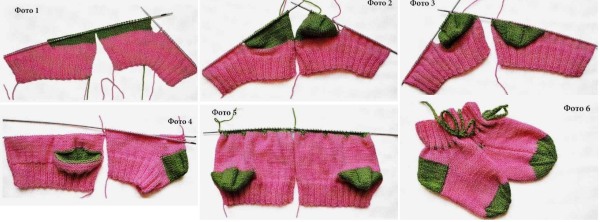
First, knit the back part of the cuff:
- Cast on 20 stitches using 2 knitting needles.
- The upper part of the sock is knitted with a 2 x 2 elastic band (or another one), 16 rows high.
- Another 16 are knitted using the selected pattern.
- Starting to form the heel, in the front row you need to knit 1 edge stitch, then 2 stitches together with the front stitch, the next 14 are front stitches, 2 together with the front stitch, and the row ends with an edge stitch.
- The remaining 18 loops on the needles in the next row are knitted as purl stitches.
- The following rows are knitted in the same way. As a result, 10 loops remain on the needles.
- To form the second part of the heel, you need to grab a loop from the edge at the beginning of the row and knit it. The same is done at the end of the row, after knitting all the loops on the needle. Increases concern only the front rows.
- Such increases are made up to 20 loops, as many as were cast on. The heel is formed.
- Next, the chosen pattern is used to knit the track up to the little finger, which is 18 rows.
- The toe is knitted in a manner similar to the heel.
- The top of the sock is knitted, not forgetting that in the front rows, each first and last loop is knitted from the edge, to connect the sole and the top. A neat seam is formed along the side edges.
- Knitting ends with a rib. After knitting 16 rows, the loops are closed.
Using yarn of different colors, the socks are decorated with stripes.
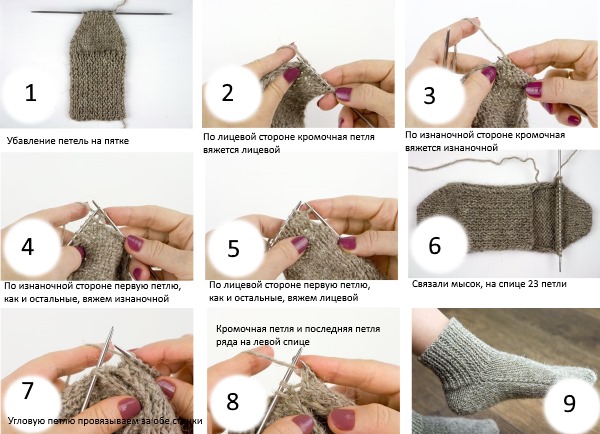
Knitting the heel
Knitting socks on 2 needles allows you to knit the heel using different methods. The method in question is called "Corner Formation", "Turn Method" or "Granny Heel".
For the sample you will need an odd number of loops, for example 21. 14 rows are knitted in stocking stitch, then mentally the knitting is divided into 3 parts. If it is impossible to divide completely, then the middle part is made wider.
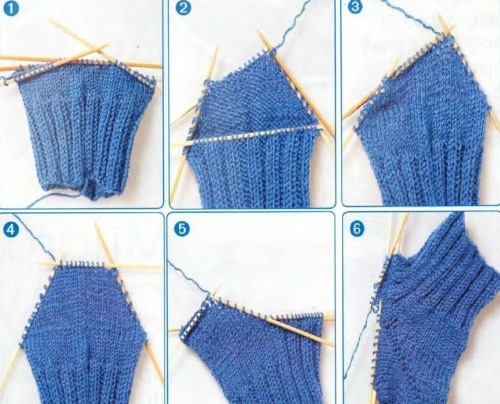
Knitting technique:
- The first 7 loops are knitted, then the next 6. The 7th is knitted with the first loop of the third part. Knitting is turned.
- Continue knitting in this manner until the loops of the 1st and 3rd parts are finished.
- Now all that remains is to knit all the side loops, the heel is ready.
Having gained experience with straight heels, you can try knitting a horseshoe heel and a conical heel.
Socks on two needles with a seam
The seam can be located on the side or in the front. The convenience of this method is that when knitting socks on 2 knitting needles, you can knit 2 socks at once, using the same knitting needles, but different balls. With this knitting method, the seam is on the side, on the inside.
When knitting heels, you need to make sure that they are located on different sides of the 2 panels. If you choose the middle part for knitting the heel, the seam will be in the front.
The knitting sequence is as follows:
- The top of the sock is knitted with an elastic band.
- From the elastic band, they move on to the pattern chosen as the main one. The length of the upper part is chosen at will.
- The heel is formed in the manner described above. The number of loops is divided into 2 parts (the second part, through one loop, is removed to an additional knitting needle) and only one of them is knitted. The height of the heel is knitted depending on the size of the foot.
- After knitting the heel, when the initial number of loops is on the knitting needles, the bottom of the sock is knitted to the required length.
- The toe is formed 3 cm before the end of knitting. To do this, all the loops need to be divided into 4 parts. Each of the parts on 2 sides is decreased by 1 loop (only in the front rows).
- The decrease continues until there are 4 loops. The working thread is broken and the loops are pulled tight and secured.
- The sock is sewn together using a piece of yarn and a needle.
The upper part of the cuff can be made with teeth if desired. To do this, 5 rows are knitted with the front surface, one row is knitted with alternating yarn overs and 2 front loops knitted together. Then 5 more rows of the front surface. The edge is folded and sewn from the inside.
Men's socks
Knitting socks on 2 needles in the given version for men is remarkable for the presence of a reinforced heel. The basis is knitting socks with a seam.
To knit the heel, first, a straight piece is knitted on 2 needles using a dense pattern (discussed when knitting seamless socks). Then, when knitting the bottom of the heel, decreases are applied. It turns out that only half of the loops are knitted in each row.
To knit all the loops, 2 rows are required. Therefore, there will be 2 times more knitted rows. But the knitting will become denser, stronger, and will not stretch. The wearing time of the product will increase due to this.
Women's socks
These socks, knitted on 2 needles, are recommended for beginners.. Due to the fact that the product is knitted with an elastic band, it fits the leg tightly. Such socks are decorated with colored stripes on the cuff or the entire product is made completely striped. You will need yarn and a pair of knitting needles No. 3. The model is suitable for size 38-39.
Knitting technique:
- Cast on 61 stitches.
- The cuff is knitted to the desired length with a 1 by 1 elastic band; the first loop in each row must be knitted with an edge stitch.
- The middle loop (31) is marked using a colored thread.
- In each front row, you need to knit 5 loops from it: front, yarn over, front, yarn over, front. Purl rows are knitted as purl (or vice versa).
- When you turn the work, all loops are included in the pattern.
- From the added 5 loops, the middle one is selected, and in each front row an increase will be made from it again, similar to the previous one.
- The top of the sock is knitted.
- A wedge will form, the length of which should be equal to the length of the foot at the top from the base of the leg to the toes.
- There are 14 increases.
- To the height of the foot, the loops are knitted without increases using garter stitch.
- Next, the sole is knitted. In this case, 20 middle loops are used. In the first row, the side part is knitted, then 19 loops of the central part, and the 20th is knitted with the first loop of the side part.
- After turning the work, remove the first loop, knit 18, and knit the 20th as in the previous row.
- There are 10 loops left on the side parts. Decreases are made on the sole, knitting together the 2 penultimate loops (19 and 18) with the front, and in the next row, 18 and 17 are knitted together. Decreases are repeated until there are 2 loops left that need to be knitted together.
- The thread is cut, but you need to leave the end to sew the sock. The sock is sewn from the back.
- To knit the second sock, do the same, or knit 2 at once. For 2 socks, use different balls.
Knitting the cuff
When knitting a cuff on classic socks on 2 knitting needles, the length is usually made no more than 10 cm. From the cuff to the heel, knit 5 cm.
But different models can have different lengths. There are models that are knitted without cuffs at all, and there are completely knitted with an elastic band.When knitting the cuff, remember that the elastic should not stretch while being worn. There are many ways, simple ones differ in alternating a certain number of purl loops with front loops.
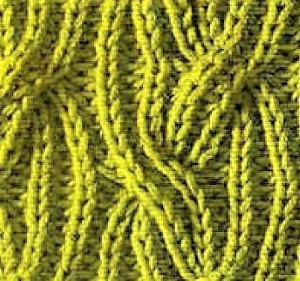
The figured elastic is formed by moving the loops, this looks beautiful on a long cuff. An even number of loops is collected. The first 2 rows are knitted with a 2 by 2 elastic (at the beginning, the front ones are required, at the end, 2 back ones).
Then knit according to the pattern. The front loops change places with the back loops in a checkerboard pattern. In this case, cross knitting of the front loops with the back loops is performed. The difference is that the loop removed once on a pin or with the help of an additional knitting needle is left in front of the work, and in the other case behind the work.
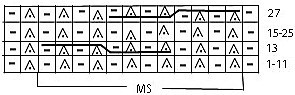
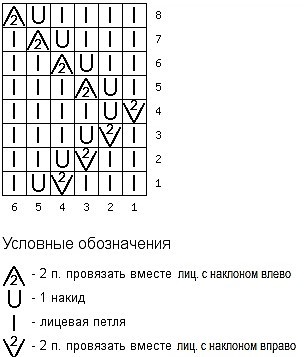
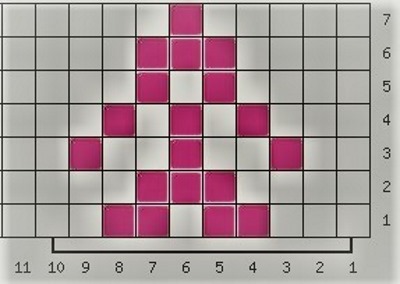
For children's socks, bias elastic bands are ideal. The diagram shows the following symbols: | — front, U — yarn over, \2/ — 2 front stitches knitted together in the classic way. The pattern involves 6 loops. The back side is purl knitting.
| \2/ | | | | | U | | | | | 3 |
| \2/ | | | | | U | | | | | 1 |
| 6 | 5 | 4 | 3 | 2 | 1 |
Broken and diagonal elastic bands, elastic bands with ribs look interesting. There are Canadian, American, Italian, French, Polish, English ones.
When knitting original pearl elastic, different methods are used. It is suggested to try one of them, casting on a number of loops on the knitting needles, a multiple of 5. For the pattern, 4 more are added.
The first row consists of edge loops, 2 front loops at the end of the row and repeating 3 front loops, purl and front loop. In the second row, in addition to the edge loops, 2 purl loops are knitted at the beginning, then there is a repeat of front loop, purl loop, 2 front loops, purl loop.
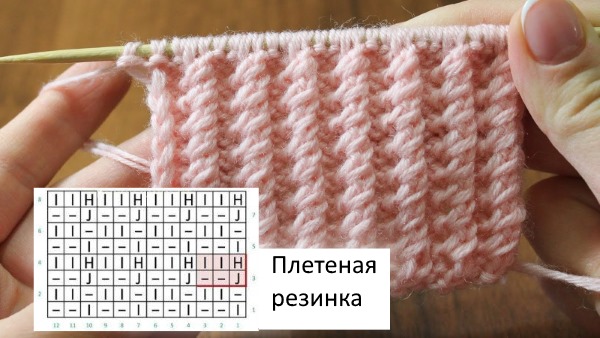
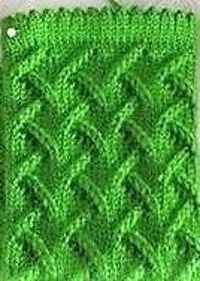
It's good to knit the socks completely using a braided elastic band:
- The number of loops cast on is a multiple of 12 + 2 edge loops.
- The first 3 rows are knitted in stocking stitch.
- All even numbers are knitted according to the pattern.
- In the 5th and 7th rows there is a repetition of 3 front, 6 back, 3 front.
- The rows begin and end with edge rows.
- Then repeat from the 1st to the 8th row.
A convenient double elastic band is knitted using the “pipe” method described above.
With a braid in front
Knitting socks on 2 needles allows you to place designs on their front part. The products are spectacular with a braid or braid. The braid looks better against a purl stitch background. When knitting such socks, you will need a pin. The braid is knitted using the knitting method from the elastic (socks with a seam). It is desirable that the pattern goes from the top of the foot.
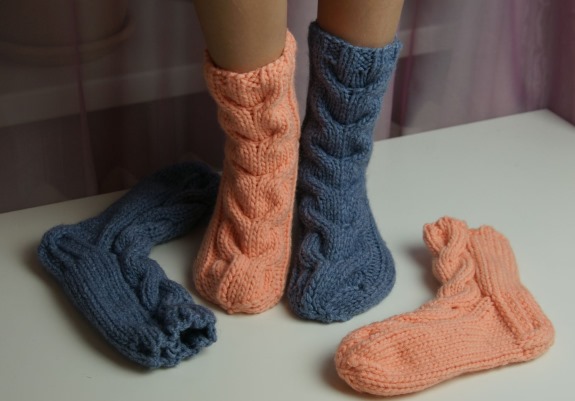
Braid pattern: remove 2 stitches and place them on a pin in front of the work, knit 2, knit the stitches that were returned to the pins, remove 2 stitches, placing them behind the work, knit 2. Return the removed stitches to the knitting needle, then knit them using knit stitches. Even rows are knitted with purl stitches.
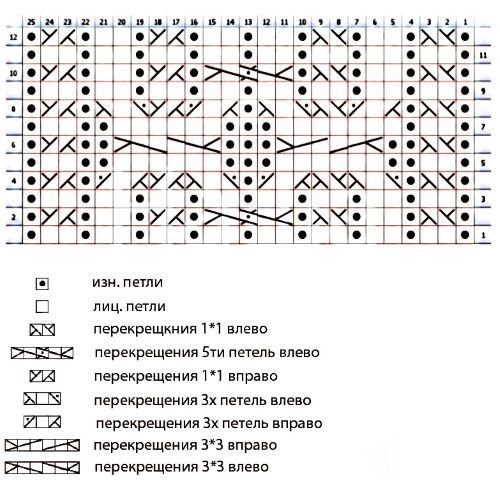
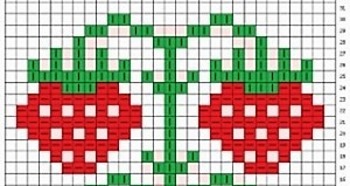
Knitting socks on two needles: diagrams and patterns
This knitting method allows you to use garter stitch and stocking stitch, as well as knit original patterns, of which there are many. Beginner needlewomen are better off starting with simpler patterns.
 |  |
 |  |
 |  |
 | 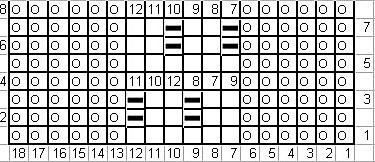 |
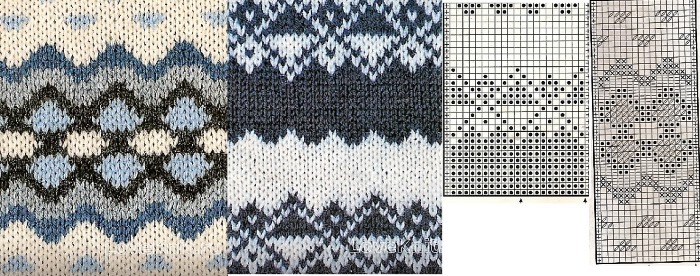
Beautiful knitted socks with ornament, patterns
When knitting socks with a seam of the front surface, it is convenient to knit jacquard patterns and ornaments. Due to the fact that the threads are intertwined, the knitted fabric is dense and warm. The yarn for such knitting must be chosen soft and elastic. All the threads used must be of the same type.
Snowflakes and deer knitted on the bootleg look impressive.
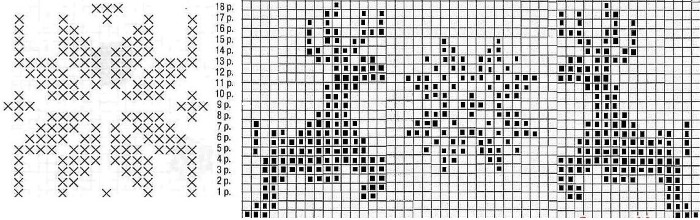

Penguins are perfect for winter socks.

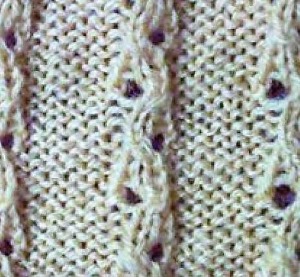
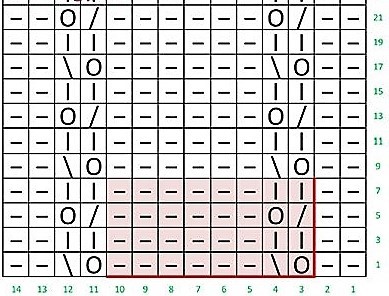
An interesting option is with leaves, the color of which can be green or autumn shades.
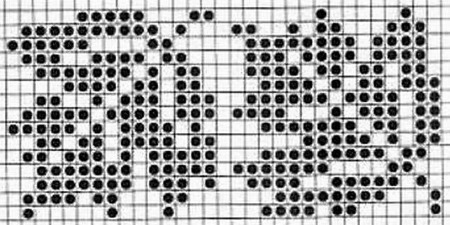
A 2-, 3- or 4-color ornament looks beautiful. Such ornaments are used to decorate not only the boot shaft, but also the entire toe.
When knitting simple jacquard patterns, leftover yarn is used that is no longer suitable for a full-fledged item.
The original knitting of socks using 2 knitting needles has its pros and cons. Knitting this way is much more familiar and faster. It is convenient to knit patterns using several balls at once. You can knit 2 socks at once.
You can knit not only socks, but also slippers, knee-highs and stockings. The same methods are used when knitting tights. The disadvantage is that parts of the sock sometimes have to be sewn together.
Author: Cutie
Article formatting:Natalie Podolskaya
Video about knitting socks with knitting needles
Knitting socks on 2 needles - master class for beginners:
I broke my head reading the pattern for socks with braids in the front. 🤦 Wasted time