The sakura tree is revered by the Japanese as a symbol of life. Another common name for it is the Japanese cherry. The flowers of this tree in the land of the rising sun are a symbol of clouds. You don’t have to be a professional artist to draw a branch of the plant.
How to draw step by step
To draw a picture of the famous Japanese tree, all you need is a sheet of paper and a pencil.
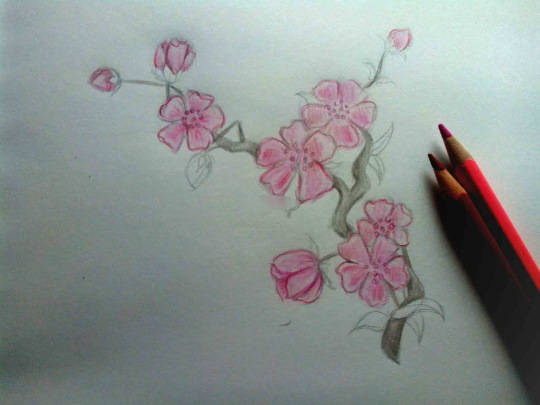
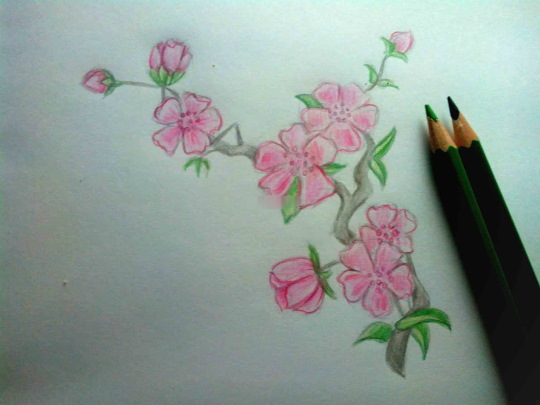
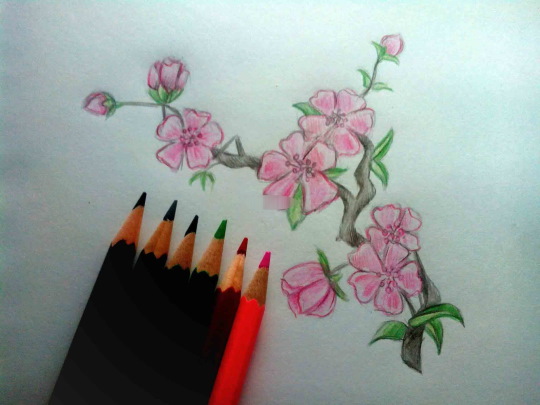
 A simple pencil can be used to make a sketch. Then the artist can choose to leave the picture black and white or color it. Colored pencils or paints can be used to color the sakura. The difficulty level is low, and a beginner can easily cope with the task.
Detailed drawing
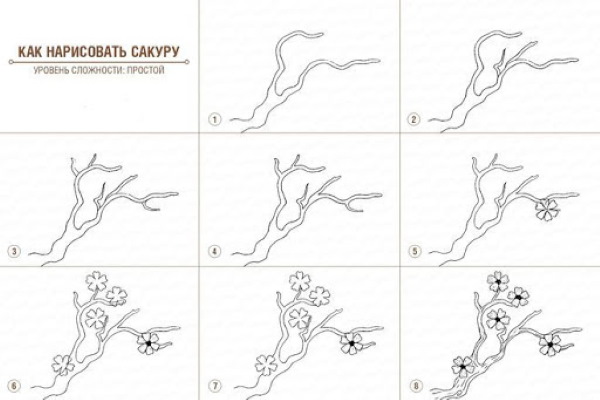
A sakura branch (the drawing of these flowers will be distinguished by its beauty and brightness) for depiction on a sheet of paper is made in several stages.


This:
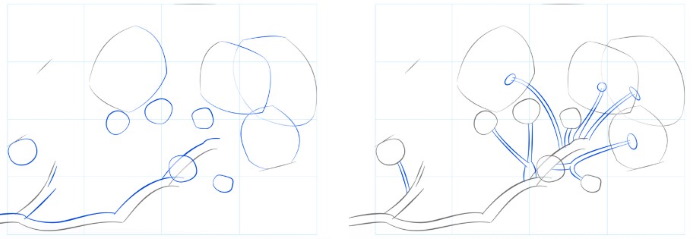
- Draw a large circle in the center of the sheet. This is an auxiliary element that will be used in the following stages to mark the borders of the branches decorated with flowers.
- At the bottom, draw a small stump with roots coming out of it and several branches rising upwards. The latter should be depicted with thin, curved lines.
- At the next stage, draw new branches from the main ones, and then add flowers. Do not rush, then the plant will come out thick and as if alive.
- Finish drawing the trunk of the sakura. Gradually transfer the lines from the stump to the branches. The latter should be made a little thicker. It is also important to remember: they should be winding.
- Finish drawing the relief of the bark on the surface of the trunk.
- Remove unnecessary elements that previously played an auxiliary role.
- Start coloring. When choosing the right colors, remember that Japanese cherry blossoms are drawn from white to dark pink.
Common features
A sakura branch, the drawing of which can be done in general terms, will require a number of steps when depicted.
This:
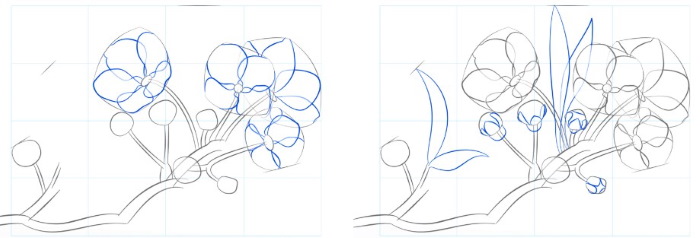
- Create a sketch. This should be done with thin pencil lines. The trunk becomes thicker towards the roots. The tree branches should be scattered in a semicircle.
- Start drawing the outline of the flowers. This should be done with light, curved lines. In the same way, you need to make small gaps in the flowers.
- Using the created sketch as a basis, increase the thickness of the outline of the trunk, branches and flowers. At the same time, there is no need to draw the branches that will be hidden behind the petals of the flowers. When creating the outlines of the flowers, you need to use short, rounded strokes. At the same time, in some places they should go inside.
- Start working with the bark. This part of the sakura is always dark. Its texture should be depicted using curved lines.
- Using the same outline, add some texture to the flowers. The detailing should not be too pronounced. It is enough to draw short lines similar to the outlines of the flowers. They should be added where the gaps in the tree were indicated.
- Remove the sketch with an eraser and mark the lines of the grass.
- Add pink. To achieve the best effect, it is recommended to use different shades of pink.
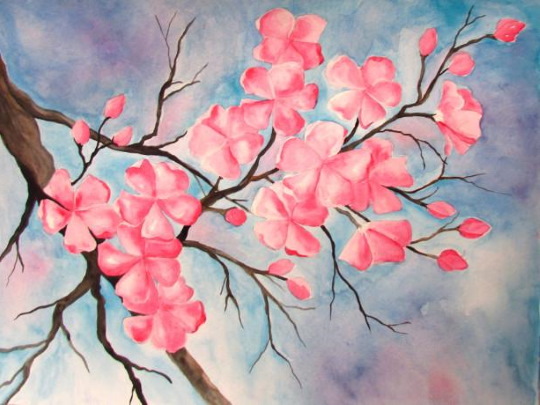
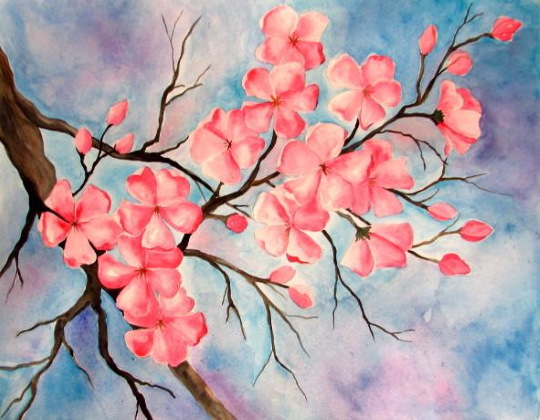
Detailed drawing of a branch
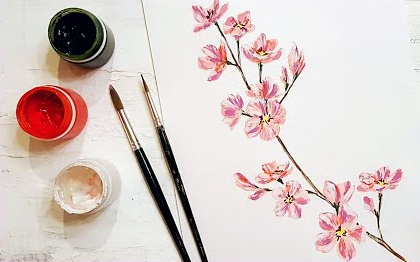
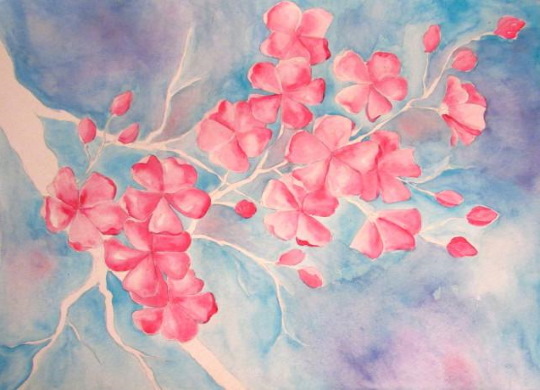
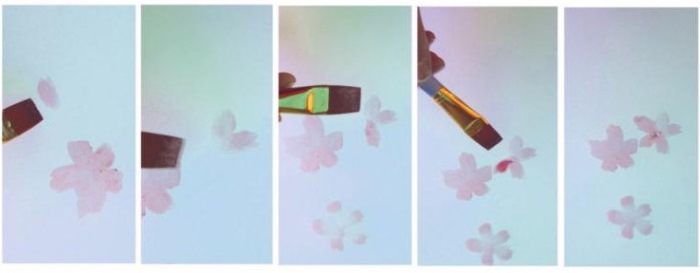
To depict a sakura branch covered with many pink flowers, you first need to set the background. In this case, it can be blue.
The work takes place in the following stages:
- Using blue color, create a background.
- Draw a small line of the branch in a dark brown tone. It is recommended to use a brush with hard bristles for this. The line should be curved.
- Taking a large brush with soft bristles and dipping it into pink paint, make short strokes and put dots of the flower contours.
- Using a soft brush, apply dark shades of pink on the base. Using the same brush, add light shades. This will form the sakura flowers. The size of the brushes used can be changed at your discretion.
- Add dark flowers at the bottom, because the light doesn’t fall on them.
- Add light and dark tones.
- Use white and pink paint and a thin, hard brush to mark the texture on the petals. Use white paint for flowers that are exposed to light, and pink paint for flowers in the shade.
- Use an eraser to remove the edges of the base that were made at the earliest stage of this work.
- Draw a core for each flower and add some stamens.
With a pencil
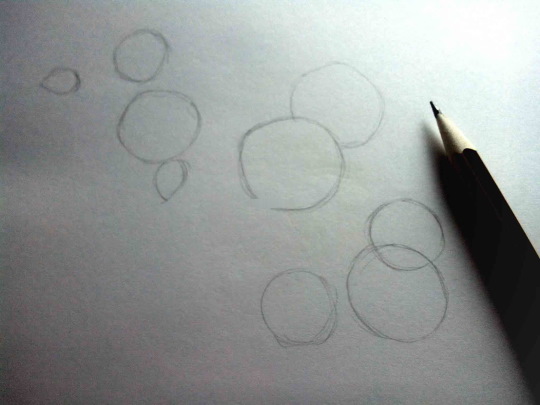
Sakura branch (to draw flowers you will need, in addition to desire, a sheet of paper, a simple pencil and an eraser) It is depicted in pencil in the following stages:
| No. | Stage | Description |
| 1 | Drawing the base of the branch | To do this, draw several wavy lines. The lower part of the branch, which will be on the sheet of paper at the bottom left, is quite thick. At the top, it splits into two, resulting in 2 thinner branches.
|
| 2 | Adding branches | On sakura, as on any other tree, many small side branches are attached to large, thick branches. Due to this structure, sakura flowers are located close to each other, which makes the tree look fluffy and graceful.
Add many small branches to each part of the large one. They should all differ in shape, growth direction and size. |
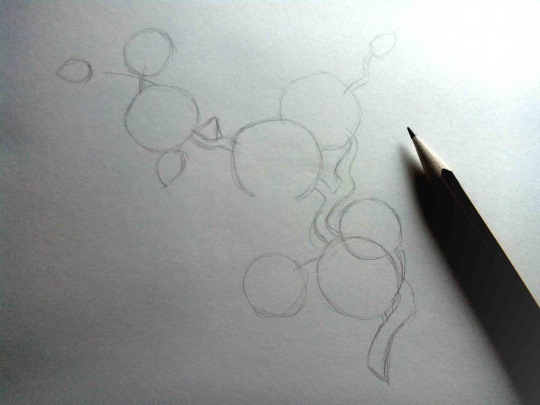
| 3 | Removing unnecessary lines | To do this, you will need an eraser. With its help, you can remove unnecessary lines.
If up to this point the drawing was more schematic, which made the work much easier, then to obtain a complete picture it is necessary that no extra lines remain.
The parts of the wavy lines where the small branches join the large branches should be erased. Some parts of the largest branches should be removed – those from which the thin branches grow. After working with an eraser, you will get the correct shape of a Japanese cherry tree branch. |
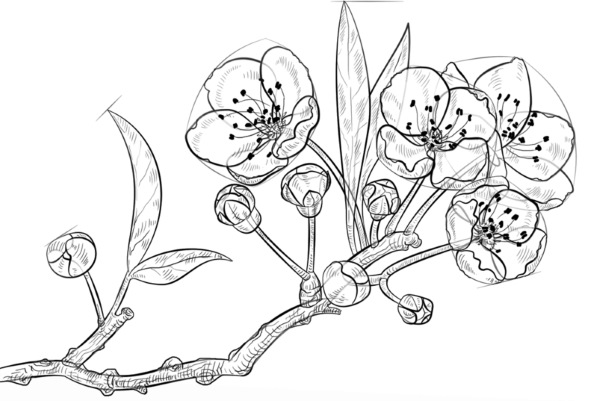
| 4 | Working on a flower | The main advantage of any sakura is its beautiful pink flowers, which look like fluffy clouds.
It is worth keeping in mind that each flower is large. It has 5 petals. Each petal should remain white. Only its contours, drawn with pencils, will be gray. On each petal, you should put several dots and draw several barely noticeable and short lines. These lines should be located near the core - where the petals begin.
The core of the flower must be completely painted with a simple pencil. You should start by drawing one of these flowers. It can be placed on any small branch. Once the first flower is drawn, you can start drawing the next one. Every small branch should be decorated with a flower. To make it easier to draw flowers, you can make a stencil. In this case, all the flowers will have the same size. The main purpose of the stencil is to simplify and speed up the work. |
| 5 | Improve the drawing by adding elements | To make the sakura branch look beautiful, you need to take an eraser and remove unnecessary lines and intersecting elements.
Then you should add elements that will give the drawing a natural look. Several more thin lines should be drawn on the branches and flowers. These will be the finishing touches in this work.
|


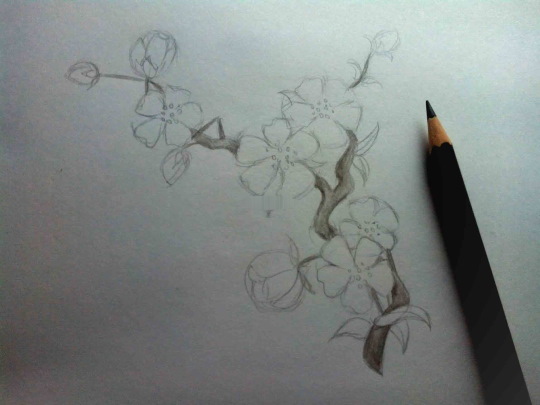
If you wish, you can paint the resulting drawing with paints. There should be no problems with the selection of colors. The branch to which the flowers are attached will be brown, and the flowers will be pink.
With paints
A sakura branch (its drawing can be done with either paints or pencils) does not require a preliminary sketch.
The work on its creation will take place in the following stages:
- Wet a sheet of paper in the places where you plan to depict flowers.
- In the center of the moistened areas, place 1 point using black paint.
- Proceed to drawing the petals. For this, pink paint is used. The petals should be created with broad strokes.
- Use a thin brush to draw the brown branches.
- Add a background. For this, blue and brown paints are used.
It is best to use a wide brush to create the background. You can do without a brush. A damp sponge will be an excellent substitute for it when creating a background. - Add a small amount of white paint to the flowers. This will make them more voluminous.
- Dry the painting.
- When the artwork is completely dry, frame it.
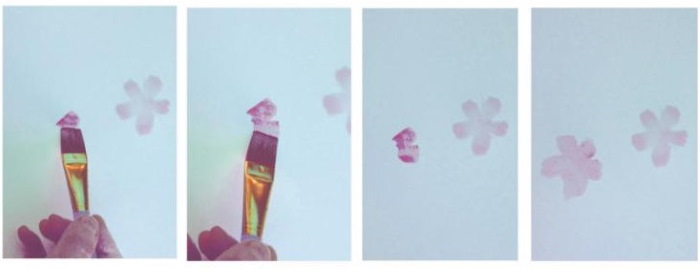
Gouache
The gouache drawing will be done using an unconventional technique called "finger painting". Another name for it is "imprint". This method of drawing a sakura branch is well suited for children. During such work, young artists become more familiar with the structure of the flower, as well as with the technique.
This work contributes to the development of:
- fine motor skills of hands;
- observation;
- imagination.
It cultivates such important qualities for a person as:
- perseverance;
- patience;
- the ability to see beauty in natural objects.
Like any other drawing work, this technique develops artistic and creative abilities. Before you start using the interesting "fingerprint" technique, you need to prepare the materials and tools that will be needed for such work.
Namely:
- A4 paper sheet. You should choose paper that is specially designed for painting with watercolors;
- sponge;
- cotton swabs;
- cotton pads. You can use an eyeshadow sponge instead;
- gouache.
Once everything you need is collected, you can start drawing.
The work takes place in the following several stages:
- Prepare a background for the future painting, the main "character" of which will be a picturesque sakura branch with many elegant flowers. To create the background, you need to moisten the sponge by dipping it in blue paint diluted with water. After wetting, you need to carefully run the sponge over the entire surface of the sheet, trying to create an even layer.
- Allow the background time to dry.
- Move on to drawing the tree branches. This should be done with your fingertips, dipping them into brown gouache.
- Create paint for drawing the most beautiful elements of sakura - its flowers. They are pink, so you need to take 2 paints - red and white, mix them. As a result, a soft pink shade is formed - the one that is required for drawing flowers.
- Proceed to the drawing of flowers. This should be done with a sponge or cotton pad. Flowers should be located on all branches. Each of them has 5 petals. The petals should be located in a circle, while their core should be left unpainted. At the next stage, it will be drawn with ruby paint.
- Once the work is dry, take ruby gouache, dip a cotton swab into it and draw the core of each flower with soft pink petals.
- Draw the stamens. To do this, cut a cotton swab, then dip it in yellow paint and put a few dots around the core of each flower.
- Armed with a thin brush, add a number of thin branches to the drawing, on which the buds will be located. The latter, in turn, are drawn using a sponge and a cotton swab.
This completes the work on creating a drawing of a sakura branch, decorated with a scattering of soft pink flowers.
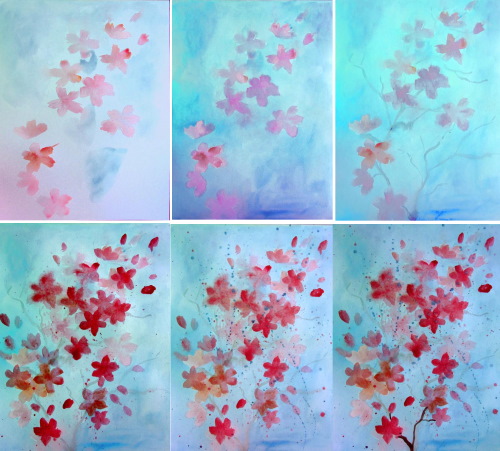
Watercolor
Drawing a sakura branch with watercolors is one of the easiest drawing methods.
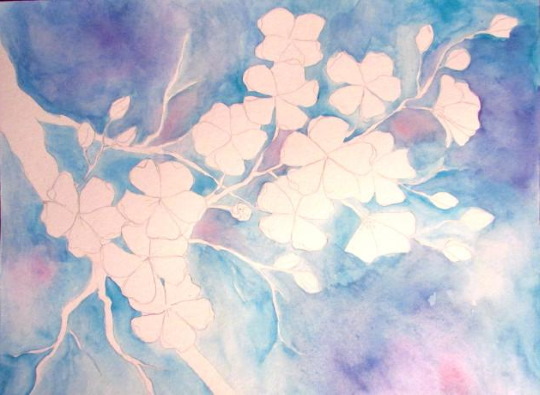
First, you need to prepare the materials and tools that will be needed for creative work:
- Paper. It is better to take one that has a density of 300 g/m2. The recommended size of a paper sheet is 280 by 355 mm.
- Watercolor. It is best to use semi-dry honey watercolor paints.
- Brushes for painting. It is better to prepare 2 pieces in advance. One of them should be thin and flat, and the other one should be thick.
Having prepared the necessary materials and tools, you can proceed to the work.
The process takes place in the following stages:
- Draw a rough outline of a flower using pink and a wide brush. In the same spirit, draw a few more flowers. These flowers will act more as a background, so they should not be too bright.
- Using a wide brush, add a few blue and purple shades for the background.
- Use a thin brush to outline the branches for the background flowers.
- Using the same technique as in the previous stages, depict bright flowers. This way they will be in the foreground. It is recommended to add a small number of buds that have not yet blossomed to the flowers.
- You can make a painting more beautiful by intentionally splashing it with blue and pink paint.
- Proceed to drawing sakura branches. For this, use brown and black shades mixed with each other.
- Having finished working on the branches, connect the background flowers and buds.
- Additionally, draw some empty branches.
- Mark the core of each flower. This is done with a small yellow dot.
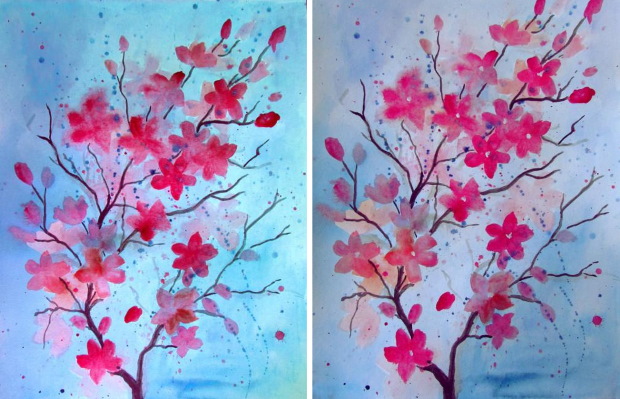
A more complex version of the image of sakura with a pile of flowers will be done as follows:
- Draw 1 flower with 5 petals. Its approximate size is 2-2.5 cm in diameter. First, draw 1 petal in the shape of a heart, then the remaining 4.
- Add a curved line to the edge of each petal.
- In the center of the flower, mark the core with lines.
- Draw a few more flowers next to the first one. They will represent inflorescences.
- Draw small leaves occasionally among the flowers, as well as several unopened buds. The buds will be represented by ovals with several leaves.
- Draw a few more groups of inflorescences.
- Combine all the groups of inflorescences and look at the drawing from the side.
- If necessary, add more flowers, buds and leaves.
- Color the background of the image. You can use blue, purple or pink for this.
- Let the background dry.
- Paint the petals pink.
- Mark the branches with black and brown shades.
- Add small strokes to the center of each flower.
- If necessary, refine the background.
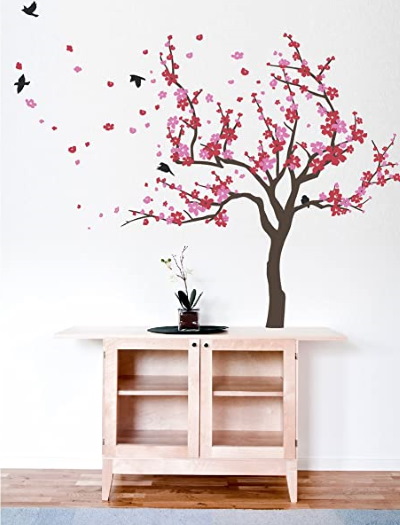
Picture on the wall
After mastering drawing on paper, you can try to depict a sakura branch on the wall.
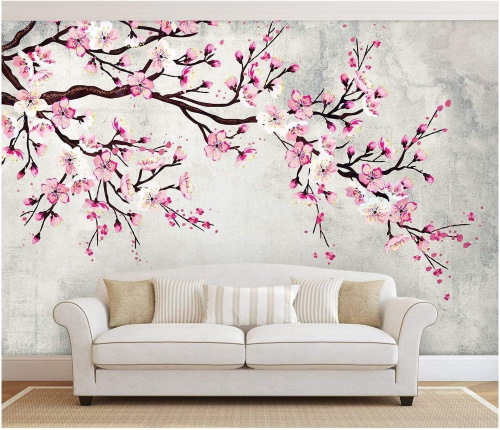
A simple option would be done as follows:
- Prepare the wall for applying the image, taking into account the shade of the flowers. For example, if they are white, the background should be contrasting. For example, shades of gray or blue.
- On a clean wall, make a sketch of a branch with a simple pencil. When applying the image, be sure to take into account the size, proportions and location of the flowers.
- Take brushes of different widths. It is better to use acrylic paints. You will need dark and light brown, pink and white colors.
- Draw a branch with brown paint, indicating the bark and structure of the tree with a lighter shade.
- Draw flowers. Each should have 5 petals and a core.
To visualize a sakura tree on the wall, you need to approach the surface preparation more seriously.
It is important that the wall is:
- even;
- puttied;
- polished;
- painted with a base color.
When creating an image, it is permissible to use the same paint as for the walls.
The stages of drawing are as follows:
- Draw a sketch of the tree with a pencil.
- For work take black, white and pink paint.
- Draw the tree trunk and branches with black paint.
- Add texture with white tone.
- Draw pink flowers with white cores in the center.
Another option is drawing using stencils.
To do this you should:
- Determine where the image will be located.
- Attach the stencil with masking tape.
- Apply paint with a brush or sponge.
- After the paint has completely dried, remove the stencil.
- Add decoration if necessary.
A similar method of tracing and drawing can be done with a projector. First, outline the outline, and then color it.
If you try, your first attempt to draw a sakura branch will be crowned with success. Even a novice artist will definitely get a beautiful branch, strewn with a scattering of pink flowers. New drawings will become more beautiful and look like real works of art.
Video about drawing
Sakura branch - drawing: