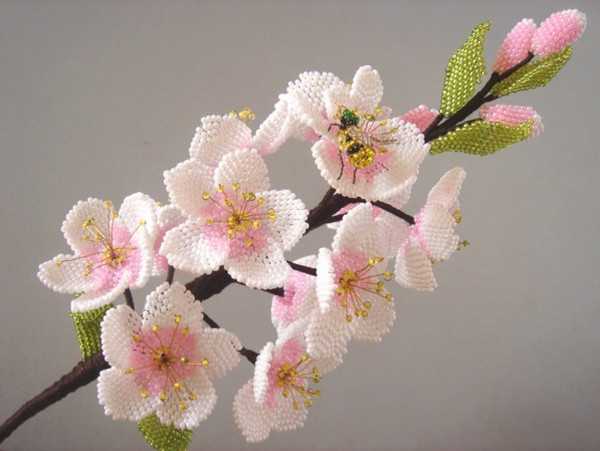
The Japanese associate the blossoming of sakura with beauty, fragility and the transience of life. The ceremony of contemplating it is called "hanami". There are more than 400 subspecies of sakura. Flowers can be white, pink and many other shades.
There are also 2-color varieties, such as Kanzan (pink-purple petals) and Kiwanoshizakura (pink with a white-yellow or red tint in the middle). Some types can have lush double flowers. All this makes the number of options decorations when weaving them from beads practically endless.
Schemes with description of works for beginners
With the image of sakura you can weave many different beautiful and elegant things:
| Type of jewelry | General characteristics and features |
| Bracelets | These can be thin string bracelets for the wrist or more massive and wide ones for the forearm using different techniques. |
| Garlands | You can create beautiful flower garlands that are suitable for decorating an apartment or garden in the style of Japanese minimalism. |
| Fan | To create a stylized fan with sakura, lay out its outline with large beads. |
| Long pendants on chains | You can choose a suitable base shape, for example, a heart, and decorate it with beaded sakura. |
| Rim | A simple and elegant headdress decorated with images of sakura flowers and leaves will suit any outfit. In order not to complicate the task of finding a headband that fits your head, you can take an elastic band of any size and simply decorate it with a beaded ribbon. This option is suitable for beginner craftswomen. |
| Brooches and earrings | Images of sakura branches with flowers and leaves can be assembled on wire using beads of the appropriate size as a base. |
| Mini-painting | Glitter and rhinestones from beads will add a glossy shine and shimmering effect to the painting with sakura. |
| Flowers for clothes | You can create delicate sakura flowers from beads of different sizes to decorate a handbag, hat or suit. These can be small flowers with several petals or voluminous sakura branches from large elements. |
| Pillow covers | You can make items from beads of contrasting colors, using them as edging. |
Depending on your experience, you can use the following techniques when beading:
- the base for jewelry can be made of beads, satin ribbon, leather or wire;
- Sakura elements can be placed in different ways, for example, in the center of the decoration or along its perimeter;
- In addition to the main color, you can add other shades to make the decoration more interesting;
- To achieve different effects, you can use beads of different shapes, sizes and materials.
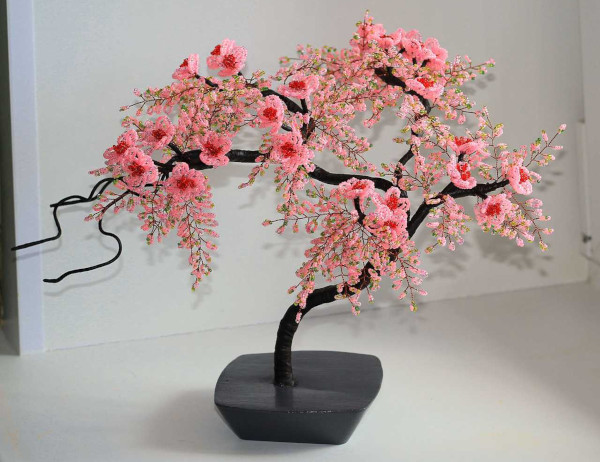
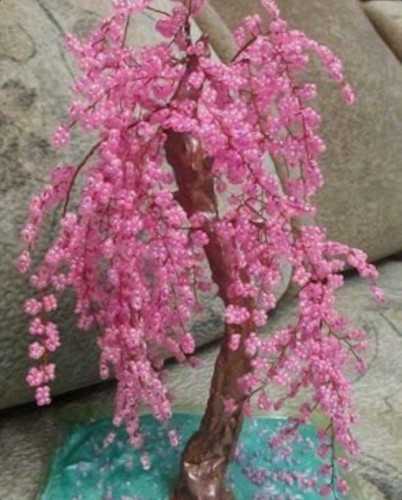
Tree of beads
The master class will use beads of 2 shades: pink and dark pink. Its recommended size is No. 10. Glass beads are transparent, shiny and resistant to external influences. Zirconium and metal material are highly durable and long-lasting.
Acrylic and plastic elements are available in a variety of colors and are suitable for simple projects.
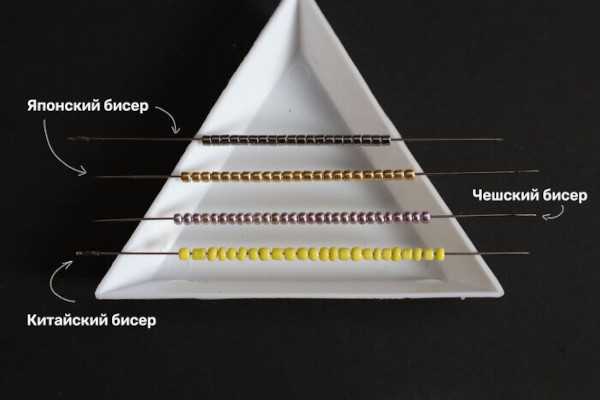
Depending on the type of beads, we can recommend the following manufacturers:
- Czech Preciosa and Miyuki (glass beads);
- Japanese Toho and Matsuno (made of glass and crystal);
- Korean Mancera and Miyoshi Glass Beads;
- American company Kameha (stone, shells and wood);
- Chinese (plastic, acrylic and glass).
The following materials and tools are used in the master class:
- A thin wire for creating smaller details. Its diameter is 0.3 mm. It can be made of various metals, such as copper, steel, nickel. Often used is "invisible wire" - a type of jewelry wire with a special transparent resin that creates the effect of invisibility.
- Using thick wire, create the base for the products.
- Masking tape will ensure careful work with materials and will help keep things clean.
- PVA glue is the most popular and universal adhesive, it is safe and environmentally friendly.
- Alabaster forms a quickly hardening and compacting mass when mixed with water. It is used as a binding agent. It will be used for decorative purposes.
- Acrylic paints are versatile and come in a variety of colours. They create vibrant, rich shades and are resistant to water and external influences.
- Thin metal foil will protect the branches when working with the trunk.
- Small scissors with comfortable handles and sharp tips. Also needed to carefully cut off excess ends of wire or thread.
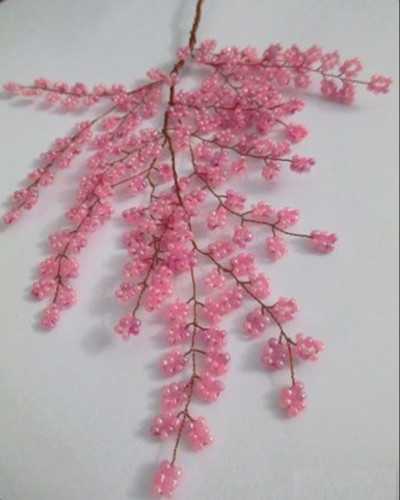
Volumetric beaded sakura is created using the following steps:
- Mix beads of different colors so that all colors are evenly distributed. Take containers of different sizes, pour beads into them and transfer them from one to another. To reduce the number of manipulations, you can use several containers of the same size. This step is necessary so that individual color fragments are not noticeable in the finished product. 6 beads are strung on a wire about 45 cm long. Make a loop, leaving a free edge.
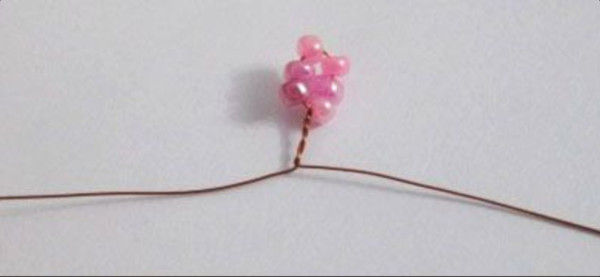
- Weave 11 loops at equal distances from each other - approximately 1 cm.
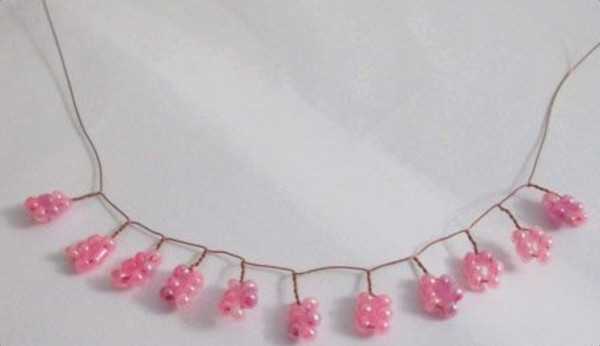
- The wire is bent so that 1 loop is in the center, and the rest are located opposite each other at equal intervals.
- The loops are twisted together. This can be done from the top or bottom. This is the main stage in the formation of the trunk and the first branches of the tree.
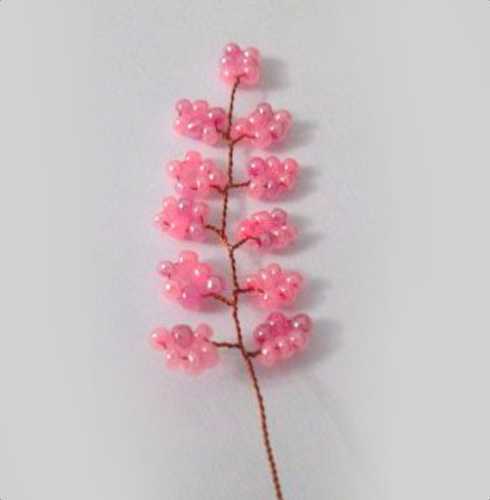
- In total, 70-100 thin "branches" are made. They are also made by twisting the wire.
- The branches are combined in 3s. This creates the main thicker branches. You need to make 3 such elements.

- To create the upper branches, 2 main branches are woven together.
- The middle branches are obtained by connecting 3 main branches.
- The lower branches unite 5 main branches. It is desirable that there are at least 2 and at most 3.
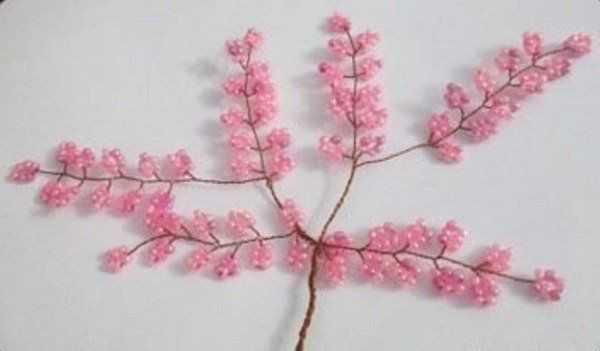
- Cut a thick wire (about 40 cm long) and screw the 2 upper wires to it, which will form the trunk part. For a tighter connection, wrap this part with masking tape.
- Starting from the middle, you need to attach 3 medium branches to the trunk and add 1 thick wire. You can attach each branch to the trunk using thin wire or fishing line. This will help give the tree a realistic look and create the impression that the branches are part of the trunk. They can be directed upward or slightly curved, creating volume and realism. To ensure reliable adhesion, wrap the entire structure with masking tape, which can be easily removed if mistakes are made.
- Attach the wire to the trunk and tie the lower branches. Wrap the trunk with tape for better adhesion of the elements.
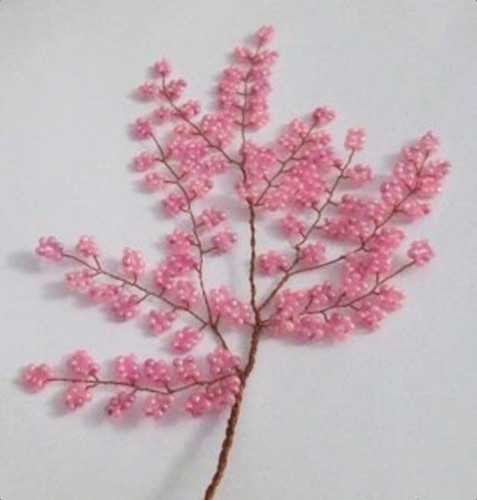
- The form for the trunk with branches is placed on a stand or on a table. Fill it with a solution of alabaster. This will give the tree strength and stability. After the alabaster hardens, a solid base for the tree is formed.
- Cover the branches with aluminum foil. Carefully bend the trunk (this will give the tree a natural look).

- Create a mixture to cover the trunk. For the solution, mix 1 teaspoon of alabaster, 1.5 teaspoons of PVA glue and a little water to get a consistency similar to that used for pancakes.
- Treat the entire trunk with the mixture (this will create the appearance of tree bark). Let dry.
- Paint the trunk with acrylic paint that will convey the shade of the bark. Carefully cover all areas of the trunk, achieving the desired color and texture. Let the paint dry.
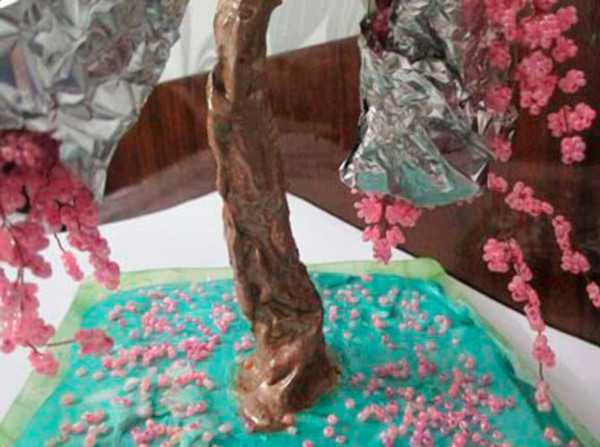
- Apply a protective layer of varnish, which will ensure durability. The varnish will fix the paint and give the product a finished appearance. After varnishing, allow the layer to dry completely.
It is important to consider the following points when working with alabaster:
- To prepare the solution, you need to mix the dry powder with warm water in the proportion indicated on the package;
- the solution hardens quickly, so it should be used as soon as possible after preparation;
- It is not possible to produce a large volume of the solution quickly, so most likely some of it will remain unused and harden. It will be impossible to use such a solution.
Image of a tree
For the master class you will need the following beads:
- Pink. For creating accents and decorative elements. Approximately 1 g.
- Brown. This is the main color used to weave the elements. Approximately 4 g.
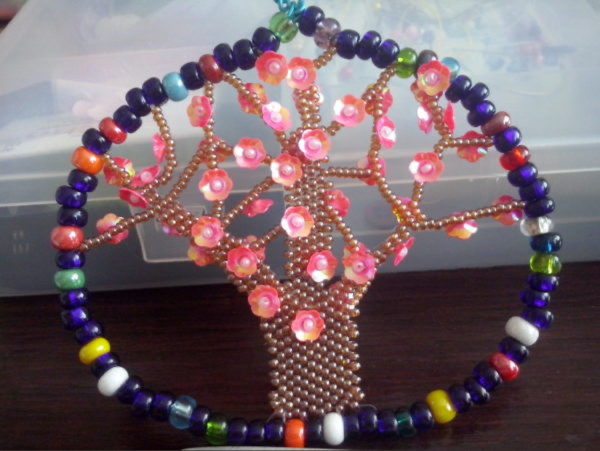
In addition to beads, to make jewelry you will also need various materials and tools:
- Needles are used to pull threads through beads. There are beading needles with different tips: open, closed, with notches. They should be sharp enough.
- Monofilament or thin fishing line. Should be strong, elastic, easy to work with and match the color of the beads.
- Concave sequins "Flower". These are multi-colored sparkles that are sewn on as decorative elements. They can be used to create additional volume and add shine. Recommended color - pink mother-of-pearl. About 3 g.
- Beads are large and multi-colored. Glass, metal or plastic beads of various shapes, sizes and colors. Used to create the base. Approximately 10 g.
- Wire. Serves as a basis for creating a pattern and connecting parts. It is better to use thin wire made of copper or nickel-plated steel. About 30 cm.
- Scissors are used to cut wire and fishing line to the desired length and shape the product.
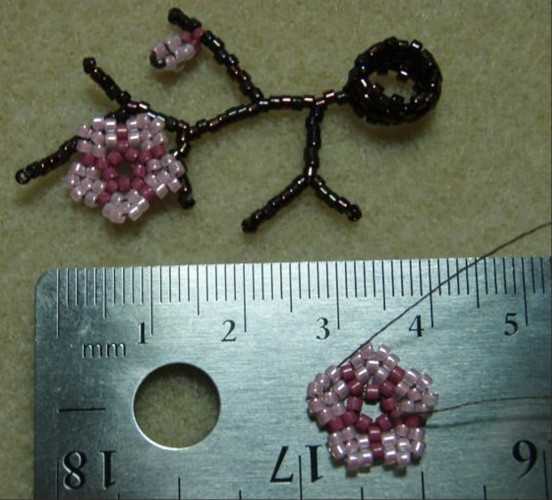
Sakura from beads is made according to the following steps:
- For the base, take a thicker wire and form a circle out of it. On this circle, you need to string large beads, alternating them by color. The ends of the wire are twisted in a spiral and bent in the form of a loop to hide the wire inside the beads.
- The trunk is woven using a simple mosaic technique, the beads are placed between the elements of the previous row. 8 beads are collected on a monofilament.
- Pass the thread through the beads from the beginning: 5th, 9th, 3rd, 10th, 1st, 11th, 12th and so on. In this case, the basic principle of mosaic weaving works - each bead touches the neighboring ones in 2 rows at once.
- Several centimeters of the trunk are woven.
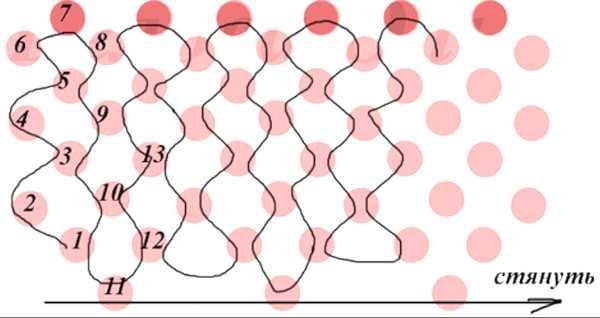
- To create thick branches, use the same pattern, but move 1 bead towards the base.
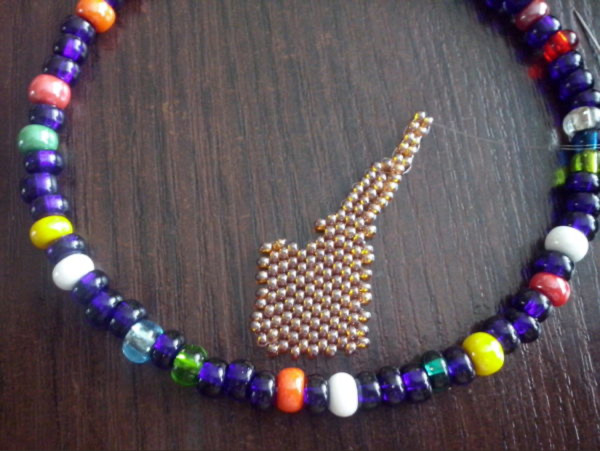
- Move on to creating thin branches. They are made from the corners of thick branches, using 1 row of beads strung on a monofilament.
- The tree trunk is applied to the base, and if all dimensions match, it is attached with a monofilament. The knots should be hidden so that the monofilament is not visible.
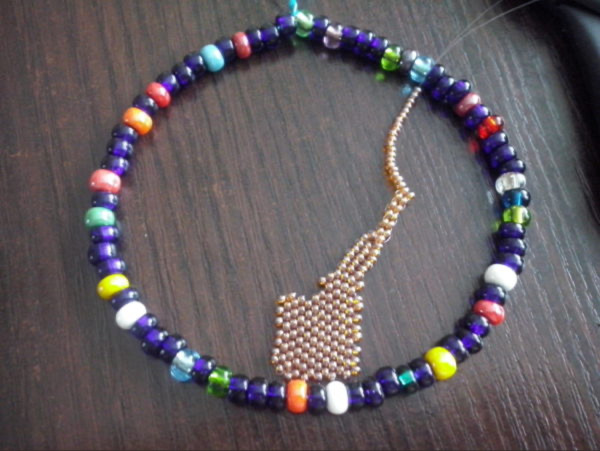
- They move on to weaving thin branches from the opposite side of the tree.
- In the center, a third thick branch is made, from which thin branches also extend.
- Add thin branches, located asymmetrically to the trunk and main branches. These elements add smoothness and volume to the entire composition.
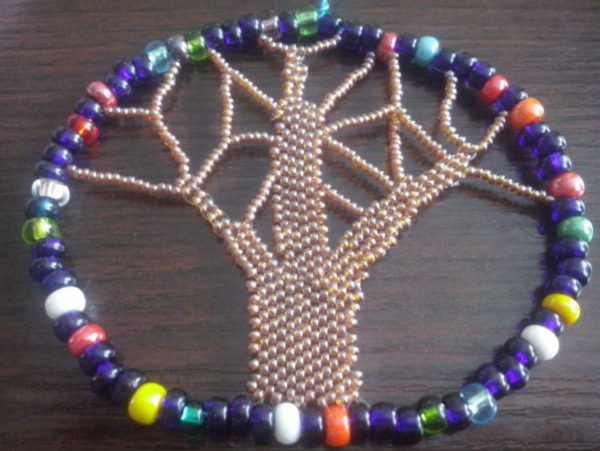
- Each branch is fixed to the base.
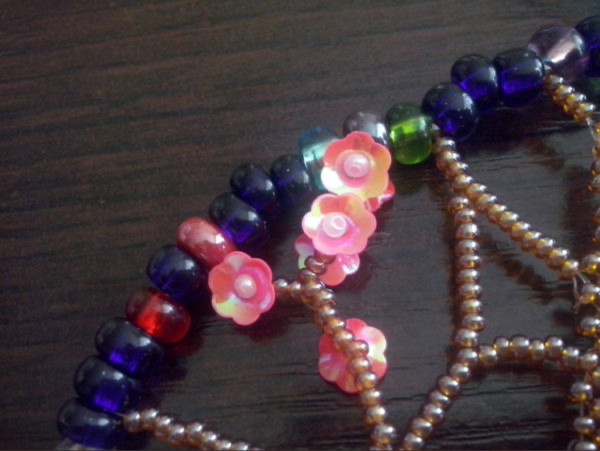
- Flowers are made from pink beads and sequins. They are sewn on the front and back sides. All sides of this product should look equal and harmonious.
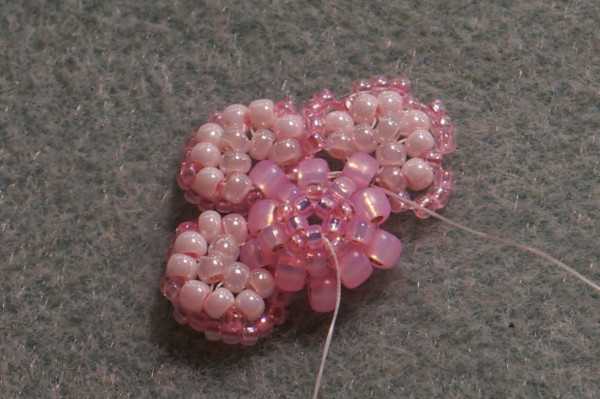
Flowers
The following will be used within the framework of the master class:
- Beads: light pink 8/0, 10/0 and 11/0, hot pink, gold and green. These colors are widely used. Larger bead sizes (8/0 and up) are suitable for creating three-dimensional elements, while smaller beads (10/0–11/0) are more often used for filling space and adding details.
- Thin wire, monofilament or thin fishing line. Wire is more flexible and allows you to work with different shapes and sizes of jewelry, but requires caution when working to avoid kinks and damage. Fishing line is more convenient for weaving, since it is thinner.
- Needle for beads for stringing on wire or fishing line and scissors for cutting off excess elements.
Sakura from beads is created in a master class, which includes the following steps:
- To create the initial circle, take 5 beads, each of which will be a petal of the future flower.
- In subsequent rows, additional beads are inserted. It is important to add beads of different sizes to create volume and realism of the petals. For a denser flower, alternate adding beads in the following order: 3, 5, 3. For less dense ones, add them through a row. Each bead should fit tightly to the previous one, forming a continuous chain.
- In the next row, add 3 beads for each bead from the previous row. The needle is held on the back side of the work, interlacing the beads between the rows. You need to twist the needle clockwise and hold it in place with 1 finger for some time to secure the created structure. The petals are created gradually, as beads are added in each new row.
- In the next row, add 5 beads. Secure, add 3 more. This creates a complex and interesting pattern of petals, adding volume and depth to them. To add volume and complexity to the petals, you can increase the number of beads at the edges of the petals and decrease their number closer to the center. This will create a gradient effect and make the petals more expressive.
- Form the stamens. Measure out 2-3 cm of thin wire, fold it in half and secure it so that you get the legs of the stamens. You will need 5-6 pieces of wire in total. Attach 1 gold bead to each end of the wire - these will be the heads. Place them in the center of the flower, securely securing the fishing line. For expressiveness, you can add a little shine with nail polish.
- You can make leaves using a simple mosaic technique.
A small branch with a flower
To conduct the master class you will need the following materials and tools:
- Light pink beads will be used to make flowers, and dark pink beads will serve as the base for the petals.
- Brown beads are needed to work on individual elements, such as twigs.
- Monofilament or thin fishing line will provide fixation of the structure, while maintaining the flexibility of the elements.
- A beading needle will allow you to thread the thread through the hole in the bead.
- Scissors will be needed during the work process to adjust the size of the parts and the overall appearance of the finished product.
Sakura from beads is created using the following steps:
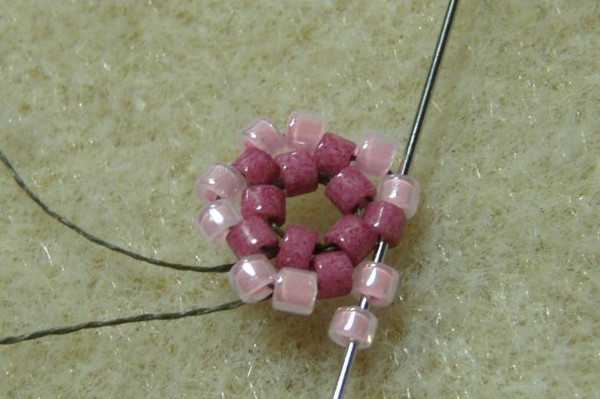
- 5 dark beads are strung on the fishing line and closed into a ring, passing through the first 2 beads in the opposite direction, and tightened. This circle should be located at the beginning of the fishing line section, since the weaving will be done in 1 thread.
- From the 1st row, insert 1 bead between the beads. Pass the needle through the last bead on the 1st circle and the 1st bead of the current row. This forms the basis for the petals.
- Between the dark beads of the 1st row, insert 2 light beads. Pay attention to the formation of the last pairs: the needle is passed through 1 dark bead and 1 light bead of the current circle.
- They begin to form a flower. They string 1 light bead and another light one on the other side of those already on the line. Similarly, they also attach a dark bead above the dark one, creating a contrast and forming the intended pattern. They weave in a circle.
- Light beads are strung into all the spaces. This enhances the color contrast and creates a more multifaceted visual image. The pattern will be repeated throughout the circle.
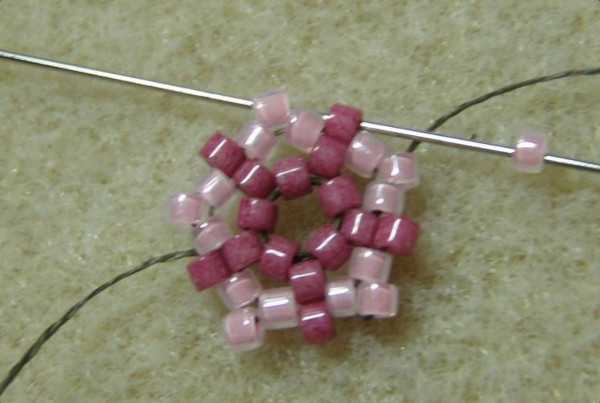
- Form the petals. To do this, insert 2 light beads between the beads of the previous row. Leave gaps between the dark ones without additional beads.
Earrings with sakura flower
To conduct the master class, you will need materials and tools that will ensure convenience and high quality of work:
- Pink beads size 8/0, 11/0 and 15/0.
- Monofilament or thin fishing line serves as the basis for creating beaded items and helps to secure the elements in the desired position.
- Scissors can be used to cut fishing line and perform other actions related to material processing.
- A beading needle is necessary for performing operations when working with beads, such as threading, pre-securing elements before stringing them onto a base, and so on.
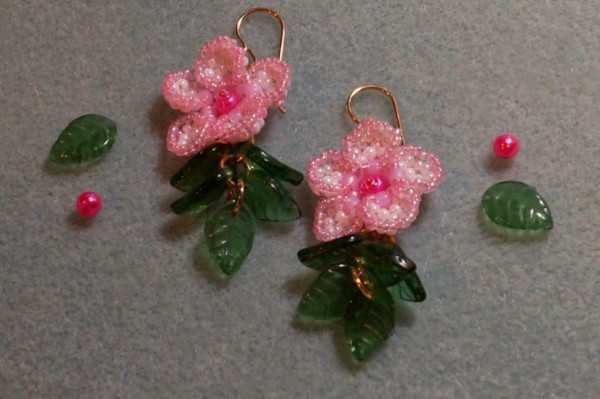
Sakura on earrings can be woven from beads by following these steps:
- The base of the flower will be a circle of 5 beads of size 15/0. To do this, string the beads on a fishing line, leaving the tails free for further formation of the product. Tie the tails closer to the end of the segment so that the weaving takes place in 1 thread.
- Add additional beads in the following rows. In the 2nd, counting from the 1st circle, place beads of size 11/0 between the beads of the 1st row. In the 3rd and 4th rows, also place beads of size 8/0 between the beads of each previous row. These actions will help to build the base of the flower.

- Use 15/0 beads. Attach 3 beads above the beads of the previous row. Return from the back side and make the next row, adding 1 more. String 2 more beads onto the 1st bead of the previous row and attach them to the 2nd of the current row. Between the beads of the previous row, add 2, and at the end - 1 more. Thus, having built this part, you can get 5 petals for the flower.
- Leave the long ends of the thread used to create the petals free inside the product and secure the edges of the petals as follows: every 2 beads of the previous row must be secured with 5 pink ones. To give the product greater density, go through the same row again, filling the holes between the stitches with 1 bead.
- Add small leaves to each petal using a few more beads to create volume and texture. It is recommended to choose colors that harmonize with the main color scheme of the earrings.
- Attach fasteners so that the garment can be put on and taken off. This can be a hook, a stud, or another type of fastener that matches the style chosen.
You can make various sakura decorations from beads, such as earrings, bracelets and beads. Pendants, brooches and hairpins will be beautiful. You can also use sakura for embroidery on clothes, shoes or interior items - paintings or pillows.
The choice of weaving technique depends on preferences and skill level. For example, you can create a voluminous sakura branch by making it from a dense chain of beads.
Video about sakura from beads
Master class on weaving a sakura branch from beads: