When knitting hats from thick yarn, you need to consider the texture of the threads so that the pattern on the headdress looks appropriate. The peculiarity of large-diameter threads is that they themselves create a certain relief on knitted items. If you choose too voluminous a pattern, the hat will look large and sloppy.
The best hat patterns and their features
| Example | Pattern name | Peculiarities |
 | Stockinette stitch | For large yarn, this is one of the most successful pattern options. The headdress with it turns out to be moderately dense and voluminous. To decorate hats, additional decor is used: beads, pearls, brooches, etc. |
 | Rubber | The knitting method ensures the elasticity of the headdress.
A hat with such a pattern stretches well and rarely gets stretched. The elastic band can be knitted in more than 20 variations. Some patterns are more suitable for creating women's items, others - men's, and others are universal. |
 | Garter stitch | When knitting with this pattern, the headdress retains elasticity, but does not stretch over time.
The technique is suitable for decorating the entire canvas of a men's or women's hat. The pattern where the front loops are knitted in one color and the back loops in another looks original. |
 | Spiral | The pattern is suitable for thick hats with lining or double ones.
The design looks three-dimensional, but has many relief holes, which is why the headdress is blown through in the wind. |
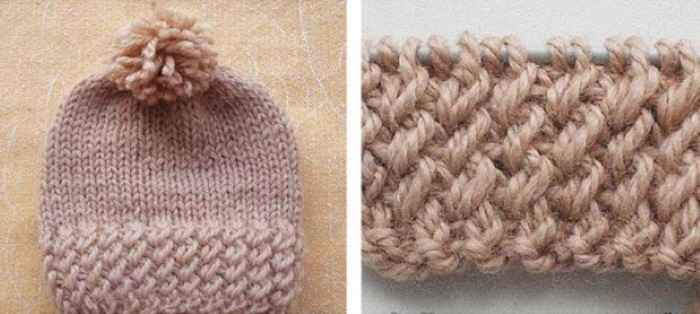
 | Pearl or small chess | This is a simple pattern to make, but it looks original when knitted with thick yarn.
The design is suitable for women's hats, as it would look strange on men's items. The peculiarity of the pattern is its bilateral symmetry. This is precisely why it is suitable for knitting winter sets of a hat and a scarf or snood. |
 | Scythe | Braid patterns can be simple or voluminous.
They can be made part of the main decoration of the hat or complement the headdress with one braid, twisting in a circle or vertically. |
 | Feather | The pattern looks great on hats made from thick yarn, which prevents wide gaps between stitches from forming during knitting.
The pattern is only suitable for creating women's headwear. It is better to include several rows with this design, rather than knitting the entire hat in one style. |
Conventional symbols in knitting patterns
The following symbols are used in the diagrams of the described patterns:
- P – loop.
- R – row.
- LP – front loop.
- IP – purl loop.
- KrP – edge loop. If this is the first loop in a row, it is removed to the needle without knitting. The last edge loop is always worked as IP.
- UB – decrease, when 2 sts are knitted together as if they were knitted together.
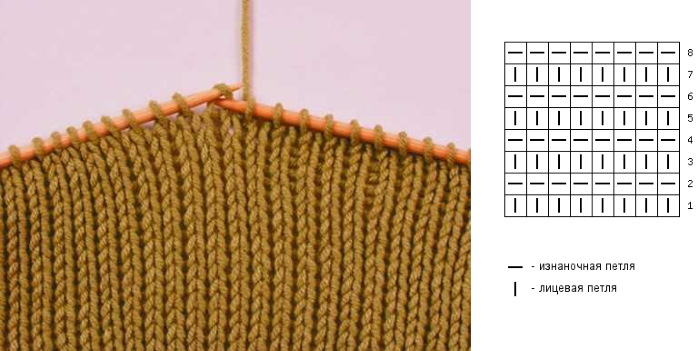
Stockinette stitch
The stockinette stitch is made from 2 types of loops: LP and IP. The knitted fabric looks smooth, all the loops fit tightly to each other.
Knitting stockinette stitch with turning rows
According to the diagram, horizontal lines indicate IP, and vertical lines indicate LP.
Knitting instructions:
- The required number of loops are cast on to the knitting needles.
- The entire first (even) row is knitted with LP.
- 2 R perform IP.
- Continue alternating even and odd rows until you finish knitting.
Loops can be knitted in 2 ways:
- The front loop is knitted behind the back wall, and the front loop is knitted behind the front wall.
- The front loop is knitted behind the front wall, and the back loop is knitted behind the back wall.
If all the loops are knitted only through the front or only through the back wall, then the front surface will turn out sloppy: the pattern will not be clearly visible.
Knitting in a circle
In this method, knitting is performed only with facial loops. After the required number of them is collected on the knitting needles, the chain is connected and knitted in a circle without KRP and IP. Circular or separate knitting needles (5 pcs.) are used for the work.
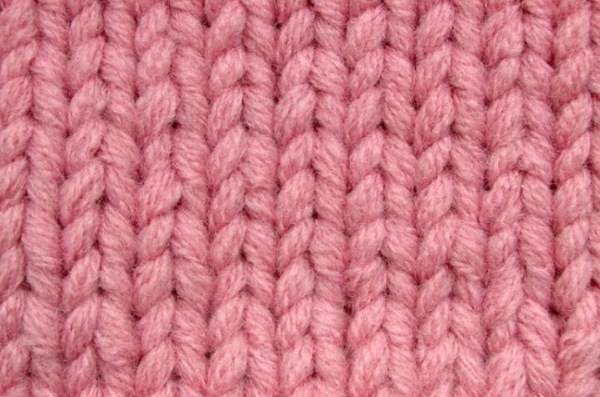
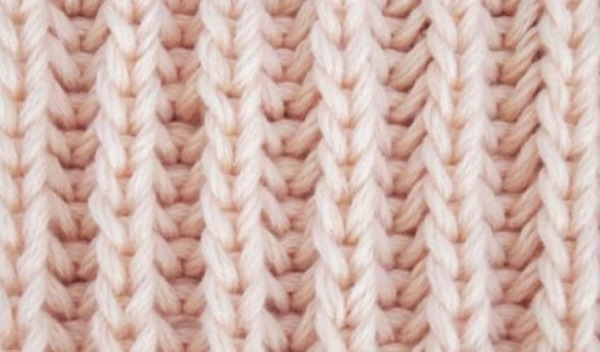
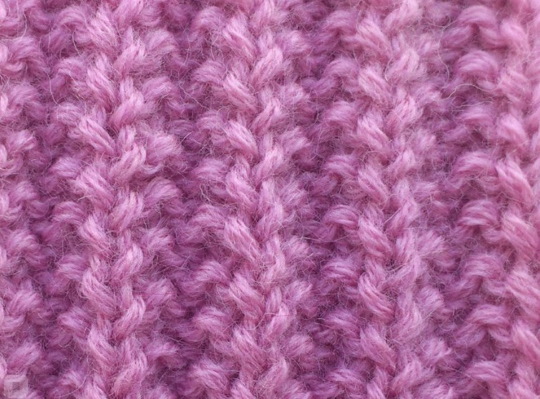
Rubber
The bottom edge of the hat is usually knitted with an elastic band so that it fits tightly around the head and does not press. But when knitting with thick yarn, the pattern made across the entire fabric looks good on both women's and men's hats.
The easiest way to knit elastic is to alternate LP and IP with a rapport of 1x1 or 2x2. Less often, 3x3 and even 4x4 loops are knitted alternately. When working, you should ensure that the front loops remain above the front loops, and the back loops above the back loops.
French elastic
The pattern for a hat made of thick yarn can be knitted with knitting needles not only in the form of a simple, but also an openwork elastic band. The pattern rapport consists of 4 P. To the total number of loops, a multiple of 4, add another P for symmetry and 2 KrP.
Knitting technique with turning rows:
- 1 R: Remove the KrP, alternately knit 2 LP, 2 IP to the end of the row. Knit the last loop LP and KrP as IP.
- 2 R: Remove KrP, knit 2 in turn, IP 2 LP to the end of the row. Knit the last loop purlwise and KrP is also knitted as IP.
- Rows 3 and subsequent rows are knitted by alternately repeating patterns 1 and 2 R.
The technique for knitting French elastic looks like this:

Note: filled squares are IP, empty squares are LP.
Elastic band with oblique loops
A knitting pattern for a hat made of thick yarn can be made in the form of an unusual elastic band. This knitting technique is suitable for edging the lower edge of a headdress. An elastic band with oblique loops will look voluminous if you knit the entire hat with it.
The pattern rapport consists of 5 P, to which 2 KrP are added. All edge loops are made in accordance with the general rules: the first is removed, the last is knitted IP.
Step-by-step instructions for knitting the pattern:
- Loops are cast on the knitting needles, the number of which is a multiple of 5 + 2 KrP. If the number of rapports is even, then knitting begins with a shift of 1 P.
- 1-2 R: knit loops, alternating 1 LP and 1 IP.
- 3 R: remove the edge loop, skip the first LP, insert the knitting needle into the hole below the next IP. Without knitting the loop, pull the thread out, make a yarn over, then knit 2 P from the working knitting needle behind the back wall. Knit the entire row in the same way.
- 4 R: turn the knitting, perform the entire row with a rapport of 2 IP together, 1 LP.
- 5 R and then knit, repeating alternately the patterns of rows 3 and 4 until the required width of the fabric.
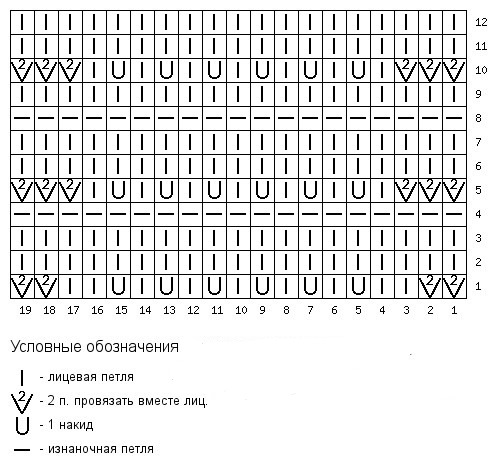
Elastic band
The pattern is knitted with a rapport of 5 P. It is suitable for decorating a hat made of thick yarn throughout the entire fabric. If you decorate only the edge of the headdress with such a pattern, the drawing will be invisible.
Step-by-step instructions for knitting a spike elastic band:
- Cast on a number of loops on the knitting needles that is a multiple of 5 + 2 P for symmetry + 3 KrP.
- 1 R: Remove 1 KrP, knit a rapport of 2 IP and 3 LP until 3 P remain. Then knit 2 IP and 1 KrP as IP.
- 2 R and other even: 1 KR, a rapport of 2 LP and 3 IP, until 3 P remain on the needle, 2 LP and 1 KR.
- 3 R and other odd: 1 KrP, then knit to the end of the row a rapport of 2 IP and 1 loop, 9t yarn, pull out the loop without knitting, make 1 yarn over, perform all 3 LP together behind the back wall. When the last 3 loops remain on the needle, they are performed as IP.
- Continue knitting the elastic band, alternating the pattern as in the 2nd and 3rd rows.
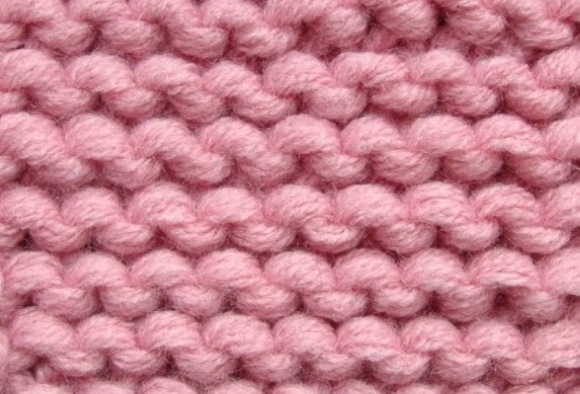
Garter stitch
The pattern uses 2 types of loops (front loops - empty squares, back loops - squares with a circle inside). They are alternated by knitting even and odd rows.
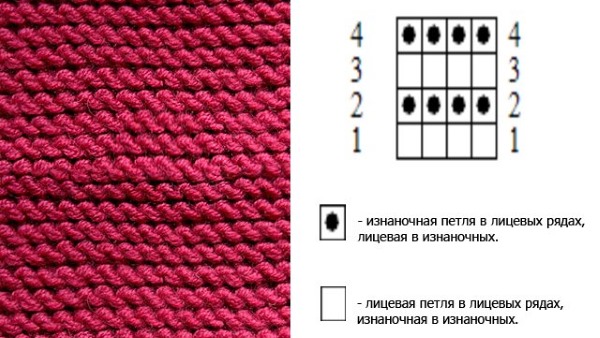
Scheme:
- When knitting in a circle. In the work, use a marker, which is placed at the beginning of the row. Knit the hat in a circle from the marker to the end of the row with face loops. Then the next row is done with purl loops and so on over the entire area of the headdress.
- When knitting with turning rows. The work pattern does not change, only edge loops are added: the first KrP is removed, the last one is performed as IP.
Spiral pattern
The pattern is knitted with a rapport of 4 P and 4 rows up. To start working, you need to cast on a number of loops that is a multiple of 4, 1 P for the symmetry of the pattern and 2 KrP.
Instructions for knitting the pattern:
- 1 R (wrong side of work): 1 KR, repeat of 1 LP and 3 IP to the end of the row, until 2 P remain on the needle. The penultimate loop is knitted as LP, the last KR as IP.
- 2 R: KrP, repeat of 1 IP and 3 LP to the end of the row. The last 2 loops are performed as IP.
- 3 R and all subsequent odd rows are performed as 1 R.
- 4 R is performed as the 2nd.
- 5 R are knitted like all odd ones.
- 6 R: 1 KrP, then knit the rapport to the end of the row: 1 IP, count the 3rd loop from the edge on the left knitting needle, drop 5 R (on the purl path), insert the knitting needle and pull out a loop, which is transferred to the left knitting needle and knitted together with the next LP, and another 2 LP at the end of the rapport. The last 2 loops in the row are worked as IP.
- 7 R are knitted like all odd ones.
- 8 R is performed similarly to 2 R.
- 9 R are knitted like all odd ones.
- 10 R: KrP, repeat to the end of the row (1 IP, 2 LP, count the second P on the right needle and step down 4 R along it, pull out the loop, transfer it to the left needle and knit together with the next P as LP), KrP.
- 11 R are knitted like all odd ones.
- All subsequent rows are knitted similarly to the pattern from 4 to 11 rows.
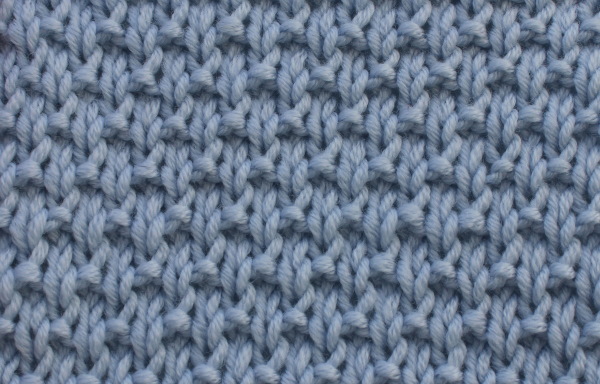
Pearl pattern
The pattern rapport consists of 2 loops, so the pattern can be easily adapted to a hat of any size. It can be knitted in a circle and in turning rows. The knitting technique is similar to a rib: LP and IP alternate, but they are knitted upwards not over each other, but in a checkerboard pattern. In the diagram, empty squares represent front loops, and areas with a dash represent back loops.
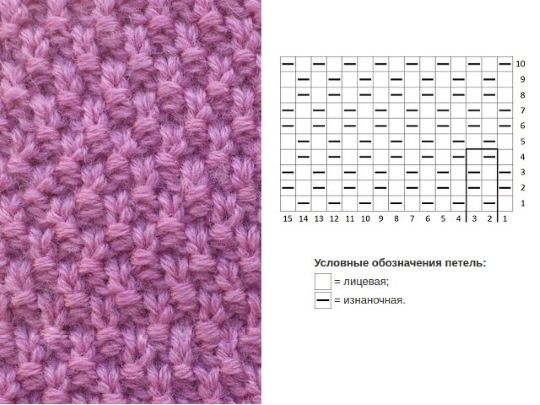
Instructions for knitting pearls in turning rows:
- 1 R: 1 KR is removed, LP and IP are alternated to the end of the row, the last KR is knitted as IP.
- 2 R: 1 KR is removed, LP is knitted over the purl loops, and IP over the front loops to the end of the row, the last KR is knitted as IP.
- 3 R and subsequent: repeat the knitting patterns of the 1st and 2nd rows alternately.
The technique of knitting pearls in a circle is even simpler. To do this, dial the required number of loops so that it is odd. The entire fabric of the headdress is knitted by alternating LP and IP to the required height of the hat.
Large pearls
The technique for knitting a large pearl pattern is similar to the previous one, only here the pattern repeat is 4 horizontal rows and 2 P.
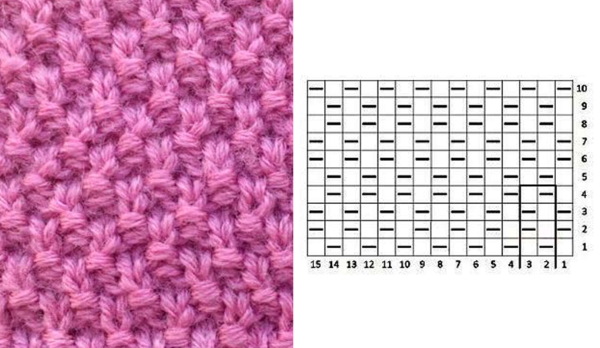
Step-by-step description of knitting with turning rows:
- 1 R: 1 KrP is removed, knit to the end of the row alternating LP and IP, 1 KrP.
- 2 R: 1 KrP, knit LP over the front stitches, IP over the back stitches, 1 KrP.
- 3 R: 1 KrP, knit LP over purl stitches, IP over knit stitches, 1 KrP.
- 4 R: 1 KrP, knit LP over the front stitches, IP over the back stitches, 1 KrP.
- 5 R and then perform as 3 and 4 R until the canvas reaches the desired height.
Schematically, the pattern looks like this: empty squares represent front loops, and areas with a dash represent back loops.
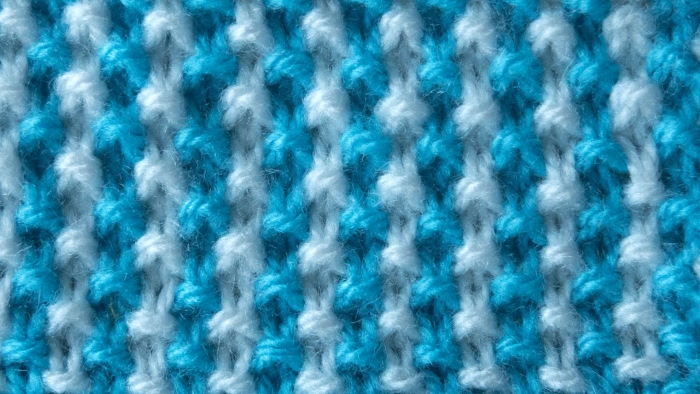
Two-tone pearls
A pattern for a hat made of thick yarn with knitting needles in the form of 2-color pearls allows you to knit bright children's and youth headdresses. The disadvantage of the technique is that the products are one-sided, so the knitting method is not suitable for making scarves and snoods.
Step-by-step description of knitting technique:
- You need to cast on an odd number of stitches with the first color (No. 1).
- 1 R (front row): change the color of the thread on the front side of the knitting (No. 2), 1 KR, 1 LP, move the thread behind the work and remove 1 P. The rapport continues to the end of the row, the penultimate loop is made as LP, the last one is knitted KR.
- 2 R (purl row): with yarn No. 2, knit KrP, a rapport of 1 LP and 1 slip of the loop with the thread before work, knit the penultimate loop as LP, KrP.
- 3 R (front): change the thread to #1, perform KrP, 2 LP, then knit a rapport of 1 slip stitch with the thread behind the work and 1 LP to the end of the row. Knit the penultimate loop as LP, KrP.
- 4 P (purl): with yarn #1 remove KrP, knit a rapport of 1 remove loop with yarn in front of work and 1 LP. Knit the penultimate loop as LP, KrP.
- 5 P and then repeat the pattern from the 1st to the 4th row.
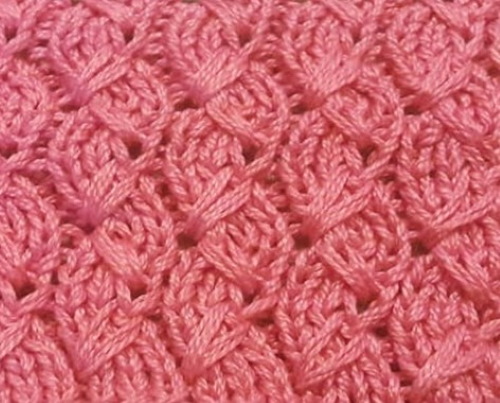
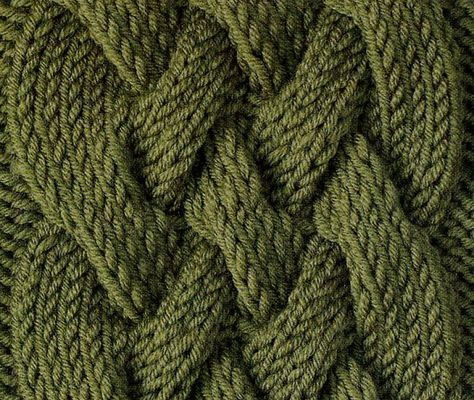
Braids
The minimum rapport for knitting a braid is 4 P. Its value can reach 15 P, and sometimes more. The braid can be single, double, triple, and in some patterns the number of interlacings in it is even difficult to count.
Simple 2-loop braid
The pattern for a hat made of thick yarn is knitted with a rapport of 5 P and 4 rows. The number of loops is cast on the knitting needles, a multiple of 5 + 2 KrP. The braid can be tilted to the left or to the right.
 | Knitting pattern with a right tilt | Designation of loops in diagrams:
|
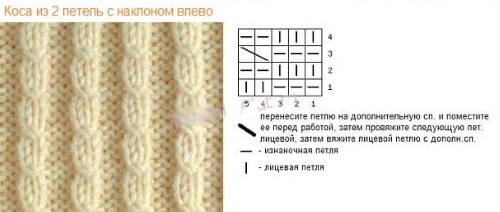 | Knitting pattern with a left tilt |
Algorithm for knitting with a tilt to the right:
- 1 R: KrP, rapport of 3 IP and 2 LP to the end of the row, KrP.
- 2 R and all subsequent even rows: knit all loops according to the pattern (over the front loops – LP, over the back loops – IP), except for the first and last KRP.
- 3 R: KrP, rapport (3 IP, transfer 1 P to an additional knitting needle, place it behind the work, make the next loop as LP, then knit LP from the additional knitting needle) to the end of the row, KrP.
- 4 R are performed as all even rows.
- Starting from R 5, repeat the pattern according to R 1-4.
The knitting algorithm with a left-hand tilt differs only in the execution of row 4. To knit it, you need to perform KrP, rapport (3 IP, transfer 1 P to an additional knitting needle, place it in front of the work, perform the next loop as LP, then knit LP from an additional knitting needle) to the end of the row, KrP.
Volumetric braid of 3 loops
The braid (or cord) is made with a rapport of 6 sts. The pattern description specifies the number of loops only for the pattern, so you can knit the number of loops between them as desired. The pattern looks best on a stocking stitch, when 2-3 sts are knitted between the braids.
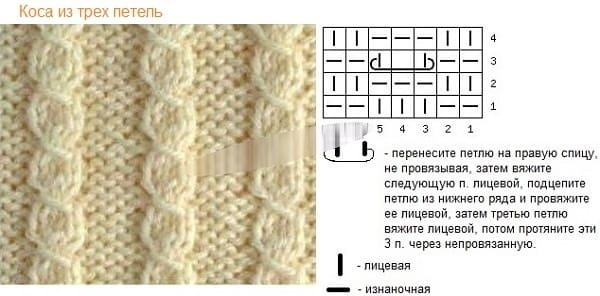
Step-by-step instructions for completing the drawing:
- 1 and 3 R: perform all loops as LP
- 2 and 4 R: knit all loops as if they were RP.
- 5 R: Transfer 3 sts to a spare needle, place it in front of the work, work the next 3 sts as LP, then knit 3 LP from the spare needle.
- Continue knitting, repeating rows 1 through 5.
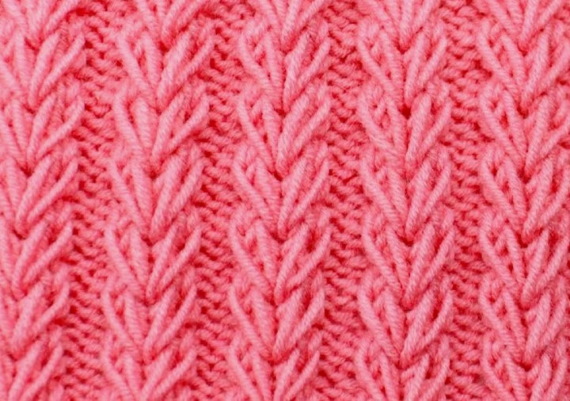
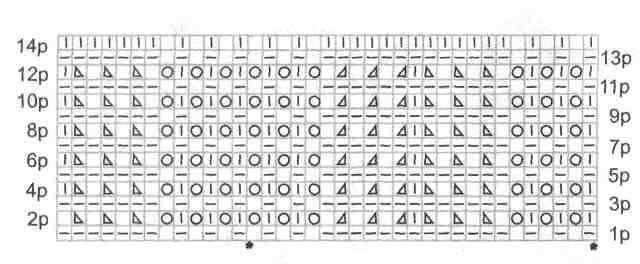
Peacock feather
The pattern can be knitted with single-color or colored yarn. It looks beautiful when done with melange threads. The pattern rapport consists of 19 P + 1 P.
Schematically, the pattern looks like this:
Step-by-step instructions for knitting decor:
- 1 and 2 R must be connected using LP.
- 3 R (front): 3 LP, yarn over, 1 LP, 6 UB, 3 LP, yarn over. Repeat the pattern to the end of the row.
- 4 P (purl): all loops and yarn overs are worked as WS.
- 5 R and all subsequent ones are performed similarly to 1-4 rows until the required height of the pattern.
To make a colored pattern, you need to change the yarn after finishing each rapport in height (4 rows).
Feather for double cap
This pattern is less dense, so it is suitable only for a hat with a lining. It looks openwork, but does not stretch well, so it is not suitable for decorating the bottom line of a hat. The pattern rapport consists of 17 P + 1 P. The work alternates 2 types of rows. Each even and odd row is knitted the same way.
Drawing diagram:
Knitting algorithm:
- Initial row (not shown in the diagram): all loops are worked as IP so that the edge of the fabric does not curl.
- 1 R: perform all loops as IP.
- 2 R (front): 3 LP, yarn over, 3 UB behind the back loops, 1 LP, 3 UB behind the front loops, 1 LP, 3 yarn over.
- The following rows are knitted similarly to 1 and 2 R, alternating them.
The yarn for creating a colored hat is changed after knitting every even row.
It is better to choose patterns for winter hats that are not large, since a large thickness of yarn creates additional volume on the headdress. Although when knitting with knitting needles, the products are thinner than those made with a crochet hook, they will still be dense and thick, which does not look good on thin girls and women with small facial features.
Video about knitting
Patterns for knitting a hat from thick yarn: