Among the variety of modern handicrafts, thread graphics are one of the most accessible and quickly mastered types. Following simple and clear digital patterns, even a beginner can create a beautiful work in 1-2 days.
Necessary tools and materials
One of the advantages of this type of handicraft is the availability and small number of materials and tools. Everything you need can be purchased at any office supply, hardware or craft store.
Patterns for isoniti with numbers for beginners are presented free of charge. The cost of other items needed for this activity does not exceed 300-400 rubles. Some of them may be in your home inventory.
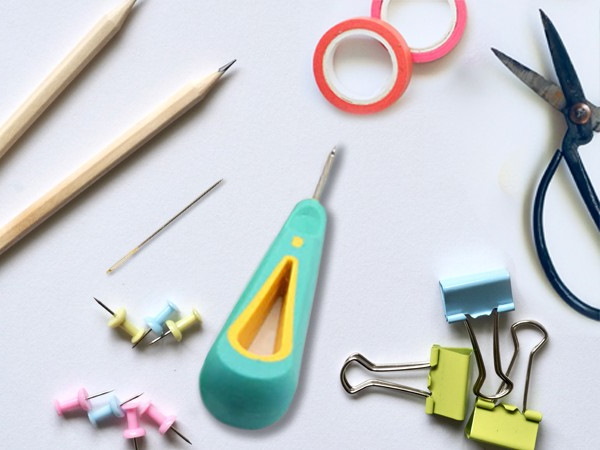
To work you will need:
- warp;
- threads;
- needle;
- scotch;
- base underlay.
In thread art, as in any kind of handicraft, there are nuances in the selection of materials. The table shows the most accessible materials, some features of their use, as well as replacement options.
| Basic materials | What can be used instead? | Features of use |
| Warp | ||
| Cardboard for children's creativity |
| The cardboard/felt must be thick so that it does not tear or wrinkle while you work. The paper must be glued to cardboard before use. |
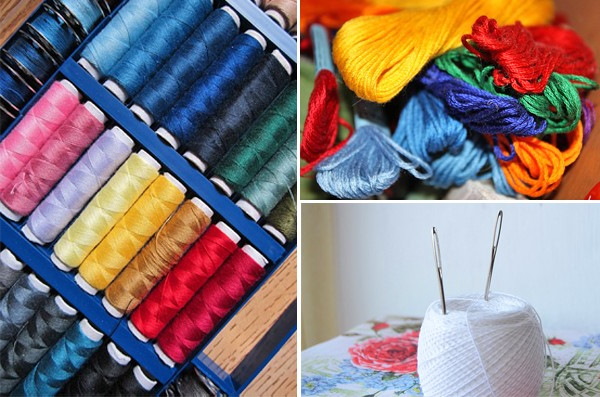
| Threads | ||
| Cotton floss |
| The thread should be uniform in thickness, strong and should not fluff. Twisted threads are best suited for this work.
The thickness and color are selected individually, depending on the characteristics of the future composition. Wool threads should be used with caution. They look best on velvet paper. |
| Needles | ||
| Sewing needle No. 10-12 | Embroidery needle | The eye should not be wider than the body of the needle, otherwise the holes in the cardboard will be torn during the process.
The thicker the thread, the smaller the needle size should be. |
| Auxiliary tools and materials | ||
| Scotch | glue:
| The ends of the threads are secured to the back side of the base with tape/glue. |
| Cutting mat |
| You can't punch holes while hanging, as the cardboard will wrinkle and tear. On the table, the awl will scratch its surface and become dull. To ensure that the awl passes easily through the cardboard without deforming it, you need to put something dense and porous underneath. |
| Awl |
| An awl is needed to prick the outline of the future embroidery. It is advisable to purchase 2 tools of different thicknesses. For piercing holes of different diameters when working with thin threads or on a thin base, it is better to use pins. |
| Stationery for sketches and additional drawings | ||
| Graph paper | Exercise book sheets in a cage | Thanks to the cells, you can quickly and accurately mark lines of the required length and the distance between them. |
| Any stationery will do, including school supplies or those for children's creativity. | An embroidery sketch drawing is essential for beginners.
Threads of different colors can be marked with multi-colored pencil lines. For clear lines, it is better to use hard pencils. |
Having prepared the necessary equipment and materials, you can begin to master a new handicraft technique.
Schemes with description of works for beginners
Patterns for isoniti with numbers for beginners, regardless of the level of complexity, are based on 3 basic techniques and 3 auxiliary ones.
Before you start creating any composition, you need to learn how to embroider:
- corner;
- circle;
- arc;
- triangle;
- fan;
- straight line.
The first 3 points form the basis, mastering which will allow you to embroider almost any plot. The last 3 elements complement and expand the pictorial means.
Corner
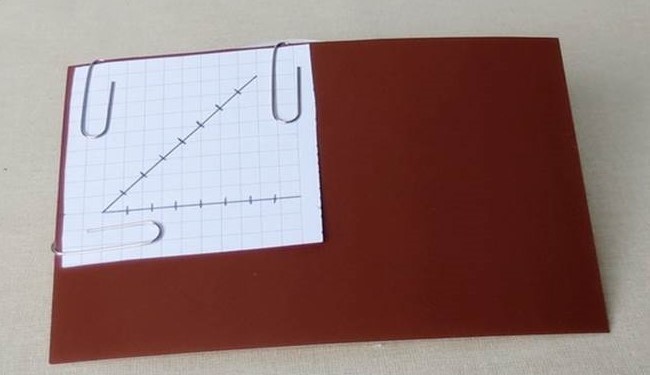
First you need to make a drawing:
- Draw an angle on lined paper with a pencil using a protractor or ruler.
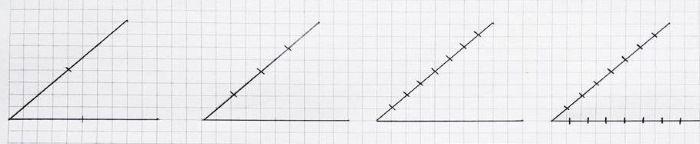
- Divide each side of the angle into equal segments.
- Number the divisions as shown in the diagram. The numbering starts from the extreme right point of the lower side of the corner. Then the numbers alternate in pairs: 2-3 on the side to the right of the top, 4-5 on the bottom to the left of 1, 6-7 on the side, 8-9 on the bottom, and so on.
- Additionally, use a contrasting color to draw the lines connecting the dots and, if desired, indicate the direction of the stitches with arrows.
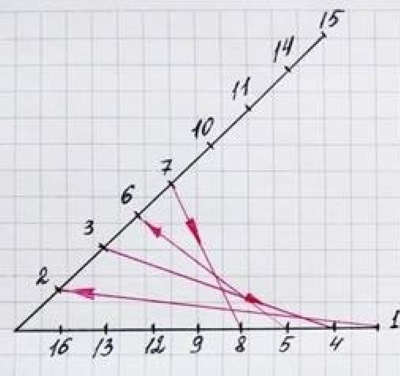
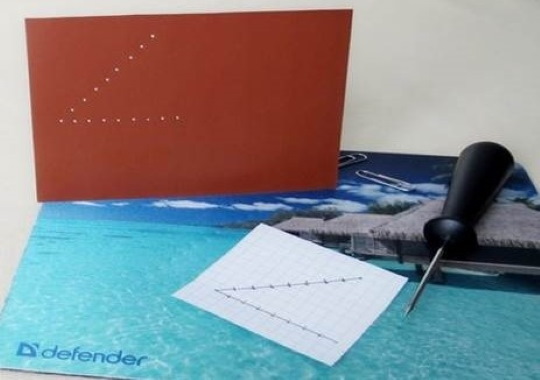
The finished drawing is transferred to the base. To do this, you need to attach it with paper clips to the front side of the cardboard and, placing it on the backing, make punctures with an awl at the marked points.
 After completing all the preparatory steps, you can begin work:
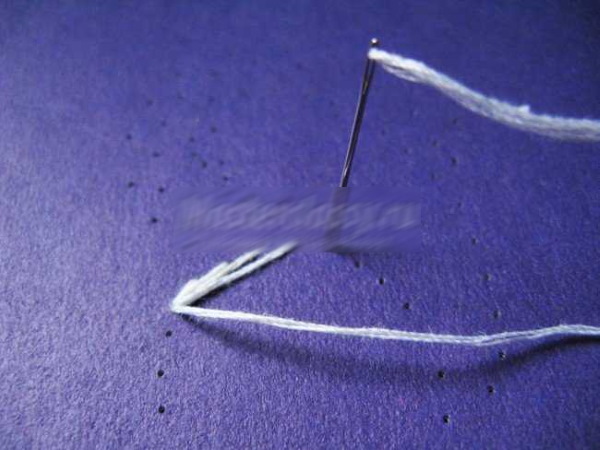
- Bring the needle and thread to the front side at point 1 and secure the thread on the back side with tape.
- Make a long stitch to point 2.
- From the wrong side, make a short stitch 2-3 and bring the thread to the front.
- Make a long stitch 3-4 on the front side.
- Next, alternate long stitches on the front side and short stitches on the back side, connecting the numbered points in order.
- After filling the corner, bring the needle to the front with a short stitch from point 16 to the unnumbered top of the corner.
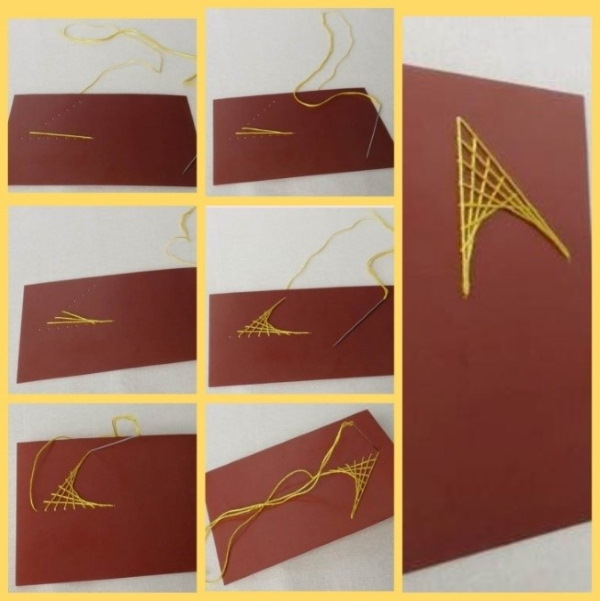
- Make a long stitch to point 1 on the front side.
- On the wrong side, make a long stitch 1-15.
- On the front side, make a long stitch from point 15 to the top of the corner, bring the thread to the back, secure with tape and cut.
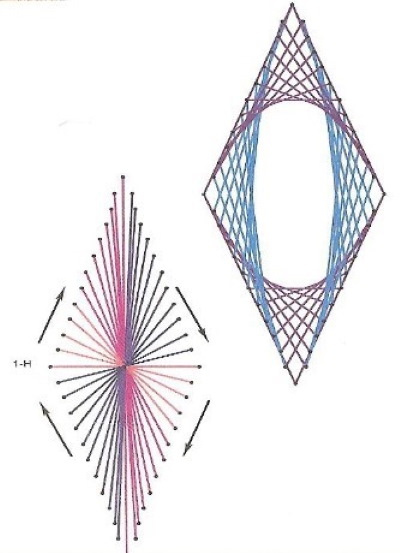
Circle
The circle drawing is done with a compass using the same algorithm as the angle. The distance between the holes should not be less than 2 mm. Transferring the image outline to the base and further work are also done in the same way as the previous element.
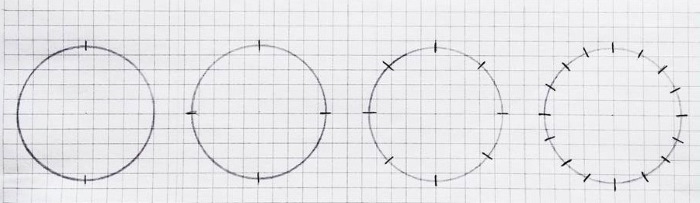
The peculiarity of the circle is that it is stitched along chords, i.e. segments between two points. Their length can change, and the diameter of the inner unfilled circle and the frequency of filling the rest of the figure's space depend on this.
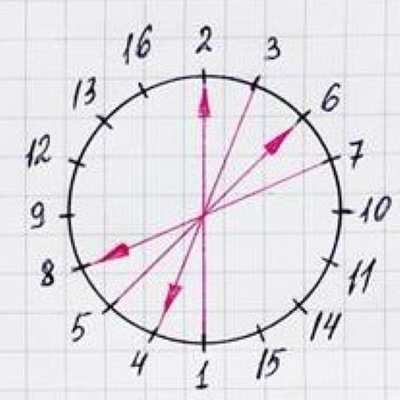
The shorter the chord, that is, the smaller the distance between two opposite points, the larger the diameter of the inner circle. Therefore, many different elements can be obtained based on a circle.
Other geometric figures are filled in the same way:
- square;
- rhombus;
- triangle.

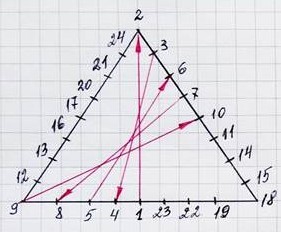
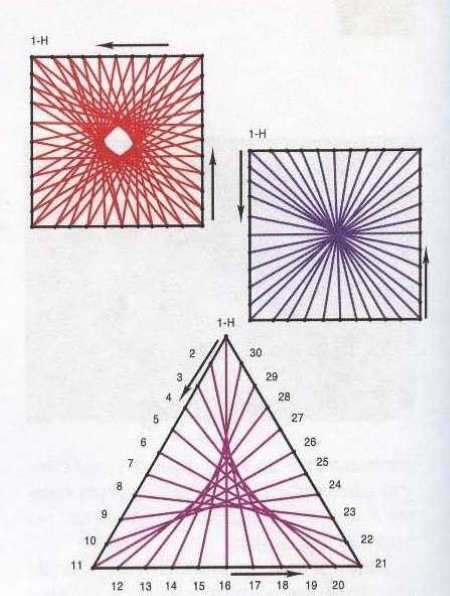
It is important to take into account that the number of dots on each side of the figures must be the same.
Arc
The arc drawing is half a circle. The stitches on the front side should be equal to or less than half the arc.
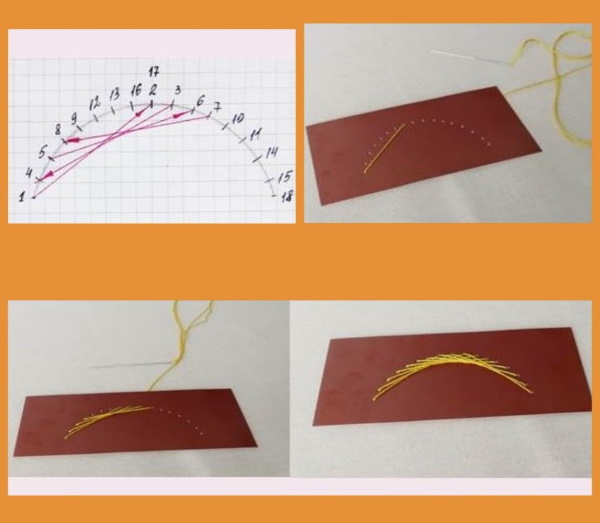
The longer the stitch, the thicker the arc will be.
Fan
This element is often used to depict flower petals. It may have 2 bottom base points as shown in the diagram, but it may also have 1 hole at the bottom.
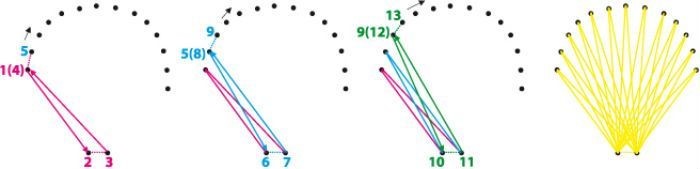
It needs to be made with a larger awl than the upper punctures, since the thread will pass through it many times.
Direct line
Thin lines are needed to outline figures or to make some elements (for example, plant stems or antennae and legs of insects). They can be made with a running stitch in the forward and reverse direction. All stitches should be the same length.
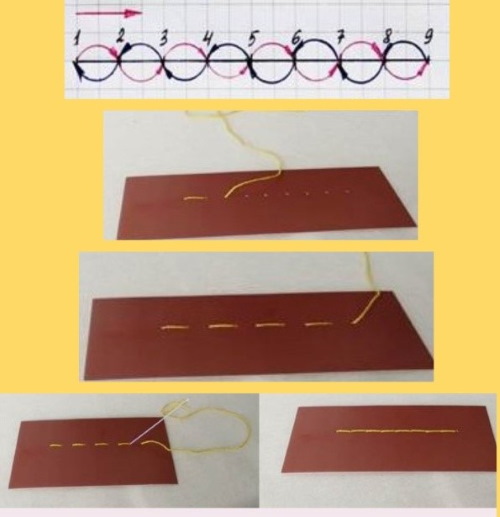
To make such a seam, you first need to lay a row of stitches with gaps between them in one direction. Then fill the gaps with stitches in the same way, moving in the opposite direction. Having mastered the principle of construction and execution of basic elements, you can move on to embroidering simple patterns and plots.
Patterns for beginners should contain a minimum of details and be easy to break down into the studied figures.
Below are simple images for embroidery using the thread graphics technique. If the lack of numbers causes difficulties, you can put them in yourself before starting work.
Fishes
Having mastered the "Angle" element, you can embroider several versions of aquarium fish. The drawings are so simple that it will not be difficult to draw them yourself. To make the task easier, you need to first measure the size of the angles with a protractor directly on the monitor.
The size of the fish, the color of the threads and the base can be any. It is recommended to take blue or light blue cardboard and bright contrasting threads.
Once the image has been transferred to the base, you can begin working.
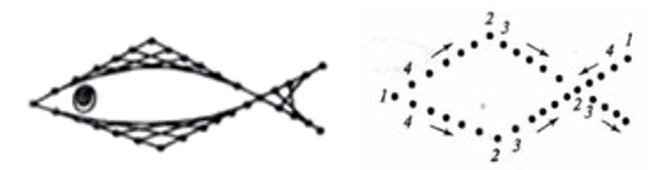
The first fish consists of 3 parts, which should be embroidered in a certain order:
- Embroider the top fin, moving from left to right.
- Embroider the lower fin in mirror image.
- Embroider the tail.
- Sew a bead in place of the eye or draw it with a black pencil.
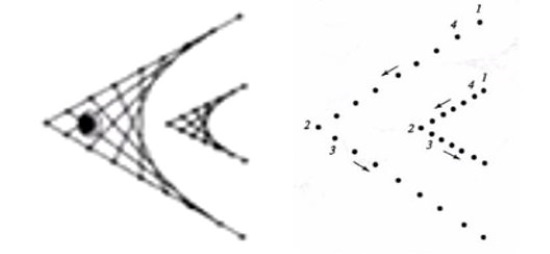
For the second fish, it is enough to complete 2 elements:
- Embroider a large corner.
- Embroider a small corner.
- Sew on or draw an eye.
The third fish is a little more complex. In this version, several elements are superimposed and combined with each other. The middle horizontal line is common for the upper and lower corners.

The work must be performed in the following order:
- Embroider the top half of the fish from right to left, starting from top point 1.
- Embroider the bottom half in mirror image, starting from bottom point 1.
- On top of the two combined corners, embroider the fish head with a thread of a different color, starting from point 1 in the middle of the top line. The width of the top corner is equal to the sum of the two bottom corners.
- Sew a bead over the embroidery.
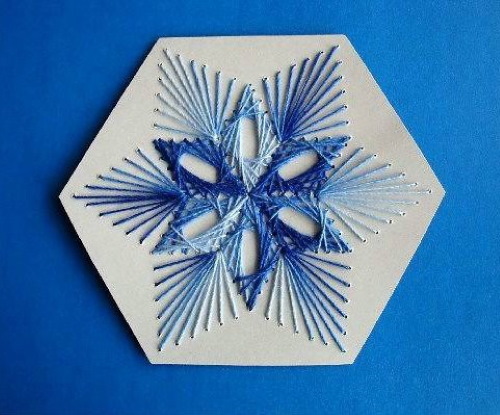
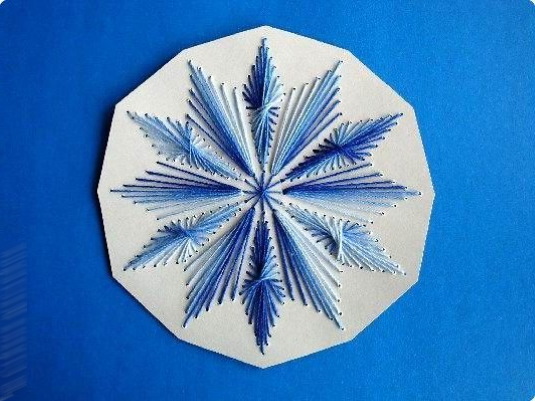
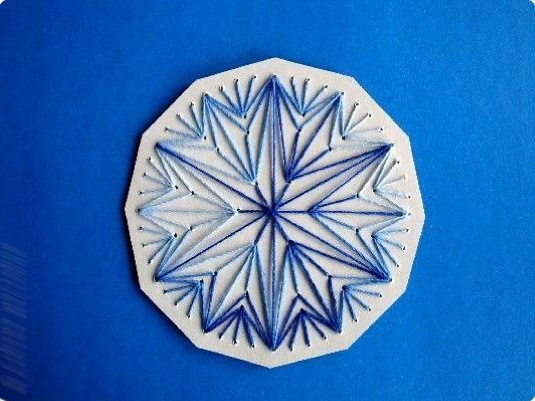
Snowflake
This image consists of 2 elements - a rhombus and an angle. They can be embroidered with dark threads on a light background, as shown in the photo, or, conversely, white on blue or black. White or silver metallic floss on dark blue velvet paper will look spectacular.
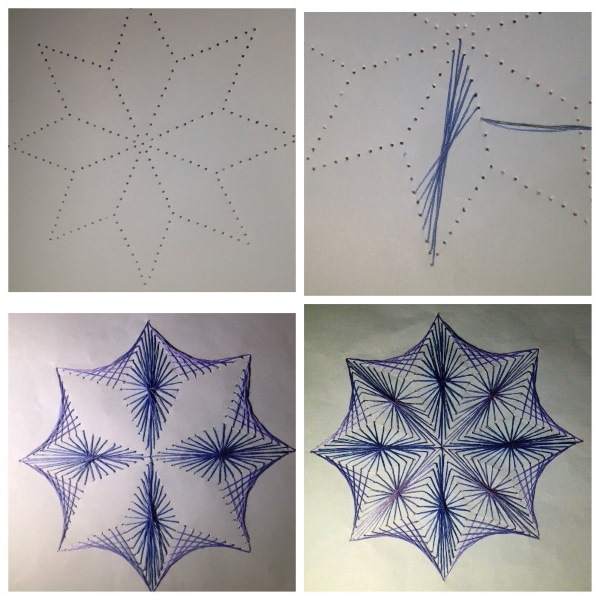
First you need to make a drawing:
- Draw a circle of any diameter using a compass.
- From the same central point, draw a second circle with diameters 2 times smaller than the first.
- Use a ruler to divide the circle into 8 equal sectors.
- Draw the rays of the snowflake by drawing 2 lines from the inner circle, connecting in the middle of each sector of the outer circle.
Once the base is prepared, you can begin work.
Since the design details are repeated, it does not matter which one you start embroidering with:
- Embroider any diamond in the direction from the center to the edge. The center hole is a common inner corner for all diamonds, so the thread will pass through it many times.
- To reduce the load on this point, you need to start the embroidery from the nearest hole on the left. Having brought the needle from the wrong side to the front side, pull the thread to the opposite top of the rhombus. Then the element is filled clockwise.
- Make 3 more diamonds, placing them every other one.
- Embroider 8 corners to form the outline of the snowflake.
- Fill the remaining empty spaces with diamonds.
Sailboat
The image consists of one large corner and long parallel straight stitches.
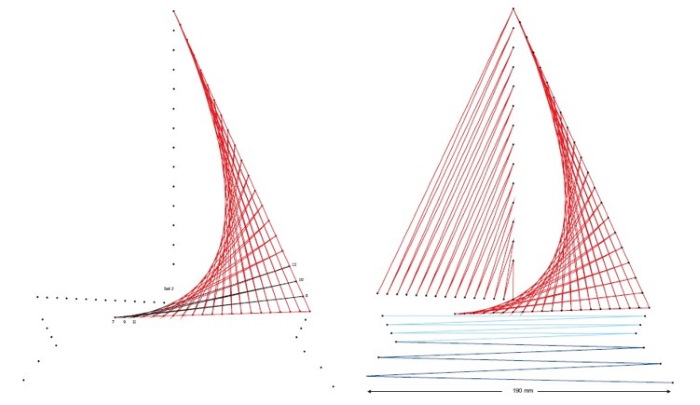
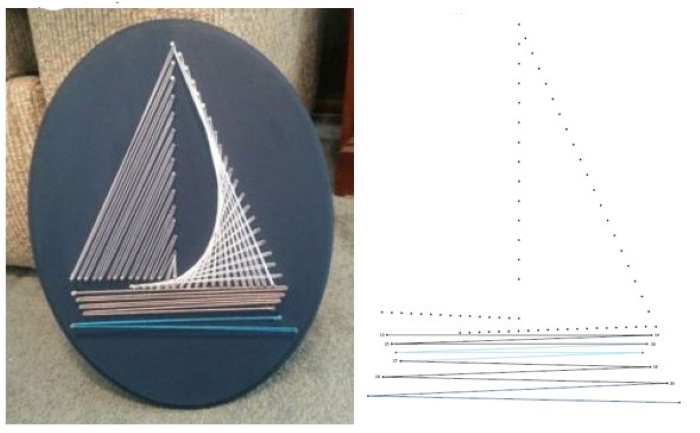
The work should be carried out step by step:
- Using white thread, embroider the right sail using the “corner” technique, starting from the leftmost point of the base.
- Using light pink thread, embroider the left sail with long, straight stitches up and down. Start at the bottom, from the first point on the left.
- Using light brown thread, embroider the yacht's hull with several long stitches. On the front side, the needle moves from left to right, and on the back side, from right to left.
- At the bottom of the picture, embroider water with the same strokes, using blue threads.
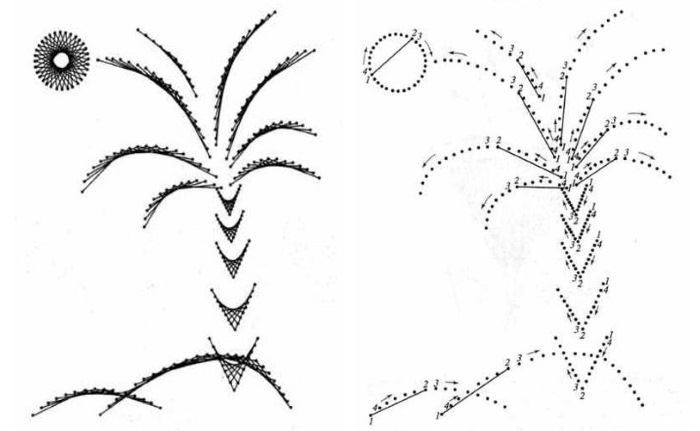
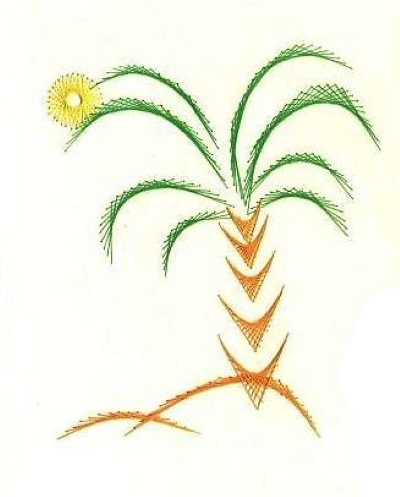
Palm
Patterns for isoniti with numbers for beginners can be more complicated. Having mastered the basic elements of embroidery and learned how to "collect" them into simple figures, you can begin to create a composition. A simple landscape consists of 3 objects: a palm tree, sand and the sun. In order to convey the feeling of the scorching heat of the desert, it is important to choose the right background.
It is not recommended to use a brightly colored base. You can take coated cardboard in pale pastel colors: pink, yellow, beige, or paint white cardboard yourself by rubbing chalkboard chips over its surface.
Step-by-step embroidery of the palm tree motif is described below:
- Using brown or beige thread, sequentially embroider sand hills in the form of two arcs at the bottom of the picture. The stitch length on the large arc is 1-8, and on the small one - 1-7. This means that there are 8/7 punctures between the exit and entry points of the needle.
- Embroider the trunk with brown thread, using angles of different sizes. Start from the right, bringing the needle out to the front side from the upper hole.
- The branches are embroidered using the "arc" technique, with green thread. The direction of the stitches on the right side of the crown is from left to right, on the left side of the crown - vice versa. The length of the stitches on all the leaves is different.
- Embroider the sun in the form of a circle using yellow or orange thread, referring to the diagram.
More experienced embroiderers can try to change the arrangement of elements at their own discretion. For example, raise or lower the trunk of the palm tree, bring the corners closer together, give a different curve to the leaves, place the sun on the other side, and so on.
Swan
The swan can be embroidered entirely with white threads or the beak can be decorated in red and a bead can be sewn on as an eye. The body in the form of an open oval and the neck are different versions of an arc. The chest is an "angle" element, and the beak is a simplified "fan".
Order:
- Embroider the body, moving from point 1 on the left counterclockwise.
- Embroider the chest according to the pattern.
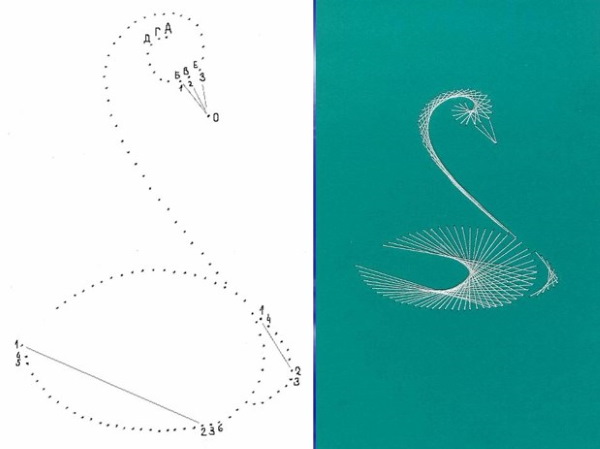
- Embroider the neck and head in a spiral from point A: A-B – stitch on the front side, B-C – on the back side, B-G – on the front side, G-D – on the back side, and so on.
- Embroider the beak with three stitches with a common entry at point 0.
Butterfly
The image consists of 4 modified triangles and 3 straight lines. Threads of any bright colors are suitable for the wings: single-color, melange, metallic. Also, the upper and lower pairs of wings can differ in color.
The body and antennae can be decorated in different ways: embroidered with threads, beads, beads; laid out with rhinestones on an adhesive base; painted with acrylic paint or a watercolor pencil.
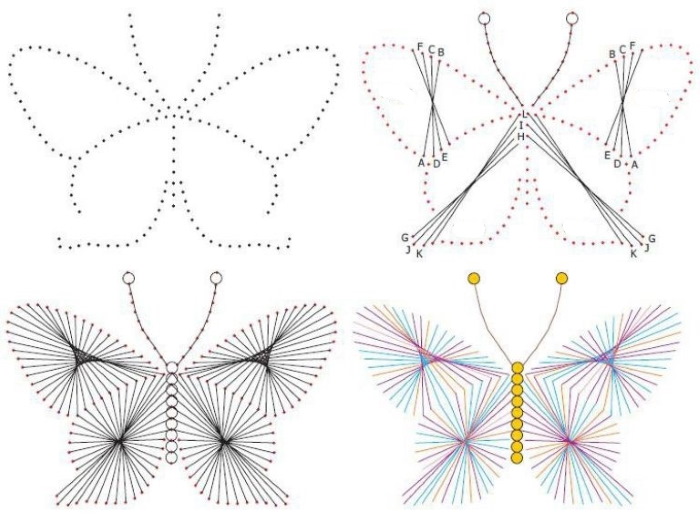
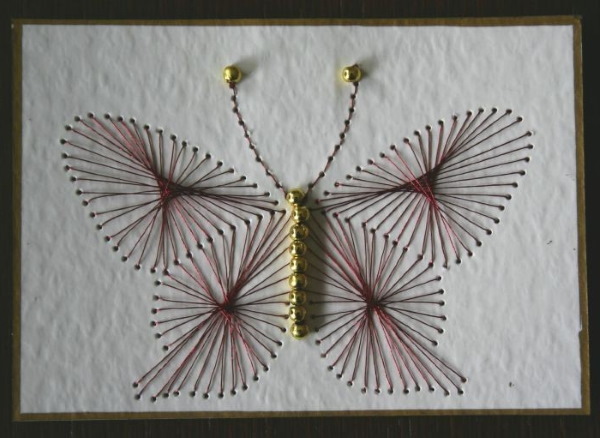
The further description of the work corresponds to the presented scheme:
- Prepare the base in the usual way.
- Embroider the top pair of wings, starting from point A at the bottom and moving through the letters in alphabetical order: AB – front, BC – back, CD – front, DE – back, and so on.
- Fill in the lower wings in the same way, starting from point G at the bottom: GH – face, HI – back, IJ – face and then clockwise.
- Sew beads between the wings using a back stitch.
- Embroider the antennae using forward and reverse stitches.
- Decorate the ends of the antennae by sewing beads onto them.
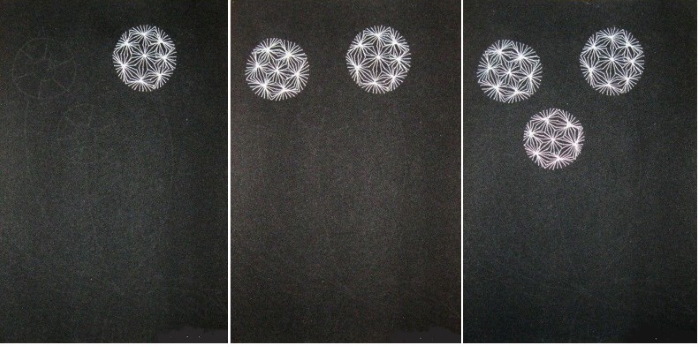
Dandelions
You can learn to create isoniti patterns with numbers for beginners on your own based on sketches. To do this, the image needs to be broken down into simple elements: a circle, a square, a triangle, a line, and so on.
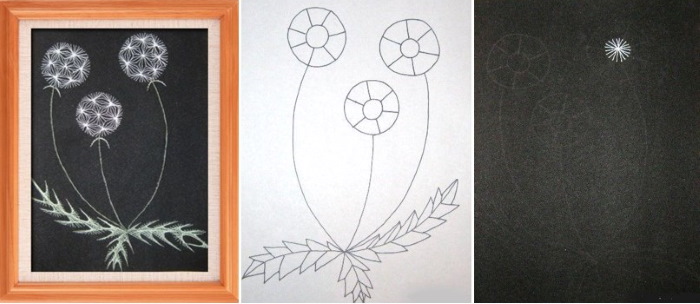
It is advisable to number large parts, and small ones can be filled in by eye. As already mentioned, the options for filling identical elements may differ. The frequency of stitching also depends on personal vision.
The master class "Dandelions" will help needlewomen who have mastered the basic techniques to take the next step in mastering thread graphics. Working on a plot based on descriptions and photos, you can develop the skills of independently seeing an image without "binding" to numbers.
Order:
- Fill the circle in the middle of the right flower with white thread.
- Also embroider the remaining elements of the dandelion cap around the core. Their number can be arbitrary (5-7).
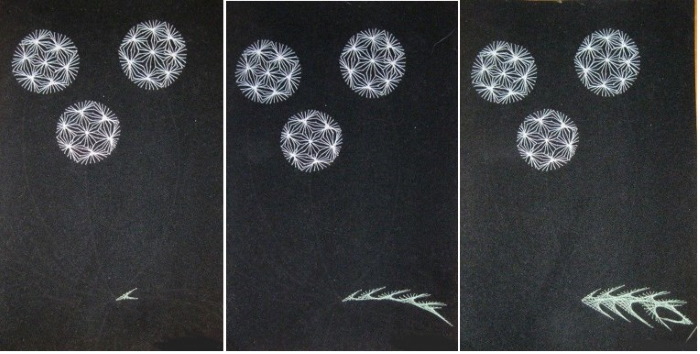
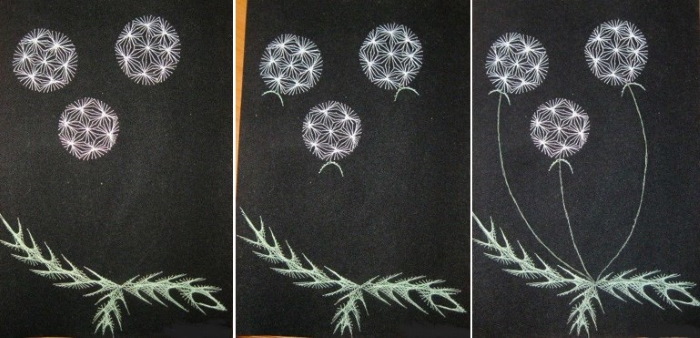
- Embroider the flower head on the left in sequence.
- Embroider the bottom flower.
- Using the “corner” technique, embroider half of the right leaf with light green thread, as shown in the photo.
- Embroider the second half of the sheet, placing a row of corners below in mirror image.
- Embroider the remaining 2 sheets in the same way.
- Embroider the sepals using the "arc" technique. The thread should be a darker shade than on the leaves.
- Using a running stitch, embroider the stems in forward and reverse directions.
Secrets for Beginners
Beginners may encounter some nuances in the process of work, ignorance of which may puzzle or disappoint.
If the thread runs out during work, its end should be secured with tape on the back side. Then the needle with the new thread should be brought out from the back to the front through the next hole, secured with tape on the back and continue working. To make the back side of the finished picture look neat, it should be glued to a sheet of cardboard or felt.
Embroidery according to the same pattern can be filled in differently. The choice of option depends on spatial imagination, taste and skill level. Beginners are recommended to embroider strictly according to the drawing. More experienced needlewomen can deviate from the proposed option, experiment and fantasize.
Avoid embroidering with too long a thread so that it does not get tangled. The length of thread required to fill the element can be roughly calculated from the drawing, adding 2-3 cm for fastening on both sides.
During the embroidery process, it is necessary to constantly monitor the thread tension. If the thread is not tight enough, it will sag. The image will look sloppy and blurry, or even lose its shape. If the thread is too tight, it will cut into the cardboard and tear it.
To avoid mistakes and accidental missed holes, you can glue a template with numbered dots to the back of the base.
The isonity technique is easy to master and accessible to people of any age, suitable for educational activities with children. Even absolute beginners can quickly master it. Having embroidered several pictures according to ready-made numbered patterns, you can then improve the acquired skills, creating unique author's works.
Author: Veronica Reutova
Video about embroidery
Patterns for isoniti with numbers:
Thank you!
Thank you! The material is very interesting and well selected. It is great that almost all elements are shown. Accessible and understandable. Will be useful in work.