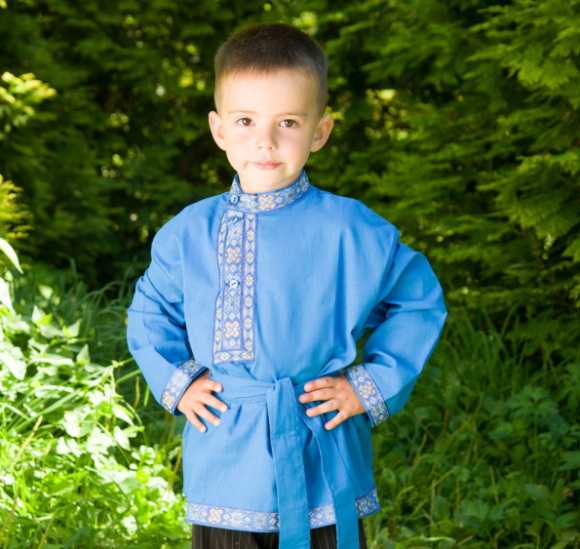
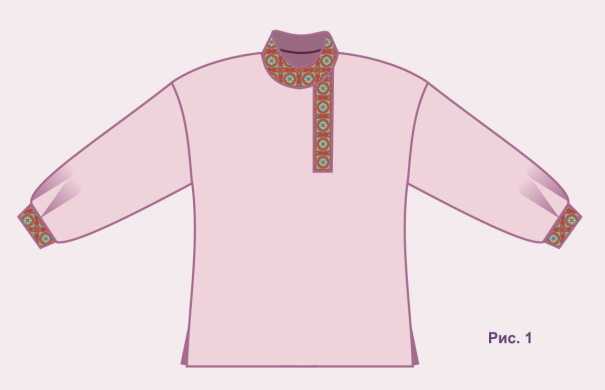
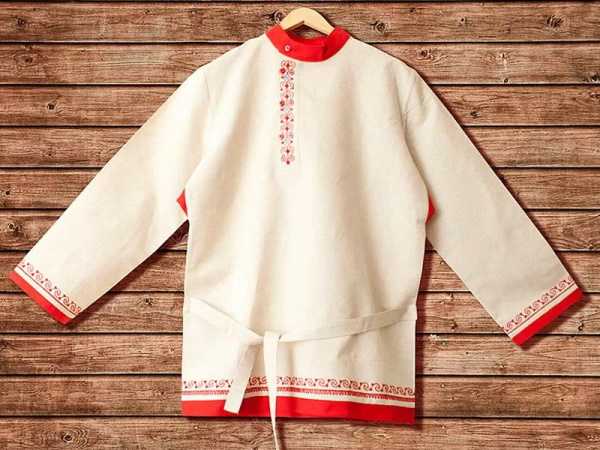
A kosovorotka is a simple, loose-fitting men's shirt with a slanted collar and a slit on the side, considered the traditional national clothing of the Slavs.
Having come back into fashion, it is also an integral part of a folk children's carnival or theatrical costume and is easily sewn by hand from cotton or linen using simple patterns, taking into account the characteristics of the boy, and for maximum authenticity it is decorated with decorative braid.
Selection of material
The kosovorotka shirt owes its name to the collar sewn diagonally, thanks to which the pectoral cross did not fall out when bending over during plowing work.
In Rus' it was sewn from hemp, cotton, and linen and was used as men's underwear and casual, free-cut clothing that did not restrict movement.
For festive events, kosovorotkas were sewn from natural silk, decorated with embroidery and complemented with a woven belt or sash.
The main advantage of the shirt was considered to be its convenience, ensured by a free cut that did not restrict movement. It is for this reason that, starting in 1880, it was used in the Russian Empire as a soldier's uniform.
The style of the shirt has been preserved to this day, and in the modern world the kosovorotka is most often used as an element of the national Russian costume, sewn for men or boys of different ages.
In this case, not hemp cloth is used (as in Russian villages), but thick cotton, linen or satin fabric. Its shade can be either white (to create a festive shirt) or beige, as close as possible to the historical costume.
Silk, satin or crepe satin of white or any other color (blue, yellow or red) are also suitable for a smart kosovorotka.
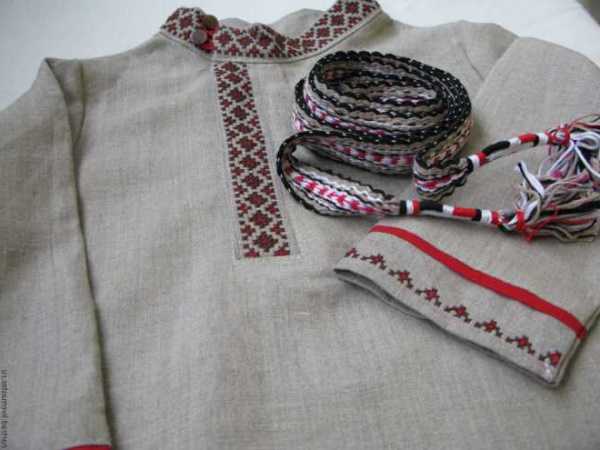
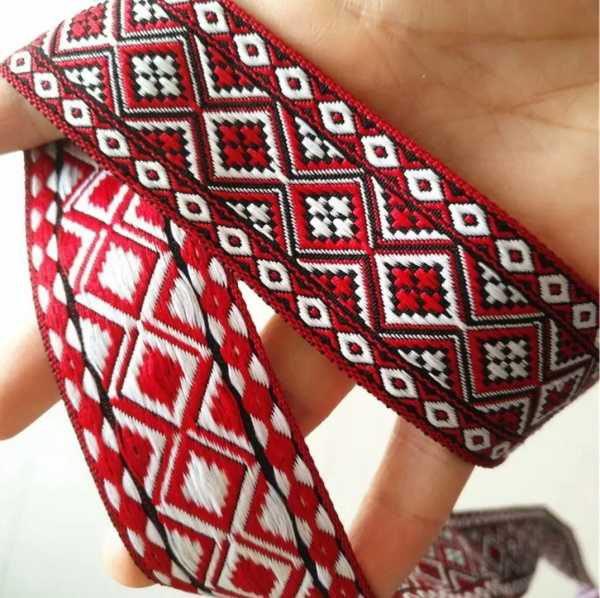
The shirt should be decorated with decorative braid sewn to the collar, and if desired, also to the hem and sleeves, embroidery or satin ribbons. If desired, the pattern can also be applied to the elbows by choosing several options for decorative ribbon.
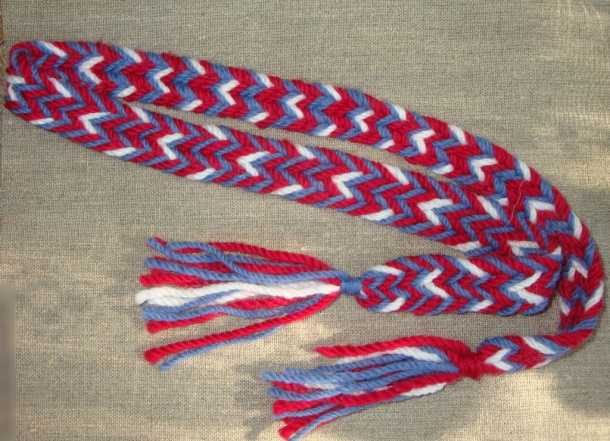
A mandatory addition to the kosovorotka is also a belt located at the waist, slightly below it or under the chest. The belt is wrapped twice around the body and tied in a knot in the center or on the side. Its ends should hang down 40 cm.
It can also be sewn from cotton, linen, silk or satin fabric in the form of a sash or woven from woolen threads (mouline threads) using the tugging method and decorated with tassels.
Materials needed for work:
| Main fabric | Thick cotton, linen or satin (silk can also be used) in quantities of 1.5-2 m. |
| For decoration of the product | Wide (1.10 m) and narrow (1.10 m) decorative braid in red and blue for decorating sleeve lapels, necklines and shirt hemlines. |
| Sewing accessories | · tailor's chalk (pencil or piece of soap); · tailor's scissors; · ruler; · pins; · Velcro fastener (10-15 cm); · thread and needle (to attach the ribbon); · sewing machine; · overlock. |
Taking measurements
A men's kosovorotka for a boy is made by hand according to the child's measurements. These values are also taken into account when purchasing fabric.
To do this, you need to determine:
- Back width, for which the tape measure must be placed horizontally between the armpits at the level of the protruding parts of the shoulder blades.
- Sleeve length. In this case, the child must bend his arm at the elbow, after which the measuring tape must first be placed from the neck line to the wrist through the shoulder and elbow. After this, the arm can be freely lowered and the measurement repeated.
- Hip circumference. He measures at the widest part of the legs, for which he wraps a measuring tape around the hips parallel to the floor.
- Head circumference (used for the neckline). When measuring it, wrap the tape measure around your head, placing it slightly above your eyebrows, and capture the most prominent part of the back of your head.
- Length of the product. It is determined using a centimeter placed from the base of the neck down to the desired length of the shirt parallel to the spine.

If you wish, you can also use the size chart compiled for children from 0 to 18 years old.
| Age and size of the child | Product length (cm) | Sleeve length (cm) | Chest and waist circumference (cm) |
| Up to a year (7-9) months (height 74/80) | 35-38 | 25-27 | 64-69 |
| 1-1.5 years (height 86/92) | 39-40 | 30-33 | 68-70 |
| for 3-4 years (height 98/104) | 43-44 | 34-35 | 71-75 |
| for 5-6 years (height 110/116) | 51-53 | 39-40 | 87-89 |
| for 7-8 years old (height 122/128) | 57-59 | 44-47 | 93-96 |
| for 9-10 years (height 134/140) | 62-54 | 52-54 | 99-102 |
| for 11-12 years old (height 146/152) | 67-70 | 55-59 | 105-108 |
| at size 40/42 | 76-77 | 60-62 | 110-114 |
| for size 44/46 | 77-79 | 63-64 | 115-120 |
| for size 48/50 | 80-85 | 65-66 | 123-125 |
When drawing up a pattern, you need to add a few centimeters to all the measurements you receive. This is done so that the kosovorotka fits as loosely as possible on the figure.
Pattern
A men's kosovorotka for a boy is sewn with your own hands using a reduced-size men's pattern.
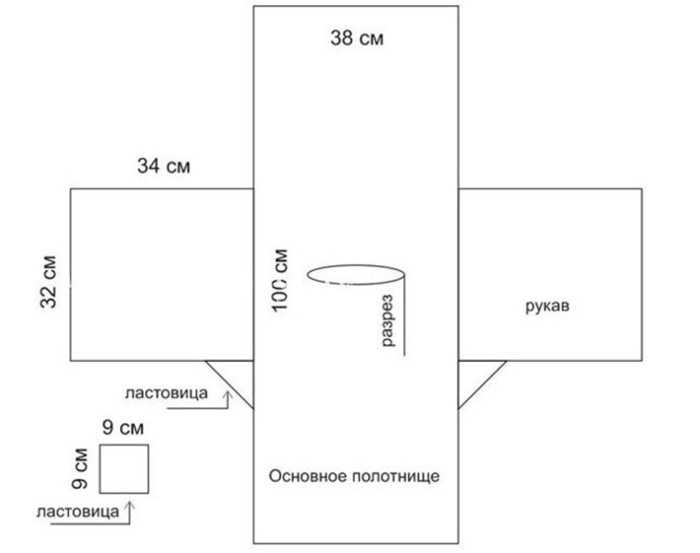
It consists of 5 main elements:
- body (stanovina) – the main, largest part;
- 2 rectangular sleeves;
- side inserts designed to increase the volume of the product to the desired size;
- gussets – 2 underarm inserts that prevent the shirt from riding up when raising your arms;
- spacers - a decorative element connecting the sleeves and the body.
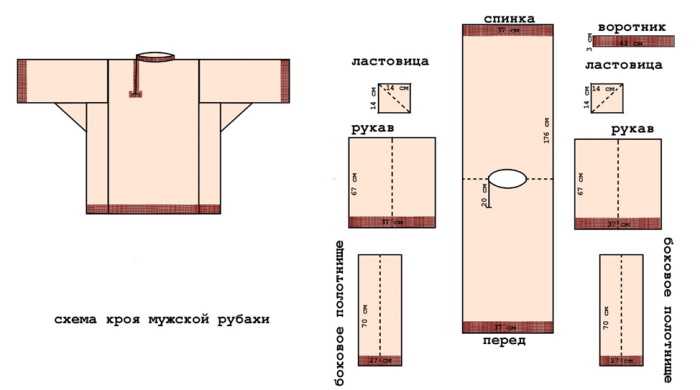
Traditionally, a rectangular cut was used to sew the kosovorotka, which allowed for a significant reduction in fabric consumption. There were practically no scraps left with this cut, and those that were obtained when forming the collar were subsequently used for patches.
Side inserts or barrels allowed to increase the volume of the product to the required size. This was done because the traditional peasant Tat loom did not allow to accommodate a canvas of a size exceeding 50-80 cm in width, which was often not enough for a tall man.
There are 2 options for finishing the collar of a shirt - a stand-up collar or a golosheika (without a collar). In the first case, it should be decorated with a decorative braid or embroidery (ornamental sewing) together with the spacer.
The pattern is made on graph paper or tracing paper, approximately 1*1.3 m in size. All parts of the product are rectangular in shape, and their length and width are determined depending on the individual parameters of the child.
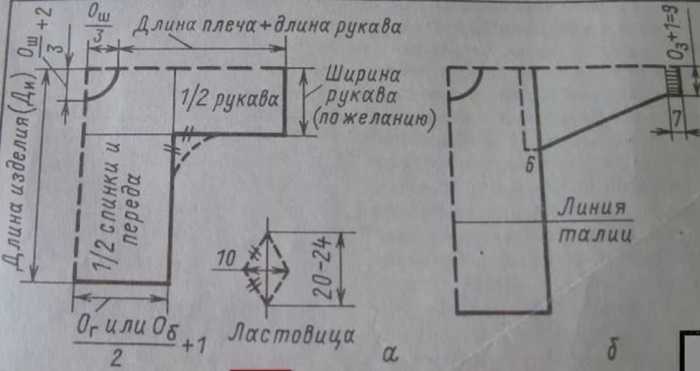
Required dimensions:
| Body | The length of the main part of the product is calculated based on the child's height. It is cut in one piece (without shoulder seams) - a wall, for which 2 body lengths should be marked up and down. |
| Side parts (barrels) | To determine their length, the length of the armhole should be subtracted from the length of the shirt (body). The width of the barrel depends on the width of the body (the larger it is, the smaller it will be). |
| Sleeve | Its length is calculated using the formula: Arm length – shoulder width and on average for a child aged 6-7 years will be 65 cm in width under an armhole of 30-35 cm. |
| Gusset | It is cut out in the shape of a square, with sides of approximately 15*15 or 20*20 cm. It can also be made triangular or in the shape of a diamond from fabric of a different shade, and used as a decorative element. |
| Neck | You can use any tape for it and additionally sew on a sewn-in border. The shirt collar is sewn on at the very end of the work (after all the details have been stitched together) |
You can also create a pattern for the product as a single piece with side inserts, having first reduced it to the child’s size.
How to sew step by step
A men's kosovorotka for a boy is sewn with your own hands along the side seams (without shoulder seams), starting from the main part - the stanitsa (body).
Before this, it is necessary to perform cutting, for which you need:
- Place the pattern on the wrong side of the fabric and pin it in place.
- Trace it with tailor's chalk or pencil and cut it out, taking into account additional allowances.
Allowances taken into account when cutting:
| Body | · to the length of the product + 8 cm (for hemming the product). · to the width of the shirt – + 2 cm for seams. |
| Sleeves | to the length value + 8 cm for hemming the product. |
| Neck | to head circumference + 2 cm for hem |
You will need to cut out an additional piece separately – a set-in strip in the shape of a rectangle with dimensions of 40*8 cm.
Having prepared all the elements, you can start sewing the product, for which you should:
- Fold the main part (body) of the product cut out of fabric in half and cut out the neck symmetrically along the fold. Its width will depend on the volume of the child's head + 2.5 cm to form the spacer.
- Sweep the frame together with the sides and start on the sleeves, for which you need to sew a gusset to their edges in the armpit area, and then attach them to the main part of the shirt and machine stitch along the side seams.
- Sew the side part of the shirt, and iron and finish the resulting seams by hand or on an overlock machine.
- If it was planned to additionally decorate the product with a decorative spacer, it should be attached to the place where the sleeves and the body are connected.
- Fold the edges of the sleeves and the bottom of the main shirt, iron them along the folded parts from the wrong side and stitch.

The kosovorotka is ready and you can start decorating it. To do this, you should:
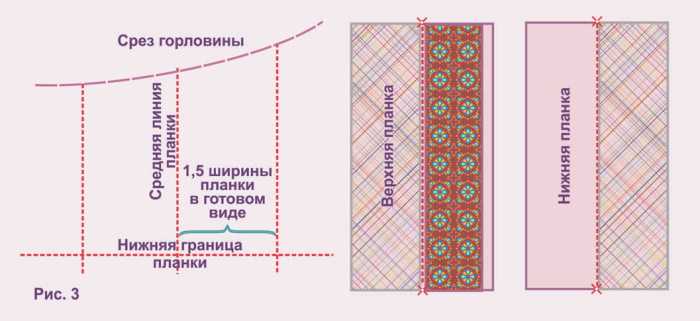
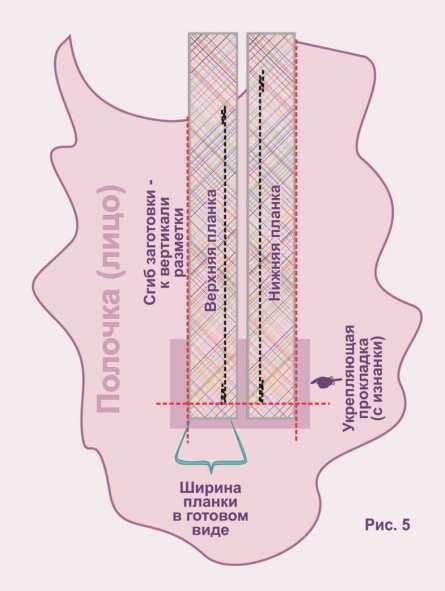
- Process the fastener (its length will be approximately 15-17 cm), for which you should cut out 2 rectangles from the main material - the first with dimensions of 20 * 5.5 cm, and the second - 20 * 10 cm. Sew a narrow strip to the left edge of the neckline and fold it inside the shirt.
- Attach the wide strip to the right side of the neckline, then fold it in half and tuck it behind the edge of the shirt. You will need to attach a button or Velcro fastener to it and use the top machine stitch to hem the pieces.
- To form the neckline, cut a rectangle measuring 40 x 8 cm from the main material, fold its edges using a tape measure and iron.
- Hand sew the piece to the neckline and machine stitch along it to form a stand-up collar.

- All the seams that have formed on the neckline need to be smoothed out, finished by hand or with an overlock, and then sewn onto the edge of it a wide braid with an ornament, a bright fabric insert or a satin ribbon.
- Sew a thick lining under the set-in insert and decorate it with braid, just like the neckline.
- At the ends of the sleeves, make small folds outward (their width should be no more than 1 cm) and decorate them with the same braid used to decorate the collar.
- Exactly the same wide tape needs to be sewn along the hem of the shirt.
Cuffs
If you want to decorate the kosovorotka with cuffs, in this case you should:
- Cut out 4 cuff pieces from the main fabric (or material of another, contrasting shade).
- Seal them with interlining, ironing it from the inside of the product.
- Place 2 pieces face to face and first baste them to the sleeve by hand with stitches, then iron and machine stitch, leaving 1 cm unfinished (this is done so that the cuff can be turned inside out).
- Adjust the length of the sleeve at the bottom and the length of the cuff using one-sided folds.
How to make a belt
The belt is an integral part of the kosovorotka. It can be made of fabric or thick wool or cotton threads, complemented with original tassels.
Braided belt
For creating a belt using different color shades of floss, the 'pulling' method is ideal.
Below are the necessary steps:
- All threads should be folded in half to form five loops.
- It is necessary to collect all the loose ends of the yarn and then fix them on a nail or door handle at a certain angle. It is recommended to place them at chest level.
- Place the loops on your fingers as follows: 3 on your left hand (index, ring and middle fingers) and 2 on your right hand (index and middle fingers).
- Knitting begins with the ring finger of the right hand. To do this, you need to pick up the loop from the index finger of the left hand from below, pull it through all the other loops to yourself and put it on the ring finger of the right hand.

- The remaining loops should be transferred to the index and middle fingers, spread your arms to the sides and secure the first row of the belt at the base.
- Using your left hand's working (ring) finger, pick up the loop from your right hand's index finger and pull it through all the other loops. Then place it on your right hand's ring finger.
- Move all the loops back onto your middle and index fingers, spread your arms apart and secure the second row at the base.
- Following the same procedure, you need to weave the entire belt and decorate its edges with tassels.
Sash
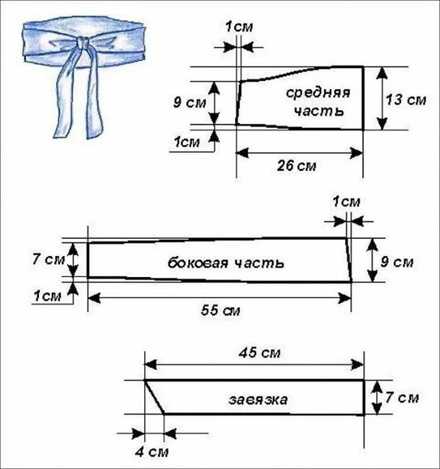
You can sew a sash belt with your own hands from thick knitwear or crepe satin, which complements the men's kosovorotka and wraps around the waist twice.
It is made according to a pattern, and its width is determined independently, and the length should correspond to 2* Waist circumference + 2-3 cm (for tying a knot) + 40-45 cm (for freely hanging ends). The pattern of the product consists of 2 middle parts, 4 side parts and 4 ties.
| Middle part | It is drawn in the form of a rectangle with a line with sides equal to 1/4 of the waist circumference and the width of the belt. In this case: · To fit the figure on the left side, 1 cm is added to the vertical line from the top and bottom points (the resulting points are connected by a line). · Add 9 cm to the bottom point and draw pattern lines to create the upper and lower edges of the belt. |
| Side part | It is made in the form of a rectangle (approximate size, 55*9 cm), while:
· For a tight fit, an additional 1 cm is measured horizontally from the top point on the right side. · On the vertical line, 1 cm is measured from the lower and upper points. · All marked lines are connected by dots. |
| The Plot | It is built in the shape of a rectangle (approximate size 45*7 cm) with a bevel of 4 cm. |
When assembling the sash belt you should:
- Place the pattern on the fabric and cut out with a 1 cm seam allowance.
- Duplicate the details of the middle part of the belt on interlining to ensure rigidity and shape stability of the future product.
- Separately assemble the upper and lower parts of the belt and stitch them along the side seams and ties. On one side of the middle part, you need to leave a 3 cm section unstitched.
- Iron and finish the seams of the garment using an overlock or by hand.
- Place the upper and lower belt pieces together lengthwise (so that the holes match) and sew them around the perimeter, leaving a 4-5 cm section free.
- Turn the belt right side out, straighten the seams and iron it.
- Sew the unstitched area by hand using a blind stitch and make finishing lines at a distance of 0.7 cm.
Recommendations
A men's kosovorotka for a boy is sewn with your own hands taking into account the features of the folk cut.
Assuming that:
- The kosovorotka must be loose and have a margin of at least 20 cm in circumference.
- The sleeve width should be at least 5 cm wider than the biceps circumference.
- The length of the shirt should not exceed the middle of the thigh (while being belted, it rises significantly upwards).
- The width of the kosovorotka from one edge of the sleeve to the other should be 10 cm, depending on the child’s height.
The material for the kosovorotka must be thick, and it can be decorated with any decorative elements - braid, laces with tassels, embroidery.
You can also use a fabric in a contrasting shade to the main piece (for example, red or blue) to finish the neckline.
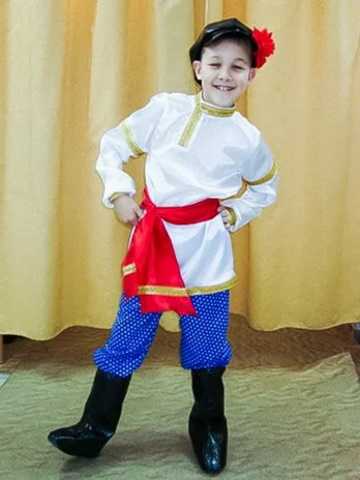
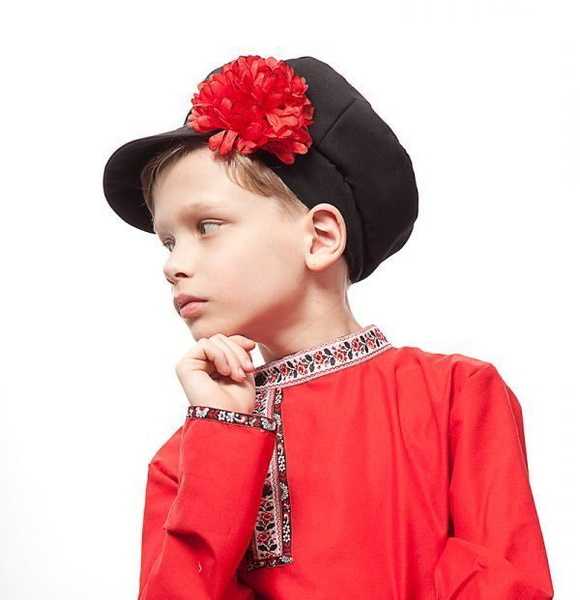
The folklore image of the child will also be complemented by:
- a cap decorated with a flower on the side;
- high boots and shalwars;
- face painting with blush on the cheeks, freckles and slightly lined eyes for expressiveness.
The kosovorotka is an integral part of the national Russian folk costume for men or children.
You can sew it yourself for a boy for a theatrical performance or a matinee using simple patterns, taking into account the features of the folk cut from thick cotton or linen material and decorate it with decorative braid and a sash that emphasizes the waist.
Video about sewing
Do-it-yourself men's kosovorotka: