Mittens are a classic winter comfortable item of clothing, warming your hands and protecting your skin from the harmful effects of frost and wind. Hand-knitted mittens will pleasantly differ from store-bought ones in their original appearance and maximum convenience, as they are knitted according to precise measurements taken in advance.
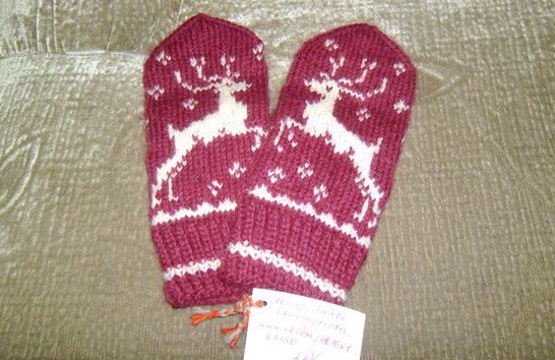
As a pattern for decoration, you can choose interesting options of snowflakes, snowmen, New Year's deer or colorful multi-colored ornaments. Such an original design will add a festive atmosphere to the knitted pair of things.
The pattern that will be chosen can later be implemented in other knitted items: a scarf, a hat, a sweater or house socks.
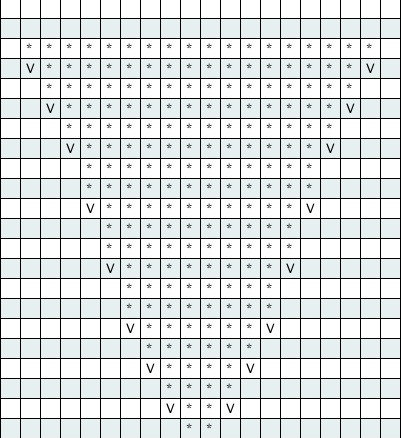
Ornament for knitting mittens. Scheme of New Year's deer
The pattern with New Year's deer is a good choice not only for mittens, but also for knitting a whole set of similar items.
Scheme with description
To make mittens you need to prepare:
- white yarn – 100 g (semi-woolen with added acrylic);
- blue or burgundy yarn – from 50 to 80 g.
Needles – circular and stocking. Knitting density – 16 sts per 18 rows. Should be 10x10 cm. Knitting techniques – loops through one, one elastic band, front surface with 2 threads.
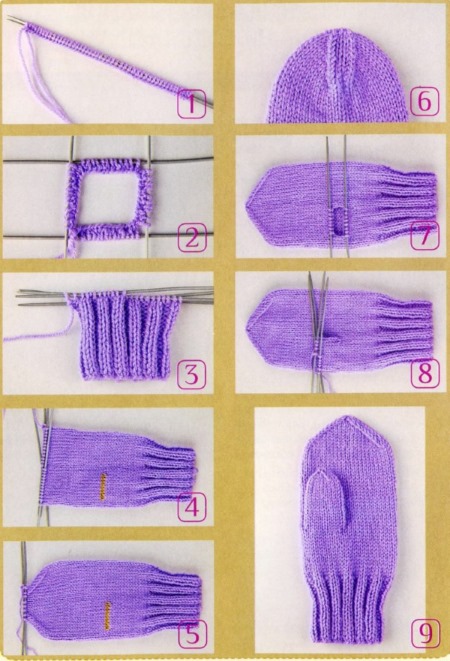
Step-by-step knitting instructions for the pattern
Procedure:
- Cast on 36 stitches onto a knitting needle. Then distribute them across 4 knitting needles so that there are 9 stitches on each.
- Knit the elastic band, knit the front and back sides 10 cm in height. Knit 2 rows of knit stitch (front stitch).
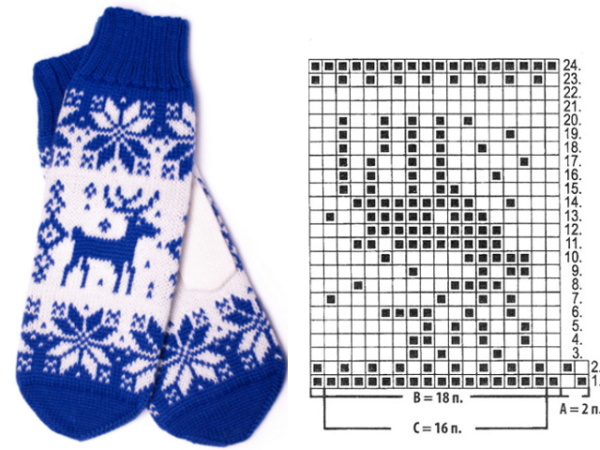
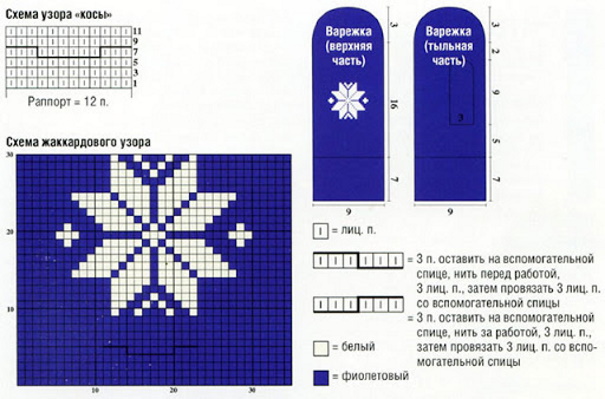
- Using the above diagram, start knitting the pattern. Using 1 and 2 knitting needles, 2 loops of the rapport (A) – row 9.
- Using 3 and 4 needles, knit 18 stitches of the pattern (C).
- In rapports B, C knit from 1 to 24 rows.
- When there are 4 loops left before the end of the row, add one more.
- After this, knit 2 more loops, add 1, knit according to the indicated pattern.
- Repeat the action in every 2nd row 5 times.
- Once the required increases have been completed, the next row should be knitted without using the increase technique.
- For the next row, add 2 more loops. Repeat the steps until the height is 16 cm.
- Knit 1 stitch according to the pattern using 1 and 3 needles, knit 2 more stitches together.
- At the end, join 2 loops on needles 2 and 4.
- Repeat the steps until there is 1 loop left on the knitting needles.
- Cut the thread, pull it through the end loops, tighten.
- The next step is knitting the finger. You need to drop 6 loops onto a pin and continue knitting.
- Move all the loops from the pin to the knitting needle. It is important to distribute all the free loops between 4 knitting needles on different sides. From each side, you need to add 4 new loops so that there is an equal number on all knitting needles.
- Using the stocking stitch technique, continue knitting the finger to the middle of the nail.
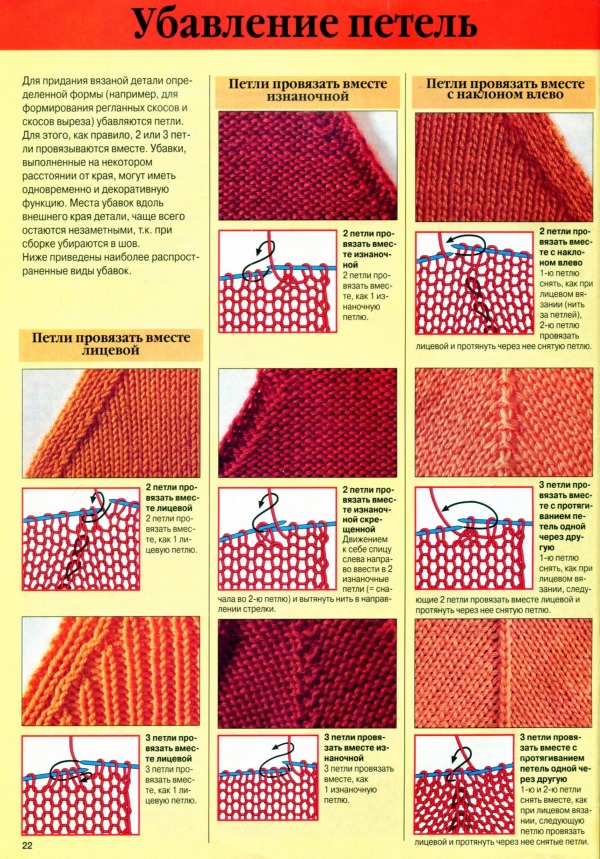
- Next, use the decrease technique.
- When there are 4 loops left on the knitting needles, you need to cut the thread, pull its end through the remaining loops, pull them together, and secure.
The mitten is ready. All that remains is to repeat the same steps symmetrically for the other mitten.
Tips and nuances
Basic knitting rules that will suit different knitting patterns:
- The knitting process should start with the elastic bands. The next step is to knit the front part of the mitten.
- The sides should be designed in the form of stripes.
- Throughout the entire process, it is necessary to carefully control the length of the draws. If they are too long, the finished product may be damaged due to the “sieve” effect.
- After creating the “body of the mitten”, you can start knitting the thumb.
- The process of knitting mittens can be carried out with different tools. This can be 2 knitting needles, a hook, or with a full set of knitting needles.
- To make a seamless product, you need to use 5 knitting needles.
The finishing stages are making laces and adding decorative knitting along the edges of the finished product.
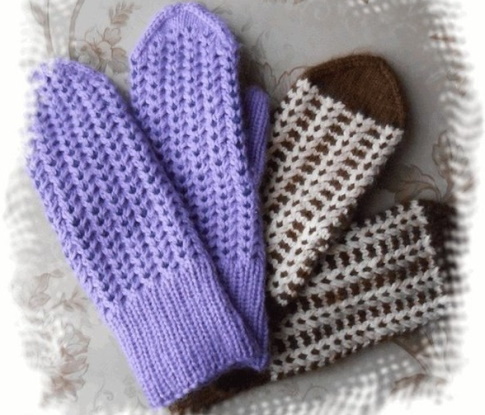
Pattern in a circle - in a circle
Ornament for mittens with knitting needles - circular patterns are considered one of the most popular. Similar patterns can be found in large quantities on the Internet.
Below we will describe one of the most common variations of this technique.
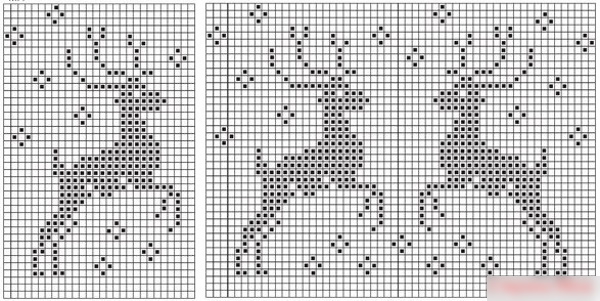
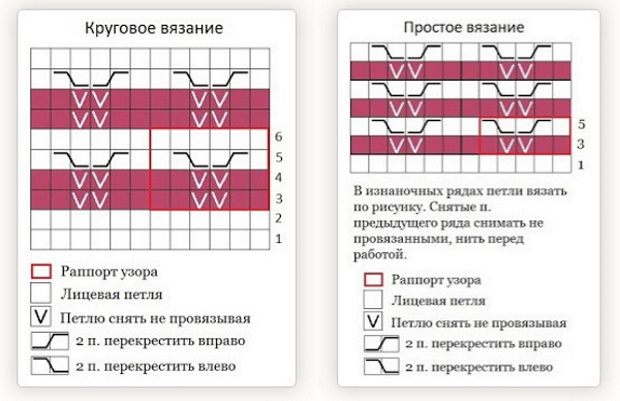
Laughter with description
The knitting pattern for such a pattern on mittens, for accurate and high-quality execution, must have a detailed description.
Finger diagram:
To make items using this technique, you will need wool threads (100% wool), labeled “Derevenka” or “Yarn from Troitsk”. Circular and stocking needles, pins can be used.
Step-by-step knitting instructions for the pattern
Procedure:
- Collect 52 sts. Knit them in a circle to get 40 rows with a 2 x 2 elastic band.
- Once you reach the last row, add 2 more stitches.
- Continue in this pattern until the height reaches the beginning of the thumb.

- The finger should start from the 10th row. From the sides to the 2 middle loops you need to add additional loops. For every second row 3 times, for every third - 3 more times, for every 2nd row - 4 more times.
- After 20 loops have been collected on the knitting needle with which the finger is knitted, they must be transferred to a pin, add 2 more loops on top, and continue knitting according to a separate pattern for the finger.
- When there is 1 cm left to the end of the finger, you need to knit the final 2 rows. The first should consist of 1 knit together with 2 knits. The second - knit 2 knits before the row ends.
The last step is to cut the thread, pull together all the remaining loops, and secure them.
Tips and nuances
You can use yarn of any color. However, it is best if it is 100% wool. As for the tools, it is recommended to choose them depending on your own skills and comfort when working.
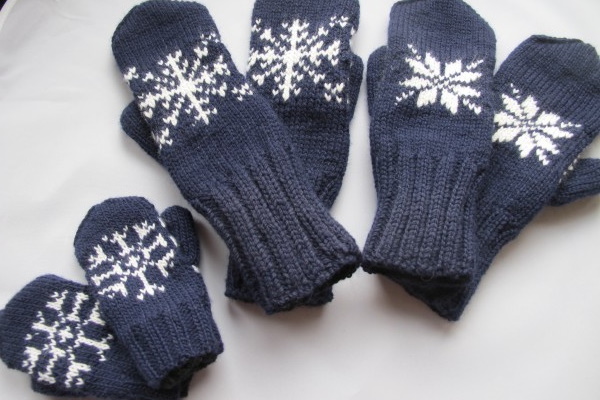
Snowflake Pattern
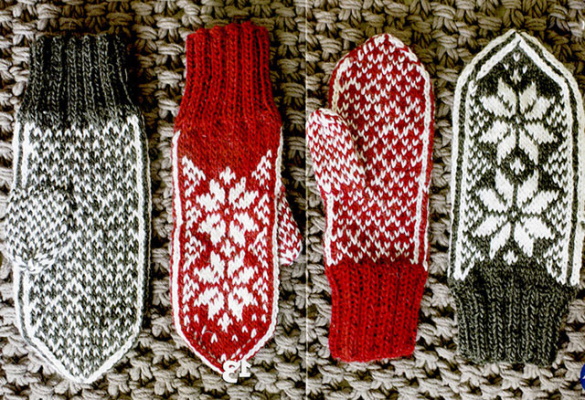
Ornament for knitted mittens - patterns of various snowflakes can be called classic in their belonging to the winter period.
Numerous variations of such patterns can be found in any specialized reference book. Below is an example of knitting mittens with a Norwegian snowflake.
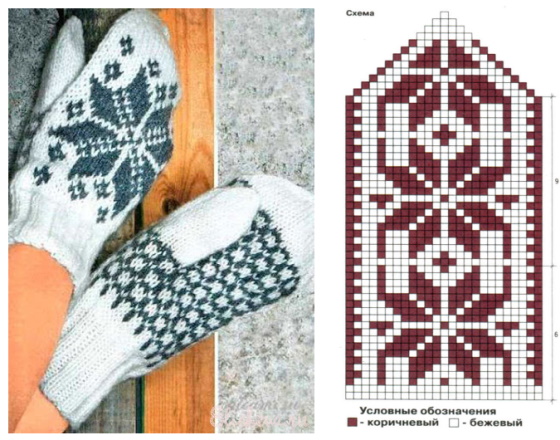
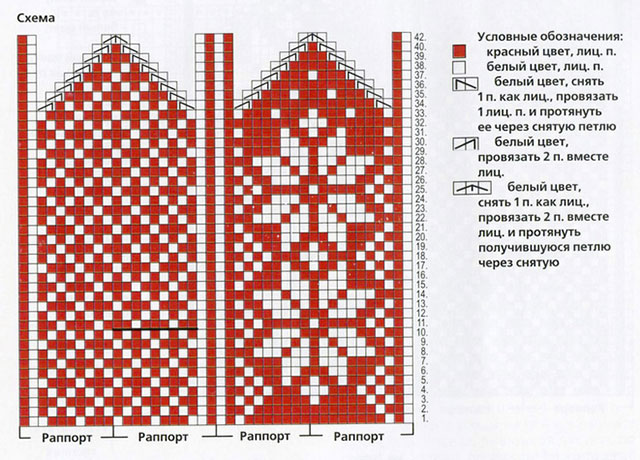
Scheme with description
The knitting pattern for the "Snowflake" pattern is quite simple, so it may not have a detailed description of the process. For work, you will need beige (or white) yarn - up to 50 g, and brown (or burgundy) yarn - up to 30 g.
It is recommended to choose consumables marked “Angora”. Knitting needles – stocking, circular.
Step-by-step knitting instructions for the pattern
Procedure:
- Cast on 50 loops of white yarn on 1 knitting needle. Knit 4 rows with an elastic band. Next 1 row with brown thread, the next 2 - beige, 1 brown, 2 beige, 1 brown, 5 beige.
- When the ribbing reaches 5 cm in height, you need to switch to the stocking stitch technique. At this stage, the creation of the ornament begins.
- On row 20, you need to leave a hole for your thumb. Knit 2 loops from the 3rd needle, then add 8 loops from the auxiliary thread. Transfer the added loops to the 3rd needle, tear off the edge of the thread, continue knitting in a circle.
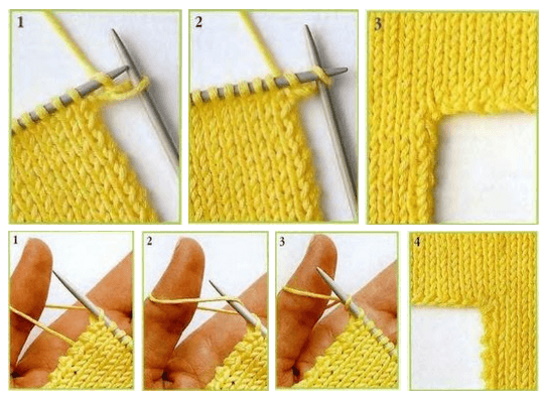
- Starting from row 44, apply the decrease technique. On needles 1 and 3, knit the first 2 loops together through the back walls. Using needles 2 and 4, knit the last 2 loops together through the front walls (all actions are performed strictly according to the pattern).
- When the ornament is finished, you need to decrease the loops using the beige thread. Repeat this until the needles are free of all loops except 1 (on each). Break the thread, pull it through all the free loops, pull them together.
- The last stage is making the finger. First, you need to break the auxiliary thread.
- Cast on the loops of the bottom row onto 1 knitting needle. Add 1 st from the side edge of the finger hole.
- Cast on the loops from the top row onto the next knitting needle, add another 1 st from the other edge of the hole.
- Divide all stitches between 4 needles. Knit in the round.
- Having reached the middle of the nail plate, distribute the free loops on 2 knitting needles, repeat the decrease technique that was used when knitting the upper part of the mitten. The other glove is knitted symmetrically.
Tips and nuances
The main techniques that will be used when knitting mittens with a snowflake pattern:
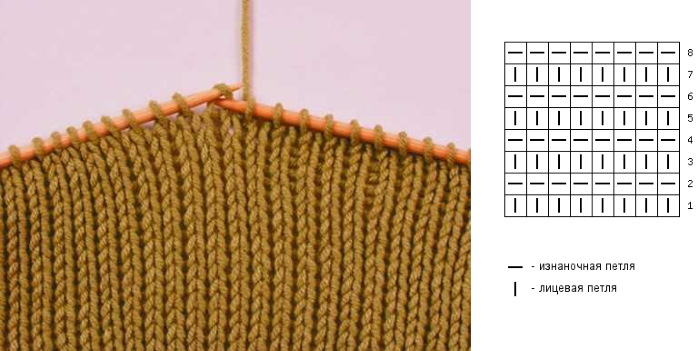
- Elastic band 1x1.
- Front stitch.
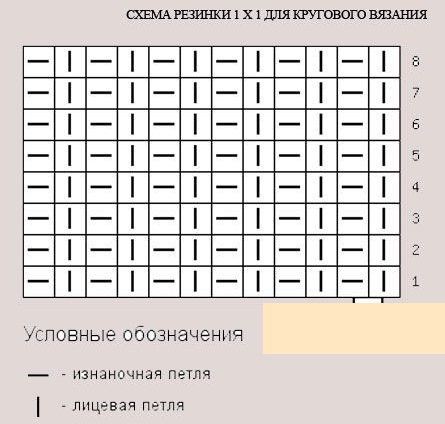
The 1x1 elastic band is knitted alternately with 1 knit stitch and 1 purl stitch. The front surface is knit stitches together with front rows, original stitches together with original rows.
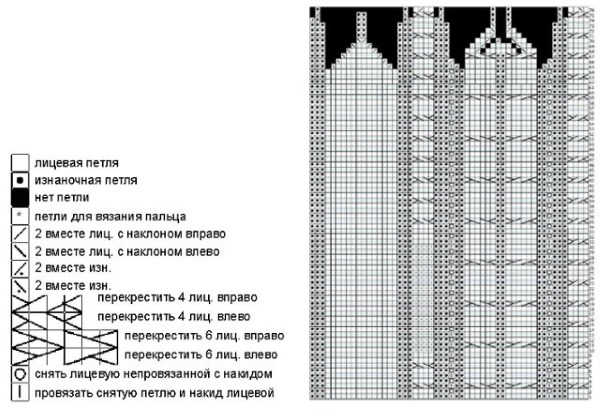
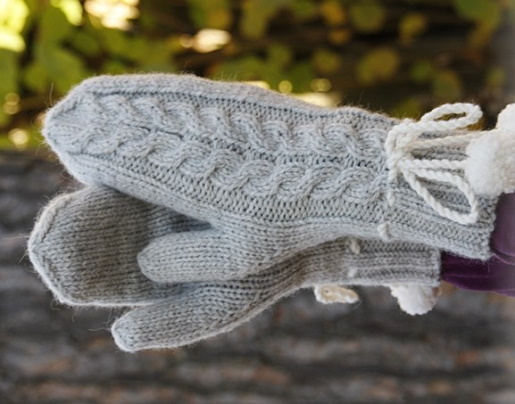
Braid Pattern
Braid is a classic pattern for knitting mittens from yarn with knitting needles. Below is a manufacturing diagram by sizes – ML, SM.
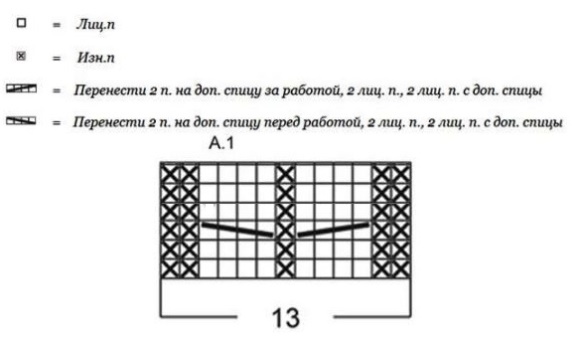
Scheme with description
Scheme:
To work you need to prepare:
- yarn – 100 grams (should consist of 35% alpaca, 65% wool, grey);
- white yarn – 50 grams (with the same characteristics);
- markers.
Working tool: double-pointed knitting needles No. 4, 3.
Step-by-step knitting instructions for the pattern
Procedure:
- Cast on 40 stitches of grey yarn with knitting needle #3. Knit 1 row of the front surface in a circle.
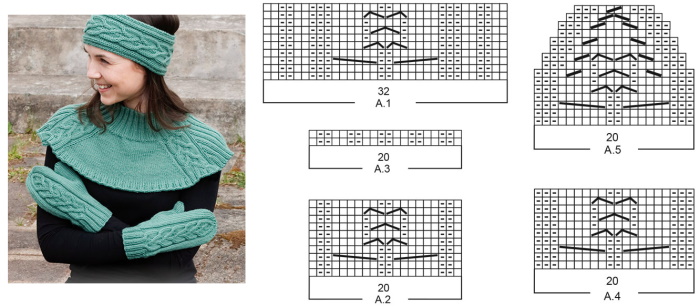
- Switch to 2L-2I elastic.
- Having reached 7 cm in height, from the next row start distributing the loops - (5l., 2 loops in 1 line) x3, (2 loops in 1 line, 2l) x3, 2 and, 3 lines. As a result - 34 loops.
- The following knitting stages will be carried out using knitting needle No. 4. Next row *2 loops in 1 line, 1 n* - in the space between * and * knit on the entire row.
- After this – 18 loops on the front ch., 13 loops according to the braid pattern, 3 loops front ch.
- The actions are repeated until the height reaches 14 cm. Next, you need to add 1 loop on both sides of 1 loop in a row (for the finger).
- The increase technique is repeated through the row up to 5 times. The result should be 46 loops.
- Transfer the finger loops (no more than 13) to a special holder or another knitting needle.
- Continue knitting in a circle. At the same time, you need to pick up 1 extra loop behind the finger in the next row. As a result, 34 loops should be involved.
- Having reached a length of 28 cm, after the 16th loop you need to insert the first marker (M). After the 17th st insert the second M.
- Decrease 1 st on each side of the first marker. Repeat every other row 3 times. Then repeat 3 times in each subsequent row. There should be 10 sts remaining.
- Next, you need to cut the thread, pull it through the remaining loops, tighten it, bring it to the wrong side, and secure it.
- The next stage is knitting the finger. First, you need to transfer the set aside loops to the knitting needle No. 4. It is important to add another 4 sts that are behind the finger. There should be no more than 16 loops.
- Knit 5 cm in single crochet in a circle.
- After this, knit 1 line from 2 new loops.
- Decrease in next row to leave 4 sts.
- Cut the thread, pass it through all the free loops, remove, bring to the wrong side, and secure.
The last step is making laces. You will need white yarn for this. The lace can be made thin from 1 thread or knitted. Next, it needs to be pulled through the holes in the main fabric of the gloves. At the ends of the lace, attach pompoms made of fabric with wool or fluff inside.
Tips and nuances
Knitting density: on the front surface with knitting needles No. 4 19 loops per 25 rows. Equal to 10x10 cm.
The main techniques used in production are:
- Decrease - 3 loops. Before the marker, you need to knit 2 loops in 1 line. After that, from 2 loops, between which there is a marker (M), knit 1l. Remove 1 loop with the front one, pull through the removed loop.
- Increase - make 1 stitch, which will be knitted with a crossed front stitch in the next row. This is necessary to get rid of holes.
The techniques are combined with each other and alternated throughout the knitting process.
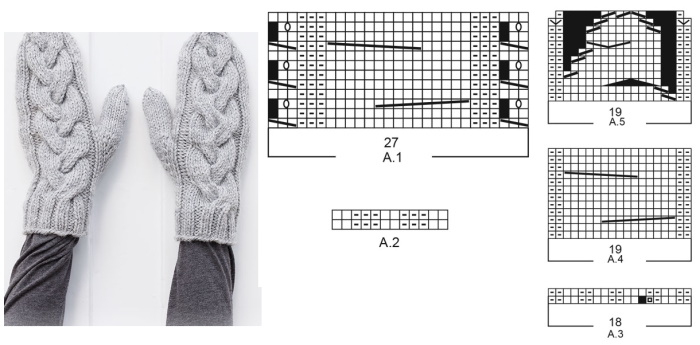
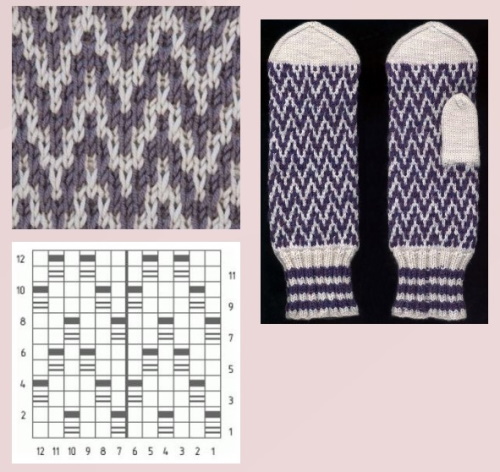
Jacquard pattern
An ornament for knitted mittens, the patterns of which will help beginners, is a good alternative to the usual knitting techniques of “spikelet”, “mosaic” or “brioche”.
Jacquard patterns are a separate group in knitting. Among all possible options, we can highlight those that are best suited for making mittens. One of them will be presented below.
Scheme with description
To work, you need to prepare hosiery needles - No. 3, 4, 5, yarn marked “Novita 7” - white and red, 50 g each.
Step-by-step knitting instructions for the pattern
Procedure:
- Cast on 36 loops of red thread on needles 3 and 5.
- Distribute the stitches evenly between the 4 knitting needles.
- Knit in a circle with a 1x1 elastic band until the height is 10 cm.
- Knit the next row with red thread knit stitches.
- Add 2 loops to 1 needle, 2 – 1 st, 3 needle – 2 loops, 4 needle – 1 st. As a result, you should get 42 loops.
- Change to 4 knitting needles, start knitting with the front surface. The pattern is knitted according to the above scheme starting from the 1st row.
- Having reached the 11th row, leave a hole for the thumb. To do this, knit the loops of the 2nd and 1st needles according to the pattern. Knit the first 2 loops on the 3rd needle.
- After this, knit the next 9 loops together with an additional thread. Transfer the loops to the right knitting needle, continue knitting in a circle until row 33 is finished.
- Starting from row 34, you need to start knitting the toe of the mitten. To do this, use the decrease technique. Cut the thread, pull the loose loops together with its end, and secure.
- The next step is to start knitting the thumb. First of all, you need to remove the extra thread that was placed on row 11.
- The loops from the cut need to be put on the knitting needles. On the sides, pick up 2 more loops. In total, there should be 22 loops.
- Distribute all the loops between 3 knitting needles. Knit in a circle using the stocking stitch technique. It is important to alternate 1 loop with red thread, the other with white.
- In each new row, shift the pattern by 1 loop.
- Having reached a height of 6 cm, knit 2 stitches together at the end of the needles.
- Repeat the decrease steps until the number of loops on the knitting needles decreases to 8. All that remains is to cut the thread and pull together all the loose loops with its end.
Tips and nuances
To knit mittens, you need to use different techniques.
The main ones are the following:
- for 1x1 elastic – knit alternately 1 purl stitch and 1 front stitch;
- for 2x2 elastic – knit 2 purl stitches and 2 front stitches alternately;
- for the front surface - use front loops.
The pattern is knitted strictly according to the diagram presented above.
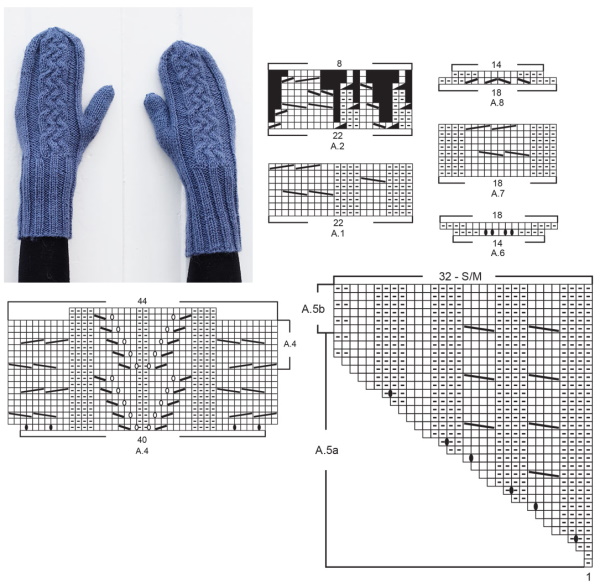
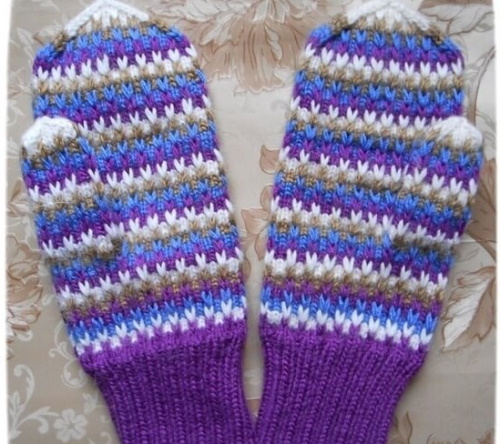
Two-color pattern
Ornament for mittens with knitting needles, schemes that are quite easy to repeat without significant practical experience, were presented above. Two-color patterns are mostly difficult for beginners.
Various options for making such ornaments can be found on the Internet or in knitting reference books. This option looks like scales, with checkerboard-shaped plates.
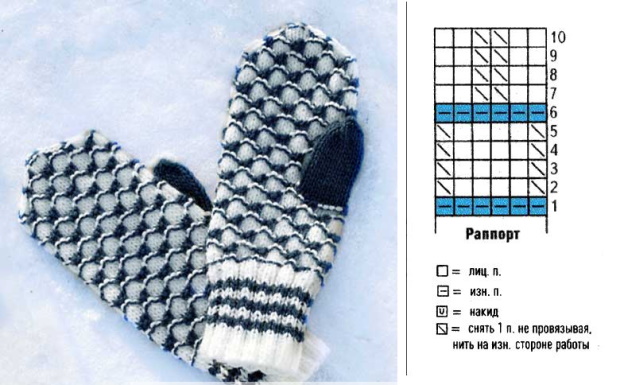
The simplest pattern of a two-color ornament, which is intended specifically for knitting mittens, will be described below.
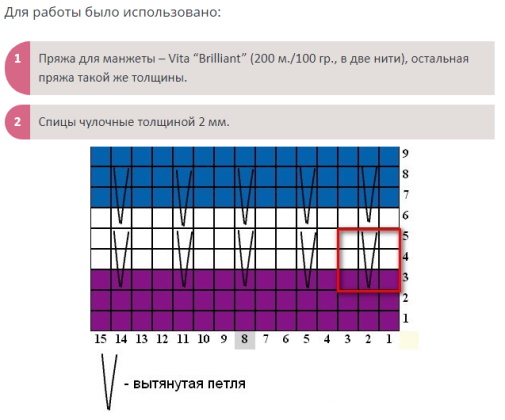
Scheme with description
To knit such mittens you will need yarn marked “Novita 7” – 50 grams of blue, 100 grams of white. It will be more convenient to work with 3 and № 3, 5 double-pointed knitting needles.
Step-by-step knitting instructions for the pattern
Procedure:
- Cast on 48 stitches of white thread on the 3rd knitting needle.
- Distribute all loops between 4 knitting needles.
- Alternate rows between needles 1 and 4.
- Knitting with a circular elastic band begins. It is important to alternate the colored stripes - 6 white stripes, 2 blue rows, 2 white rows, 2 blue stripes, repeat all rows again. Add 5 white rows.
- Take knitting needles 3, 5. Add blue thread to the work. Continue knitting the main pattern. In this case, you need to start from the first row on the diagram, repeat 6 loops of the rapport 8 times.
- Repeat from 1 to 10 rows. Knit them 2 times. Knit from 1 to 6 rows. On the 7th row, leave an opening for the thumb. To do this, take the loops from the first knitting needle, knit 4 loops from the 2nd knitting needle.
Knit another 8 sts with a new thread that will differ in color from the base. Transfer 8 sts to the left knitting needle, knit them with a white thread, continue knitting the ornament.
- Continue knitting the main pattern in a circle. After all rows from 1 to 10 have been knitted 7 times, you need to knit 1 row of the pattern.
- The average height of the palm should be close to 15 cm. After that, you need to move on to the decreasing technique.
- At the beginning of needles 3 and 1, knit 2 loops together using a front yarn over. At the end of needles 4 and 3, knit 2 more loops together.
- Continue decreasing several times. Stop when there are 4 loops left on the needles.
Cut the remaining thread, pull the loose loops together, and secure the end of the thread. The right mitten should be knitted symmetrically, however, there is one important point. It is recommended to knit the hole for the thumb using the 3rd knitting needle.
Tips and nuances
When knitting two-color mittens, it is important to consider several points:
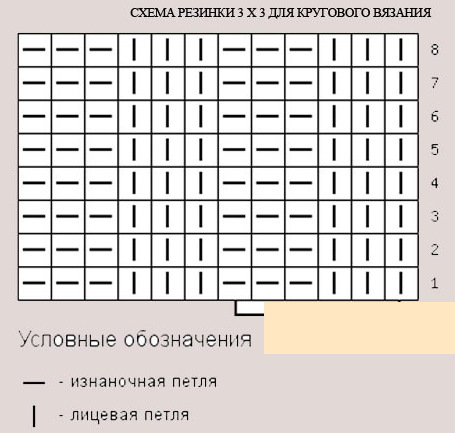
- Knitting with a rib pattern - 1 purl stitch - 2 front stitches - 1 purl stitch.
- Knitting density – 24 loops from the main pattern using needles 3 and 5 = 10 cm.
- The main pattern is to knit strictly according to the presented diagram.
Before putting on the finished mittens, it is recommended to steam them. The patterns and designs for mittens presented in the article can be knitted with other knitting needles.
Everything depends on the knitter's personal convenience in using the tools. It is recommended to practice working with different types of knitting needles in advance in order to ultimately choose the most suitable ones for yourself individually.
Video about knitting mittens
Ornament for knitted mittens: