Step by step needle stitched stem stitch helps to decorate a dress or a summer blouse. This stitch is not complicated, so even a beginner embroiderer can cope with it. The name of the stitch is associated with its appearance: it is used to embroider stems of flowers and plants, as it resembles them.
What is a stem suture?
With the help of the stem stitch, needlewomen embroider stems and petals of flowers on finished products. It received such a name due to the fact that it looks like a stem.
Stem stitches are also used in some other types of sewing:
- ribbon embroidery;
- satin stitch patterns;
- beadwork;
- contours of ornaments.
To sew a line with this stitch, you need to prepare the fabric, hoop, threads, ribbons, needle, pencil to mark the place of the future line of stitches.
Stem stitch patterns
It is difficult to learn how to do a stem stitch step by step with a needle, so it is recommended to focus on finished works, for example, on photographs of finished embroidery in magazines or on Internet pages. To do the embroidery correctly, you should transfer the selected pattern or picture onto special paper (tracing paper), from which you then transfer everything onto canvas or fabric. More experienced craftswomen create patterns on their finished works themselves.
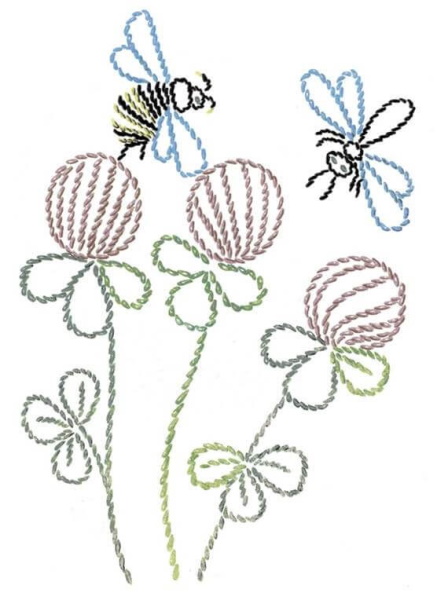
The stem stitch is used not only to decorate floral motifs, but also animal silhouettes, letter outlines, beaded motifs, and complex ornaments.
Beginner embroiderers should not choose complex patterns with many small details. In this case, there is a possibility of making a large number of mistakes. For example, you can start learning the stem stitch with this simple pattern. Its advantage is that it does not have sharp bends and does not have a large number of details.
How to do it, diagram (technique of execution)
Stem stitch with a needle, which both a beginner and an experienced needlewoman can perform step by step, is used in both hand sewing and bead embroidery. The technique of execution has some differences. In any type of embroidery, it is important to make stitches of the same size so that the final result looks neat.
To begin work, you should follow these steps:
- Place the fabric with the design in the hoop.
- Thread the needle.
- Attach the needle to the back of the design.
- Start stitching from left to right.
There are several stages in accordance with which it is necessary to sew a line with these stitches:
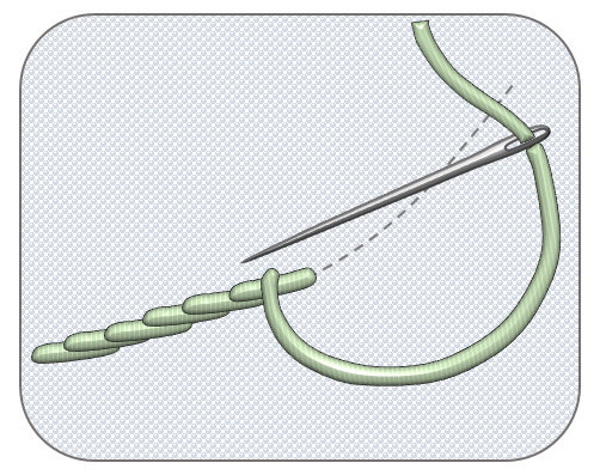
- Bring the needle and thread to the front side of the fabric at the beginning of the pattern.
- Make a stitch no more than 4 mm along the marked line.
- Pierce the fabric with the needle down.
- Pull it out in the center of the previous stitch to the front side.
- Repeat the sequence of actions until the line is completed.
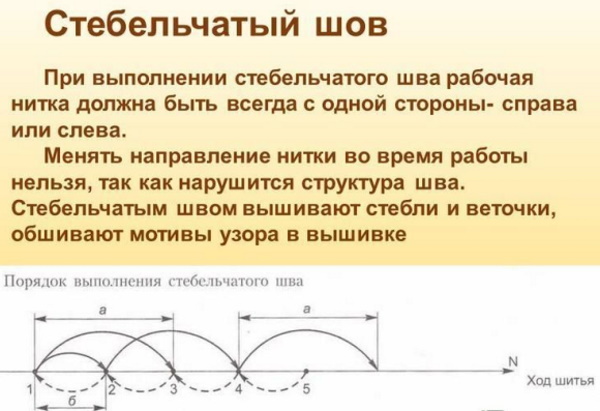
The stem stitch is divided into 2 types: dense and regular. Both types should be done from left to right.
You can create stitches using 2 techniques:
- Stitching – each seam is made sequentially, the needle must pierce the material and bring the tool out to the other side.
- Sewing – piercing the fabric in a horizontal direction, it is necessary to make 2 punctures at once and then pull the thread through.
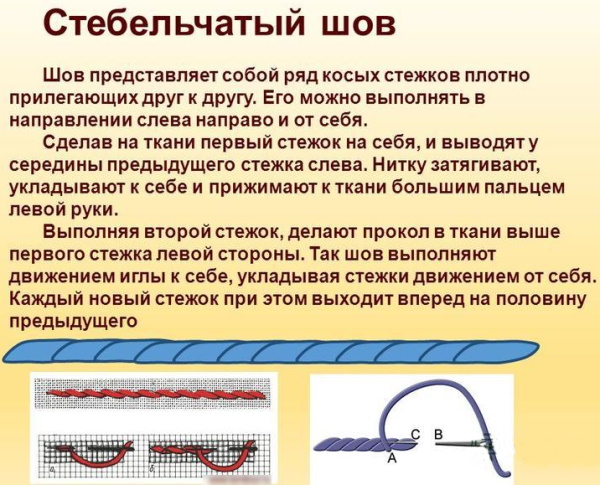
It is necessary to pay attention to the fact that small stitches are better suited for marking bends. The thread should also not twist, and the fabric should not tighten during work. The technique of performing a stem stitch (back stitch) can be presented in a more schematic form. Three points should be marked on the fabric. Points 1 and 2 are located at the edges of one stitch, and point 3 is in the center of the future stitch.
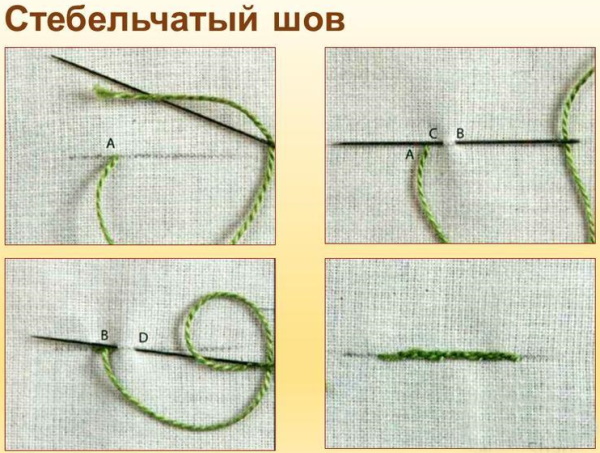
To make a stem stitch, you need to bring the needle from the wrong side to the front side at point 1, pierce the fabric with the needle at point 2, bring it out at point 3, returning back. The next stitch must be started at point 4, bringing the needle out at point 2. Hold the fabric at point 4 so that it does not tighten. Then continue stitching along the intended line, while the thread should not go beyond the line of stitches. It should be located on one side of the line of stitches.
Stem stitch embroidery
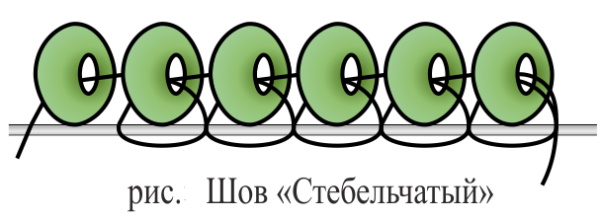
The stem stitch with a needle must be done step by step from left to right. The tip of the needle should be directed to the left, and the stitches themselves go in the opposite direction. While on the front side of the material the stitches fall on top of each other, on the back side of the fabric an even line is formed.
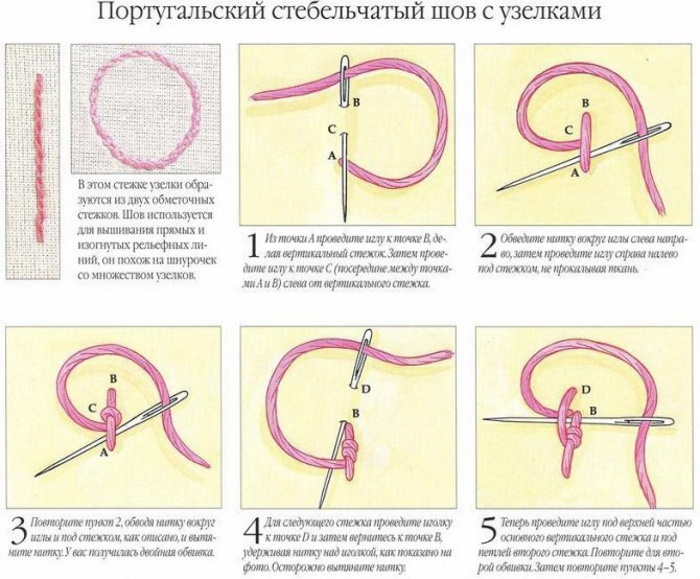
The stem stitch can be done in a slightly different technique. Needlewomen sometimes use the Portuguese stem stitch with knots. The difference of this technique is that in this stitch the knots are formed from 2 overcast stitches. It is used for embroidering lines with relief.
It is performed according to the following master class:
- Mark points 1, 2, 3 and 4 on the fabric. While sewing a vertical stitch, pass the needle from point 1 to point 2. Then pass the needle to point 3, which is located between points 1 and 2.
- Wrap the thread around the needle from left to right, then pull the needle from right to left without touching the working material.
- Repeat the steps in step 2, passing the thread around the needle under the stitch and pulling the thread out. This will create a double wrap around the stitch.
- To make the next stitch, insert the needle into point 4 and return to point 2, keeping the thread in position above the needle and avoiding twisting the thread.
- Pass the needle under the top of the main stitch and under the loop of stitch 2. Repeat wrapping the stitch with thread.
- Repeat the steps described in points 4 and 5.
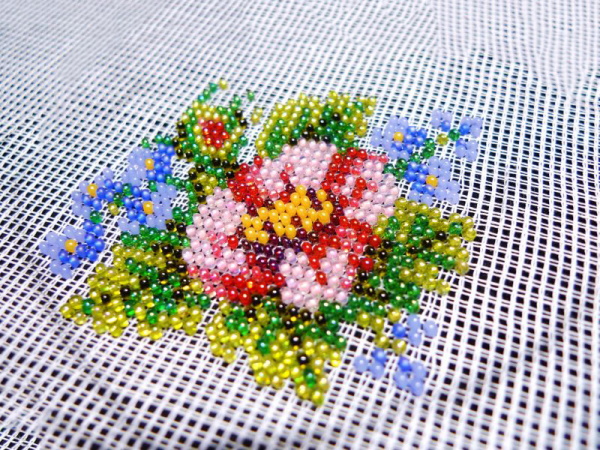
Stem stitch with beads
The stem stitch helps the beads to lie more evenly and makes the work look neater.
The stem stitch is performed according to the following points:
- Fasten the needle with the working thread on the back side and bring it out to the front side.
- Place 2 beads on the needle.
- Pierce the fabric next to the outer bead and bring the needle out to the wrong side.
- Pull the needle and thread through the beads.
- Pass the thread through the outermost bead.
- Thread 1 bead onto the needle and, pulling the thread tight, move it towards the other bead. Bring the needle out to the wrong side, piercing the fabric as close as possible to the threaded bead.
When embroidering with beads, needlewomen can make some mistakes. The main mistakes are presented in the table below.
It also provides recommendations that will help make your embroidery more accurate:
| Error in embroidery | Ways to fix it |
| The tilt of the beads changes in each row. | When sewing beads to fabric, it is necessary to monitor the tilt of individual beads. |
| The appearance of uneven rows due to splitting of the canvas. | An incorrectly selected needle can ruin the canvas and worsen the appearance of the product. To avoid this, it is necessary to correctly combine the thickness of the needle and fabric. The way the working thread is tensioned can also make the embroidery less neat. Therefore, it is recommended to monitor the tension of the thread while working. |
| Sewing too tightly will result in constrictions in the work. | To avoid this, you should pull the thread with the same force throughout the entire embroidery process. |
A more dense way to sew beads is to use a stem double-sided stitch. It is considered a double-sided type of stitch. To do this, you need to put a bead on a thread, then bring it out on the wrong side, since you also need to secure a bead on the inside of the stitch. Then you need to bring the needle out to the front side and thread it through the bead.
To continue the seam, thread the 3rd bead and pierce the fabric with a needle. From the wrong side, thread the bead again and bring the needle out between the 1st and 2nd beads. To complete the row, tighten the thread into a knot and pass it through the entire row on the wrong side. This will help align the beads on the wrong side.
Ribbon embroidery
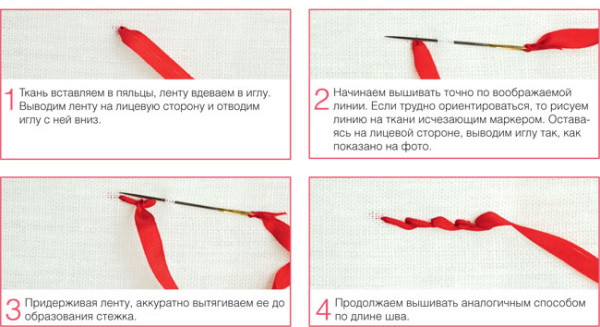
The stem stitch with a needle is done step by step not only with beads, but also with ribbons. When doing it, the ribbon must be held under the needle, not above the needle. When embroidering, not an ordinary needle is used, but a tool with a long and wide eye. It is recommended to choose silk or synthetic ribbons. Their width is most often 3 - 12 mm.
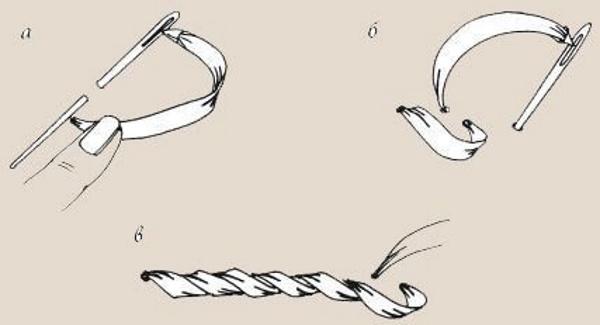
To begin embroidering, thread the ribbon into the needle, secure it to the fabric on the back side, and then bring the ribbon to the front side of the material:
- Straighten the tape, a little further from the right puncture of the fabric, pierce the canvas with a needle again. The distance between the resulting holes should be wider than the width of the tape.
- Bring the sharp end of the ribbon to the front side in the center of the first stitch, without catching the ribbon.
- Thread the needle through the ribbon, straightening it out.
- Through the end of 1 stitch, pass the needle to the front side through the same hole.
- Straighten the ribbon, pull it with a needle, making identical stitches.
- Finishing the stem stitch, secure the tape to the back of the fabric.
To make the stem stitch more voluminous, you can twist the ribbon counterclockwise. To make it look like a cord, you can twist the ribbon in the opposite direction.
The seam can be wrapped with another tape to change the color. Bring the tape out from the front side where the stitch line ends. The needle should be inserted between the last two stitches, without catching the fabric. Straighten and tighten the tape. This action should be continued until the stitch line ends.
Advice for beginner craftswomen, subtleties of execution
Some materials tend to deform after washing, so it is recommended to wash the fabric before starting embroidery. If you do not do this, there is a chance that after washing the finished work, the fabric will deform, and the pattern will deform along with it.
On canvas that has small holes, stem stitch embroidery will look less neat than on linen or cotton fabric. To make the design more precise and understandable, you can first mark it on the front side of the fabric. Special fabric pencils and markers are sold for this purpose.
Beginners should choose simpler patterns or inscriptions. To prevent the thread from getting tangled during the embroidery process, it should not be made too long. If it is too long, the thread will get tangled and twisted. This can worsen the appearance of the embroidery.
The following components of a neat stem stitch can be distinguished:
- The stitches must be the same length;
- They should be directed in one direction;
- The needle should be brought out inside the bends.
Beginner embroiderers most often use such a method of embroidery as pricking. In this case, the fabric must be pierced once and brought to the wrong side. This allows you to control the tension of the thread and avoid twisting it. After the needlewoman becomes more experienced, you can use the 2nd method - sewing. It saves time and allows you to make 2 punctures in the fabric at once.
To make the stem stitch more dense, it is necessary to pass the needle not through 1 puncture in the fabric, but through the center of the previous stitch. The thickness of the stitch also depends on the thickness of the thread and the stitch itself. Thus, the stem stitch, made step by step with a needle, helps to form the contours of the embroidery. Since the stitch resembles a plant stem, needlewomen began to call it stem stitch.
Video on how to make a stem stitch with a needle
How to make a stem stitch: