There are quite a lot of patterns of the "Stars" pattern, and each has its own peculiarity in the process of creation. In general, in the description they resemble the sun or pine needles. Most often, variations of the pattern in the form of stars are used to decorate headwear and scarves, especially in sets.
The quality of the Star pattern and its appearance may vary depending on the yarn, hook and tools used.
Necessary tools and materials
The diagrams and description of the "Stars" pattern for the hook, despite the simplicity of execution, can cause technical difficulties in the process associated with the selection of materials and tools. To prevent your hands from rubbing and to ensure that the knitting result is smooth, pay attention to the selection of tools in advance.
Tips for choosing a tool.
| Type of instrument | For what | What are the numbers good for? |
| Metal | Moves well on loops. Steel ones are more often recommended, since aluminum ones bend quickly, lose their shape and coating, contaminating the threads. | 0.5-1.5 for openwork items. No. 2-6 for working with thick woolen threads. No. 4-6 for working with thick woolen threads, iris, floss, cotton. |
| Wooden | Used for thick knitting with large loops. In this case, knit only with elastic threads so as not to break the tree. | |
| Bone, plastic | A light but fragile tool that wears down quickly on threads, which affects the size of the loops. | |
| Short | For standard knitting. | |
| Long | For Tunisian crochet. |
Knitters also pay attention to how comfortable the hook fits in the hand.
How to choose a convenient hook:
- It is recommended to pay attention to those that have a plastic or wooden handle, which makes it more convenient to work with.
- The narrow part of the hook base is located at a distance of 3-4 cm from the head.
- The hook head should be well polished and not have a groove that is too large. A groove that is too sharp and deep will regularly catch the thread during knitting or injure the skin. A groove that is too blunt will tighten the loops, complicating the work process.
In addition to these characteristics, you can choose a hook of different thickness, which changes the size of the loops and the density of knitting. The tool number corresponds to the thickness of its head (for example, a thickness of 2 mm is No. 2). At the same time, the thickness of the hook should be 1.5 times thinner than the working thread in order to hook them well.
Before starting knitting, carefully select the type of yarn for a particular product.
Choose from different varieties, many of which are also suitable for hand knitting due to their softness and elasticity, so as not to hurt your hands.
- Angora wool - This is rabbit down. It is rarely used in pure composition, more often it is found mixed with silk or cotton thread.
- Merino wool - thin and fluffy sheep wool. Australian merino is considered the highest quality option.
- Camel wool - Depending on the age of the animal, it can be soft or hard. The color varies from light to dark brown. The wool is often used undyed.
- Mohair – is the long and thin wool of the Angora goat, which has a shine. In its natural form, the yarn is white. Synthetic or other woolen threads are often added to mohair threads. The Russian equivalent is the wool of Orenburg goats, from which downy shawls are made.
Yarn can be not only pure, but also dyed. In this case, the durability of the color is carefully checked. To do this, the thread is moistened with water and placed between white fabric and ironed well. If after this procedure the white fabric is not dyed, this means that the threads are dyed well.
To determine how much yarn is needed for a certain product, the yarn consumption is calculated. It is believed that the optimal indicator is about 300 m per 100 g. In order for the wool to continue to retain its properties, it is recommended to rewind the skeins yourself.
To do this, wind the thread between 2 fingers, later adding more fingers one at a time. If the thread is wound tightly, it gradually loses its elasticity.
Schemes with description of works for beginners
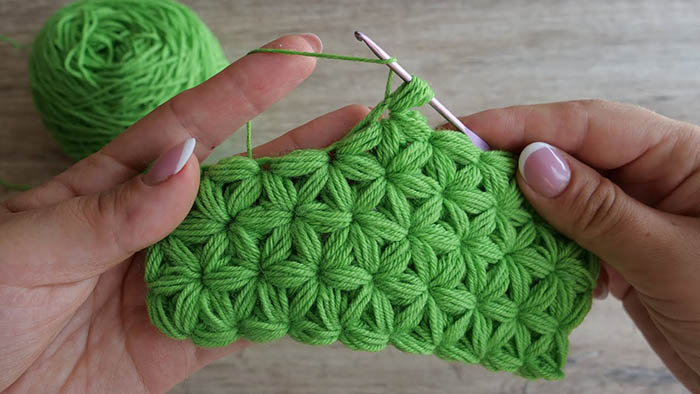
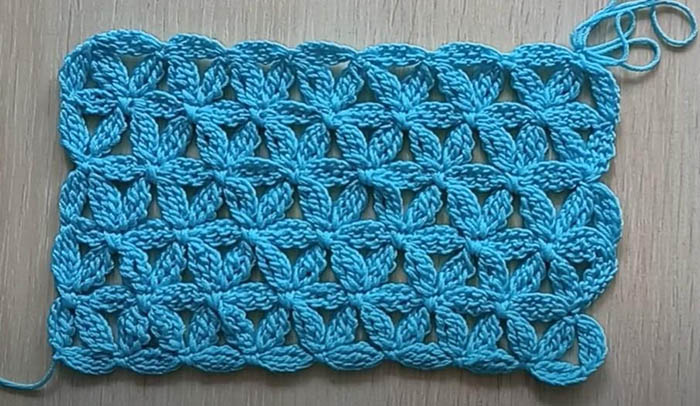
The crochet star pattern (diagrams and step-by-step description below) is most often found in the form of a dense pattern of 6-pointed stars adjacent to each other. This classic version is often used to create snoods, hats, scarves and other clothing.
Classic scheme
The "Stars" crochet pattern (diagrams and description are described in detail below) in the classic version consists of 2 rows that repeat one after another, shifting the pattern. In the diagram, all elements are designated by initial letters (air loop - VP, lifting loop - PP, air column - BC, lush column - PS, H - yarn over).
The knitting process includes the following steps:
| Row | Order |
| Warp | All VP. |
| 1 | 1. 4 PP, through the 3rd loop of the base 3 PS, 3 VP. 2. 1 PS in the loop connecting the first 3. Loops of this column leave on the hook. 1 PS in the 3rd loop of the foundation. 1 PS in the 7th loop of the foundation. 3. Connect all the threads from the hook. 4. Continue the algorithm until the end of the row. |
| 2 | Shift of stars.
1. Lift, 3 VP, 4 BC (the 1st is knitted into the 4th PP, the 2nd into the column of the 1st row with 2H, the 3rd – into the middle of the star). |
Circular variant
A simple version of the classic "Stars" pattern, which is made by knitting chain stitches in a circle. In this version, the order of the knitting steps changes. In the diagram, all elements are designated by initial letters (chain stitch - VP, lifting stitch - PP, lifting column - SP, chain stitch - BC, lush column - PS, yarn over - H).
| Row | Order |
| 1 | 1. 2VP, PS in the 1st VP of the previous row, connect with VP and knit together into a new VP. (Collect a chain of the desired length in this way). 2. The last BC is tied with BC on a thread, it is pulled through the column and VP of the previous row. In the same loop, make SP. 3. In the loop that connected the SP, knit a column without knitting it from above. 4. In the loop through which the 1st row was connected into a circle, knit 1 column without knitting from above. 5. In the adjacent loop on the left in the 1st row, knit 1 column without knitting from above. 6. 3 columns are connected with a loop. |
| 2 | This is where half of the star pattern is formed, with the working thread in the center.
1. Knit 3 columns without knitting from above, similar to point 1. Connect the columns with a loop. 2. The last star in the row is connected to the loop in the column that formed the rise. To do this, when knitting a loop, make loops of 2 bunches and connect with the desired loop. |
If the pattern is chosen for a headdress, decreases are made in the upper rows: after SP, loops are cast on for 2 bunches through the middle of the new star and the lower loop, for the 3rd bunch, 1 thread is pulled through the 1st to the left of the lower loop, 2 more through the adjacent left loop. So the pattern is shifted to the left side. Then the star is knitted according to the previous pattern and the pattern is decreased only through 1 fragment.
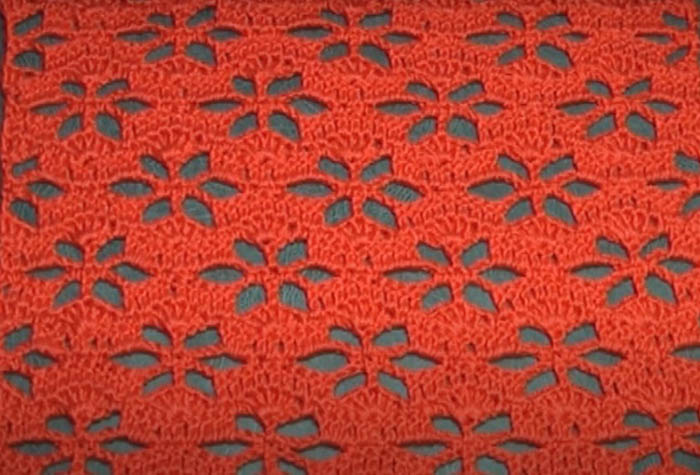
Pattern "Star Scattering"
The double-sided pattern is suitable for creating clothing (tunic, cape, jumper, etc.). The pattern includes a repeat of a fragment in 4 loops, 3 symmetry loops and 2 side loops.
A sample of 21 loops is knitted in 2 rows. The pattern is repeated in a checkerboard pattern.
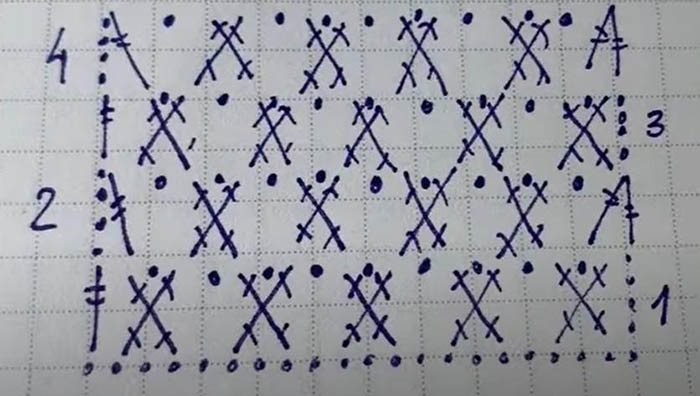
In the diagram, all elements are designated by initial letters (air loop - VP, lifting loop - PP, lifting column - SP, air column - VC, lush column - PS, yarn over - H).
| Row | Order |
| Initial row | They are assembled in a chain from VP. |
| 1 | 1. 4 VP, 2 H in the 5th loop from the hook and pull the thread into 1 H, 1 H, skip and knit into the next loop 1 H. Knit 2 loops on the hook together, and so on 2 more times. 1 VP, 1 H and pick up 2 jumpers in the bar in the cross, pull H and knit a column with 1 H. You get a cross of the pattern. Make 1 VP, instead of 4 and repeat this algorithm further along the row. 2. To finish row 1: 2 H, 1 column with 2 H in the last loop of the row. |
| 2 | 1. 2nd row: 4VP, 2 H, in the 1st column under 2 strips knit a column with 2 H. Front loop from the face, 2 H, in the next column knit 1 H, 1 H, skip VP of the previous row, in the next VP of the previous row knit 1 H. Knit 3 times 2 loops (as in point 2), 1 VP, 1 H, knit a column with 1 H in a cross. Make 1 VP, instead of 4 and repeat this algorithm further along the row.
2. To finish the 2nd row: after the VP, make a column with 2 H, knit it into the last column of the 1st row, 1 H, 1 H not to the end, 2 H knit into the last VP of the previous row 1 column with 2H, 2H. All 3 loops on the hook are knitted together. |
| 3 | The 3rd row is repeated like the 1st. |
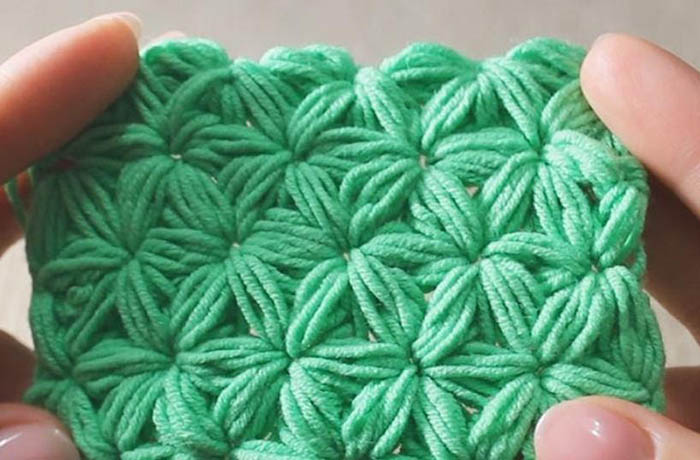
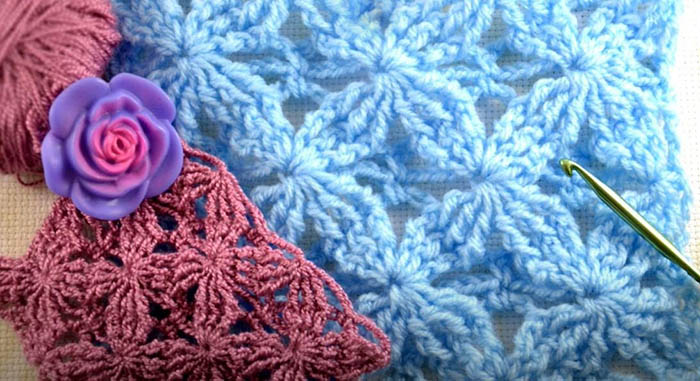
Pattern "Stars-flowers"
The "Stars" crochet pattern (diagrams and descriptions for each pattern are described in detail) includes 1 element (ray), which are connected in a certain sequence. They begin to knit without the initial row, immediately forming a pattern.
In the description, all elements are designated by initial letters (air loop - VP, lifting loop - PP, lifting column - SP, air column - BC, fluffy column - PS, yarn over - H, single crochet - SN, connecting column - SS).
Knitting pattern:
- Form a beam: 5VP, 3H and a column with them in the base of the chain. 3H and a column in the base. Knit all the fragments and form a beam.
- The next beam is made. A column with 3 yarns is knitted into the base of the chain after the previous beam, capturing 2 threads.
- For the sample, 4 rays are knitted.

- Knit 2 rays and attach them under the loop between the 4th and 5th rays and attach with a dc or slip stitch. You get a triangle of rays.
- Make another dc at the junction. Knit a beam into the base between the dc. Knit the next beam into the base of the previous one. Attach these 2 beams between the 2nd and 3rd beams using a dc.
- Knit 2 rays as in point 4 and attach with a dc between the 1st and 2nd petals.
- Knit the beam without changes. The last beam in the row is knitted with 3 columns with 3 H, attaching to the 1st VP in the row.

- 2nd row: 5 VP, turn the fabric, 3 H and a column with 3 H at the base of this beam. Finish the beam and attach it to the top of 2 beams in the previous row using SS.
- From here, knit a beam and attach it to the next top of 2 beams of the previous row. Repeat this algorithm until the end of the row.

- In the 3rd row, knit 5 VP, turn the fabric, a column with 3 H and finish the beam. From it, make another beam and attach it underneath between the 1st and 2nd beams of the previous row, forming a triangle. Pick up the thread from below, bring it out and knit 2 times to form the center of the star. Continue the algorithm to the end of the row. This row is similar to the 1st row, but has a shift. At the end of the row, make 1 beam.

- The 4th row begins with knitting a beam immediately from the previous, unattached beam. In this case, the fabric is turned. The beam is attached to the top of 2 beams formed in the previous row. Continue this algorithm until the end of the row.

- 5th row: start the pattern from the beginning.
Velvet Stars Pattern
The crochet pattern “Stars” (diagrams and descriptions show all the steps in detail) consists of 12 repeating loops and 5 additional ones.
In the diagram, all elements are designated by initial letters (air loop - VP, column with 2 yarns - CC2N, column without yarn - SC, skipped loop - P, yarn over - H).
| Row | Order |
| Initial row | Cast on 17 stitches. In the 5th stitch 3 CCH2N. |
| 1 | 1. 1 VP, 5 P, 1 RLS. 1 VP, 5 P, 3 СС2Н. 2. 3 VP, in the same loop 3 CCH2N (then repeat). 3. At the end, knit 4 columns with 2 yarns into the last loop of the row. |
| 2 | 1. 1 VP, turn the canvas.
2. SC in the 1st column. 5 VP, 1 front CC2N (do not finish knitting). 3. 2H, hook under the column of the previous row and pull out the loop. Knit the loops in pairs until you get 2 loops. 4. In a row, 2 front CC2H under the column of the previous row (do not finish knitting). 5. 3 front CC2H under the columns in the previous row. 6. The thread is picked up and pulled through 6 loops on the hook. 7. 5 VP, SC into the peak of the arch of the previous row. 8. 5 VP and again a group of 6 front CC2H, tie together and continue this algorithm until the end of the row. 9. At the end of the row: 5 VP, SC in the 4th lifting loop of the previous row. 1 VP, turn the fabric over. |
| 3 | 1. SC in the 1st column, 1 VP, 3 CC2N in the common top of the columns of the previous row. 3 VP, here also 3 CC2N. 1 VP, SC in SC of the previous row. 1 VP and continue.
2. At the end of the row: 1 VP, SC in the last column of the previous row. 4 VP and turn the fabric over. |
| 4 | 1. 3 VP with 2 yarns together under the nearest columns of the previous row. 5 VP, SC in the arch of 3 VP of the previous row. 5 VP, 6 front CC2N with a common top over 6 columns of the previous row. 5 VP, SC in the arch and continue the algorithm to the end of the row.
2. At the end of the row: 3 front CC2H together and 1 CC2H in the side SC of the previous row. 4 VP, turn the fabric over. |
| 5 | The drawing is repeated again. |
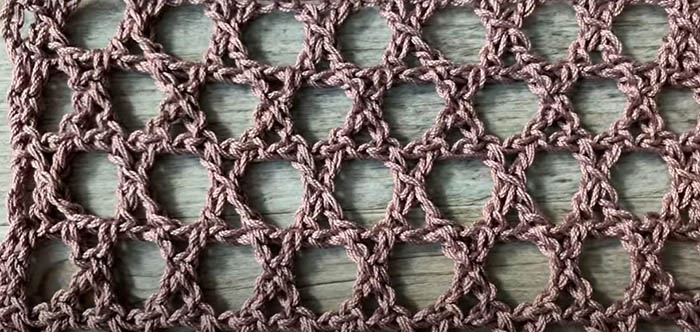
Pattern "Openwork Stars"
The openwork pattern in the form of stars is suitable for creating summer items. The pattern is repeated through 16 loops and 1 additional.
In the description, all elements are designated by initial letters (air loop – VP, lifting loop – PP, side loop – BP, double crochet – SN, skip loop – P, single crochet – SB).
| Row | Order |
| Elementary | VP chain. |
| 1 | 1. 3PP, in BP - 2CH, 2P, 1SB, 1VP, 1P, 1SB, 2P, 5CH (into the common base loop) - you get a fan. Continue the pattern further. 2. At the end of the row: after VP and CH – 1P, 3CH. |
| 2 | 1. 3VP, turn the canvas.
2. In the 2nd dc of the previous row – dc, in the 3rd dc – dc, in sb – dc, in ch – dc. 3. 3VP, SN (in the middle of the fan 5 columns), 3VP, 9SN. Continue the pattern further. 4. At the end of the row: 5CH (starting and ending with VP in the previous row). |
| 3 | 1. 1VP, turn the canvas.
2. 2SB, 5VP, 1SB, 1VP, 1SB. Continue the pattern further. 3. At the end of the row: 5 VP tie SC into the penultimate column of the previous row, 1 SC into the upper VP lift |
| 4 | 1. 3VP, turn the canvas.
2. 3CH, 3VP, 1CH (knit under VP), 3VP, 9CH, 3VP, 1CH, 3VP. Continue the pattern further. 3. At the end of the row: 3CH under the VP of the previous row, 2CH in the last 2 loops of the row. |
| 5 | The first row of stars is finished. Next, the pattern is shifted in a checkerboard pattern. |
Secrets for Beginners
- If a beginner has doubts about the choice of threads, it is better to take not too thin ones, about 180 m in a 50 g skein.
- Use the recommended hook size on the skein of yarn. Or choose the average from the recommendations.
- Insufficient deepening of the hook head is sometimes corrected with sandpaper or another tool. But this process can remove the top coating of the hook, which can make the work process more difficult. Therefore, it is recommended to buy ready-to-use tools with the required deepening and store them in a box to avoid scratches and nicks on the surface of the tool.
- Knitting with a thick hook on thin threads allows you to make an openwork fabric with gaps.
- Crocheting with threads of suitable thickness allows you to get a fabric without gaps, with loops of different sizes (depending on the hook number).
- When working with dark threads, it is recommended to place a light fabric or paper under the fabric so that the loops are more visible.
- It is easier for beginners to master the process of crocheting with patterns made in rows, rather than in a circle, where without skill you can get confused.
- Before you start knitting, make a small fragment of the pattern from the selected threads (a square of about 10 cm) to practice the tension of the thread and see how the pattern will look with this yarn. Then the knitted fragment is moistened and dried to see how the yarn behaves - whether it shrinks after washing and whether it loses color saturation.
- To prevent the hook from rotating in your fingers while working and to prevent your hands from getting tired, hold the tool like a knitting needle – with your thumb and middle finger, placing the entire length on your palm. The little finger and ring finger hold the hook. Leave the index finger free to hold the loops.
The diagrams and descriptions for the crochet pattern "Stars" may be clear and easy to perform, but knowing some secrets and following the advice of experienced knitters allows you to save time from mistakes in the process.
Video about knitting
Crochet pattern Stars in a circle for a hat, snood: