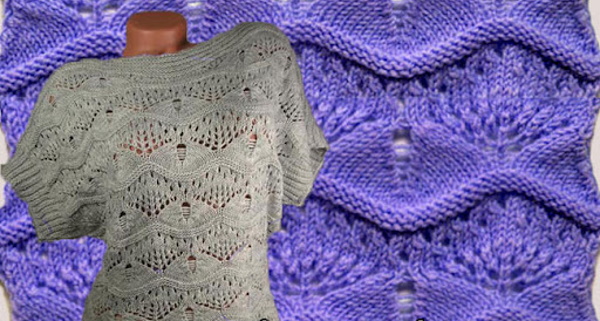
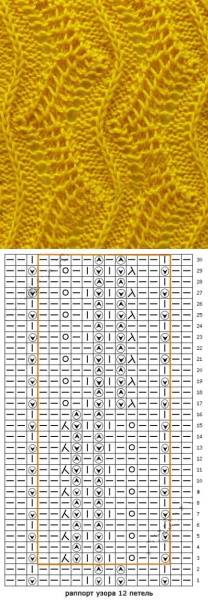
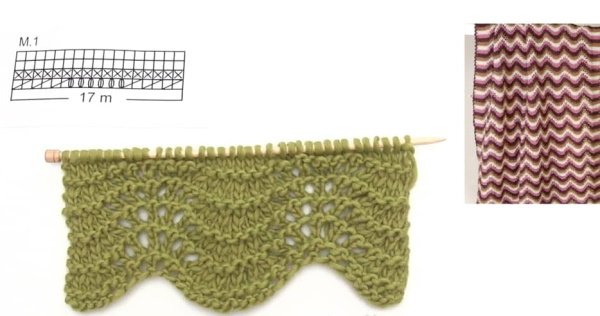
Scheme and description of the pattern "Wave" knitting needles will help a needlewoman of any skill level to create a unique and beautiful knitted item. In this ornament, combinations of different shades of thread look especially good. The waves can be both wide and narrow. They are knitted on women's and children's products for different seasons.
Necessary tools and materials
The Wave knitting pattern, the diagram and description of which can be found in old printed publications, allows you to diversify any wardrobe. It is performed on winter, summer and demi-season items. It is used to decorate the edge or create a flounce on a sweater.
In order to obtain the desired pattern, the needlewoman must have:
- yarn;
- needle;
- knitting needles;
- hook;
- plastic beacons;
- scissors;
- centimeter.
When choosing yarn, you need to understand what season the item will be created for. If for summer, it is better to take cotton, silk or linen. And for winter clothes you will need warmer threads.
The following will suit such clothes:
- alpaca;
- cashmere;
- mohair;
- merino;
- wool.
The listed types of warm yarn are made from environmentally friendly and natural material collected from domestic animals during the specified period. Most of the time, the manufacturer adds acrylic fiber to the original thread, which improves the quality of the yarn and makes it affordable for most buyers.
If in ancient times, most knitting was done with wooden or bone needles, then modern needlewomen prefer circular or separate knitting needles. The former are designed to create seamless items, and the latter allow you to knit complex items in parts.
Sometimes a hook is needed for knitting. It is necessary for creating individual elements, such as cones or bunches. In addition, it is convenient to connect individual parts of the fabric with a hook.
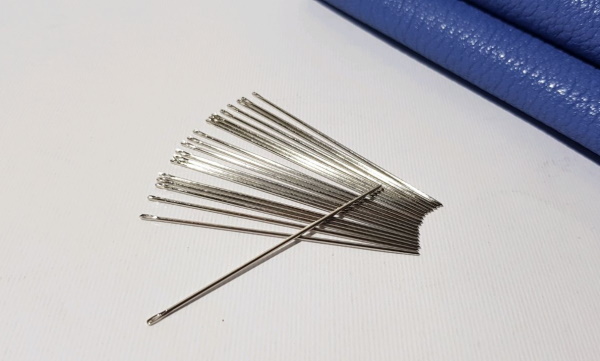
A needle is necessary for a needlewoman to sew parts, attach buttons and other accessories, or secure pockets, ties, and bows. It is better to choose this tool with a large eye so that the knitting thread can fit through it.
Plastic markers-beacons will be needed by the needlewoman to mark the necessary sections, details and areas in the work. For example, they can be used to fence off a certain number of loops for a pattern or to mark the beginning of a row when knitting on circular needles. Scissors are also needed for working with yarn. They must be well sharpened to cut the thread at one time.
A tailor's tape measure will also be needed by a craftswoman to create, for example, a sweater or a hat. She will use it to take measurements in order to accurately calculate the number of loops and knitting density.
Schemes with description of works for beginners
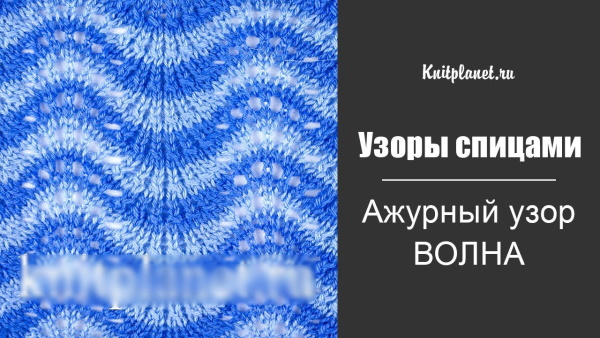
The "Wave" knitting pattern, the diagram and description of which will help a novice needlewoman understand the process of creating an ornament, has a number of characteristic features. Firstly, it always has yarn overs and decreases in loops. Secondly, the waves in it should converge and diverge. Thirdly, the technique called "Peacock Tail" is always appropriate here, where the pattern narrows towards the end, while having layering and texture.
The wavy pattern appeared later than the garter stitch and stocking stitch. This is due to the fact that at the beginning of its origin, the method of creating clothes had to be simple and suitable for those harsh living conditions. In addition, several centuries ago, only men were engaged in knitting, who did not particularly pay attention to the sophistication and smoothness of the shapes and patterns on the canvas.
The motto of that time was "simple, practical and reliable". In addition, knitted items had to protect people from the cold and strong wind, which also did not contribute to the creation of decorative patterns on the fabric.
Only when yarn products caught the interest of the upper class, they began to transform and change, acquiring patterns, curves and other detailed ornaments. Modern craftswomen know many variations of the wave pattern, which will suit any style, cut and mood.
The most popular among them are:
- "Openwork";
- "Vertical";
- "Two-color";
- "Nautical";
- "With triangles."
These variations allow you to create an interesting canvas, captivating with its pattern. There are special symbols for working with yarn, allowing you to write down and shorten the pattern for ease of use. This method is accepted throughout the world and is a unique and understandable language for knitters from all over the world.
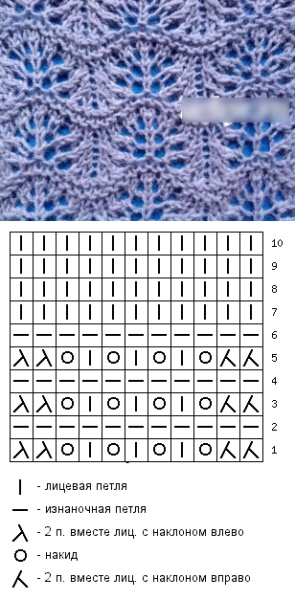
| Name | Abbreviation and designation |
| facial | persons or persons - "X" or "I" |
| edge | kr or kr. – "O" |
| purl | izn. or ip – «-» |
| yarn over | nak. – «Ո» |
Also, to create waves, knit several loops together, which is designated by "V" or "/\". The point in this case indicates whether the elements should be knitted purlwise or facewise. Beginner needlewomen can practice creating a simple wave.
To do this you need:
- Start working with a set of loops (preferably an even number).
- Knit row 1, purl only.
- Make row 2 of all knit or X stitches.
- Work Row 3 in the same way as Row 1, using the purl stitch technique to create the stitches.
- Knit row 4, alternating knit together 6 stitches (2 times), yarn over, X-loop, yarn over, X-loop, yarn over, X-loop, yarn over, X-loop, yarn over, X-loop and yarn over and X-loop. Work this way to the end of the line.
- Knit the fabric to the desired length, alternating work from row 1 to row 4.
This classic design can be modified to create different types of waves and color combinations.
Openwork
The diagram and description of the pattern "Wave" with knitting needles allows you to decorate the fabric with openwork knitting. The ornament is suitable for knitting blouses and skirts for little fashionistas or a vest for an adult and self-confident woman.
For knitting you need:
- Start by casting on the required number of stitches.
- Create row 1 by knitting 2 stitches together 3 times after the edge stitch. Then repeat the yarn over and X stitch alternation 12 times, and finish the row by knitting 2 stitches together 3 times again.
- Knit rows 2, 3 and 4 with purl stitches only.
- Repeat work from row 1 to row 4 for the desired length of fabric.
At the end of the work, the loops are closed and the product is tried on.
Vertical
There are also vertical waves in knitting. They allow you to visually stretch the silhouette.
To get this pattern you need:
- Start by casting on the required number of stitches (preferably even + add a stitch to balance the pattern).
- Create row 1, alternating 3 times the front with a yarn over. After the last yarn over, knit 2 stitches together 3 times. Then follow 3 consecutive draw throughs (slip 1 stitch as a front stitch onto the working needle, and knit the second stitch in the same X-way and lasso it over the slipped stitch). Then repeat the alternation of the front and yarn over again.
- Knit rows 2, 4, 6 and the rest of the even ones according to the pattern that appeared on the fabric.
- Make row 3 of only knit stitches.
- Repeat the same knitting process in row 5 as in row 1.
- Knit row 7, creating 3 purl and 3 knit after the edge. Then 6 purl and 3 knit - knit like this until the end of the strip.
- Work rows 9 and 11 in the same way as row 7.
- Repeat the pattern repeat for the entire required length of the product, alternating row by row work from the 1st to the 7th strip.
Externally, the waves on the product will have small “interceptions” consisting of facial loops.
Two-tone
The "Wave" knitting pattern, the diagram and description of which may contain recommendations for knitting with several colors of yarn, can also be used to create blankets or bedspreads. In this variation of waves, you can use from 2 to 6 colors and the more there are, the more original and brighter the thing will look.
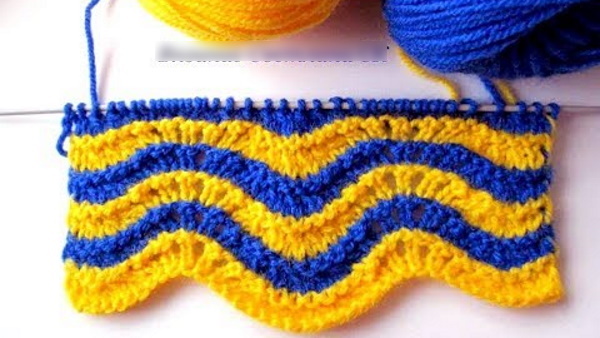
To create an ornament you need:
- Start by casting on stitches.
- Form row 1 by knitting purl, yarn over, knit, yarn over and 5 knits. Then knit 3 stitches together with a left-leaning knit stitch and 3 stitches together with a right-leaning knit stitch. Then knit 5 knits again, yarn over, knit, yarn over and purl.
- Work in rows 2, 4, 6 and other even ones, following the pattern on the canvas.
- Knit in row 3 after the edge stitch, purl, X-loop, yarn over, X-loop, yarn over, 4 X-loop. Then join 3 together with a left-leaning knit stitch and 3 together with a right-leaning knit stitch. Then repeat 4 X-loop, yarn over, X-loop, yarn over, X-loop and purl.
- Create row 5, repeating the work in the same way as in row 3, only reducing the number of alternately knitted front loops before and after joining the loops by 1, that is, instead of 4 X-loops there will be 3. And from the first to the last edge loop, increase the number of front loops by 1 in each row.
- Reduce the number of knit stitches before knitting the stitches together until they and the yarn over are separated by 1 X stitch. Then begin increasing the number of knit stitches to the original number.
- Increase the number of X-loops near the edge loops by 1 until there are 5.
The pattern repeats along the entire length of the fabric.
Nautical
The "Wave" pattern with knitting needles, the diagram and description of which will allow you to create a thing with a marine theme, popular this season. This ornament is considered one of the simplest in execution and relief on the canvas.
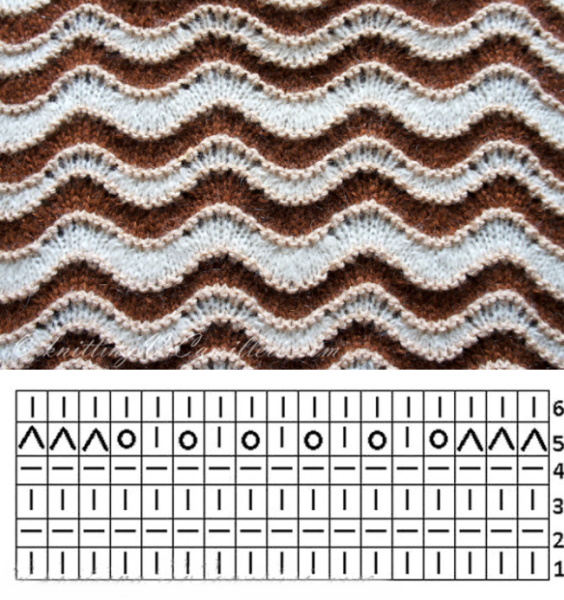
To decorate a sweater with a nautical pattern, you need:
- Start by casting on stitches.
- Create row 1, alternating 3 purl and 3 X stitches.
- Knit row 2, repeating alternately 2 purl, 3 knit and 1 purl.
- Knit rows 3, 6, 8 and 10 as shown on the fabric.
- Make row 5 by repeating 3 purl, 3 X-stitches and 2 purl.
- Knit row 7, repeating 3 knit and 3 purl.
- Form row 9 by alternating purl, 3 X-stitches and 2 purl.
- Work row 11 in the same way as row 2.
- Repeat the work in rows along the entire length of the canvas.
The product will be voluminous and interesting. Suitable for knitting a winter sweater or hat.
With triangles
You can also add variety to the knitting with a wave formed from triangles. The pattern will add volume and relief to the product. It is more suitable for slender girls, as it will make larger women look fatter.
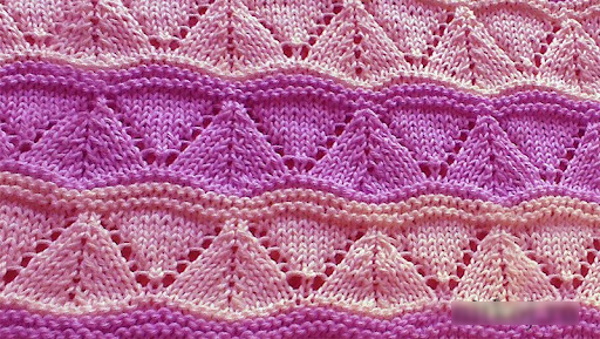
To get a wave of triangles, you need to:
- Start by casting on stitches.
- Knit row 1 purlwise.
- Create rows 2, 4, 6 and the rest of the even ones as the pattern on the fabric suggests.
- Start with row 3 to form triangles. To do this, after the edge stitch, knit and make a yarn over, then knit 4 purl, 2 together knit with a right tilt, 11 knit, 2 together knit with a left tilt, 4 purl and a yarn over.
- Knit row 5, creating 2 knits and a yarn over after the edge stitch. Then follows a triangle pattern, where there are 4 purl, 2 together knit with a left tilt, 9 knit, 2 together knit with a right tilt, 4 purl, a yarn over.
- Create row 7, knitting 3 knits and a yarn over after the edge stitch. Then make a triangle pattern, creating 4 purl, 2 together knit with left tilt, 7 knit, 2 together knit with right tilt, 4 purl, a yarn over.
- Knit rows 9, 11 and 13 in the same way as 7, while in each of them increasing the number of front loops before the yarn over and decreasing their number by 2 loops inside the triangle.
- Create row 15 by knitting 7 knits and a yarn over. Then knit 4 purl, knit 3 together, purl 4 and a yarn over. This forms the top of the triangle wave.
After this, repeat the work from row 1 to row 15.
Secrets for Beginners
Knitting waves has its own characteristics and secrets that will help a novice needlewoman to master a new pattern faster.
To correctly complete the pattern you need:
- Alternate yarn overs and crochets together.
- From an even number of loops, half always remains.
- Keep track of how many loops are on the knitting needle.
- Constantly count the number of yarn overs.
- Stick to the rule "as much as is added, so much is subtracted."
Beginner needlewomen need to learn that any wave is formed by decreasing and increasing loops. Therefore, this process must be alternated when creating a fabric and not skipped. When finishing a part of the ornament, from the total number of loops, with the correct execution of the pattern, ½ of their original number always remains on the knitting needles. Experienced needlewomen recommend always knitting waves on an even number of working loops.
The simplicity of the wave can lull the knitter's vigilance, and she will stop monitoring the number of loops on the knitting needles. This should not be allowed, because it will throw off the pattern and the product will have to be re-knitted.
It is also recommended to pay close attention to yarn overs. An uneven number of them can disrupt the pattern rapport and create an asymmetrical or slanted wave.
The golden rule of the wave should be filled in by every needlewoman who has chosen this pattern as a favorite. How many loops were added in the previous row, the same number of them should be removed in the next or after 1 row. The tactic allows you to maintain the symmetry of the pattern and figures on the canvas. Before you sit down to knit waves, you need to choose the right yarn for work. Smooth types of material are more suitable for this ornament, and it is lost on fluffy ones.
To choose the right skeins from the abundance offered, before purchasing we recommend:
- Hold the skein in your hands.
- Check the thread for uniformity and quality.
- Test the yarn for static build-up.
- Determine the plasticity of the material.
- Apply the roll to the exposed area of skin.
- Smell the skein.
- Read the ingredients on the label.
Before buying, it is recommended to feel the thread tactilely by holding the skein in your hands. The test will help you understand how pleasant the material is to the body and how it responds to it. You can also squeeze the skein slightly in your palms. This will help you determine whether the thread is springy.
A good product is made only from high-quality material. To determine this parameter, you need to study how uniform the thread is. To do this, you can examine its free end, sticking out from under the packaging. If the fiber structure is not uniform and has thickenings or narrows in different places, then it is better not to take such a skein.
Uneven thread thickness will negatively affect the condition of the fabric. Despite the fact that a mesh pattern is selected, uneven fibers can break in the most inappropriate places. Also, the product will have an unattractive appearance.
The ability to accumulate static electricity is also an important component of any thing, especially winter. No one wants to get an unpleasant discharge or click when touching the interlocutor or the door handle. To test, you need to rub the free end of the thread in the skein between your fingers and determine how much the constituent fibers have fluffed up and crawled out beyond the usual border. The test will also show how the material will behave when worn and how quickly pellets will appear on it.
Another important factor when knitting is how well the yarn stretches and takes shape. To check this indicator, you need to stretch the free end of the thread with your fingers and let go. Then see how quickly it returns to its original position.
If the product will come into contact with the face and other sensitive areas of the skin directly during wear, you need to check how these areas react to the yarn. To conduct a test, apply the skein to the open area and hold it there for a few seconds. Then remove it and see how the skin reacts to the material. If redness appears after contact, it is better not to take this skein.
Some experts recommend smelling the yarn before buying it. This is necessary to determine the naturalness of the material. If you smell a sharp or barely perceptible chemical smell when inhaling, it is better to put the skein aside, because it contains toxic substances that can subsequently lead to health problems.
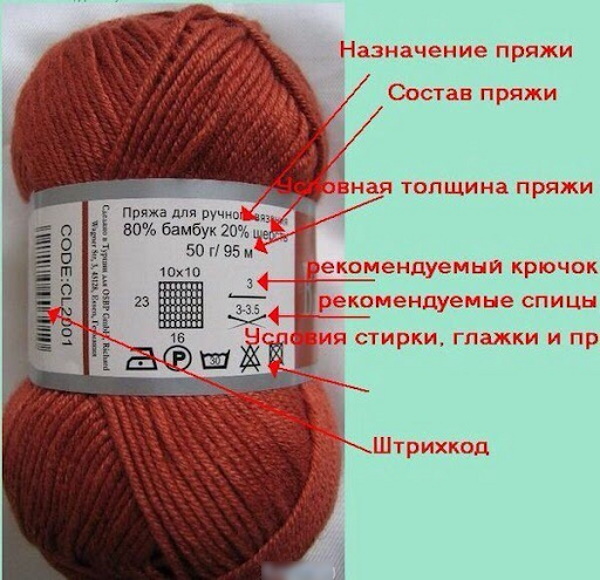
The last point before buying is to read the information on the label. Here the manufacturer usually indicates not only the composition of the skein, but also its length, density and thickness of the thread. The label also contains information about which knitting needles or hook are suitable for working with the yarn.
If you decide to knit something from old yarn that doesn't have a label, you can choose knitting needles the old-fashioned way. To do this, take a thick sheet of paper and pierce it with the tip of the tool you have. Then pull the thread through the hole and see how it goes. If it goes freely, without snagging or sagging, and at the same time, does not slip, then the diameter of the knitting needles is suitable.
Also, the needles should not be very sharp or blunt. In the first case, the knitter will constantly prick her fingers and hands, and in the second, it will be inconvenient to pick up and knit the thread in the loops.
The diagram and description of the pattern "Wave" with knitting needles allows you to create a pattern on circular knitting needles. When choosing a tool for this, you need to make sure that the place where it connects to the line is smooth. Otherwise, when working, the thread will constantly cling to this transition and may break.
Video about creating the Wave pattern with knitting needles
Wave pattern knitting: