Scheme and description of waffle knitting patterns will help beginners and experienced needlewomen to create an interesting product. Despite the fact that some consider knitting to be a "grandmother's occupation", it has been popular for many centuries, and products made of wool and other threads are always relevant and in demand.
The roots of weaving threads with knitting needles go back centuries. However, some techniques that modern knitters use were inherited from their ancestors.
Necessary tools and materials
The waffle pattern with knitting needles, the diagram and description of which is easy to understand for knitters of any level, is popular with modern needlewomen. "Honeycombs" or squares that form threads allow you to get a relief volumetric and, at the same time, pleasant to the touch, fabric.
Knitting requires yarn and knitting needles. Sometimes, to connect the product into one whole, the craftswoman needs a needle and scissors. If you want to make a thing with a clasp, then it is recommended to choose the appropriate fittings.
Experienced needlewomen recommend using a waffle pattern to decorate winter or demi-season items, because the pattern is practically invisible on a fabric made of thin threads.
To create a relief pattern, the following threads are suitable:
- "Alpaca";
- "Camel";
- "Cashmere";
- "Merino";
- "Yak".
The listed yarn is natural and not fluffy, like, for example, angora. The waffle pattern on a product made from them will be noticeable and will not get lost in the protruding fibers.
To choose the right yarn, the item from which will be pleasant to the body, wearable and beautiful, when buying you need to:
- Crumple the skein in your hands.
- Test the thread for elasticity.
- Check the fibers for uniformity.
- Fluff up the thread.
- Smell the yarn.
- Read the ingredients on the label.
During the purchase process, experts recommend holding the skein you like in your hands and understanding how your body reacts to the material. The test will show how pleasant the thread is to the body, soft and whether it causes irritation to the skin.
Before buying wool, you need to test its elasticity. To do this, stretch the end of the thread and see how quickly it takes its original shape. If the material quickly returns to its original position, the product will be easy to knit and will last a long time.
It is also recommended to check the fibers for homogeneity. To do this, you need to carefully look at the free end of the skein. High-quality material consists of identical fibers, and there are no thickenings and thinnings in it, unevenly alternating each other.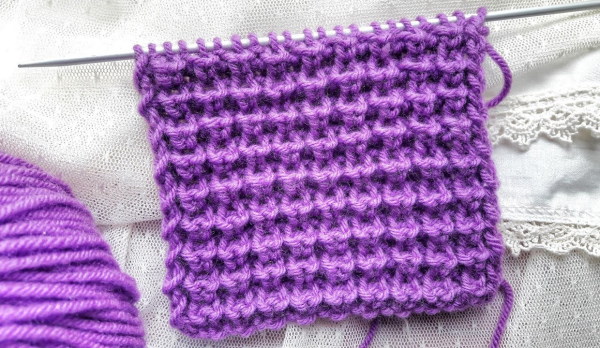
The free end of the yarn you like should be placed between your thumb and index finger and rubbed. The test will show how dense the material is and how the item should be worn without deformations and pellets.
To determine the quality of yarn, some experts recommend smelling the skein. The test will help to understand whether the threads contain low-quality synthetic impurities. It is known that if the material has an unpleasant chemical smell, it may also be toxic, which is fraught with unpleasant health consequences in the future.
Before buying, you should also read the composition and recommendations indicated on the skein label or on its packaging. Usually, the manufacturer writes the composition of the yarn, its length and thickness, and what knitting needles or crochet hook you can use with it.
Schemes with description of works for beginners
The diagram and description of the waffle pattern with knitting needles is a necessary auxiliary material that facilitates work with yarn and auxiliary tools. It is known that the symbolic designation of loops was first used by knitters about 3000 years ago.
Historians have established that the birthplace of knitting is Egypt. It was there that needlewomen created yarn items for everyday wear using knitting needles. But some experts are ready to argue with this statement, because they are sure that this type of needlework originated in countries with a colder climate.
If in the Scandinavian countries knitting was originally a male occupation, then in Rus' the female population has been knitting for a long time. Providing the family and relatives with warm hats, mittens, scarves and sweaters for the winter was considered obligatory for every housewife.
Historians do not know where and how the pattern called "Waffle" first appeared. At the same time, the popularity of the ornament has filled almost the entire globe. Decorating knitted fabrics with such patterns is common in Norway, and in Foggy Albion, and in Russia and even in the USA.
The waffle pattern, or “waffle,” as needlewomen call it, comes in several variations.
The most popular are:
- "For Beginners";
- "3-D";
- "Basket";
- "Crossed";
- "Rhombus-shaped".
A waffle can be knitted by both a beginner craftswoman, using the appropriate pattern, and an experienced one. In addition to simple "honeycombs" on the canvas, an ornament with a 3-D effect is created, where the interweaving of threads gives a sense of volume and the transition of one geometric figure to another.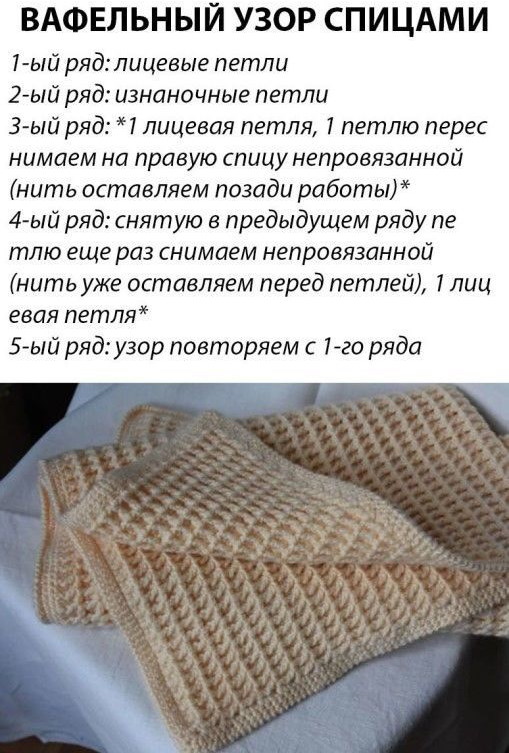
As in all other knitting patterns, the waffle pattern is made by combining purl and face loops. In addition, each work has edge loops, which should never be forgotten, and additional knitting options, without which the pattern simply will not work.
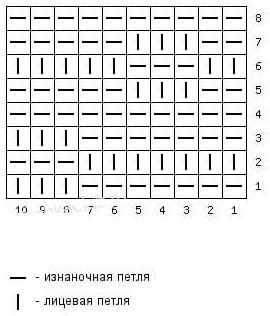
To facilitate schematic recording, craftsmen use abbreviations and symbolic meanings familiar to every needlewoman.
| Name | Abbreviation and designation |
| purl | izn. or ip – «-» |
| facial | persons or persons - "X", "I" or "+" |
| yarn over | nak. – "O" |
| edge | cr. – «Ո» |
| removed loop | sp or snp. – «V» |
In addition to the main loops, they also use knitting together, which is indicated by a non-isosceles triangle with an "eye" that indicates where the loops should be tilted in the work. If you need to create several from 1 loop, then the desired number is placed above the Latin letter "V", indicating the quantity. If the letter is inverted and there is a number under it, then this is read as knitting loops together.
For Beginners
The waffle pattern with knitting needles, the diagram and description of which will allow you to knit a beautiful voluminous fabric, also exists for beginner needlewomen. The ornament can be used to decorate mittens, vests, scarves or hats, both for adults and little fashionistas. For knitting, you will need yarn and knitting needles of the appropriate diameter.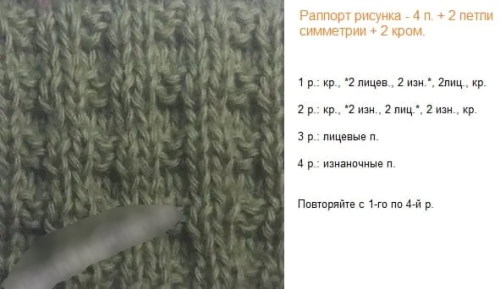
To make a waffle, you need:
- Cast on the required number of stitches, for example, 12.
- Knit a row after casting on stitches using only knit stitches or only purl stitches. In this case, always remove the first stitch and purl the last stitch in the row.
- Work Row 1, alternating 2 knits with 2 purl stitches to end of strip.
- Form row 2, alternating 2 purl with 2 front. Here the pattern is knitted the same way as it looks on the canvas, that is, those loops that were front in the odd row are always knitted back in the even row.
- Knit row 3 with knit stitches only.
- Work row 4 with purl stitches only.
- Alternate the pattern from row 1 to row 4 along the entire length of the fabric.
At the end of the work, the loops are closed. Externally, such a waffle resembles squares with clearly defined sides.
3-D
The waffle knitting pattern, the diagram and description of which has the intriguing name "3-D", allows you to create a canvas with the effect of superimposing one geometric figure on another. This ornament resembles circles diverging on water. For knitting, you will need suitable yarn and circular or separate knitting needles.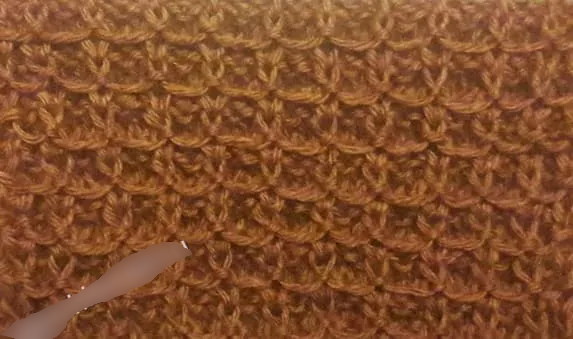
To create a three-dimensional pattern on the canvas, you need:
- Cast on the required number of stitches on the knitting needles, for example, 12 (including edge stitches).
- Make a row after casting on stitches with knit stitches.
- Knit row 1, alternating 1 knit stitch, 2 slipped stitches with thread behind the work and 1 knit stitch. Repeat the pattern to the end of the strip.
- Form row 2 by knitting 1 front and 2 back stitches alternately. The alternation is also repeated until the end of the row.
- Knit row 3, where 1 loop is removed with the thread behind the work and 2 front loops are created. The pattern is repeated to the end of the line.
- Design subsequent rows, alternating the work pattern from row 1 to row 3 along the entire length of the fabric.
At the end of the work, the loops are closed. If necessary, the product is assembled by sewing the necessary sections together, and they begin trying it on and preparing it for further wear.
Basket
The knitted pattern can resemble a basket. Such a scheme is also understandable to inexperienced craftswomen and, if strictly followed, will help to create a beautiful warm thing of any size. For work, select yarn with the necessary properties and knitting needles of a suitable diameter.
To knit a waffle basket, you need:
- Cast on 12 stitches.
- Knit row 1, alternating 7 purl with 3 knit stitches along the entire line.
- Form row 2 following the pattern on the fabric. In this case, 3 purl will alternate with 7 knit.
- Work row 3 in the same way as row 1.
- Knit row 4 with purl stitches only.
- Form row 5 by alternating 2 purl, 3 knit and 5 purl.
- Design row 6 as shown in the pattern on the fabric.
- Knit row 7 the same as row 5.
- Form row 8 from purl stitches only.
- Repeat the pattern from row 1 to row 8 along the entire length of the fabric.
At the end of the work, the loops are closed. The pattern on the canvas will look like the weaves on the sides of wooden baskets.
Crossed
The crossed waffle knitting method is also called "With re-shot loops". The ornament usually decorates women's and men's sweaters. This pattern looks unusual and stylish on armlets.
To work you will need yarn of the chosen color and knitting needles of the required length and diameter.
To knit a crossed waffle, you need:
- Cast on 22 stitches (including edge stitches) on knitting needles.
- Knit the row after casting on stitches only with the front stitch. This is necessary so that the fabric holds its shape and is easy to work with.
- Form row 1 by alternately knitting 4 knit stitches, 1 slipped stitch with yarn behind the work and 4 knit stitches. Repeat the pattern to the end of the line.
- Knit rows 2 and 4 with purl stitches only.
- Work rows 3 and 5 in the same way as row 1, repeating the pattern from the first stitch to the last.
- Knit row 6, alternating 4 knit stitches and 1 purl stitch throughout the row.
- Repeat the pattern repeat from row 1 to row 6 along the entire length of the product.
At the end of the work, the loops are closed in any convenient way. This ornament looks like even cells of a wafer cake. The pattern will be large, and those who want to make it smaller need to remove the unknitted through 3, not through 4 loops. The ornament looks organic on yarn with a medium thread diameter.
Diamond-shaped
The waffle pattern with knitting needles, the diagram and description of which will help to beautifully design the knitted fabric, can outwardly resemble diamonds of various diameters and textures. The ornament is often used instead of the usual elastic band on hats, scarves, mittens or gloves. For work you will need a skein of yarn and knitting needles of a suitable diameter.
To get diamonds you need to:
- Cast on 20 stitches (including edge stitches).
- Knit the row after casting on stitches using only knit stitches or only purl stitches.
- Form row 1, alternating 3 knit and 2 purl. Repeat the pattern to the end of the knitting line.
- Design rows 2, 4, 8, 12 and the remaining even rows with a step of 4 as suggested by the pattern on the fabric.
- Knit row 3 the same as row 1, repeating the alternation from the beginning to the end loops.
- Form row 5, making a draw through, and for this insert the working knitting needle between loops 8 and 9 and, catching the working thread, pull out the loop and knit it with the front one in the row (after the edge). Throw 8 loops onto the right knitting needle and pull them through the loop from the draw through. Next follows 1 purl, crossed from the draw through between the loops, 2 purl and 1 purl, crossed from the draw through. Repeat the work process to the end of the row.
- Work row 6, alternating 3 purl, 2 knit, 3 purl and 4 knit.
- Knit row 7, repeating the alternating knitting of 3 front, 2 back, 3 front and 2 times 2 together back.
- Form row 9, alternating 3 knits, 1 crossed from the yarn over, 2 purl, 1 crossed from the yarn over. Then make a yarn over between the 7th and 8th loops, as in row 5. Repeat the pattern from 1 crossed to the yarn over. Finish the row by knitting 2 purl and 3 knits.
- Work row 10, alternating 3 purl, 2 knit, 3 purl, 2 knit, 3 purl and 4 knit.
- Create row 11 by knitting 3 knits, 2x 2 together purlwise, 3 knits, 2 purlwise, 3 knits. Repeat the pattern from 2 together to 3 knits. Finish the row by knitting 2 purlwise and 3 knits.
- Alternate repeating work from row 5 to row 12 throughout the entire fabric.
At the end of the work, the loops are closed and, if necessary, the product is assembled. Externally, the ornament resembles a braid with constrictions or an incomplete rhombus.
Secrets for Beginners
In any handicraft, with each new craft, skills are strengthened, and the result is better and more interesting. At the same time, experienced needlewomen note that they sometimes come across such patterns or designs that do not work the first time.
Selecting the material for creating a knitted product is one of the most important stages before starting work. Experienced craftswomen know several tricks that will help make it easier for beginners to choose yarn and knitting needles.
To do this you need:
- Check the durability of the paint.
- Make sure that the skeins start with the same color.
- Knit a sample.
- Correctly understand the numbers on the label.
To prevent a colored thread from fading during the first wash, you need to check its color fastness. Sellers will not let you do this before buying, but you can do the test at home. To do this, wet the end of the thread and clamp it between folds of white fabric. If after a while there are traces on it, then the yarn is fading, and you will have to wash it separately.
If you need 2 or more skeins of multi-colored yarn to knit a multi-piece item, it is recommended that you make sure that they all start with the same color yarn. This will allow you to harmoniously start working on the halves without worrying about them being different or not matching in shades.
Before you start creating a full-fledged fabric, you need to knit a small sample. This is necessary in order to see how the selected pattern looks when working with yarn. In addition, the sample will help to calculate the required number of loops and determine the knitting density.
The information on the label is very important not only to understand what the material is made of. It tells you the length of the thread and how to correctly determine its thickness. Experience shows that not everyone understands what, for example, the numbers 32/2 or 25/5 mean. The number before the fraction indicates the thickness of the thread, and after it - the number of fibers in the thread structure. You can also calculate the length of the thread, and for this 32 is divided by 2 or 25 by 5. The resulting number will be the answer to the question.
In addition to yarn, you need to choose the right diameter of the knitting needles for the work. To do this, pierce a hole in the paper with the tip of one and pull the thread of the skein through it, which you will work with. If it passes freely, does not sag and, at the same time, lightly clings to the edges, then the diameter of the knitting needles is chosen correctly.
Beginner needlewomen should know that separate needles are suitable for knitting small parts, small items and fabrics that will be sewn together. To create seamless items, use needles connected with fishing line or wire.
The diagram and description of the waffle pattern with knitting needles is understandable even to beginner knitters. With the help of such an ornament, you can decorate any product that will warm you in winter and lift your spirits on cloudy days.
Video about waffle pattern
Simple beautiful waffle pattern with knitting needles: