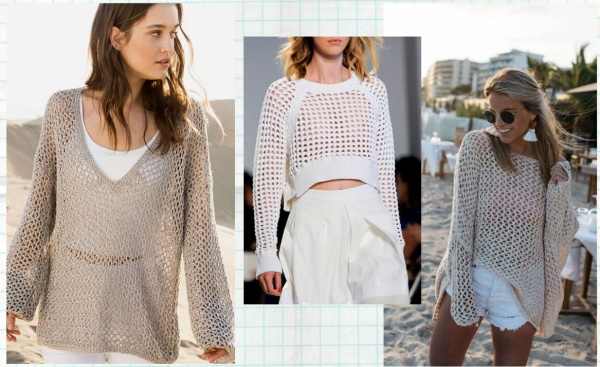
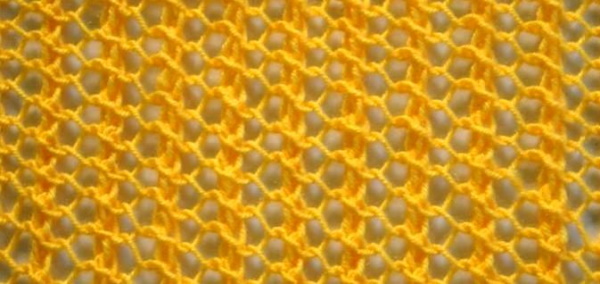
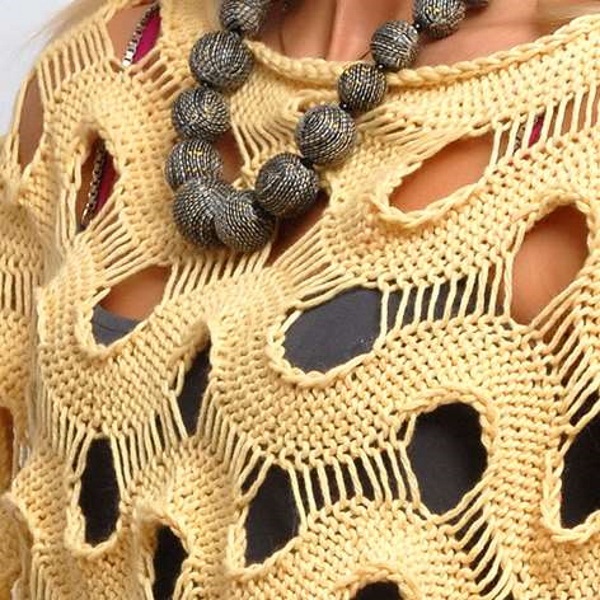
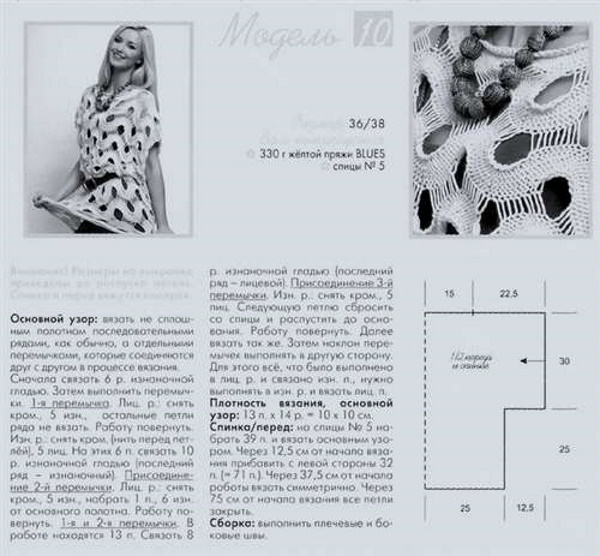
The patterns and descriptions of the "Grid" pattern with knitting needles allow craftswomen to create real knitted masterpieces. The ornament is presented in a wide variety of variations, and is suitable for creating both summer and warm things. The knitting technique is simple and understandable for both beginners and experienced needlewomen. This ornament can be used to decorate a hat, scarf or jumper.
Necessary tools and materials
The "Net" pattern with knitting needles, the diagrams and description of which can be found in any thematic publication, is suitable for both women and men. Children's things also look beautiful from it.
To knit a mesh item, you need to have:
- yarn;
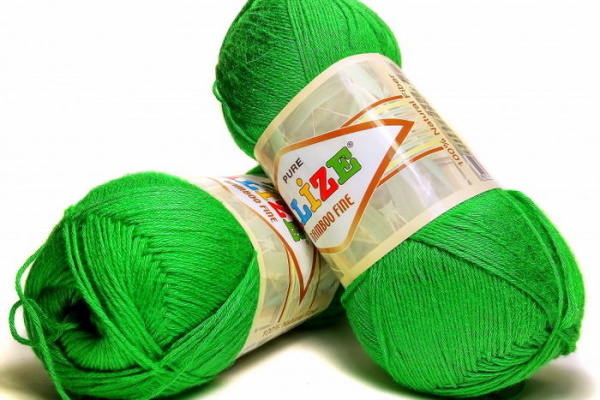
- knitting needles;
- needle;
- scissors;
- plastic beacon tags.
The material from which the item is knitted determines how it will look, fit on the figure and be worn. For example, warm yarn will produce a winter or demi-season item, and non-warming options will produce beautiful and comfortable summer items.
For the production of winter types of mesh products, experts recommend:
- alpaca;
- cashmere;
- merino;
- mohair;
- wool.
These eco-friendly yarns are made from the down and wool of llamas, goats, sheep or rams. Some of them are rarely found in their pure form, as this would make the material expensive and make it difficult to work with the thread. To fill the market with affordable skeins, acrylic or other artificial thread is added to the natural fiber. This allows not only to reduce the price of the material, but also to make it more durable, wear-resistant and elastic.
It is recommended to knit summer items with holes from:
- bamboo;
- flax;
- cotton;
- silks.
The listed material is also of natural origin. It allows the skin to breathe and protects from direct sunlight. The material also has hypoallergenic properties. It is recommended to select knitting needles so that they match the diameter of the thread. Usually, the thickness of the tools needed to work with the purchased material is indicated on the skein label.
There are separate and circular knitting needles. The former are used for knitting things in separate parts, and the latter allow you to create a seamless fabric. A sewing needle is needed for assembling complex items. It will also help make seams more invisible or hide them completely.
Scissors should always be at hand for the craftswoman. It is desirable to have a tool with well-sharpened blades to cut the thread at one time. Knitting complex or seamless items is not possible without markers. They are necessary to mark the necessary fragments, loops and sides of the fabric. In addition, they are convenient for separating the number of loops needed for the pattern or marking a row of the rapport.
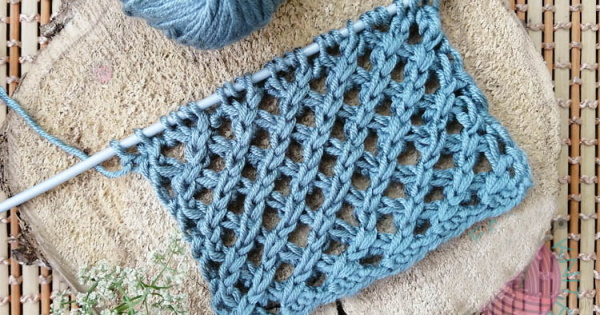
Schemes with description of works for beginners
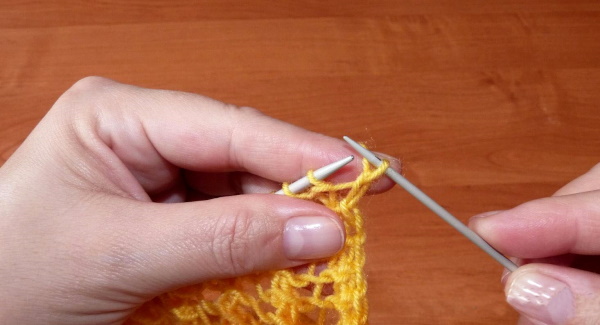
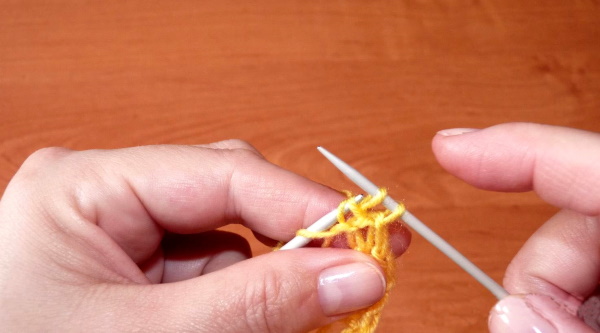
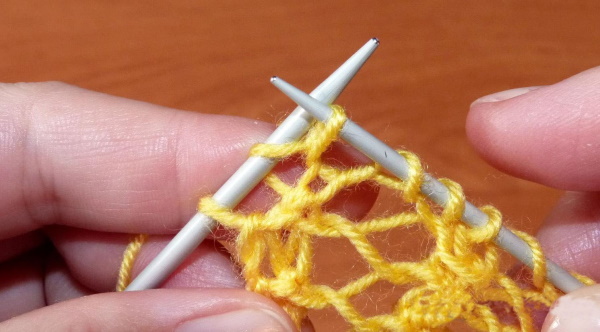
The "Net" pattern with knitting needles, the diagrams and descriptions of which some needlewomen inherited from their mothers and grandmothers, is popular in the 21st century. It is better to start knitting things "in holes" with simple models. In order to understand and analyze the ornament, novice needlewomen must master the basics of knitting and know how to create front, back or yarn over loops. In addition, you need to understand how to deal with the first and last edge loops.
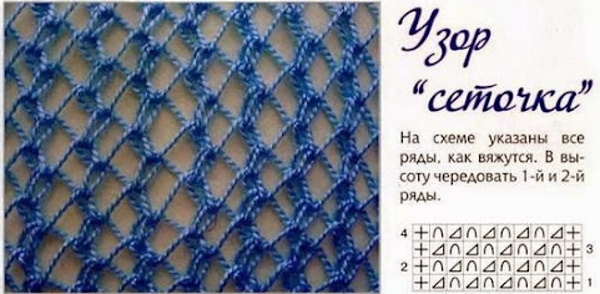
The world of knitting has its own language, consisting of abbreviations and symbols that are understandable to all needlewomen:
| Name | Abbreviation and designation |
| facial | persons or persons - "X" or "I" |
| edge | kr or kr. – "O" |
| purl | izn. or ip – «-» |
| yarn over | nak. – «Ո» |
Also, the mesh effect in some patterns is achieved by twisting the loops or thickening the columns due to the addition of loops. Sometimes, knitting the loops together with the front or back side is used. Often, they are thrown unknitted from one needle to another or swapped to achieve a braided effect. Knitting meshes is not complete without double yarns. They can be made by throwing the working thread on the needle twice in the right place.
Researchers have found that the mesh pattern appeared many centuries ago. It turned out that in ancient times they used 1 large needle, which allowed them to create items with holes. The method of knitting on 2 needles appeared much later, and the first knitters were men. In the modern world, there are many variations of the mesh.
The most common are:
- "Openwork";
- "Boucle";
- "Waves";
- "Grape";
- "Large";
- "With cones."
Each of the listed techniques allows you to knit a fashionable and stylish thing with an original pattern. At the same time, the mesh looks good in various color options. Beginner needlewomen can practice on a simple pattern for creating a mesh.
To do this you need:
- Start by casting on stitches.
- Knit row 1.
- Work row 2 by alternating 2 together knit stitches with a right tilt, 2 yarn overs, 2 together knit stitches with a left tilt.
- Form row 3 by repeating 2 knits, purl, knit.
- Knit row 4, alternating after the edge yarn over, 2 together X-loop with a left tilt, 2 together X-loop with a right tilt, yarn over.
- Complete row 5 by repeating knit stitch and 3 purl stitches.
- Form row 6, alternating stitches as in row 2.
The rest of the fabric is formed by repeating the manipulations with the yarn in order.
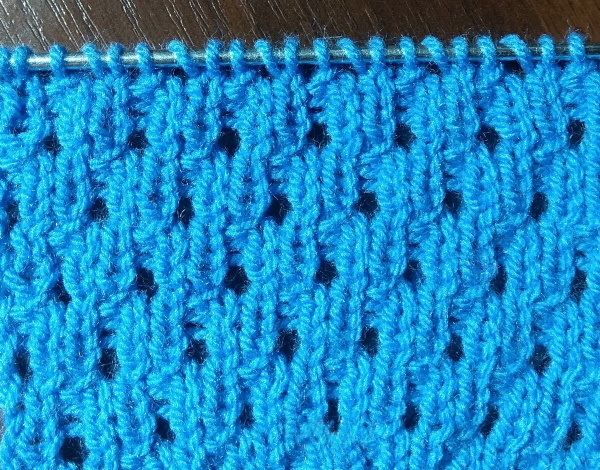
Openwork
There are many openwork variations among the grid ornament. One of the most common is the diagonal grid.
To knit the pattern you need:
- Start working by dialing the required number of loops. It is convenient that the number is divisible by 4 completely. Also take into account 1 loop for the symmetry of the pattern.
- Knit row 1, alternating X-loop, yarn over, double yarn over and yarn over. Finish the row with an X-loop.
- Form rows 2, 4, 6 and other even ones with purl stitches only.

- Create row 3 by knitting 2 front X-loops, yarn over and draw through in turn. Finish the row with a front stitch before the edge stitch.
- Knit row 5, creating 2 stitches together after the edge stitch with the front stitch and making a yarn over. The rest of the strip consists of repeating the X stitch, yarn over, double yarn over, yarn over. Finish the row with a front stitch, yarn over and yarn over before the edge stitch.

- Form row 7, alternating yarn over, draw through and 2 knits. Finish the strip with an X-loop before the edge.
- Repeat the work process from row 1 to row 7 for the entire planned length of the fabric.
The pattern will be placed diagonally on the canvas.
Boucle
The patterns and description of the pattern "Net" with knitting needles allows you to work in the technique "Boucle". The created ornament looks like honeycombs-strawberries.
For it to appear you need:
- Start by casting on a number of stitches that is divisible by 3.
- Form row 1, alternating knit and 2 purl.
- Knit row 2, repeating 2 X-stitches and purl.
- Create row 3 by knitting 2 together purlwise, yarn over, purlwise.
- Form row 4, alternating front and back stitches.
- Knit row 5, repeating X-loop, purl and X-loop.
- Work row 6 as row 4.
- Create row 7 by alternately knitting yarn over, purl and 2tog purl.
- Repeat the knitting pattern of row 2 in row 8.
- Form row 9 as row 1.
The fabric is formed by repeating the work from row 1 to row 8.
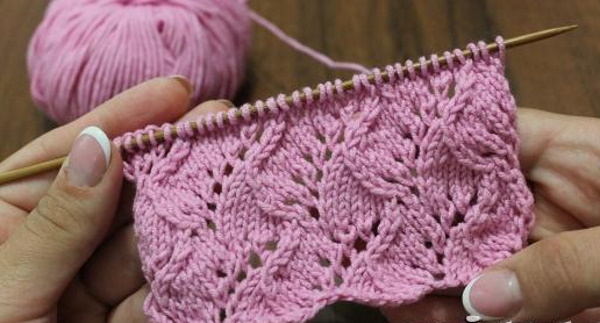
Waves
You can also decorate a knitted item with a wave mesh. The pattern looks good on both winter and summer items.
To create a pattern you need:
- Start working with the required number of loops.
- Knit row 1, alternating 2 knit stitches with 2 purl stitches.
- Form row 2 by repeating 2 together with X-loop, knit, purl, 2 together with X-loop.
- Knit row 3, alternating yarn over and 4 knit stitches.
- Create row 4 by repeating purl, k2tog 2 times, knit.
Repeat the work from row 1 to row 4 along the entire length of the fabric. This technique produces a fine mesh.
Grape
The "Net" pattern with knitting needles, the diagrams and description of which may contain recommendations for creating the "Grapes" ornament, allows you to decorate both an adult scarf and mittens for a little fashionista. The combination of holes in it looks like grape leaves.
To create an ornament you need:
- Start by casting on a number of stitches that is divisible by 2 without a remainder.
- Knit row 1, repeating knitting X-loop, pulling up long loop, 2 together X-loop through back wall.
- Form rows 2, 4, 6 and the remaining even ones with purl stitches only.
- Knit row 3, alternating knit stitch, pulling long stitch, 2 together behind back walls of knit stitch.
- Form row 5 by repeating row 1.
The fabric is knitted by alternating rows of work. The pattern is voluminous, and the mesh is small.
Large
The "Grid" pattern with knitting needles, the diagrams and description of which allow you to create large holes on the fabric, is suitable for a summer sweater or vest. In this case, the main columns will be thick, and the horizontal crossbars will be thin.
To create a large grid you need:
- Start by casting on a number of stitches so that their number is divisible by 3 without a remainder.
- Form row 1, making a yarn over after the edge stitch, then alternating 3 together X-loop and a double yarn over. At the end of the strip, before the edge stitch, make a single yarn over again, as at the beginning.
- Knit row 2, making a single yarn over after the edge stitch, then repeating 3 together purlwise and a double yarn over. At the end of the row, make a single yarn over before the edge stitch.
- Repeat rows 1 and 2 for the entire required length of the fabric.
The pattern is suitable for both warm winter yarn and light summer yarn.
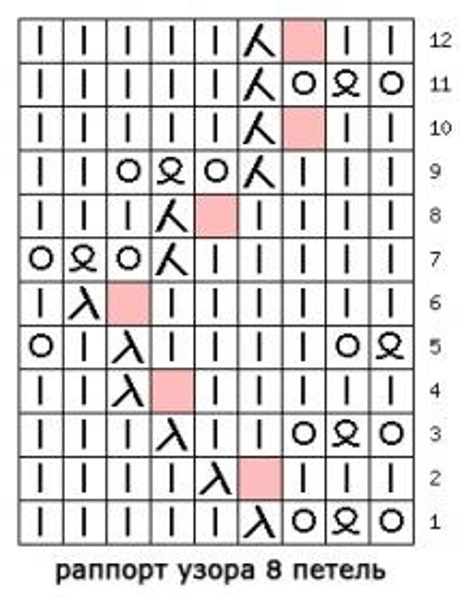
With cones
A dense mesh with holes that look like pine needles and cones is suitable for wearing in the cold season. It is better to choose medium-thick yarn for work, because on voluminous threads the pattern will turn out without holes at all.
To knit the mesh, you need:
- Start with a set of stitches that is evenly divisible by 4.
- Knit row 1, knitting 5 loops from 1 after the edge. Then repeat 3 loops together purlwise, yarn over and create 5 and yarn over. Finish the row with 3 together purlwise and yarn over before the edge.
- Form row 2 by knitting a yarn over and 3 loops (2 yarn overs of the previous row and 1 loop between them) together purlwise after the edge. Then alternate a yarn over, 5 loops behind the back walls together knitwise, 3 loops together purlwise. Finish the strip with a yarn over and 5 loops behind the back walls together knitwise before the edge.
- Knit row 3, joining 2 together after the edge stitch and making a yarn over, then repeat the pattern, making 1-5, yarn over, 3 together purlwise and yarn over. Finish the strip by making 1-5 and making a yarn over before the edge stitch.
- Form row 4, making 1 knit stitch after the edge stitch and 5 knit stitches together behind the back walls. Then work, alternating making a yarn over, knitting 3 together purl, yarn over, 5 knit stitches together behind the back walls. Finish the strip with a yarn over and 2 together X-loops behind the front walls before the edge stitch.
The work in the given technique is repeated from row 1 to row 5 along the entire length of the fabric.
Secrets for Beginners
Each job has its own secrets and features, knowing which, you can significantly facilitate the process. Knitting is no exception. Little tricks allow you to choose the right material and auxiliary devices so that knitting brings pleasure.
To get a good thing that will last a long time and please the eye, you need to:
- Select a model.
- Select yarn.
- Select knitting needles.
- Decide on the decorations.
- Take measurements correctly.
- See the pattern on the sample.
- Follow the instructions and recommendations.
While it is not difficult to decide on the model and additional accessories, you need to know how to choose the yarn.
Experienced craftswomen recommend for this:
- Hold the skein in your hands.
- Check the thread for uniformity and quality.
- Determine the static nature of the yarn.
- Test the material for plasticity.
- Apply the roll to the exposed area of skin.
- Smell the skein.
- Read the ingredients on the label.
Before buying, it is recommended to feel the thread tactilely by holding the skein in your hands. The test will help you understand how pleasant the material is to the body and how it responds to it. You can also squeeze the skein slightly in your palms. This will help you determine whether the thread is springy.
A good product is made only from high-quality material. To determine this parameter, you need to study how uniform the thread is. To do this, you can examine its free end, sticking out from under the packaging. If the fiber structure is not uniform and has thickenings or narrows in different places, then it is better not to take such a skein.
Uneven thread thickness will negatively affect the condition of the fabric. Despite the fact that a mesh pattern is selected, uneven fibers can break in the most inappropriate places. Also, the product will have an unattractive appearance.
The ability to accumulate static electricity is also an important component of any thing, especially winter. No one wants to get an unpleasant discharge or click when touching the interlocutor or the door handle. To test, you need to rub the free end of the thread in the skein between your fingers and determine how much the constituent fibers have fluffed up and crawled out beyond the usual border. The test will also show how the material will behave when worn and how quickly it will cough.
Another important factor when knitting is how well the yarn stretches and takes shape. To check this indicator, you need to stretch the free end of the thread with your fingers and let go. Then see how quickly it returns to its original position.
If the product will come into contact with the face and other sensitive areas of the skin directly during wear, you need to check how these areas react to the yarn. To conduct a test, apply the skein to the open area and hold it there for a few seconds. Then remove it and see how the skin reacts to the material. If redness appears after contact, it is better not to take this skein.
Some experts recommend smelling the yarn before buying it. This is necessary to determine the naturalness of the material. If you smell a sharp or barely perceptible chemical smell when inhaling, it is better to put the skein aside, because it contains toxic substances that can subsequently lead to health problems.
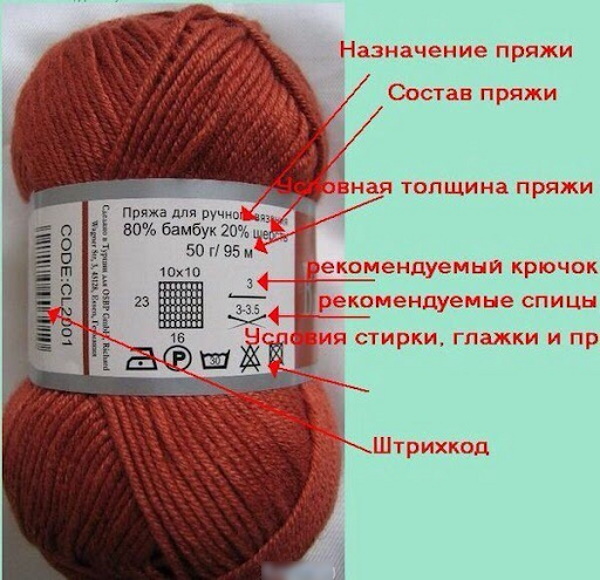
The last point before buying is to read the information on the label. Here the manufacturer usually indicates not only the composition of the skein, but also its length, density and thickness of the thread. The label also contains information about which knitting needles or hook are suitable for working with the yarn.
If you decide to knit something from old yarn that doesn't have a label, you can choose knitting needles the old-fashioned way. To do this, take a thick sheet of paper and pierce it with the tip of the tool you have. Then pull the thread through the hole and see how it goes. If it goes freely, without snagging or sagging, and at the same time, does not slip, then the diameter of the knitting needles is suitable.
Also, the needles should not be very sharp or blunt. In the first case, the knitter will constantly prick her fingers and hands, and in the second, it will be inconvenient to pick up and knit the thread in the loops.
If circular needles are chosen for needlework, the place where they connect to the line should be smooth. Otherwise, the thread will constantly catch on this transition during work and may break.
The patterns and descriptions of the "Net" pattern with knitting needles help needlewomen to please their relatives or themselves with beautiful products for going out or for every day. Using this technique, you can also create clothes for dolls and other toys or pets.
Video on how to make a grid pattern
How to knit a mesh pattern with knitting needles: