On a hat with knitting needles, decreasing loops is one of the important parts of the work on creating a headdress. This final touch allows you to give the accessory a finished and laconic look. The way the loops on the top of the hat are closed can determine the level of skill of the needlewoman. Despite the apparent simplicity of the process, experts recommend taking it seriously.
Ways to decrease stitches on a hat
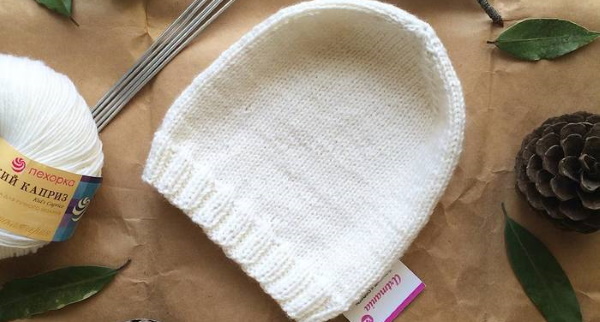
Decreasing stitches on a hat with knitting needles allows you to give it the desired shape. For example, if you close a stocking hat incorrectly, you can get a regular model called "Beanie" or make a cap out of a beret.
Reduction allows you to adjust the yarn fabric in the desired way. It is a decrease in the number of loops in the last rows before the final completion of work on the product. Beginning to knit, beginners do not imagine how many ways to design the last row of a headdress exist. Most often, loops are removed at the edges or in the middle of the fabric.
In addition, you can reduce:
- more than 2 loops in 1 or more places;
- in 6 places;
- in 8 places.
The number of places for reducing loops on the fabric depends on the model of the product being created. In addition, the product can be reduced in simple and complex ways, which will also add variety to working with yarn.
On the edges
Usually, loops are shortened to form the end of the product or to give it a shape along the edges. Beginners who have recently begun to master the basics of needlework, in their first hats, knit the loops together after the first edge and before the last. You can also close the edge together with the adjacent loop, which allows you to sharply narrow the knitted fabric and give it the shape of a cap.
To correctly remove the required number of loops along the edges, you need to:
- Knit the fabric to the middle of the product.
- Start decreasing a few stitches at the end of the row, knitting 2 as 1.
- Finish knitting the hat to the desired height.
- Close the loops.
This method is applicable when creating simple headdresses that are knitted with regular fabric without complex patterns. When determining the middle of the fabric, the folds and peaks are not taken into account.
In the middle of the hat
Some people decrease stitches on a hat with knitting needles in the middle of the fabric. This method is good because it allows you to create an additional pattern on the hat. In addition, it will make the process of reduction itself more invisible, since the edges of the product will be whole.
To remove loops in the middle you need to:
- Knit the fabric to its middle.
- Divide the number of loops by 2.
- Hang a plastic marker to avoid confusion.
- In each front row, knit 2 center loops together according to the pattern.
- Knit the product to the desired length and close the work.
If you close the loops in every odd row, the hat will not be big. Those who want to get a longer product can reduce the loops after 2 or 4 rows.
How to decrease more than two stitches at once
In the standard knitting version, it is customary to decrease 1 loop at a time, but there are situations when it is necessary to decrease a larger number and do it all at once.
In this case you need to:
- Knit the product to the desired length.
- Determine the place where there are extra loops.
- Select 3 suitable loops.
- Remove 1 of them onto the working needle without knitting.
- Swap 3rd with 2nd place.
- Return the removed loop back.
- Knit all together through the front walls.
- Continue knitting the remaining row in the usual way.
The decrease is repeated as many times as the length of the hat requires.
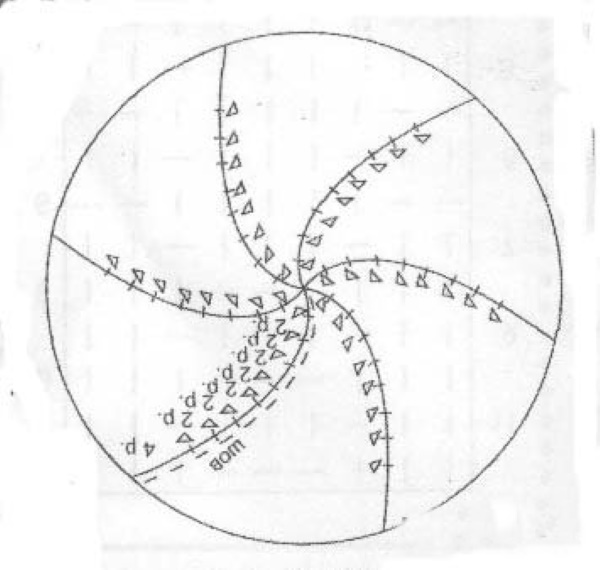
In 6 places
Reducing the number of loops in 6 places is usually necessary in products that are created with wedges. This method is applicable to berets and those headdresses that end with an "asterisk", and it is also called sector.
To reduce loops in 6 places, you need to:
- Knit the product to the desired height.
- Divide its area into 6 sectors.
- Hang a plastic beacon at the beginning of each section to avoid getting lost.
- Decrease 2 loops from the side of the beacon in an even row, knitting them together with front or back stitches, depending on the pattern.
- Decrease by 2 loops on the side of the beacon in the odd row in the same way as was done in the previous one.
- Continue decreasing stitches until no more than 4 stitches remain on the needles.
- Tighten them with a thread and close the work.
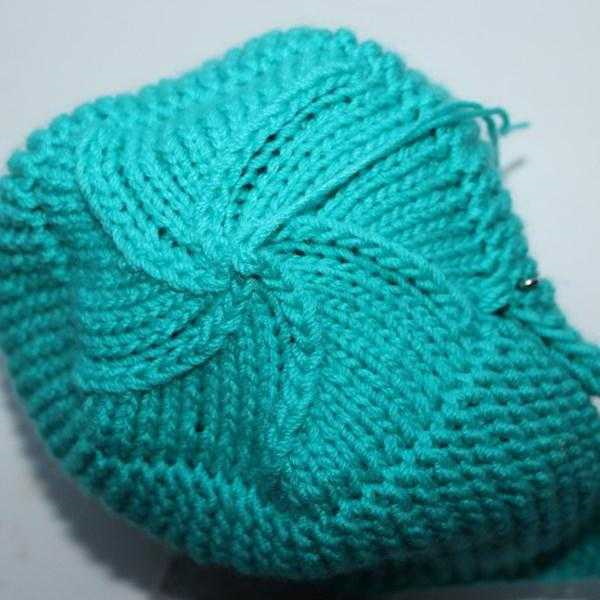
To make the product more beautiful, the remaining “tail” is pulled to the inside of the headdress and secured there.
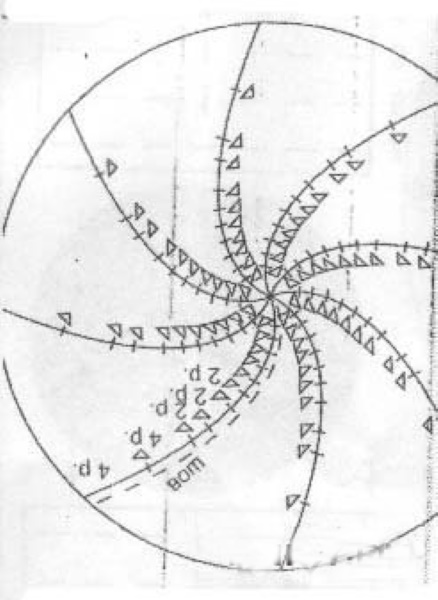
In 8 places
Sometimes the model requires that the loops be reduced in 8 places. In this sectoral decrease, it is necessary to conditionally divide the fabric into the required number of parts. In this case, it is necessary to mark the beginning of each section with a plastic or thread beacon. Let's consider an eight-sector decrease on a product of 160 loops.
Here you need:
- Knit the product to the middle of the crown.
- Calculate how many loops there should be in each sector. For this 160/8=20.
- Count 20 loops and hang a plastic beacon at the end of each twenty.
- Knit a row to the 19th loop and connect it together with the 20th according to the pattern of the front or back. Do the same with each loop in the line under the same numbers.
- Rehang the beacons.
- In the next row, decrease every 18th and 19th stitch in the row, knitting them into 1.
- Move the beacons to mark the sectors again.
- Knit into one in the next row every 17th and 18th loop in the line.
- Mark the sectors with plastic beacons.
- In the next row, decrease every 16th and 17th stitch, knitting them as 1 with the pattern that follows in the fabric repeat.
- Move the beacons to the desired locations.
- Knit into one every 15th and 16th loop in the line.
- Once the headdress reaches the desired height, tighten the loops with thread and secure.
To speed up the process of decreasing, you can close the loops in the front and back rows. This method will make the crown smooth and dense.
Simple decreases
There are several ways to simply and beautifully decrease loops. Each of them is easy to implement in work even for a beginner craftswoman.
| Method name | What to do |
| Purl | 2 loops knit in the desired place as 1 purl |
| Facial | knit a couple of loops in the right place, like 1 front |
| Crossed facial | a pair of loops, knitted as 1, are thrown onto the 3rd adjacent |
| Pulling | pull 1 loop through another, most often the 2nd of the pair is pulled through the 1st |
The fabric with the drawn-out method of decreasing loops looks as if the chain links in certain places were gathered on a high rod. At the same time, the decreased front ones differ from the back ones by the “backs” that are visible on the fabric. The first ones are smoother and more delicate, and the second ones are strong and resemble chain mail in appearance.
In addition, there are closing methods where the loops are tilted to the left or right. This is how the length of the line is reduced, for example, when working with a neckline, where the knitted seam should be beautiful and not stand out much against the background of the rest of the fabric.
Pattern for decreasing stitches for a hat using stockinette stitch
You can also decrease stitches on a hat with knitting needles when knitting with the front surface. Decreasing the length of the product always begins when it exceeds the tip of the ear by 1-2 cm.
For ease of work, experts recommend dividing the fabric into sectors and calculating how many loops there should be in each. Next, you need to mark the beginning of each sector with a plastic beacon to easily navigate the loop count and pattern. You can decrease loops on a fabric made with the front surface both before and after the beacon.
In the first case, when knitting on circular needles, you need to:
- Stop 2 stitches before the start of the new strip.
- Knit 2 stitches and return them to the left needle.
- Pull the loop through the 1st of the next strip.
In this case, it is always recommended to make the loop marked with a beacon as a front loop.
If you need to close the loops after the marker, you need to:
- Slip 1 st with marker.
- Knit stitch.
- Pull the front stitch through the loop with the marker.
- Make this reduction in a row 4 times.
- Knit the next row without decreasing, following the pattern.
- Decrease the number of loops in each even or odd row so that this happens every other row and not more often.
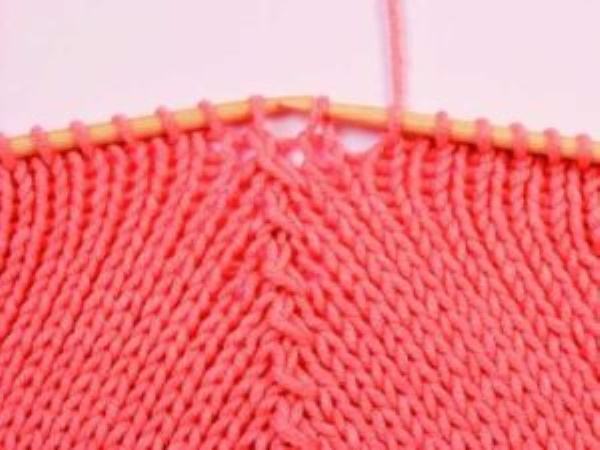
The work is finished when there are no more than 4 loops left on the needles. There is another method of closing loops in a product made with the front surface, where the place of reduction forms the silhouette of a half-braid.
To design the top of the hat this way, you need to:
- Knit the product to the desired height of the fabric.
- In a new row, remove 3 loops and leave them on a pin or the 3rd knitting needle before work.
- Knit 2 stitches together 5 times so that 1 stitch is from the main needle and the 2nd one is from the slipped stitch on the pin.
This is how the reduction of loops with a rightward tilt is formed.
To do the same thing, but tilting in the other direction, you need to:
- Knit the product to the desired length.
- Select 3 stitches in the new row and slip them, leaving them unworked, so that they end up on a pin behind the work.
- Knit 2 stitches together 3 times, with 1 stitch coming from the pin and the other stitch coming from the knitting needle.
- Continue decreasing until you reach the desired crown length.
At the end of the work, the loops are either closed in the classic way or pulled together with thread.
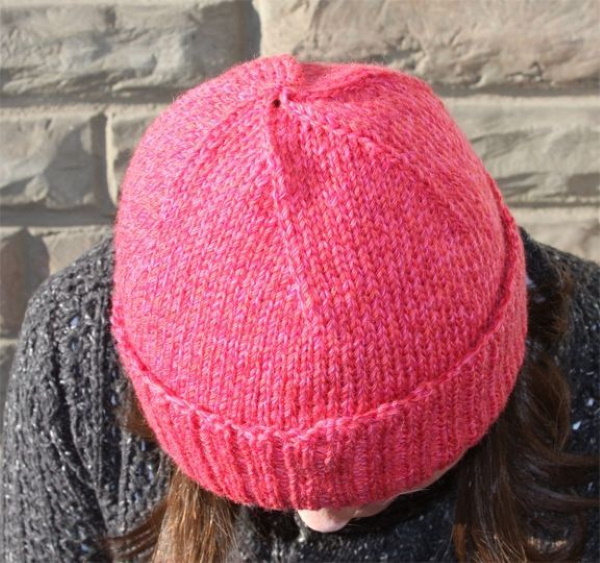
For a round hat
It is easy and beautiful to reduce the number of loops in a round headdress for a man, woman or child. The only difference is that the working fabric will be of different sizes.
For a round headdress, you can use the sector method described above to decrease loops. Hats in which loops were reduced through a row in the same place evenly, without shifts or overlaps, also look good to form the crown.
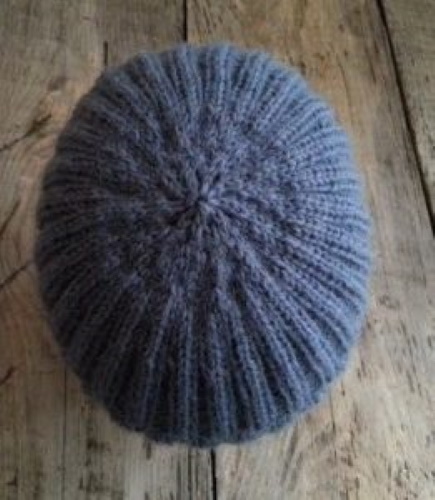
To give the crown a round shape, you need to:
- Knit the main fabric with a pattern 12-16 cm high.
- Begin decreasing stitches every other row, decreasing every 9th and 10th stitch, knitting them together.
- Reduce the number of loops until there are 10-12 stitches left on the needles.
- Pull the loops together at the end of the work and tuck the end of the thread inside the product.
The finished hat is tried on and washed before wearing.
How to beautifully decrease stitches on a hat with an openwork pattern?
Decreasing stitches with knitting needles can be done beautifully and unnoticeably. Finishing a hat with an openwork pattern is not as difficult as it may seem at first glance.

In order to start forming the crown, you need to knit a longer piece of fabric in this case than for regular hats made with simple patterns. A convenient length for starting to decrease loops in openwork items is 18-22 cm. If you start decreasing earlier, the accessory will fit tightly around the head and a beautiful cascade effect will not be achieved.
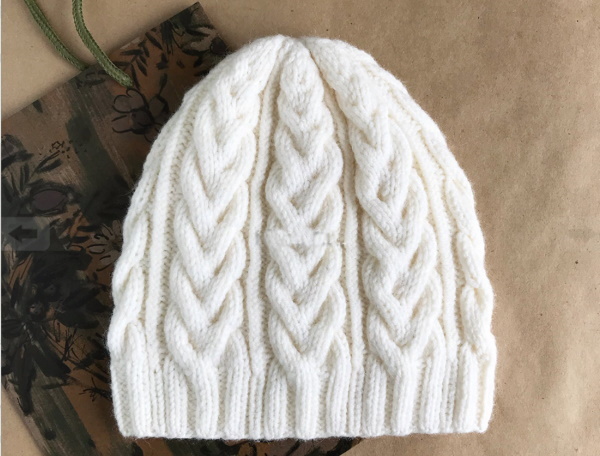
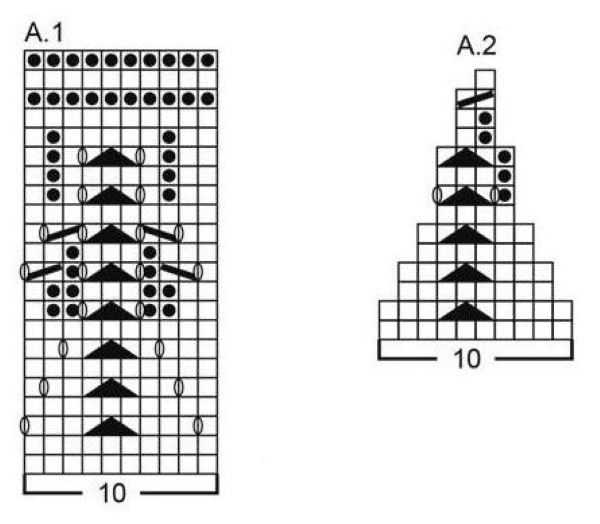
As an example, we can take a headdress with an openwork pattern, in the fabric of which there were 186 loops before the decrease, and the ornament includes braids and waves.
To shape the crown, you need to:
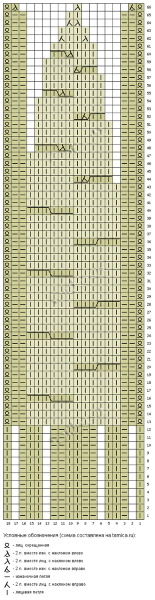
- Start decreasing stitches from a new row. To do this, knit 1 purl after the edge stitch, transfer 5 stitches untucked to an auxiliary pin in front of the work, knit 3 knit stitches, join the next 2 together with a knit stitch, knit 2 together with a knit stitch from the pin and transfer to the working needle, 3 knit stitches, purl stitch, 2 together behind the back wall with a knit stitch, purl stitch, transfer 5 stitches to a pin behind the work, 3 knit stitches, 2 together with a knit stitch, 2 together with a knit stitch from the pin, 3 knit stitches. Repeat the pattern to the end of the row.
- Knit rows 2 through 10 using the pattern according to the chart and following the instructions on the fabric.
- In row 11, follow the same work recommendations as in row 1, except that you place 4 stitches on the pin and replace the 3 front loops with 2.
- Work rows 12 through 16 following the pattern prompts on the fabric.
- In row 17, follow the recommendations for working in row 11, only put 3 loops on the pin, and replace 3 front loops with 2.
- Work rows 18 to 20, following the pattern on the working fabric.
- Complete row 21 by knitting 1 purl, 2 times 2 knit together, 1 purl, 2 together knit, 1 purl, 2 times 2 knit together. Work like this until the end of the strip.
- Knit row 22 as indicated by the pattern on the fabric.
- In row 23, make 1 purl, 2 together behind the back wall of the front, slip 2 onto the working needle without knitting, 1 front and pull it through the 2 slipped, 2 together front. Work like this to the end of the row.
At the end of the work, the remaining loops are pulled together with a thread, secured and brought inside the product. The openwork headdress is ready for trying on and wearing.
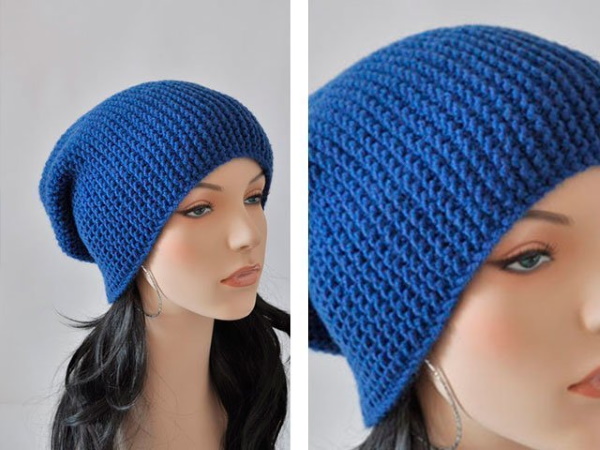
Stocking cap
Despite the fact that a stocking cap is not difficult to knit, it still needs to be beautifully decorated and the top rows closed. Some people prefer to form the crown of such a product by simply knitting the fabric to the desired length and closing the loops in the usual way, without reducing their number. In addition, at the end of the work, the loops can simply be pulled together with a thread, obtaining the shape of a hanging pumpkin.
To get a nice finish on a stocking headdress, you need to:
- Finish knitting the product to the desired height.
- Calculate how many loops you need to reduce the product by. For example, there are 60 loops in the work and 30 rows left to make, then 60/30=2, that is, in each row you need to decrease 2 loops.
- Start decreasing the number of loops in the crown area. To do this, knit 2 loops together in every 2nd row as the pattern on the fabric suggests.
To obtain a closed stocking, the remaining loops are pulled together with a thread, which is pulled inside the product and secured well so that the product does not unravel during fitting, washing or wearing.
Scallop hat
The easiest way, as many novice craftswomen believe, is to close the loops in a comb hat. To do this, you do not need to resort to complex calculations and mark the required number of loops in the sections with plastic beacons.
To close the loops in this headdress, you need:
- Knit the comb to the desired height.
- Close the working loops in the last row.
- Fold the fabric in half.
- Sew the product with a needle and thread.

Now the hat can be tried on and washed. To prevent the seam of the product from sticking out, the comb is turned inside out.
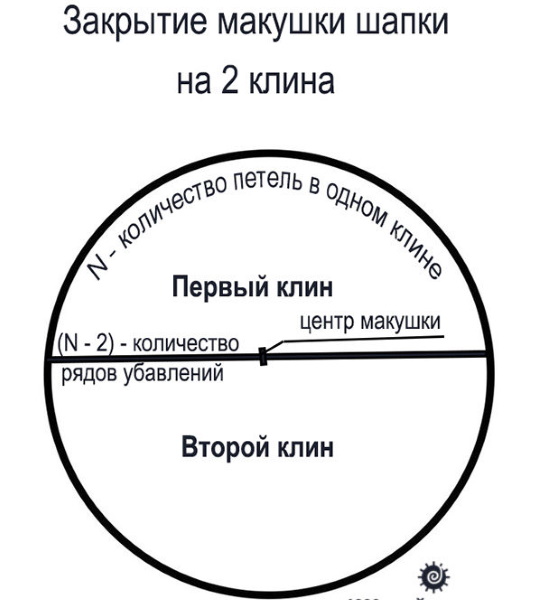
Wedge hat
In order to form the crown of a hat knitted with wedges, you need to divide the total number of loops in the work by the number of sections-sectors.
After which:
- Use plastic markers to mark the distance from one number of loops to another, for example 10.
- Knit the row from which the decrease begins, with the main pattern to the 9th loop, after which the 9th and 10th are joined together either with the front or back (as can be seen from the pattern). Continue knitting to the next 9th and 10th loops of the line, and do the same with them. Perform the decrease along the entire row.
- Form the next row according to the pattern without decreasing the loops.
- Decrease every 8th and 9th stitch in the row until the end of the line.
- Knit the strip according to the pattern without decreasing.
- Alternate decreasing stitches with working the main pattern every other row.
Usually, in wedge-shaped hats, the work is closed when there are no more than 4 loops left on the knitting needles. They are pulled together into one and the thread is pulled out to the back of the product with a knitting needle, needle or hook so that it does not interfere.
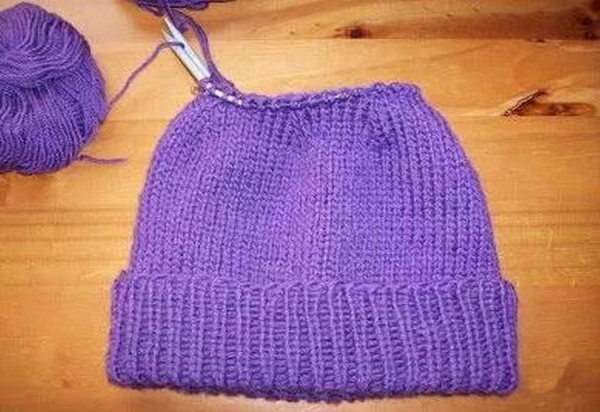
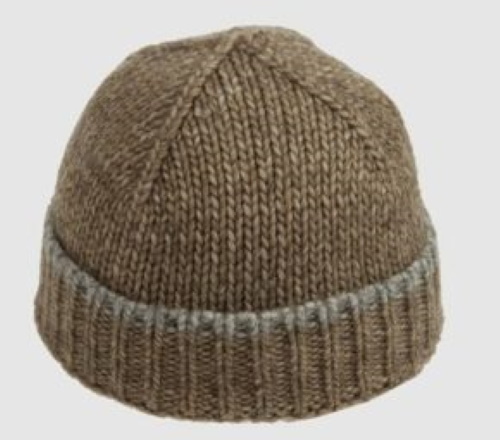
Hat with elastic band
The decrease of loops on the hat with knitting needles should also be done when using the "Elastic" pattern with different pitches. It is known that in the classic variation of this ornament, the front loops alternate with the back loops, therefore the decrease of loops should be done correctly so that the item looks beautiful and stylish.
When working with an elastic band with a step of 1 by 1, to form the crown of the hat you need to:
- Knit the main pattern to a height of 5-6 cm.
- Start decreasing stitches in each front row. To do this, for example, decrease the width of the fabric by 2 or 4 stitches, knitting the required number together front or back at the beginning and end of each row after and before the edge stitch.
- Close the resulting cap as soon as there are no more than 4-6 loops left on the knitting needles.
The method of reducing loops is suitable for knitting on separate needles, and in the case of circular needles, the procedure is carried out at a certain distance along the line of the fabric.
You can form the crown in a 2 by 2 elastic band using the following procedure:
- Knit until the hat reaches the desired length.
- Make 4 stitches in the next row of 8 stitches, working from left-hand slopes. To do this, remove 4 stitches, where 2 are front and 2 are back, onto a pin before work.
- Knit 2 stitches (from pin and knitting needle) together 2 times.
- Create 2 times 2 loops (from pin and knitting needle) together purlwise.
- Repeat the described joining of loops 4 times.
- Make 4 from 8 loops with tilts to the right. To do this, 4 loops are removed on a pin behind the work.
- The knitting process is repeated, only 2 are joined together using the purl technique.
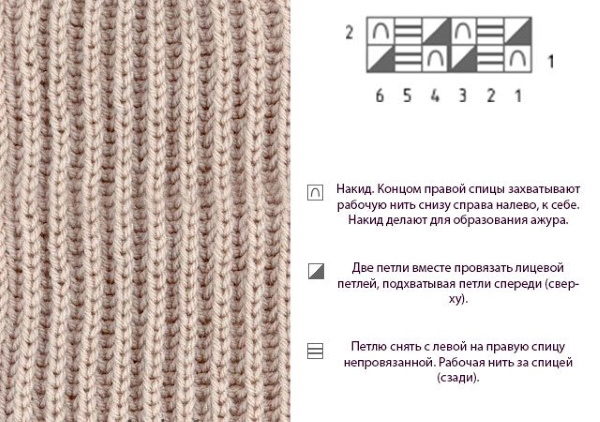
You can work in the same way with a 1 by 1 elastic band, only make 2 loops out of 4, and the principle of work in these cases is the same. Some experienced needlewomen advise transferring the pattern to a regular one with a step of 1 by 1 before making decreases in English elastic.
This will help to form a beautiful edge and smoothly transfer the pattern to the end. Other craftswomen note that when working with this "foreigner" you can reduce the loops using the method of knitting several with a tilt to the right or left.
In the first case, the work is carried out as follows:
- Knit together the front yarn over and the starting stitch.
- Return the loop to the knitting needle.
- Lasso the next knit stitch and yarn over it.
This way, the fabric will become 2 loops narrower.
To decrease with a left tilt you need:
- Slip the knit stitch and yarn over onto a working needle without knitting.
- Combine the following purl stitches, knit stitches and yarn over stitches.
- Place a lasso of the removed knit stitch and yarn over the knitted pieces.
Using the first or second method, you can preserve the pattern and reduce the width of the fabric.
Useful tips
When forming the crown and decreasing extra loops, you need to carefully monitor the pattern so that it does not get lost or "float", especially for hats with openwork patterns. Experienced needlewomen note that there are several secrets that help to correctly remove extra loops and beautifully knit a headdress.
These include:
- The right choice of yarn.
- Ability to correctly calculate the number of loops to decrease.
- Laconic design of the crown.
- Constant fitting during work.
- Willingness to experiment.
Hats are knitted from any yarn, winter ones - from warm, and demi-season or summer ones - from light. In addition, the material should match the color scheme, and the pattern on it should not spoil the appearance of the wearer. Before you start reducing the number of loops and forming the crown, experts recommend determining how many need to be removed. To do this, divide the total number of loops by how many should remain and get the number of extra loops in each row.
Also, when reducing the width of the fabric, you need to remember that the reduction is carried out only in the front rows. Not everyone likes the crown pulled together in a simple way, so you need to think about how to decorate the hat. For example, pom-poms or rhinestones are popular. You can sew the end of the headdress to its "body" at the back, getting a turn-up like a shell, which will also add zest to the product.
Experienced needlewomen recommend not to forget to constantly measure the hat during the process. This will help to avoid unnecessary unraveling and tedious alterations before finishing the work. On a hat with knitting needles, the decrease in loops must be done correctly and moderately. In addition, when decorating the fabric, you can use your own ideas and connect your imagination, which will allow you to knit a real warm masterpiece.
Video about decreasing stitches on a hat with knitting needles
Decreasing stitches on the hat to create the crown: