If you make a paper flower with your own hands, such a masterpiece will delight the eye for many years. Paper bouquets are similar to real inflorescences, captivate people with the beauty of forms, grace of lines and unique images of leaves and buds.
Materials for work
Paper art improves imagination and sense of artistic style, and does not require any special materials or equipment for work.
To create paper crafts you will need:
- paper (colored, plain, corrugated, napkins);
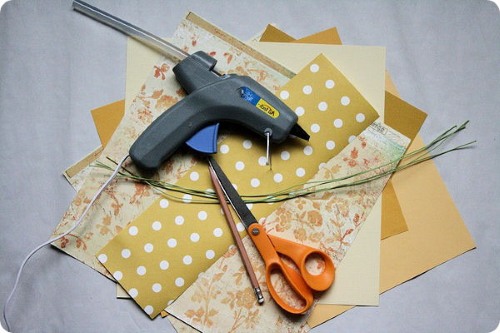
- glue;
- scotch;
- scissors;
- threads;
- stapler.
Additional tools that may be needed include: wire, an awl, drinking straws or empty ampoules to create stems; various beads, buttons, and seed beads to decorate the buds. Various paints will be used to paint the compositions. In some cases, a hole punch, colored ribbons, pieces of fabric, and cardboard will come in handy.
Recently, special kits for making artificial flowers have appeared in stores, which contain the main components and step-by-step instructions with illustrations.
Origami flowers
You can create a paper flower with your own hands in the origami style, which consists only of folding various configurations. To make crafts in this technique, you will need multi-colored double-sided paper, a gluing agent, and scissors.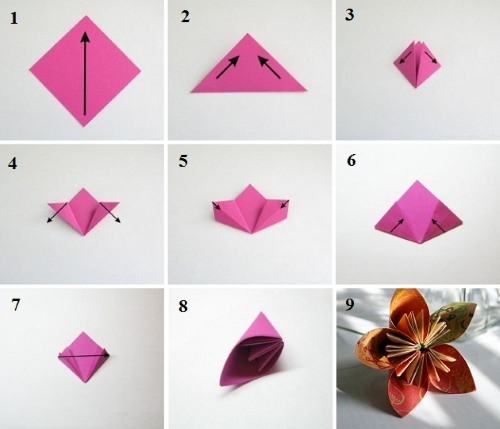
To make the simplest model, you need to do the following:
- prepare a square sheet of colored paper;
- fold it diagonally on both sides until even edges are formed, and also make straight folds that will result from folding the square in half;
- bend one of the resulting vertices towards the center;
- do the same with the three remaining corners;
- make folds on all the folded triangles. To get them, you need to fold it, first forming a triangle on one edge, then smoothing it out, we form a fold on the other edge;
- turn the product over to the other side;
- bend the corners of the formed square;
- unfold the workpiece again;
- on the previously made folds, which are on all the triangles bent to the center, certain actions must be performed. Make folds in the middle of the figures, and smooth out their edges;
- do the same with the remaining triangles;
- fold the corners and turn the future flower over again;
- all the corners look like flower petals. Straighten them out;
- turn it over again to the opposite side and bend the corners away from the center. These are the petals of the future masterpiece;
- bend along the diagonals, carefully pulling out these leaves;
- The ends of the outer leaves of the resulting flower need to be slightly sharpened by squeezing them with your fingers.
You can make such a creation from any color you like.
Flowers from colored paper
Even children can easily and simply make artificial flowering plants from ordinary colored paper. There are many different ways, but it is worth paying attention to such simple methods.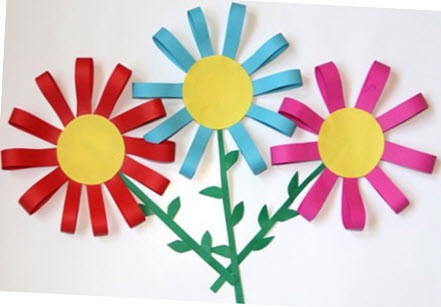
Option 1:
- Use a ruler to measure and mark lines on a sheet of paper, which will serve as a template for cutting out narrow strips. These blanks will be the components of the future flower.
- Each resulting strip must be folded in half and the ends secured with glue.
- Take a sheet of yellow paper and draw a circle with a compass. This will be the center of the flower.
- Glue the petals to the cut out core on the back side.
- Using green paper, cut out the leaves and stem.
- Finally, stick all the resulting components onto a clean white sheet of paper.
Option 2:
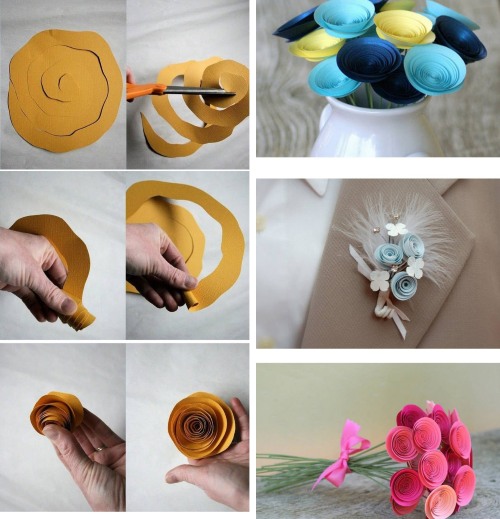
Spiral paper gifts of flora can be used to decorate handmade cards or gift wrapping.
To make such paper flowers, you need to follow the sequence:
- The first thing to do is to create a bud template. To do this, try to draw a spiral on a piece of paper of any color and cut out the blank exactly along the lines.
- Carefully twist the entire resulting paper spiral, starting from the end point.
- We form a stem and leaves from green paper.
- Before you start connecting the individual parts of the creation, gently straighten the spiral - this will help the flower open.
Flowers from corrugated paper
To learn how to make crafts-flowers from corrugated paper you need:
- trim the base of the stem to the desired length. Cover one edge with glue and wrap it with a narrow strip of yellow crepe paper. This will be the core;
- take the original sheet of material of the desired color (red, burgundy), fold it 12 times and cut out petals from it. Form a bud from the resulting parts: attach each piece to the stem with glue, smearing the lower part with it. From time to time, you can thicken the bud by rewinding the leaves with yellow paper;
- When all the parts form a single whole, wrap them with a green strip of crepe, and at the same time intertwine the stem.
In addition to this method, there are others, any of which is suitable for making a certain composition. For example, it is recommended to use previously twisted paper strips.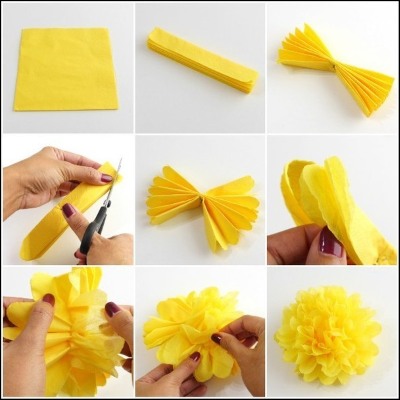
The main thing is to show imagination and diligence when assembling.
Flowers from paper napkin
Elegant flowering plants can be made from ordinary napkins. Very simple production helps to attract children to this activity. Paper napkins with one or more layers can turn into different types of flora. You just need to choose the right scheme and color scheme.
You can learn this technique using the example of a lush flower. It is better to use a dense material, because it perfectly retains its shape, and the folds on the folds are well expressed. For one product, you will need to take 5 napkins. To increase the fluffiness, you can use from 7 to 10 pieces, but it is advisable to make the blanks of different sizes. Craftsmen advise alternating material of different colors.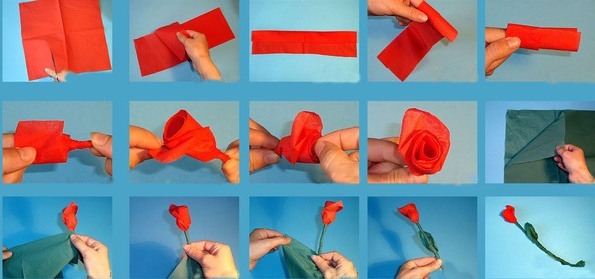
Manufacturing instructions:
- to form a flower from paper, you need to cut the edges of the original raw material with your own hands into a semicircle or a rounded triangle. Next, you need to give each napkin the shape of an accordion, fastening it in the middle with a strong thread. Then trim the ends a little, making them uneven, to give a torn effect;
- collect each inflorescence into a single composition, folding them together and securing them by the ends of the threads;
- to make the masterpiece denser, the base of the leaves should be glued or tied with tape;
- If desired, you can attach a ring made from the main material to the back of the product, which will serve to hold a table napkin or cutlery.
Paper flowers using quilling technique
Paper flowers made in the quilling style are extremely popular and look impressive and beautiful, especially if made by hand. They can be used to decorate holiday packaging, a box, a photo frame, a greeting card. The technique is simple, but it requires patience and time.
This technique can also be called “paper twisting”, since it involves twisting oblong paper strips of different structures. Stripes made from mother-of-pearl, shiny or matte raw materials will look impressive.
The simplest manufacturing technology is as follows:
- After cutting out the strips, you need to twist them into spirals using an awl or a thin rod;
- give the resulting curls the desired shape by pressing or squeezing;
- Glue the resulting elements together and secure them to the base.
There are many ways to form compositions using the quilling technique. The main thing is to have a scheme that has the contours of the image and the details that fill it. Beginners should gain experience in making easy patterns.
What kind of paper can be used to make flowers
Floral arrangements, both voluminous and the simplest, can be created from simple office sheets, not only pure white, but also colored.
Types of paper that can be used to make flowers:
- corrugated;
- kraft paper;
- packaging;
- newspaper, suitable for making bouquets in a printing house;
- notes that will be a great solution for decorating a music room;
- geographical maps;
- cosmetics catalogues;
- used writing paper;
- magazines;
- tracing paper;
- graph paper;
- multi-colored foil;
- material decorated with different banknotes;
- parchment;
- cigarette.
Decorations made from colored paper baskets will look stylish in children's institutions.
Chamomile
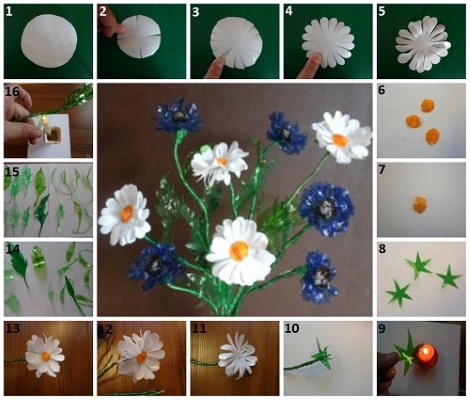
How to make chamomile:
- For the core, cut out a circle from yellow cardboard with a diameter of 11-12 cm;
- take a white sheet of paper and cut it into long strips 2-3 cm wide. Without bending them, glue the edges of the strips together;
- Glue the purchased petals along the upper edge of the cardboard circle. If necessary, attach another yellow circle on top to mask the connection points;
- To form a stem, you need to insert a thin rod wrapped in green paper into the middle of the cardboard, to which you need to glue the previously prepared green leaves. For a more beautiful look, it is advisable to use double-sided raw materials.
If you are making a chamomile using the quilling style, you should:
- make paper strips 3 cm wide in white, yellow and green colors;
- wind it around an awl, then remove it and loosen it slightly;
- to get a teardrop shape, you need to pinch the petal a little on one side;
- secure the ends of the strips with glue. You will need a lot of these droplets to make them look lush.
- the middle of the future flower is made from a yellow blank. On one side, on the strips for fringe, cuts are made as densely as possible. Then we roll it into a spiral. Attach petals to the back side;
- Make a stem from corrugated material, winding it evenly onto the rod. Attach a flower to one end of the resulting blank.
Rose
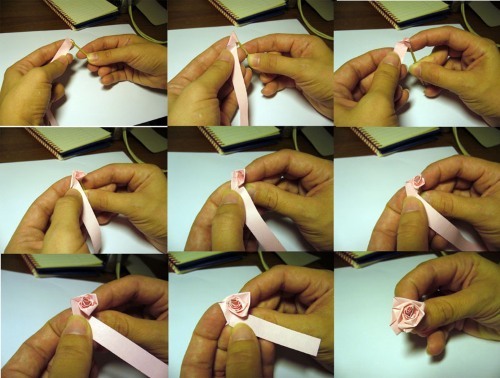
It is not difficult at all to make a paper rose flower with your own hands:
- draw a spiral on a square of paper, cut it out and twist it so that the result is a rose;
- attach the resulting bud to the base using glue;
- give it the desired shape by carefully straightening the flower.
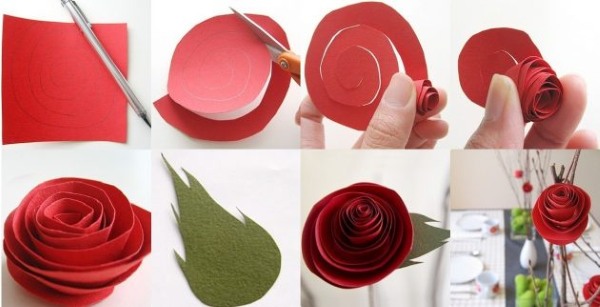
To create a bouquet, you will have to make many of these blanks. The color of the paper will be chosen at will.
Aster
Several options for its production are offered.
Method 1:
- take a white sheet of paper, fold it in half 3 times. You should get a plate with 8 layers. Cut this strip with teeth on one edge and cut the folds;
- in the same way, make a yellow blank that is half the width, and form two strips from green paper with teeth of different lengths;
- wind the yellow edging onto a narrow stick and secure with glue;
- in the same way, roll 8 white rectangles on top, and green ones behind them;
- straighten the resulting flower, while bending the outer leaves away from the center.
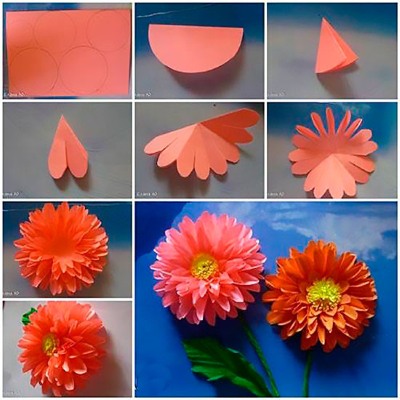
Thanks to step-by-step instructions, you can very easily and quickly make a paper flower with your own hands.
Method 2 (basket of asters):
- for the base, cut out the foam plastic to the required size and insert it into the cake box;
- secure candies to toothpicks with tape;
- make 6 strips measuring 25x7 cm from corrugated paper and fold them lengthwise 4 times;
- make jagged cuts on one edge;
- round off the fringed ends with scissors, and stretch the solid edge, giving it a rounded shape;
- wrap the resulting blank around the candy structure so that the teeth are inside, and connect with tape from below;
- in this way, wind 2 more pieces of paper strip;
- the next three edges are twisted with the curled teeth outward;
- make a sepal from green raw material, rounding off the tips;
- wrap the toothpicks with green corrugated paper, securing them with glue, and wrap the sepals around the bud, also gluing them together;
- Decorate the box with corrugated material and insert the created flowering plants into the foam.
Tulip
To make a tulip using corrugated paper you will need skill, because the work is delicate.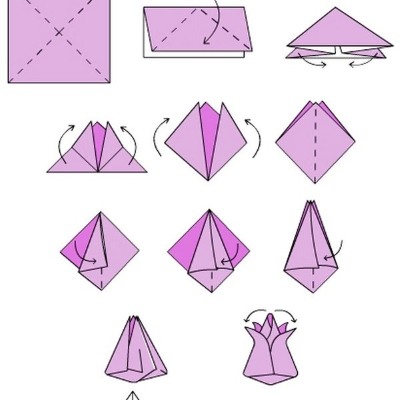
These spring gifts of nature are created as follows:
- First of all, you need to make a cardboard petal blank and use it to cut out the required number of petals (6-7 for one flower);
- then you should start forming the pistil and stamens. Pick up a medium-sized wire and wrap a 5 cm piece with corrugated paper of a black or brown shade - you will get a stamen, to which you will attach one leaf with glue;
- take a wire of a small circle and wrap a piece, 4 cm wide, in white paper. It is necessary to create a pair of such blanks and cut them in half. Lay them out in the form of a cross and glue them to the petal;
- using this technology, prepare more stamens;
- tie all the stamens and pistils together with white thread;
- form a bud by attaching the remaining petals to the wire;
- you can use a larger wire and attach the bud to it with a thread;
- Cover the entire stem with green thread. Make leaves from paper and glue them to the bottom.
Candy tulips look beautiful. To make them, you will need small round candies in foil. They should be wrapped in corrugated material and attached to a wire, to which the petals of the expected bud will then be glued.
Peony
To create a peony flower from corrugated paper with your own hands, you will need:
- cut sheets of the same size from rolls of paper of different colors;
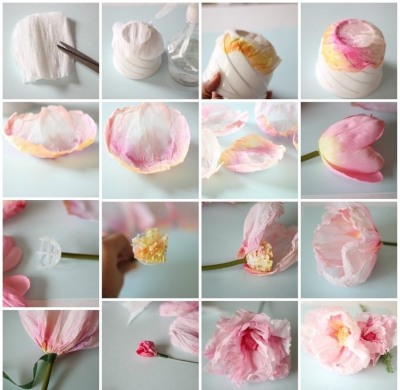
- fold each into an accordion of the same width;
- measure out all the pieces, starting from small to large, with a distance of 3 cm;
- each folded piece is secured with a paper clip exactly in the middle;
- cut the ends of the blanks in the shape of petals, or simply remove the corners, forming a triangle;
- lay out all the blanks from the largest (the bottom one) to the smallest, aligning them in the center;
- all the leaves are connected into one colorful accordion and wound in the middle with a thread;
- form a bud, giving the resulting craft the shape of petals, turning them upward and bending them to the sides.
If you use many different colors, you will get a lush, attractive peony. For example, take 7-8 shades to make a gradual transition from a light tone to a darker color. To create a finished look of the flower, in the process of forming the bud, put green corrugated paper in the very bottom layer.
How to Make a Garland of Paper Flowers
Flowers for garlands can be made small and large. Small items are combined into garlands, which are used to decorate any part of the room.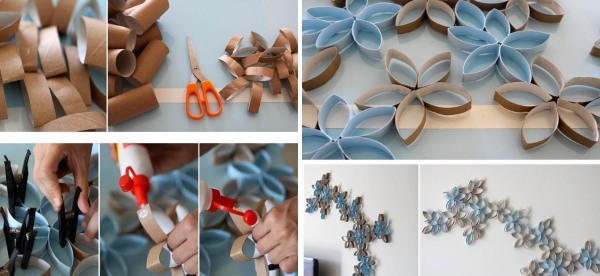
To make a paper flower garland you should:
- Cut out a flower template from cardboard and make an even number of paper elements using it. Choose a color scheme based on the theme of the celebration.
- Take the fishing line and straighten it. Then glue the two parts together so that the connecting thread is located in the middle. We go to the end along the entire length of the base, after which we tie a ring at each end of the fishing line, with the help of which the garland will be attached to the holders.
- It is advisable to place flowering elements at a distance of 3 cm from each other.
If desired, it is worth using stencils with complex ornaments. The main thing is to make paired parts neatly and evenly.
We make flower bouquets
Flower bouquets are often made using candies.
To make a simple flower, you need to cut out a 9x8 corrugated rectangle, cut off the lower corners, and give the upper ones a rounded shape. Then stretch the resulting piece from the middle and wrap it around a round candy, previously connected with tape to a skewer. You will get a closed bud. Fasten it at the bottom with a thread.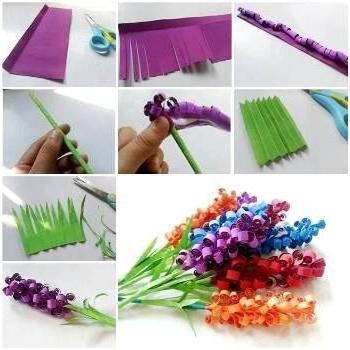
For an unblown bouquet, you will have to make many of these blanks and fasten them together. To make blossomed flowers, prepare 8 pieces of 3x8 for each craft.
Do the same as the previous version, only stretch it in the center and on top. Use a thin stick to bend the slightly cut ends in the other direction. The petal will look like a real one.
To obtain an open flower, glue new petals to the blank with a closed bud. Place each subsequent leaf on the previously glued leaf. To form the trunk, take a 6x8 piece of paper, which is then cut into a fence-like shape. Then twist the cut pieces and glue them to the flower base.
Next, wrap the green corrugated ribbon around the skewer and you will have a charming bouquet that can be used to decorate your interior.
Flowering balls for decoration
You can make not only a paper flower, but also a real flower ball with your own hands. It is good to decorate the room, both for a holiday and on a weekday.
The easiest way is to make a ball using regular napkins.
It is interesting to make such a craft together with a child. To do this, you need to crumple an old newspaper into a tight ball and wind it with woolen thread. This will be the base. Then fold the paper napkin into 4 layers and fasten the middle with a stapler. Round off the ends of the square with scissors and press them to the center in layers. Glue the resulting roses to the previously prepared newspaper.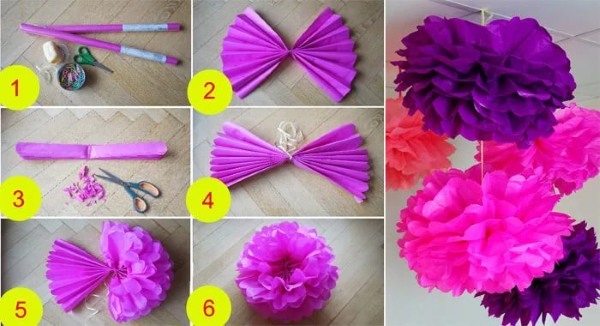
The resulting composition can be decorated with beads, colored paper leaves and placed in a vase or attached to the ceiling with a ribbon. Another type of balloons can be made from corrugated paper. First, make a round base for the future composition. It is necessary to inflate a balloon of the required size and wrap it with a thick thread, previously soaked in PVA.
After drying, pierce the ball with a needle and remove it from the thread frame. Then glue the resulting frame to a suitable stand (pot, vase). If the product is to be hung, attach a ribbon to the base, forming a loop from it. Cut the sheet of corrugated source material into pieces measuring 3-4 cm by 30-40 cm.
Stretch the resulting strips by hand from one edge, then roll them into a roll from the other and wind them with thread. Glue the created roses to the prepared base with the knitted side. Fill the entire area of the frame with blanks.
There are many ways to create paper flowers with your own hands. You just need to choose the option you like and, of course, try it. After all, a composition made with your own hands with love will never fade, it will bring positive and joy.
Video on how to make a paper flower with your own hands
How to make a 3D rose with your own hands, find out in the video:
Making paper flowers with your own hands:
Everything is super, just great.
My mom's birthday is coming soon. I want to make paper flowers for her)