The mask in the theater plays an important role in creating the image of the character and conveying his character. The artist's skill lies in the ability to draw such an image so that it not only reflects the hero's appearance, but also conveys his emotions and mood.
Necessary materials and tools
Pencil drawing is one of the most popular forms of art, which has a centuries-old history and many techniques of execution. To successfully create works using a pencil, you need to have a set of appropriate materials and tools.
| Tools and materials | Brief description |
| Paper | It comes in a variety of grades, densities and textures, allowing artists to choose the best options to create a variety of effects. There is sketch paper, which has a rough surface, and a smooth surface, suitable for detailed drawings. |
| Pencils | They come in different hardnesses, designated by the letters "H" (hard) and "B" (soft). Harder pencils allow you to create fine lines and work with small details, while soft pencils allow you to get richer and darker shades. |
| Erasers and pens | Used to correct and erase pencil lines. Erasers come in different shapes and sizes, as well as degrees of hardness. Soft erasers are suitable for erasing fine lines and details, while harder erasers are used for larger areas of a drawing. A kneaded eraser is a soft eraser that is used to soften and blur lines. |
| Stencils | They are tools for quickly applying repeating elements or patterns to paper. Stencils can be of different shapes and sizes, allowing the artist to create a variety of effects. This is a convenient way of drawing, especially when you need to quickly create a large number of identical elements. |
| Rulers, compasses | Tools used to accurately measure and draw lines, circles, and arcs. Rulers may have different divisions and scales that allow the artist to accurately measure distances and angles. Compasses are used to draw circles and arcs of a certain radius. |
| Sharpeners | They are designed to sharpen pencils so that the artist can get clear and sharp lines. Sharpeners can be mechanical or manual, and also differ in the type of blades and the number of holes for pencils of different diameters. |
Master classes
An important aspect of drawing a theatrical mask is attention to small elements. Every detail must be thought out and executed with high precision to create a complete image.
Particular attention is paid to the eyes, which should reflect the character's personality. They can be big and expressive or small and tricky, depending on the author's idea.
In some cases, the mask may have special effects such as light, shadow or shine to enhance its expressiveness. It is also important to consider the context of the scene in which the mask will be used.
For example, the mask of a comedy hero should be bright and memorable, while the mask of a tragic character should be more restrained and sad.
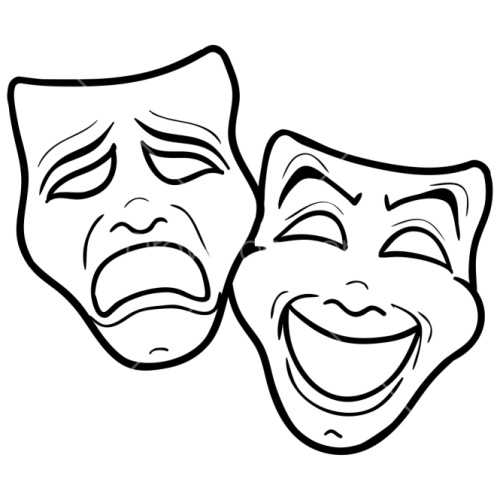
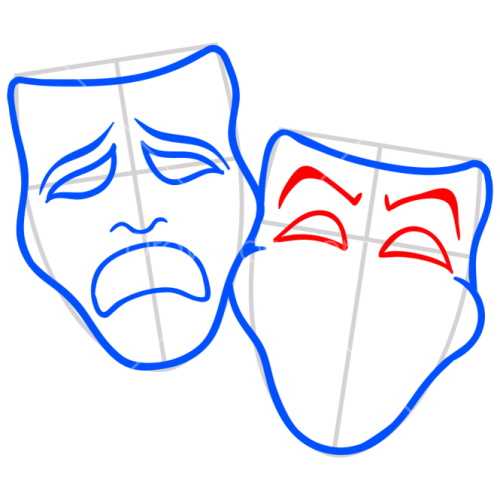
Happy and sad
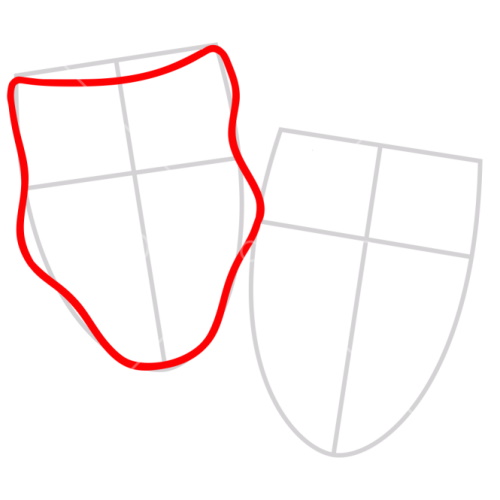
The theatrical mask in the picture can be depicted with the help of a master class, which involves depicting 2 different ones - cheerful and sad.
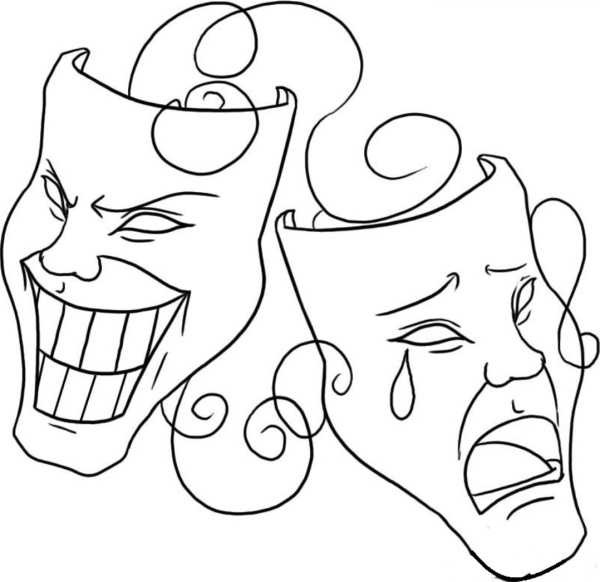
Its step-by-step implementation will allow you to get an idea of how to create simple and expressive mask images for creative projects:
- Start by sketching 2 ovals for the faces. They should be placed next to each other in the center of the paper. The ovals can be the same size or one slightly larger than the other.
Depending on how elongated the ovals are, the mask will be more or less flat. Make the outlines of the ovals simple lines or give them slight curves to create volume.
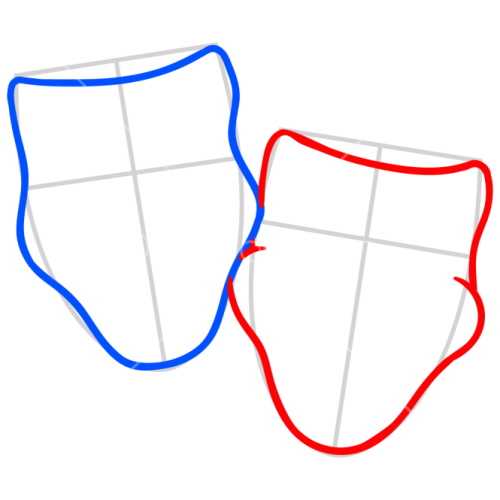
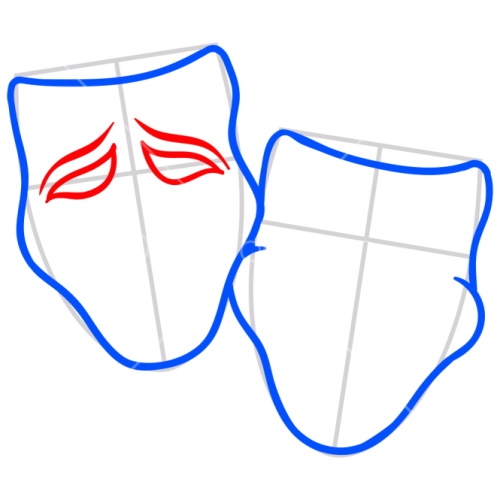
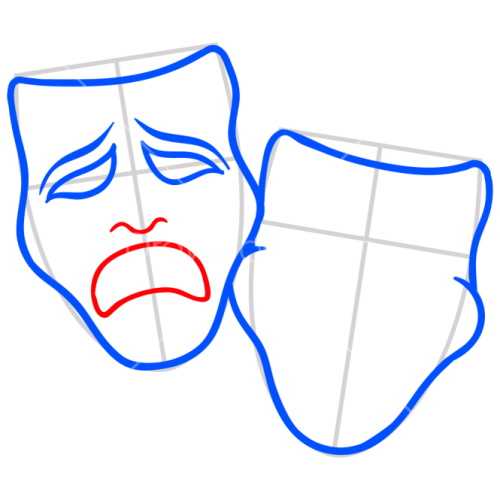
- Draw a smiling mouth in the form of 2 arcs on one of the ovals. Its corners will be directed upwards. This will create the impression of a smile. Draw teeth and a nose. Add eyes with eyebrows.
- On the 2nd oval, draw a mouth with the corners pointing downwards. It can be a little smaller than the laughing mask. Draw wrinkles and folds that point from the eyes to the corners of the mouth, this will create the appearance of sadness.
 | |
 |  |
 |  |
 |  |
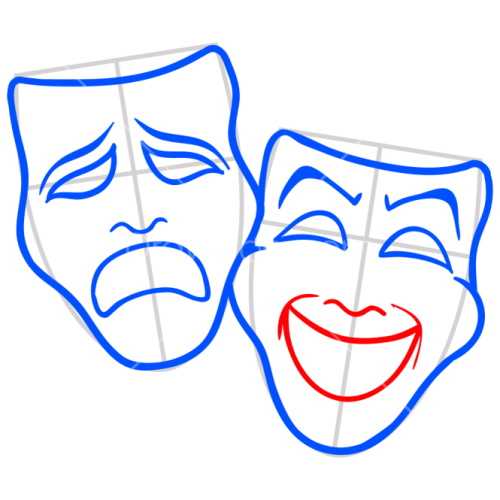 | 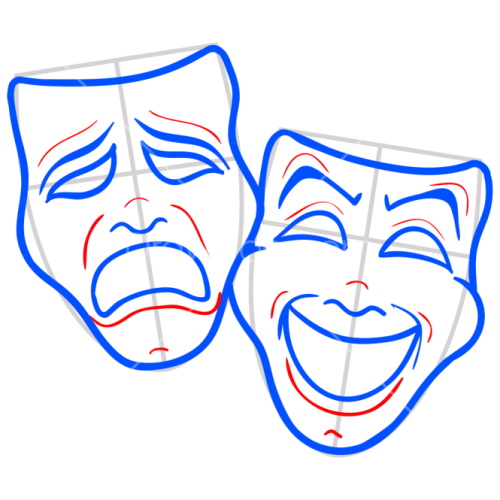 |
Draw eyes, eyebrows and nose. Add tears under the eyes to enhance the sadness effect.
- Check and correct all errors. To do this, use the eraser. Remove excess and unnecessary lines to get clean and clear contours.
- To give the masks a finished look, trace the outline of each mask. Do not press too hard to avoid damaging the design.
- Choose the right colors to create the mood and convey the character of each mask: bright and saturated colors are suitable for a cheerful one, and darker and more muted colors are suitable for a sad one.
Coloring can be done using pencils, markers, watercolors or other art materials that suit you best.
Parsley
Petrushka is one of the main characters of Russian folk theatre, a comic hero of a puppet show. He embodies various traits of the Russian national character: sharp wit, resourcefulness, courage. He is also known for his cheerful optimism.
Petrushka often gets into ridiculous situations and emerges victorious thanks to his ingenuity and ability to find a way out of the most difficult situations.
The theatrical mask in the picture can be created according to the following instructions:
- Start with a general sketch of Petrushka's face. Outline the main features: the oval of the face, the lines of the nose and chin. Avoid straight lines and angles. Use smooth, rounded contours to give the mask a more natural look.
- Draw an oval shape of Petrushka's face using the outlines you drew earlier. Keep in mind the proportions: the upper part should be narrower than the lower one.
- Add a cap that is divided into 2 parts: right and left. Both parts of the cap are symmetrical relative to the vertical axis. Draw triangles that represent the sharp tip of the cap.
- Create a collar consisting of 6 triangles. Place them symmetrically around Petrushka's neck. They should emphasize the shape of his face and give the mask a finished look. The triangles should be proportional to each other.
 |  |
- Draw the eyes. Create their elongated shape.
- The nose should be proportional to the face. Draw it as a curved line with a small hump in the middle. Do not create straight or sharp lines.
- Draw a smiling mouth, placing it below the nose. Use rounded shapes to make the smile natural and welcoming.
- Add 2 symmetrical circle shapes to the mask under the oval, just below the base of the cap, at eye level. These circles will represent the character's cheeks.
- Draw the eyebrows as short lines. Slightly curved upwards, they will add more expressiveness to the character.
- At the level of the eyebrow line, draw small rounded shapes that will indicate the ears.
- Draw horizontal stripes on the left side of the cap with a slight tilt to the left.
- Add 2 small circles to the end of each of the cap pieces - these will be bells.
- Use the eraser to remove all unnecessary lines.
- Trace all the main lines of the drawing with a medium-hard pencil (HB, 2B).
- You can add colors using watercolors, colored pencils.
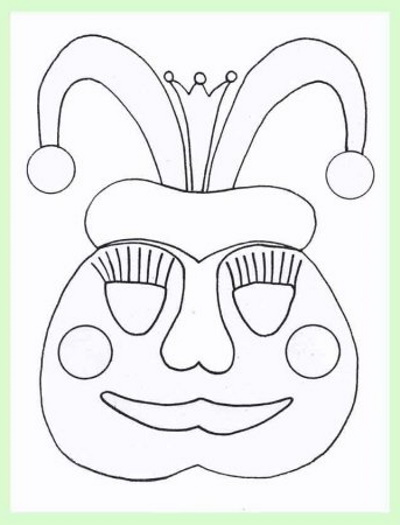
Pirate
The pirate is a role that can be both negative and positive. This character can be made cheerful or sad, cunning or simple-minded.
However, he is always energetic and charismatic. The role of a pirate is associated with adventure, danger and treasure. This image evokes associations with sea travel and the romance of the pirate life.
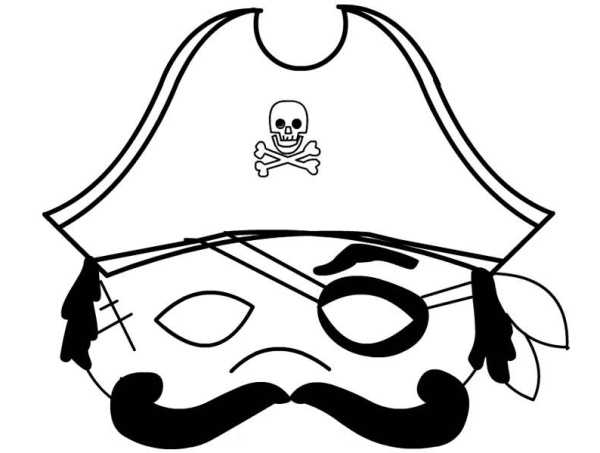
The theatrical mask in the picture can be created using a master class consisting of several stages that will allow you to create a unique image of a pirate:
- Sketch the mask. This will help determine the overall shape and proportions. Draw an oval for the face, outlining the facial features. This is the outline that will serve as the basis for the next steps.
- Outline the oval of the face.
- Draw a triangular shape that will be the base for the cocked hat. This shape should match the size of the face oval and be located on top of the head. The cocked hat can have rounded or pointed corners.
- Add a pirate bandana to the tricorn. It should be visible on the left from under the tricorn, with its knot on the right. The bandana will help give the mask more style and character.
- Draw the mustache, taking into account the proportions of the face. They can be narrow or wide, straight or curved.
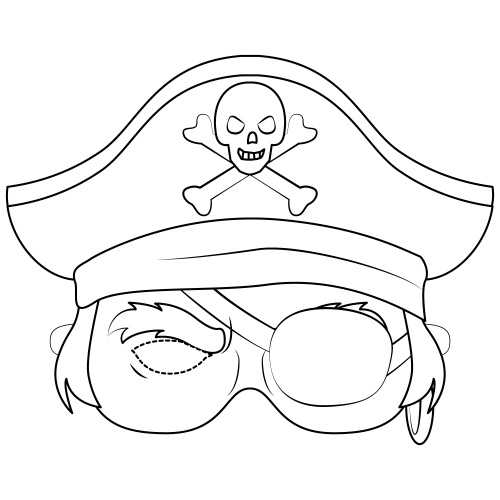
- Add eyes following the proportions of the face and taking into account the position of the bandana. You can add shadows under them to make the look deeper.
- Draw a bandage on the right eye, emphasizing the distinctiveness of the image. It can be narrow or wide, with different patterns and ornaments.
- Draw the nose, taking into account its shape and position on the face.
- For the right eyebrow, draw a curved line from the bottom of the tricorn to the edge of the mask. Make sure that the line is symmetrical relative to the center of the face. There is no need to draw the left eyebrow, as it is hidden under the bandana.
- Finish drawing the hair from under the cocked hat. It should be short and tousled. You can add a few strands sticking out from under the bandana.
- Draw a skull on top of the cocked hat. It should look scary.
- Remove unnecessary lines and contours to make the mask look more realistic.
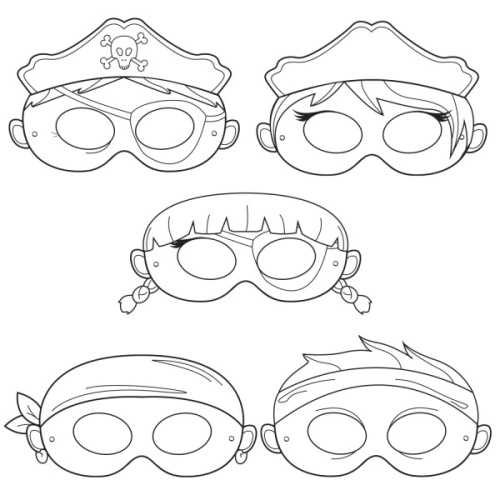
- Outline the mask to give it definition and expression. Use different line thicknesses to create volume.
- Color the mask. You can use black, red and brown for dark tones and white, yellow and blue for light tones.
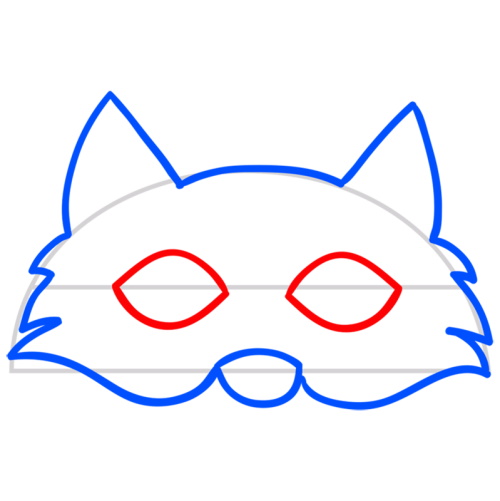
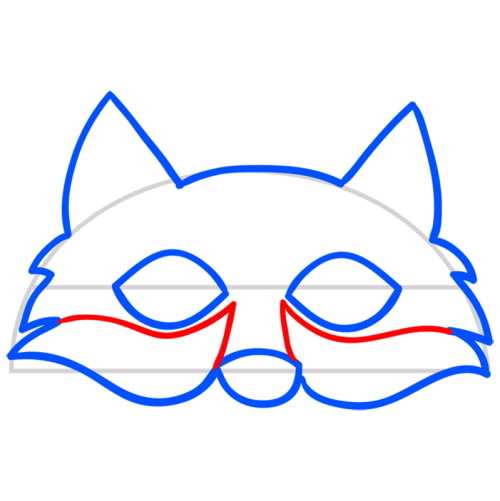
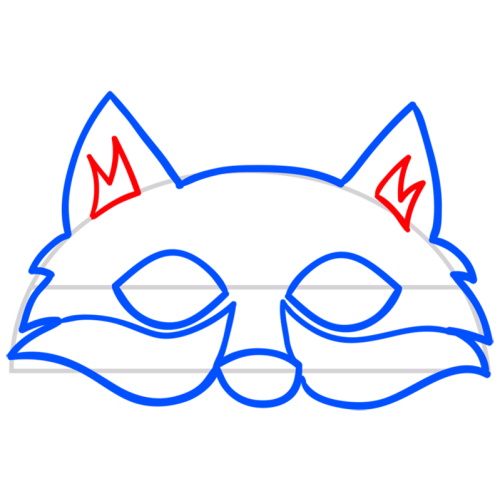
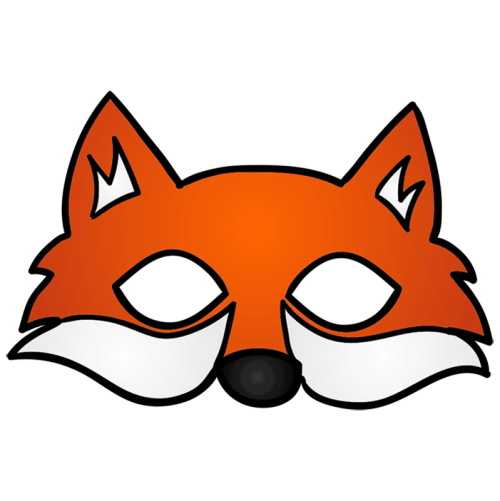
Foxes
The theatrical mask in the picture can be created based on the recommendations:
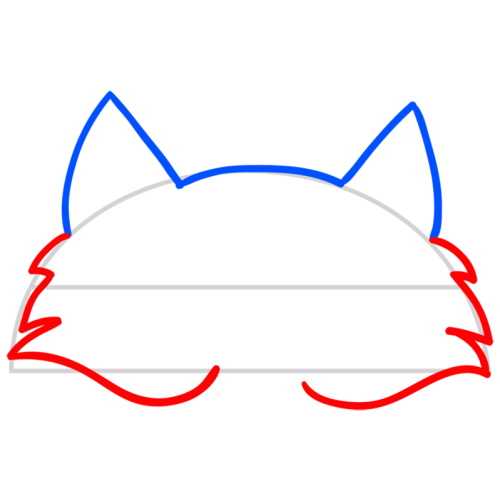
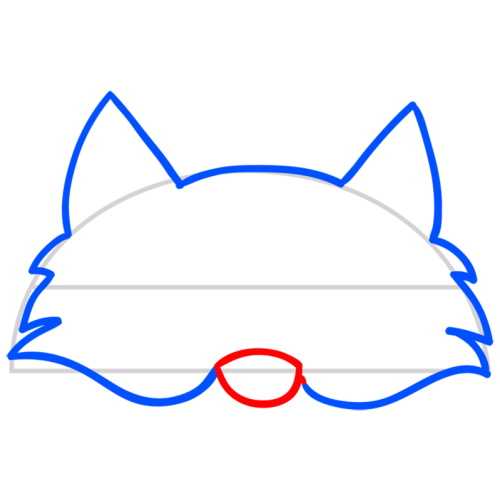
- Decide on the overall composition of the image. Schematically depict the general contours of the fox's head. Prepare the basis for subsequent detailed drawing.
- Draw an oval at the top of the sheet, which will be the basis for the fox's muzzle. It is important to create the correct size of the oval so that it matches the proportions of the mask.
- Add bangs to the left of the oval. They should be long enough and curved.
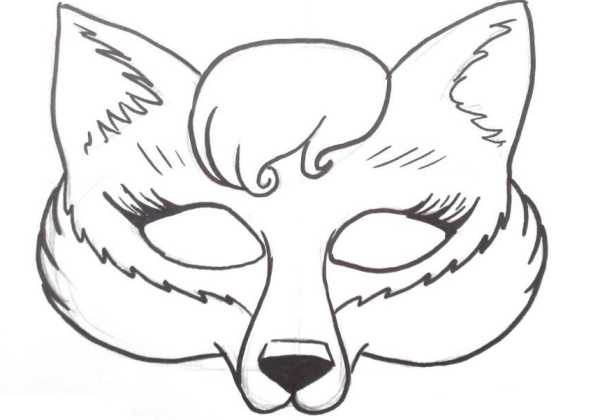
- The fox's eyes should be bright and expressive. Start with small circles in the center of the oval. Pay attention to the shape and location of the eyes.
- Draw thin lines from the outer corner of the eye down to the bangs. The eyelashes should be long and thick, which will add realism to the mask.
- Start drawing the nose, located below the eyes. It should be thin and slightly curved.
- Add cheeks to give the mask volume. They should be round and slightly raised, which will create the impression of a cute and friendly expression.
- Draw eyebrows above the eyes. They should be thin and curved, in keeping with the fox's appearance.
- Place the ears on top and back of the head. They should be small and have a characteristic rounded tip.
- Remove unnecessary or untidy lines. Make sure that all elements of the mask correspond to the intended image.
 |  |
 |  |
 |  |
 |  |
 | 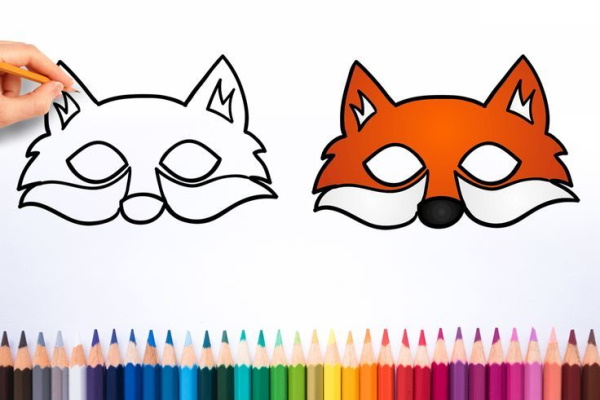 |
- Trace all the contours of the mask with a pencil.
- You can paint the mask using red, orange, and yellow shades.
In ancient Greek style
You can draw an ancient Greek theatrical mask using the following steps:
- Draw a simple outline of the face on paper, avoiding too detailed lines and shapes.
- Draw an oval shape for the head. It should be symmetrical and proportional.
- Draw the hair using wavy lines coming from the outline of the head and going down to the shoulders or neck. This will create the effect of curls.
- Place the eyes in the center of the face, creating an almond or ellipse shape. Emphasize the expressiveness of the eyes by drawing a thick line around the eyes. Add pupils for volume.
- The mouth should be slightly smaller than the middle part of the face. Draw the lips, giving them a natural shape. The corners of the mouth can be slightly down.
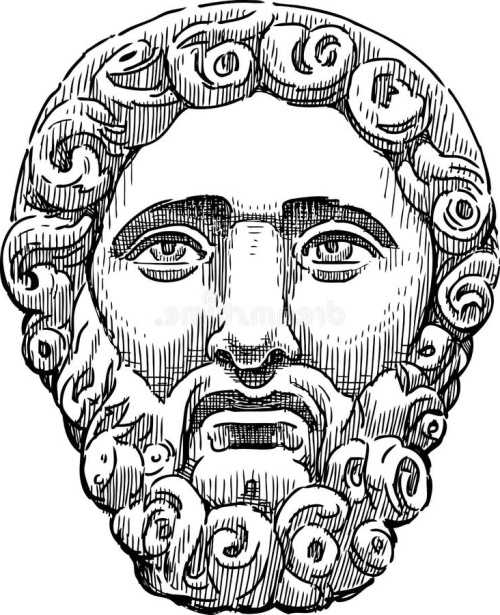
- Add a nose between the eyes. The shape of the nose can be straight or slightly curved. Consider the proportions relative to the entire face.
- Draw the cheeks slightly raised towards the temples. This will give the face a classic Greek look.
- Eyebrows should be thin and arched. They are located above the eyes and have an arch shape.
- Add a beard, draw it under the chin. Use wavy lines to create the effect of curls.
- Check if there are any extra lines. If there are, delete them to make the mask look clearer.
- Outline all the contours of the mask, making them more visible.
- You can start coloring. Choose colors that match the Greek style, such as dark brown and beige shades for hair and skin, and dark colors for eyes and eyebrows.
Japanese
This master class is just one of the possible options for drawing a Japanese mask.
You can use the guidelines as a starting point for creativity, making changes and additions to the process.
- Start by sketching the main features of the face, using light lines to define the general shape of the mask. This will help determine the size and placement of facial features. Use a soft graphite pencil to make the sketch easy to adjust and erase.
- Using curved lines, draw an oval face with slightly elongated features in the vertical plane. This will give the mask a more expressive look. Avoid angular lines when creating an oval face;
- Draw 2 large eyes. Their outer corners should be directed upwards, and the inner ones should be directed downwards. The line of the eyes should start at the bottom of the nose and end just above the ears.
- The mouth should be small but clearly defined. Place it under the nose and draw a mouth line with a bend in the middle. The bend of the mouth should be directed downwards, which gives the face a thoughtful expression.
- Draw the nose. It should have a narrow shape with a small hump on the bridge of the nose. The nose is placed approximately in the middle between the line of the eyes and the chin.
- The shape of the eyebrows should be wide and slightly arched. The outer edges should be slightly raised. Place the eyebrows above the eyes so that they slightly overlap their outer corners. Emphasize the arch of the eyebrow for expressiveness. Make the lines of the eyebrows smooth and continuous.
- Place the ears high on the head, closer to the crown, and draw them small, rounded and slightly tilted forward.
- To draw the beard, draw a few short lines coming from the chin of the mask. They should be directed downwards and slightly curved inwards. This will help give the beard volume and realism.
- Draw a mustache that will start from the corners of the mask's lips and go down. Draw a line that will connect the corners of the lips, add additional short lines going down from this line. To make the mustache more expressive, you can add some curves and shadows.

- Delete excess and unnecessary lines. Make sure that only those lines remain that are necessary to create the image.
- Outline all the contours of the mask using black or dark gray. This will help highlight the main details and make them more visible.
- You can color the mask. Use dark and rich colors for the hair and beard, and light shades for the skin. Avoid too bright and unnatural colors so that the mask looks as realistic as possible.
Tips for Beginners
The mask must be carefully thought out and drawn.
Here are some recommendations that will help you create a beautiful and expressive drawing:
| Stages | Comments and recommendations |
| Defining the shape of the mask | The first step is to choose the shape of the mask. They can have different shapes: oval, triangular, etc. You can choose a shape that matches the creative idea or the character. Choose a style that matches the character and add emotional details such as eyebrows, wrinkles or folds in the fabric to convey the mood and emotions. |
| Creating a contour | Always start with a sketch when drawing. Use a pencil to create the basic lines and shapes. Experiment and add your own elements to make the mask unique. |
| Detailing | Add facial features such as eyes, nose and other details that make the mask recognizable. Use soft strokes to create smooth transitions between lines. |
| Shadows and volume | To make the mask look realistic, add shadows and volume. This can be done with crosshatching and darker lines on the tips of the nose, chin and other protruding parts of the mask. |
| Finishing touches | Add finishing touches such as highlights, reflections and texture. These small details will make the mask more expressive and alive. |
| Colour and design | For added visual impact, you can use colored pencils or markers to color the mask. You can also use graphic effects such as hatching, crosses, or dots to give the mask a unique look. |
Painting a mask is a painstaking process that requires attention to detail and an understanding of the symbolism it carries.
The result is a unique and memorable piece of art that conveys the atmosphere of a theatrical performance and allows the viewer to become more deeply immersed in the plot.
Video about drawing
Theatrical mask - drawing: