If somewhere there is an impressive box with movies and music on CDs that hardly anyone will ever listen to or watch, then there is no need to rush to get rid of it. On the contrary, old disks will serve you well, because you can make a variety of DIY crafts from disks from them.
Home Decorations from Discs
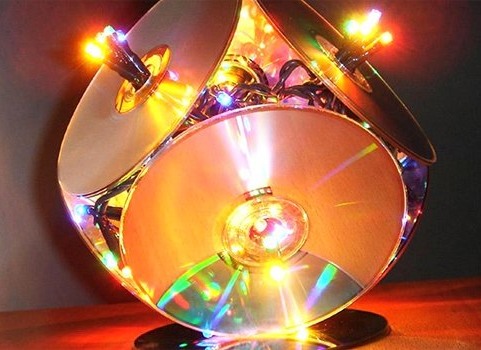
You can make creative interior decorations from disks. For example, a lamp.
For this you will need:
- disks;
- fluorescent lamp;
- lamp starter;
- 2 pieces of plywood, larger than the disk.
Progress of work:
- Glue together pieces of plywood with a diameter of 180 mm with a recess in the middle for the starter. Inside the recess, glue insulating material and three holes for the limiting posts.
- Drill the middle layer outward, release the power supply and the switch of the lamp.
- Using shoe nails, install a toggle switch on the middle layer.
- Drill three 10mm deep holes for the limiting posts in one piece of plywood. Insert the posts into the base of the disc.
- Insert the fluorescent lamp into the base, connect it to the switch, and string the disks on.
- After the lamp is completely hidden under the disks, insert the cover. The lamp is ready for use.
A DIY craft made from disks in the form of a chandelier will also be original.
For this you will need:
- 12 discs with double mirror layer;
- screwdriver;
- drill with a diameter of 2-3 cm;
- nippers;
- pliers;
- matches;
- thin wire or paper clips;
- light bulb with socket and switch.
Important! For work, you need discs with a double mirror layer, as they allow you to get an unusual visual effect, in which the light is decomposed into a spectrum. If you do not have such discs, you can glue two discs together. Then you need not 12, but 24 cd.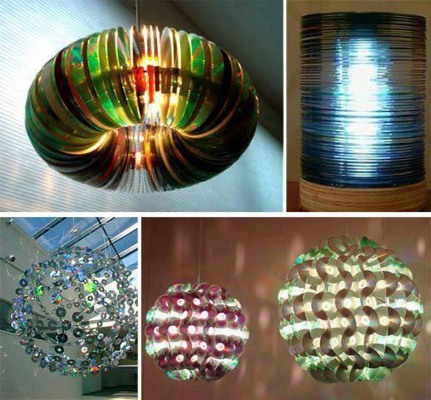
Step-by-step instructions for making a chandelier from CDs:
- Make a stencil. To do this, use a conveyor to divide it into 72-degree sectors each. Then step back 5 mm from the edge and drill 5 holes.
- Place the disks in a stack, place the template on top and drill the disks. Insert a match into each drilled hole. This is necessary to prevent the disks from moving while drilling.
- Install a lamp holder into the first disk.
- Using pliers and nippers, prepare 30 “U”-shaped fastening staples from paper clips, sized 6-8 mm – 10 mm – 6-8 mm.
- Assemble the lamp. To do this, insert the brackets into the holes and bend them inward with pliers. Do not tighten the brackets too tightly, as the disks should be freely held on the brackets.
- After the first 5 disks are installed, insert the light bulb into the socket. Its power should not exceed 25 watts.
- Secure the remaining disks and hang the lamp in the desired location.
Original hot stand
The Internet and offline stores are overflowing with all kinds of hot pads. Such pads will come in handy not only at home while watching your favorite movie, but also at work. And it is not necessary to buy a ready-made product, because it is easy and quick to make with your own hands.
To do this you will need:
- 2 discs;
- a small sheet of corrugated cardboard;
- glue;
- scissors;
- file;
- press;
- putty;
- skin;
- napkins with interesting designs;
- acrylic varnish and paint.
Progress of work:
- Trace the disk onto cardboard and cut out the circle.
- Insert cardboard between the disks and glue them together.
- Place the resulting blank into a file and place it under a press for 2-3 hours.
- After the glue has dried, coat the edges and the middle of the workpiece with putty.
- Treat the surface of the sandpaper after the putty has dried and apply paint in two layers. Be sure to dry the surface of the product before applying the second layer.
- Glue the napkins to both sides of the workpiece with PVA glue.
- Cut off excess napkins using sandpaper.
- Paint the ends of the product with paint to match the color of the drawing on the napkin and varnish the finished product. After the coating has completely dried, the stand is ready for use.
Candlestick from CD
A candlestick made with your own hands will allow you to create a romantic atmosphere in the room. Such decoration can be decorated to your taste. In the version below, small sea stones and shells were used.
Before you start working, you need to stock up on:
- instant or hot glue;
- 1 handful of decorative stones and shells;
- acrylic paints or varnish;
- a small round candle in a metal candlestick.
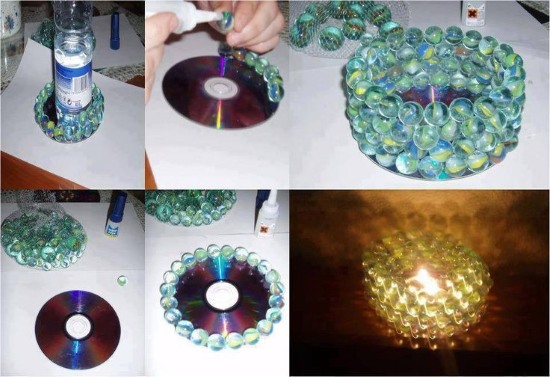
Step-by-step instructions for operation:
- Place a candle in the center of the disk on the desired side and trace around it with a marker.
- Using glue, stick on the pebbles and shells. It is important not to violate the border of the outlined circle.
- Cover the surface of the pebbles and shells with acrylic paints or varnish after the glue has dried.
- Place the candle in the circle previously designated for it.
Curtain made of discs
If there are not a couple of CDs, but a lot, then you can make an original curtain. Such a DIY craft from disks will look perfect at the dacha.
For curtains you will need:
- disks (the bigger the better);
- packaging of paper clips;
- thin drill;
- drill.
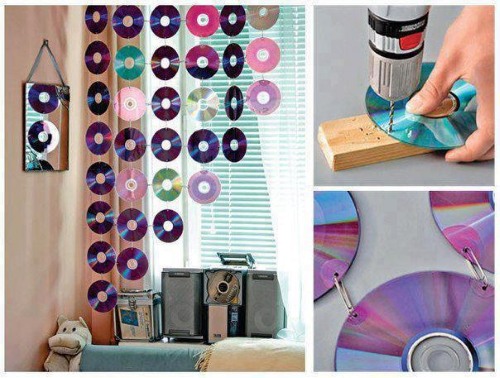
Step-by-step instructions for making a CD curtain:
- Lay out the disks in the order in which they will be located in the future curtain.
- Use a marker to mark the locations of future holes.
- Stack several discs and drill holes at the lowest speed.
- Using paper clips, connect the disks into chains by threading the paper clips through the holes you made.
- The finished chains, also using paper clips, are combined into a piece of fabric.
- Hang the finished curtain in the desired location.
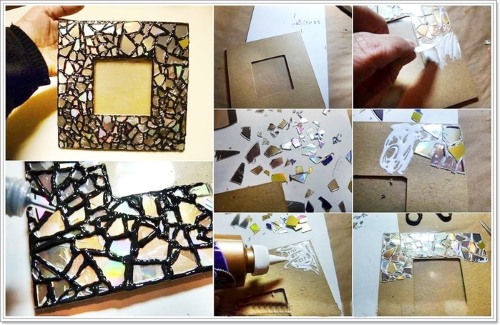
Mirror Mosaic: Crafts from Broken Discs
In DIY crafts from disks, mostly whole products are used. But if the disk breaks during the process of working on the product, do not throw it away, as it can become the basis of a wonderful mirror mosaic.
It is easy to decorate almost any interior item with disk mosaics - a photo frame, a chandelier, and even a kitchen work surface.
For the mosaic you will need:
- sketch of the drawing in 2 copies;
- disks;
- sharp scissors;
- marker;
- acetone;
- glue;
- acrylic grout.
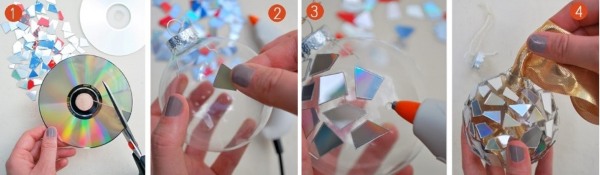
Master class on working with mosaics from CDs:
- Before starting work, you need to choose a drawing and cut it into elements. The mosaic parts in it should not be long and sharp, or rounded, since such elements are difficult to cut out of the disk and they are easy to break.
- Place the elements of the future mosaic on the disk and outline them with a marker.
- Heat up sharp scissors and cut out the elements drawn on the disks. This work should be done with gloves and glasses, as it is easy to get burns, cuts or injure your eyes with a flying piece of the cut disk.
- Erase marker marks on cut out pieces with acetone and glue them to the surface to be decorated using a large amount of glue.
- Dilute the grout and use a spatula or a piece of thick cardboard to rub it into the seams.
Step by step instructions: mosaic for a flower pot
An old flower pot can be easily and quickly updated using discs.
To work you will need:
- disks;
- flower pot or similar container;
- glue;
- scissors;
- acrylic paints.
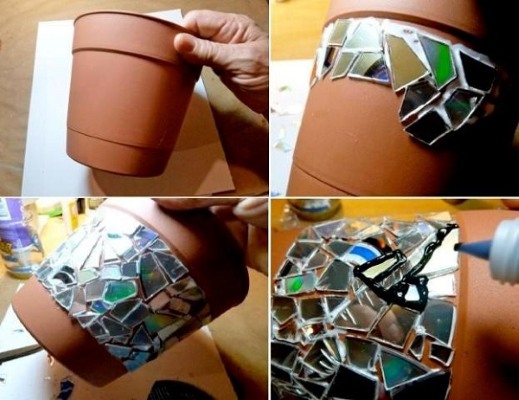
When decorating a pot with mosaics, you can use either the technique discussed above or the one suggested below. In both cases, it is important to protect your hands and eyes before working.
Sequence of actions:
- Cut discs into arbitrary sizes and shapes.
- Apply glue to the pot and glue the elements of the future mosaic. After the mosaic is ready, you need to leave the pot for a couple of hours so that the glue dries.
- Using a thin brush, apply paint between the cracks in the mosaic and leave to dry again.
Napkin holder made from disks
A napkin holder is one of the wonderful DIY crafts made from discs that will allow you to decorate your kitchen.
For the product you will need:
- disks;
- stationery knife;
- metal ruler;
- acrylic varnish and paints;
- glue;
- napkins.
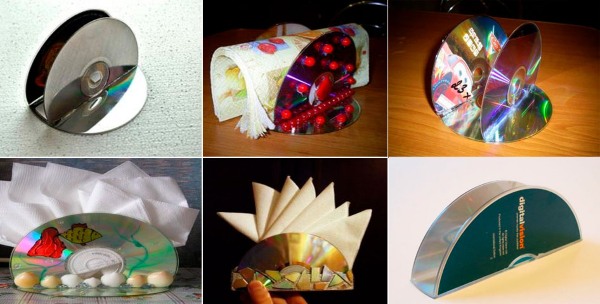
Progress of work:
- First, prepare the sides of the napkin holder. Determine the height of the future napkin holder, apply a ruler to the excess part, it will need to be cut off. Run a knife along the ruler several times and, when the cut on the disk becomes deeper, break it. Cut off the excess part on the 2nd disk in the same way.
- Take two circles, larger in diameter than the middle of the disks, and glue them on the side that will be the back.
- On the 3rd disc, mark the width of the napkin holder and cut off the edges.
- Glue the napkins onto the disks and cut off the excess from the edges. After the glue dries, you need to cover the elements of the product with varnish.
- Assemble the napkin holder - insert the first 2 disks along the edges of the 3rd. To do this, make cuts on the 3rd disk with a hot knife, nail or jigsaw. It is important to protect your face, hands and work surface before work.
Pen and pencil holder
Such a simple craft will definitely be useful around the house.
For this you will need:
- 9 discs;
- 4 long bolts;
- 4 nuts;
- thick cardboard;
- glue;
- compass;
- plastic bottle.
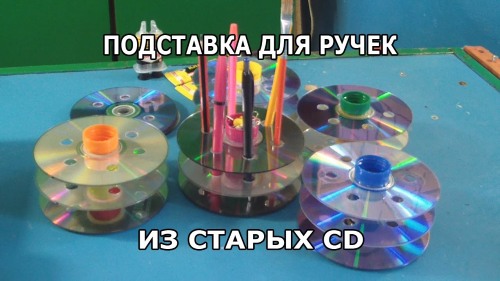
Sequence of work:
- Trace the disk onto cardboard, cut it out and glue it onto the disk.
- On the remaining disks, use a compass to draw a circle of the same diameter. Cut this circle out of the disk using a hot nail or another method. It is important to protect your hands and face.
- Place the disks on top of each other and drill holes for the bolt and nuts. Fasten the disks.
- Cut a sheet out of a plastic bottle to fit inside the stand and insert it.
Photo frame from disk
A photo frame is a great original craft for beginners.
Before you start working, you need to prepare:
- disk;
- photo;
- glue or double-sided tape;
- beads, beads or ribbon;
- a thick needle or mini drill;
- threads;
- suction cup.
Progress of work:
- First, place the disc on the back of the photo and trace a circle, then cut out the photo in a circle.
- Using a heated thick needle or mini drill, drill a hole.
- String beads and beads of your choice onto a thread. Fold the resulting decoration in half and insert the suction cup into the resulting loop.
- Glue the decoration to the disk on one side and the photo on the other.
The photo frame is ready, all that remains is to find a place for it in the interior.
Pincushion from CD disks
All the DIY crafts reviewed use large disks. The exception is the pincushion, as it is made from a small disk.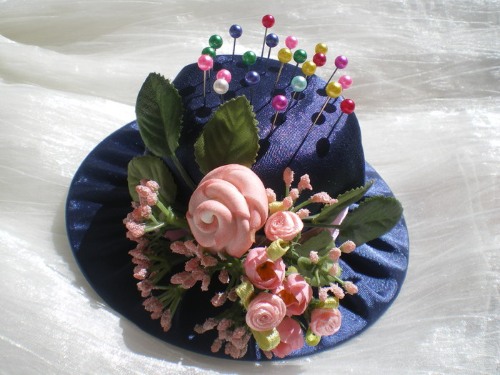
To work you need to take:
- small disk;
- velvet;
- ribbons;
- needle and thread;
- glue;
- compass;
- filler - cotton wool or synthetic padding.
Sequence of actions:
- Twist roses from ribbons for decoration and cut out leaves from fabric.
- Trace the disk onto the velvet and cut out with a 6-7 cm allowance. Sew the edge.
- Place some padding polyester under the stitched edge and sew up the hole.
- Using a compass, draw a circle on the fabric with a smaller diameter and a 5 cm seam allowance. Cut out the circle, sew along the edge, fill with padding polyester, tighten and sew up the opening.
- Glue or sew the parts together.
- Cut out the ribbon, burn the edges, wrap it around the seam, tie it in a knot, and glue the edges of the ribbon to the brim of the hat. Glue roses and leaves to the ribbon.
Clock from an old computer disk
Many women dream of decorating their home with a unique and useful thing. If you have an old clock with a working mechanism at home, you can make an interesting decoration for the kitchen or room.
The following will be useful for this work:
- 2 discs;
- thick cardboard;
- working mechanism with arrows;
- glue;
- colored velvet paper;
- ready-made figures;
- battery.
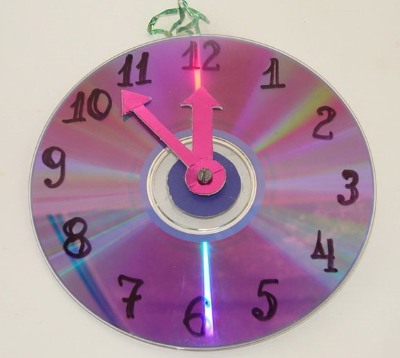
Step-by-step instructions for making a watch:
- Trace the disk along with the hole onto cardboard and colored paper of the desired color, then cut out the circles.
- Glue the circles together: cardboard + disc + cardboard + disc.
- After the glue dries, use double-sided tape to stick colored paper to the cardboard, and numbers on top of the paper. These can be either printed numbers or hand-made ones.
- Install the mechanism through the hole on one side and attach the hands on the other. Insert the battery.
This battery-free clock can be used to teach children the time.
Crafts from disks for children in kindergarten
Often in kindergarten they give the task of making all sorts of crafts with their own hands. One of these can be a picture on a disk, drawn with figures from plasticine. Such a composition is not only beautiful, but also useful, as it develops fine motor skills of the hands.
For the painting you will need:
- disk;
- plasticine;
- scotch;
- cardboard;
- scissors;
- rope or magnet.
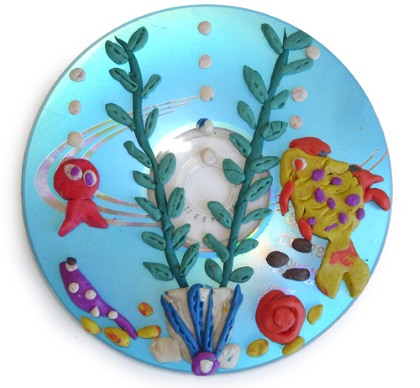
Sequence of work:
- Cut out a circle of cardboard and stick it to the back of the disk with double-sided tape.
- Before you start sculpting a picture, you need to choose a subject. The picture described in the master class is a landscape after rain. First, you need to take a piece of blue plasticine, heat it up and spread it evenly over the surface of the disk.
- Draw a horizon line in the lower third of the blue background.
- Roll 7 strips of red, orange, yellow, green, blue, blue and purple colors and stick them to each other, then fold them into an arc.
- Make a sun with rays and two clouds.
- Make an uneven semicircle out of green plasticine and stick it to the lower third of the disk - this is grass.
- Stick a rainbow above the grass, and above the rainbow, a sun with rays and a cloud.
- Glue a magnet or rope to the back side with double-sided tape.
Master class with children: fish from a CD
A hand-made fish will be a great decoration for a child's room or a gift, as you can write wishes on the back.
Materials required:
- disk;
- glue;
- plasticine or velvet paper;
- colored cardboard;
- scissors;
- a simple pencil and an eraser;
- felt-tip pens or colored markers.
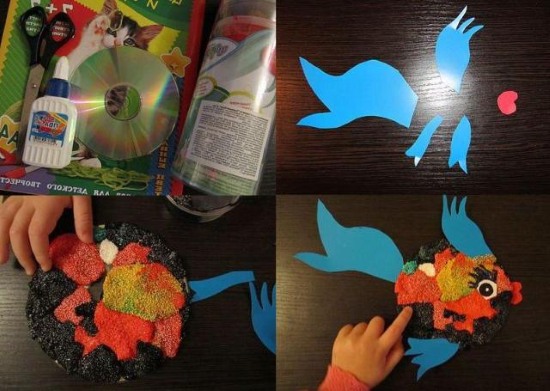
Progress of work:
- First, you should draw a fish and some seaweed of different lengths with a simple pencil. In order for the future product to look harmonious on the disk, it is better to draw a fish on a larger area of the disk.
- Trace the outline of the disk twice onto light blue or blue cardboard and cut it out.
- Glue the cut out circle onto the shiny side of the disc, and the fish and seaweed on top.
- Colour the fish and seaweed with pieces of plasticine, pressing it into the drawing.
- Another option for decorating a fish is velvet paper. In this case, draw a fish on thick cardboard, carefully cut it into parts - head, body and fins. Trace each part on multi-colored velvet paper and glue it to the disk. Trace the seaweed on green paper, cut it out and glue it under the fish.
- Glue the second cut out circle to the back side and write your wishes with markers.
Animals from disks with your own hands
Children love animals, if you want to spend time creatively with your baby, but there are no interesting ideas, try making an animal from a disk. It is easy and fast, and the finished product can be glued to the refrigerator with a magnet.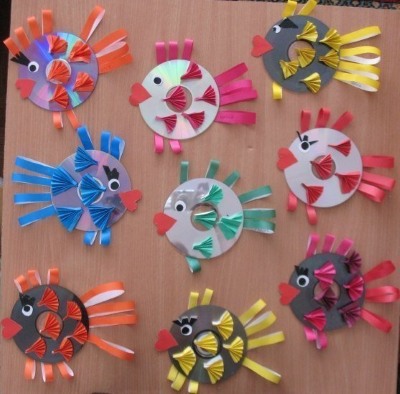
First, prepare:
- 2 discs;
- colored paper;
- magnet;
- glue;
- paints or marker.
Sequence of actions:
- Draw a sheep's head and two paws on black paper. Draw eyes on the head - 2 white circles with pupils.
- Trace the disk on white paper, cut out a circle and glue it to the disk. Draw curls on it like on a lamb's wool.
- Glue the head in the middle, and the paws and magnet on the back.
A ladybug is another interesting craft that a child will find very interesting to make.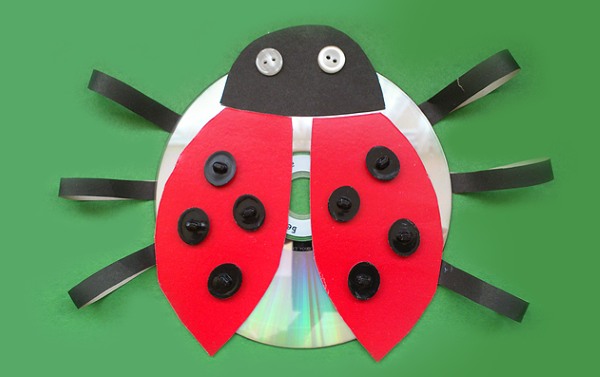
You will need the same tools for it as for the sheep.
Execution:
- Trace the outline of the disk twice - on black and white paper and cut it out.
- Glue the black paper onto the disc.
- Cut the red circle into two equal parts, glue it to the black one in the shape of open wings, leaving 2-3 cm from the edge of the disk.
- Cut out 10-12 identical circles from black paper and symmetrically glue 5-6 pieces onto each wing.
- Draw eyes on the edge. They can also be made from paper - glue two black circles, smaller in diameter, onto two white circles.
Crafts from disks for the garden and vegetable garden
Crafts from disks will be a great decoration for your garden and vegetable garden. If you have time and the necessary materials, you can make interesting items with your own hands. And these will not be just trinkets, but practical things. For example, a scarecrow in the form of an owl will help keep the harvest intact.
For this you will need:
- disks;
- foil;
- colored paper;
- scissors;
- glue;
- marker;
- stick.
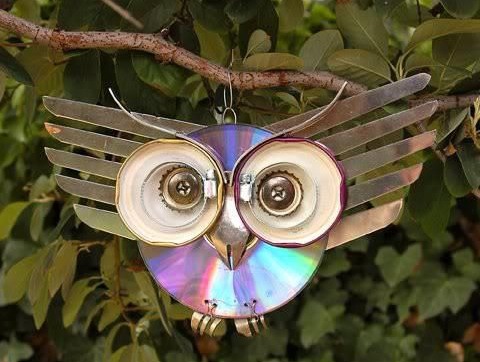
Progress of work:
- Cut the edges of 4 discs into fringe.
- On a new disc, cut out the eyebrows, beak and ears of the owl.
- Glue 2 disks with fringe together, placing one on top of the other. This is the owl's head.
- Cut out 2 identical circles from colored paper, draw pupils on them and glue them to the head.
- Glue the other 2 discs with fringe to the head. The finished owl can be glued or hung on a tree.
What else can be made from computer disks
A wonderful box made of discs will help you carefully store little things or jewelry dear to your heart - rings, earrings or chains.
For the product you will need:
- disks (4 pcs);
- pencil;
- ruler;
- cardboard;
- scissors;
- threads;
- needle;
- textile.
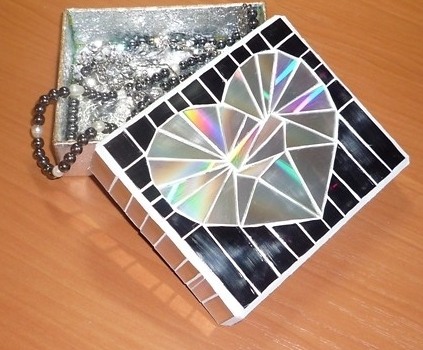
Step-by-step instructions for making a box from CDs:
- Cut a circle out of the fabric with a 2 cm allowance, on which you need to make cuts.
- Apply glue to the allowance and glue it to the disk. Do the same with the remaining disks.
- Place 2 discs together with the fabric facing out and sew or glue them together.
- Cut a wide strip of cardboard 8-10 cm long + 2 cm for seam allowance.
- Cut the seam allowance into triangles.
- Cut a strip of fabric twice as wide as the cardboard strip. Glue the fabric to the cardboard, ignoring the seam allowance.
- Grease the allowance with glue and stick it to the disk. In order to hide the allowance, you can insert another disk inside.
- Decorate the lid to your taste and place on top.
Drawing on CDs
The disk can become a canvas for various drawings. For example, stained glass painting.
Before work you need to prepare:
- disk;
- brush;
- toothpick;
- black acrylic paint;
- silver or white outline.
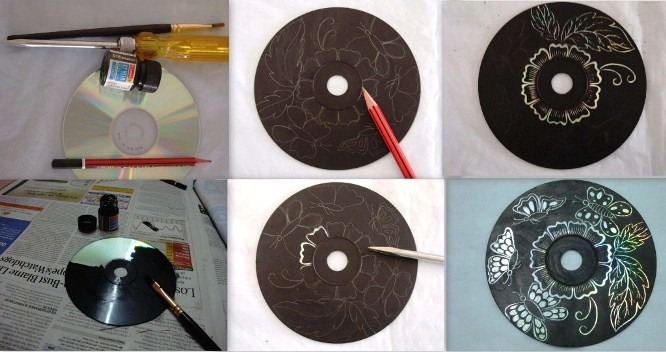
Sequence of actions:
- Paint the disc with black acrylic paint.
- Apply a pattern to the disc and then remove the paint with a toothpick.
- Add dots along the edges of the pattern using the outline.
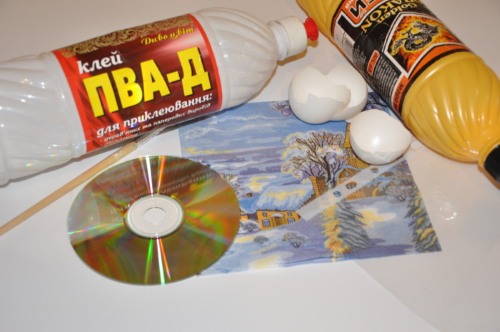
Decoupage of CD-disks
A disc decorated using decoupage technique can become a decoration in any interior.
To work you will need:
- disk;
- paints;
- sponge;
- PVA glue;
- brush;
- a piece of cardboard;
- water;
- alcohol;
- napkins with interesting patterns;
- cord or magnet.
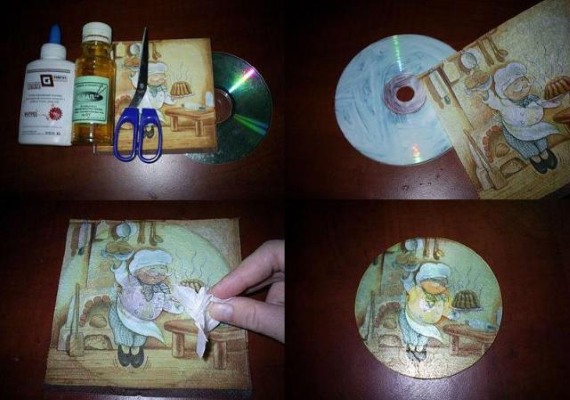
Crafts from disks are easy to make using decoupage technique.
The process of working with a disk in decoupage technique for beginners:
- Cut a circle out of cardboard of the same diameter as the disk.
- Treat the surface of the disc with alcohol and stick the circle onto the disc.
- Wet the napkin, leave it aside to let the excess moisture drain, and then place it on the disk. Go over the napkin with PVA glue.
- Glue a cord or magnet to the back side. The decoupage painting is ready.
Crafts from disks are a way to give a second life to unnecessary things and create an exclusive thing with your own hands. The master classes reviewed do not take much time and consist of simple materials that are easy to purchase.
Video: Crafts from disks
Interesting crafts from disks in the video:
Lots of options for crafts from disks in the video: