A girl with long hair is a good idea to start learning the skill of drawing in children. It is a great idea for decorating a personal diary and instilling a love for art in children. The drawing can be depicted in different styles, but the easiest for children are cartoon, anime and minimalism.
What you need for drawing
For drawing with children, it is better to use regular album sheets or office sheets - A4 format. For such drawings, you will need simple pencils, a sharpener, an eraser and office paper.
For drawing contours, it is better to work with a simple pencil of a well-known brand. This can be artistic pencils of the Koh-i-Noor, Faber-Castell, Stabilo, Action or other similar brands. For a child, it is better to choose small pencils.
How to draw a girl with long hair with a pencil
Drawing that can be done in cartoon style is not a difficult job, although it may seem so. Cartoon style is a simple and interesting way to draw a beautiful drawing.
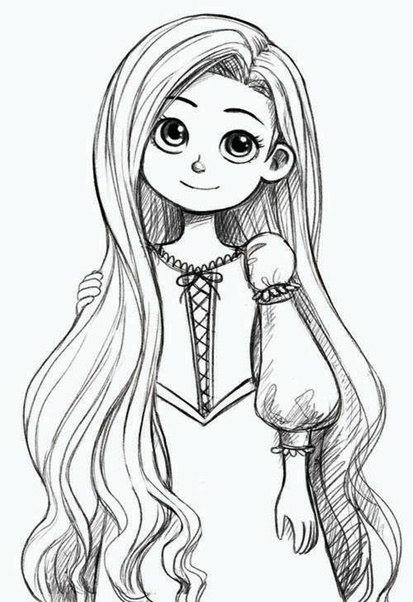
A girl with long hair is drawn step by step as follows:
- First, you need to draw a circle for the future oval of the face.
- Next, you need to make a division of the face. Draw a vertical axis of symmetry with the hero's face tilted to the left.
- Draw a horizontal axis in the center of the circle, this axis is intended for future marking of the eyes. Draw the marking of the ears, approximately in the middle of the head.
- In the jaw area, lengthen the circle a little so that the shape resembles a rounded square.
- From the oval of the face, draw a long vertical axis without tilt; this axis is intended for the symmetry of the future body markings.
- Having measured a quarter of the face oval, start drawing the hair. Having marked the parting, start by drawing smooth wavy lines, placing the hair on the face. It is better to start drawing the hair without touching individual strands, limiting yourself to simple shapes before starting the general detailing.
- Outline the neck and shoulders. Start drawing the neck with parallel lines that create, in comparison with the oval of the face, a thin shape that arcs into the shoulder. Draw a small circle in place of the shoulder.
- Mark the location of the arms and body. The arms should be as long as two ovals of the face (start marking the length from the end of the head). Having marked the length of the arms, it is necessary to divide the marked space in half. At the half mark, also draw a small circle marking the elbow, and also at the end of the arm length, draw an oval marking the future palm. Connect these elements (the circle of the shoulder, elbow and palm) with segments.
- At the place of the future body, you need to make a mark in the form of a square, expanding towards the end.
- Moving on to the face, draw 2 circles in the center.
- Between the eyes, approximately towards the end, depict the nose as follows: draw a circle, from which, on the left side, draw a line depicting the length of the nose.
- From the end of the nose to the end of the jaw, that is, in the middle, depict a smile with an arc, at the ends of the arc add small circles hinting at a smile.
- Above the eye mark, draw two arcs – the future eyebrows.
- Start outlining the clothes. To mark the clothes, first draw the collar, then move on to drawing the sleeve, drawing it as a circle that gathers into lace at the end. From the circle, draw a continuation of the sleeve in the form of a drop, then draw the end of the sleeve. After drawing the sleeve, draw the palm. Draw the palm as follows: from the end of the sleeve, draw two lines, from the left - continue to draw the line of the thumb, from the right line, draw the curve of the fingers in an arc and connect it with the curve of the thumb. Next, divide the palm into fingers, gradually drawing them.
- Start drawing the waist line from the sleeve, at the end of the curve of the waist draw a belt in the shape of a triangle, then draw a straight line of the skirt.
- Refinement of facial features. Make the upper and lower eyelids brighter, then draw the pupils and iris of the eyes, not forgetting about the highlights. Darken the line of the eyelids gradually, preferably with soft pencils, lightly connecting the lower and upper eyelids at the outer corner of the eye. Complete the look with eyelashes. Mark the auricles on the ear. In place of the nose on the right side, draw a small arc depicting the nostril. Erase unnecessary lines.
- Refinement of hair. Draw curls falling on the face, then draw a smooth twist of curls along the length of the hair. Some curls overlap others, mark such curls as darker than the rest. At the ends of the hair, separate the curls from the total mass of hair and draw each curl separately.
- On the hair (on the left) depict the fingers of the hand as ovals, and depict the last, most visible finger as a slingshot covered by hair.
- Detailing of clothing. On the collar, depict lace with wavy lines, under the lace, repeat the curve of the collar with another arc. From the collar to the center of the belt, depict a corset, connected with threads in the shape of an "X" and tied with a bow. On the sleeves, depict lace in the same way as on the collar. Also mark the folds on the sleeves where the sleeves are pulled together.
- Shading. Shade the face where the hair falls on the face, shade the auricle, mark the tip of the nose with light shading, also shade the pupils and make a smooth transition of color on the iris of the eye. Shade the neck and hair near the neck with a soft pencil, also shade some bends in the hair and folds in the clothes.
The drawing of a girl with long hair is ready. All that remains is to correct the borders and add a background to immerse the character in some world. And to make the picture look more realistic, you can go over the borders with a black pencil, adding shadows. If desired, you can make it more interesting by coloring the clothes and irises with colored pencils.
Cartoon girl with long hair
Drawing a full-length person is a good option for developing a child's understanding of body proportions. You will need paper, a simple, well-sharpened pencil, a sharpener, and an eraser.
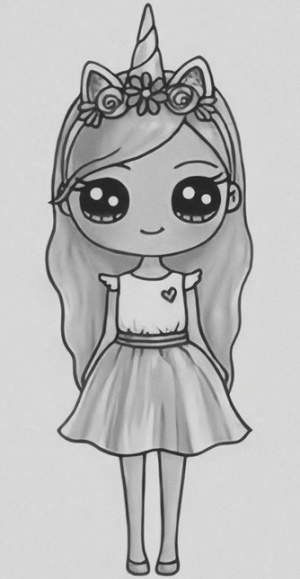
The drawing is done step by step as follows:
- First, you should depict the hairstyle. The hairstyle is depicted as follows: 2 arcs are drawn, which are connected by a joint depicting a parting.
- After the top part of the hairstyle, the hair near the face and the face itself are depicted, that is, first, the bangs are depicted, falling on the face. The bangs should look voluminous and end slightly below the supposed face. Having drawn the outline of the bangs, you should depict the face with a smooth line in the form of a semi-oval. The bangs end, curling behind the ears. Draw the ears directly at eye level.
- Face. The eyes on the face should be located in the center. The eyes are two circles. Inside the eyes, you need to leave space for highlights, and at the bottom of the eyes, leave space for the iris. You should also depict the eyelashes with lines. Above the eyes, eyebrows are depicted with thin arcs. Just below the eyes, in the center of the face, you should depict the girl's mouth. The mouth is depicted as an arc, which is slightly upturned on the right side of the face. At the ends of the mouth, use lines to clarify the shape and smile.
- In the center of the oval of the face, on the lower side, the neck is depicted, it is drawn with two parallel lines. The neck is two smooth lines that flow into the shoulders.
- The shoulders are drawn a little shorter than the oval of the face. Next, you should depict the blouse. The blouse has a collar in the form of an arc. At the ends of the shoulders, the blouse continues to the beginning of the waistband of the skirt. Depict the blouse slightly turned up at the end. On the blouse on the right side, depict a heart.
- At the ends of the sweater, depict sleeves in the form of wings.
- Skirt. First, you should draw the waistband of the skirt. The waistband of the skirt is a little narrower than the blouse, it is drawn as a rectangle. Then the skirt itself is drawn. The shape of the skirt is simple: it starts with parallel arcs, at the ends the skirt is slightly turned up, and the end of the skirt itself is drawn as a wavy line.
- Arms. The arms start from the sleeves and approximately to the end of the blouse. The arms are drawn with a straight line, then the arms rise slightly, repeating the shape of the skirt. The palms are depicted slightly hidden behind the skirt.
- The legs should not be drawn wider than the jacket. The legs are illustrated with two lines that narrow towards the beginning of the shoes, then widen again to depict the shoes. The shoes on the legs are crescent-shaped.
- The hair is depicted as a wavy line, the end of the hair is located just below the end of the arms.
- On the head there is a headband, which starts from the ears and goes to the decoration on the headband. In the center of the head there is a unicorn horn in the form of a slightly rounded triangle. Ears are drawn nearby. Flowers are drawn under the horn and ears.
- Refinement of the figure and drawing. You should go over the contours of the drawing again with a dark soft pencil so that the drawing has a clear shape. It is necessary to draw folds at the junction of the jacket and skirt. Draw a couple of lines on the iris of the eye. Draw a couple of arcs on the horn to refine the shape of the horn. Refine the belt in the same way with an arc, creating a fold.
- Shading. Shade the hair with a uniform tone, then darken the areas around the face and headband. Around the face, namely under the bangs, lightly go over the pencil to create volume for the face. Darken the neck, shoulders and legs in the same way. Shade the cheeks under the eyes with a light tone. Darken the end of the blouse a little as well. Uniformly shade the skirt with a soft pencil. Shade the eyes with a dark tone, without touching the iris and glare. Darken the edges of the horn, shade the flowers with a uniform shade. Go over the headband with light lines.
The drawing is finished. The illustration may change slightly and be colored differently later.
Girl with long hair in anime genre
Anime style drawings are the most recognizable images nowadays. Drawing a girl with long hair will always make a cute illustration for personal notes, a diary or an album. For work you will need paper, a simple, well-sharpened pencil, a sharpener and an eraser.
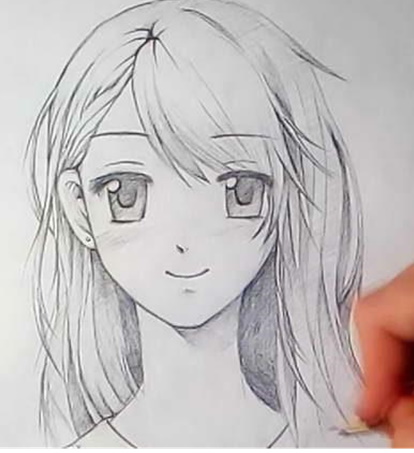
Stages of drawing step by step:
- You need to start drawing with an even circle: you can draw a circle with a compass or trace any round object.
- Draw a horizontal straight line in the center of the circle using a ruler.
- Draw a second circle on the axis so that the circle is equal to the first circle - these are the eyes.
- Mark a horizontal axis in the center of the second circle.
- Draw a vertical axis of symmetry running through the center of the two circles.
- Drawing the oval of the face. From the junction of the contour of the first and second circles, begin to narrow the face, depicting the jaw.
- The upper eyelid is depicted at the intersection of the circles. It is necessary to draw a horizontal line at this place and mark on the axis the place for the eyes between the axis of the eyes and the middle of the first circle. The upper eyelid is drawn with an arc. The lower eyelid, on the center line of the first circle, is also drawn with an arc. The upper eyelid should be thicker than the lower one. Above the eyes, depict the eyebrows with thin lines. In the center of the eyes, depict the pupils and large highlights.
- The character's nose should be positioned in the center of the face in the form of a comma, representing the tip of the nose.
- The mouth is drawn with the same thin arc, depicting a smile. At the ends of the smile, you can depict the end of the mouth with dots.
- Draw the character's shoulders and neck, but not too broadly, using simple, thin lines.
- Erase the marking lines on the face.
- The hairstyle should be depicted in a small dynamic, that is, some strands should flutter a little in the wind. You should not overdo it with the number of strands, since the hair has a common volume.
- The pencil is used to softly mark the precise facial features, hair contour, eyebrows and eyelash line.
- The pupils should be shaded, the eyes should be shaded lighter than the pupils, without touching the highlights. The neck and hair located near the neck should be shaded. The ends of the hair should also be slightly darkened.
Girl with long hair, anime style drawing - quite simple and modern drawing. It is suitable for drawing at any age and will appeal to both boys and girls.
Full Length Chibi Braided Girl
A girl with long hair, whose drawing can be done in different styles, is a great option for decorating the pages of a personal diary. The chibi style is an easy way to depict any character. It is easy to do and does not require good artistic training. For work, you will need office paper, an HB pencil (or softer), a sharpener and an eraser.
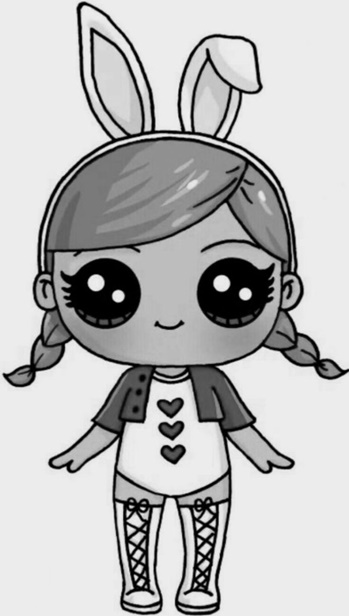
The stages of drawing are as follows:
- First, you should depict the hairstyle. The hairstyle is depicted as one solid arc, and the future headband is immediately marked on it with the same arc.
- After the top part of the hairstyle, the hair near the face and the face itself are depicted, that is, first the bangs falling on the face are depicted. The bangs should look voluminous and end slightly below the supposed face. Having drawn the outline of the bangs, you should depict the oval of the face with a smooth line so that the chin is depicted with a straight line. In the center of the face are the ears, which must be specified with two arcs. From the ears, elements of braids in the form of leaves are depicted, that is, tapering towards the end. Such elements must be depicted twice. At the ends, it is necessary to depict a smaller element of leaves.
- Face. The eyes on the face should be located in the center. The eyes are two circles. You can leave space inside the eyes for highlights. You should also depict thick eyelashes with three lines. Be sure to immediately draw highlights and the iris in the eyes. Above the eyes, eyebrows are depicted in thin arcs, which are partly located under the bangs. Under the eyes in the center of the face, you should depict the girl's mouth in an arc, ending the arc with dots at the ends.
- The girl's body is depicted for marking with an oval, which will later need to be erased.
- The shoulders are drawn twice as short as the oval of the face. The shoulders start right away, passing into the arms and palms in one arc, and there is no need to draw the neck. The palms are drawn in two ovals (the outer oval is longer), then they connect with each other, passing into the body.
- The legs are drawn as parallel arcs, extending continuously from the body. The legs widen towards the end to depict boots. It is also necessary to mark the beginning of the boots on the legs, and at the end depict the sole, similar to the bend of the previously drawn foot.
- Clothes. The jacket is drawn approximately half the body and is complemented by drawing sleeves that are half the length of the arm. The sleeves of the jacket and the jacket itself should be slightly indented from the body and arms. The collar of the jacket is depicted as two arcs, the jacket also ends in an arc. Three hearts are drawn in the center of the jacket.
- Details. The headband is complemented by rabbit ears, the left one is drawn in the shape of a leaf, and the same detail is depicted inside. The right ear begins with drawing a leaf, is cut off in the middle with a straight line, and then the ear falls, covering part of the shape. The jacket is complemented with three dots on the left side. The boots are marked by an arc towards the end, from which the lacing comes out. The lacing is depicted in the form of crosses located on the markings, repeating the shape of the boots. At the end, the lacing is complemented with bows.
- Clarification of the figure and drawing. You should go over the contours of the drawing again with a dark soft pencil, color the pupils.
- Shading. The jacket is painted over completely in one color. Mark highlights on the hair, paint over in one tone. The area under the eyes is darkened to depict the cheeks. Next, the face contour, hair around the face, ears, body contour and boots are darkened. The inner contour of the ears on the headband is also painted over in one tone, darkening the edges.
The girl with braids is ready to decorate the pages of a personal diary and other albums. This drawing is easy to do and does not require much effort and materials for implementation.
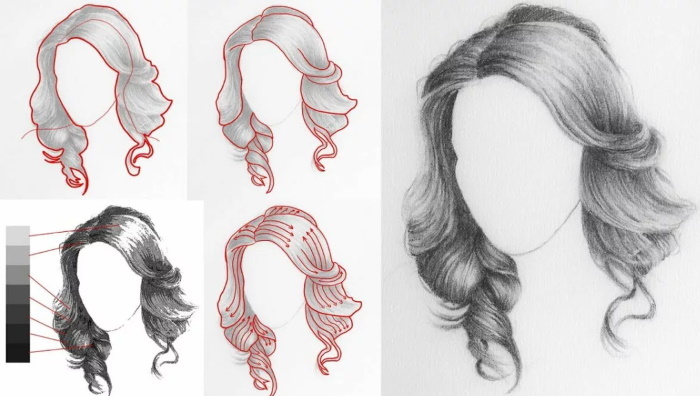
Drawing long hair naturally isn't easy, here's a step-by-step guide.
Coloring pages for copying
This picture for copying is suitable for children from 7 years old. The image does not have complex details and techniques, the figure is assembled from simple forms.

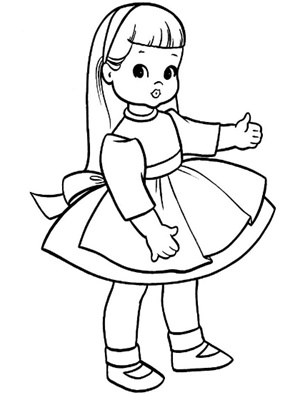
A drawing suitable for children aged 6 and up. The illustration is very simple and clear, consisting of simple shapes. Looks good both as a sketch and in color.
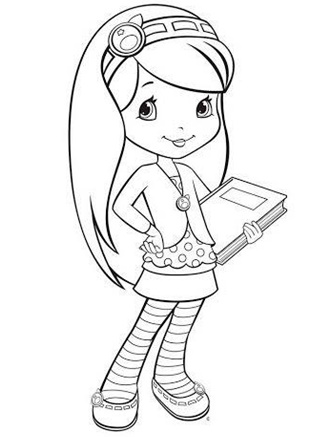
This illustration is suitable for children aged 7 and up to copy. The shapes are simple, the proportions of the face are standard. This illustration is perfect for simple decoration of a personal diary or album. It is well suited for developing fine motor skills.
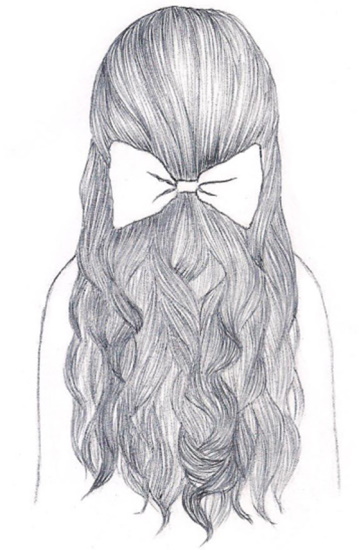
This coloring book is for a primary school child.. The girl is shown in a three-quarter position (slightly rotated). This will not add any complications, but will only change the calculation of proportions. The curls have a structure and guide lines that show the movement of the hair and its volume.

Girl with long hair from the back — a simple drawing for middle school children. There is no need to draw the facial features in detail, but there is a multi-layered composition of hair from individual locks. The emphasis is on the hair structure.
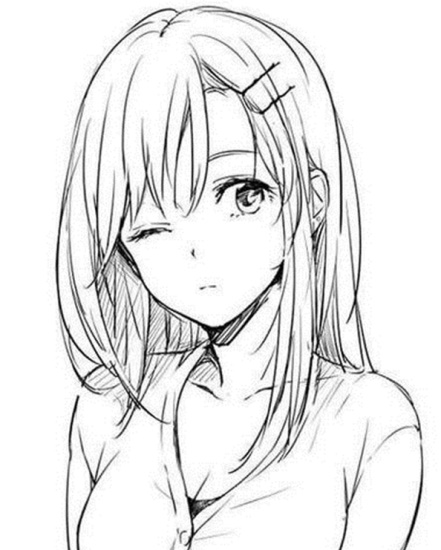
Another anime drawing, where there are large eyes with the same large highlights on them, and hair that is clearly divided into parts. This drawing is made in the style of minimalism, but it incorporates many fundamental elements for the successful practice of a child's creativity. It takes into account the anatomical features of the face, neck, shoulders, and the position of the hands.
Drawing a girl with long hair can be a fun and unusual way to get involved in both art in general and animation. The main thing in this case is not the complexity and the chosen drawing, but the child's interest in the desire to create. Because drawing is an ideal way to develop a child's imagination.