A beautiful tambour stitch is one of the ancient embroidery techniques. It is done with a needle or a hook. The universal stitch can be used to create pattern outlines or embroider pictures. Step-by-step descriptions and master classes will help beginners master the simple embroidery technique.
What materials are used in embroidery in this technique?
The tambour stitch, as a universal method of embroidery and fixing colored threads on the surface of the fabric in the form of chains, involves the use of various materials.
This could be:
- cotton fabric;
- silk fabric;
- suede and leather;
- felt wool materials;
- denim, corduroy;
- knitwear.
 The choice of threads also has no strict limitations. Their thickness and texture depend on the chosen fabric and should be in harmony with it. For example, floss gives a more voluminous effect than simple twisted yarn. For dense thick fabrics, voluminous threads are chosen, and for thin material, threads of a smaller diameter are taken.
When choosing materials and threads, you should pay attention to the following:
- The materials used should not shed. Threads should be rinsed in water before embroidery until the dye disappears. To fix the dye, they can be rinsed with a vinegar solution.
- When embroidering, it is important to consider the possibility of shrinkage of materials when wet.
- Embroidery threads must be of uniform thickness and twist.
What is a chain stitch, purpose
The chain stitch is a type of hand stitch, usually consisting of a chain of loops that emerge one from the other in succession. The name "chain stitch" comes from the large round tambour-like frame (large drum) used for embroidering carpets in the Middle East.
This type of hand stitch has several names. It is called chain stitch, spikelet stitch, butterfly stitch, tambour chain stitch. Regardless of the different names, the basis is one principle and one technique for performing the seam.
 The chain stitch has many varieties and areas of application. It is performed in the direction from top to bottom or from right to left. When working with thin fabrics, it is better to use a hoop, then it will be easier to monitor the tension of the thread.
The needles used for sewing depend on the thickness and quality of the threads. When embroidering, it is recommended to have several types of needles and use the most convenient ones.
The main areas of application of the chain stitch are presented in the table:
| Purpose of the seam | Option for performing stitches |
| Embroidery of the outline of the drawing | Laying out colored chains of loops along the designated contours. |
| Solid filling of the drawing surface | Dense filling of the pattern space with small chain stitches. |
| Making embroidery elements (flower, leaves) | The loops are scattered individually or diverge from a common base. |
| Clothing repair | Using different stitching techniques and the voluminous texture of the chain, you can decorate cuts in the fabric or sew on an applique. |
| Hemming the edge | Due to the ability of the chain stitch to easily unravel, leaving almost invisible stitches, it is used for sewing parts and hemming the edges of a product. |
The chain stitch is used to decorate different types of clothing (blouses, sundresses, dresses, coats), embroider hats, underwear, household items (tablecloths, towels, napkins, potholders).
Types of chain stitches
The shape of the chain stitch is determined by the size and width of the stitch, the thickness of the thread, and the angle of the loops.
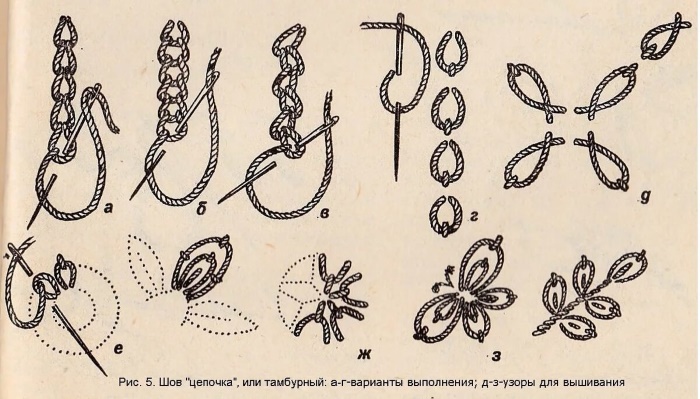
There are more than 10 varieties of chain stitches. Here are some of the main types:
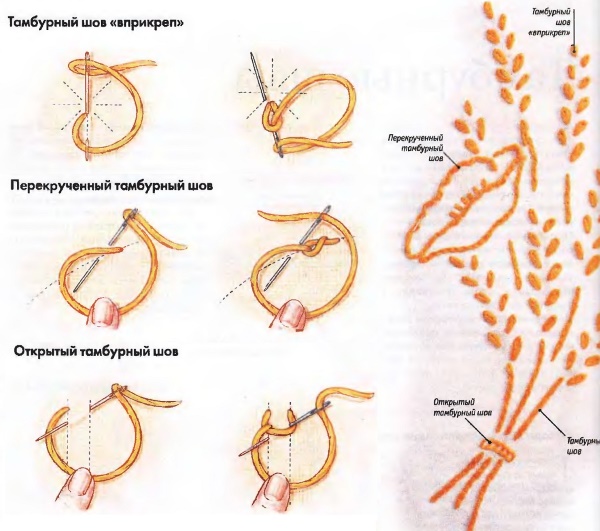
- Simple chain stitch. It is a sequence of loops, where each link has a teardrop shape and comes out of one another. This style is used for fine embroidery and for laying out elegant lines. Sewing is done in the classic way with a forward needle.
- Open chain stitch. This technique allows you to make embroidery lines up to 8 mm wide. It looks like scales going one after another. To lay this seam evenly, draw two parallel lines. Satin ribbons can be pulled between the threads of the decorative stitch.
- Twisted chain stitch. Has a narrow relief structure. Looks impressive both when done with thin threads and made with thick wool yarn. It is done by twisting the main stitch loop.
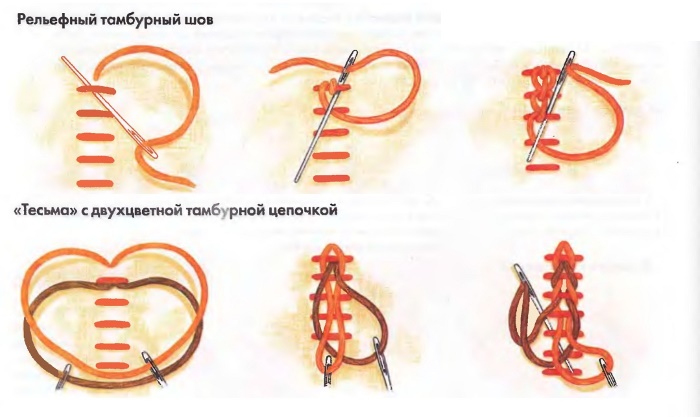
- Backed stitch or raised chain stitchThis embroidery consists of two types of stitching. First, a line of horizontal parallel stitches is laid, then a tambour chain is embroidered over them, which is created without piercing the fabric.
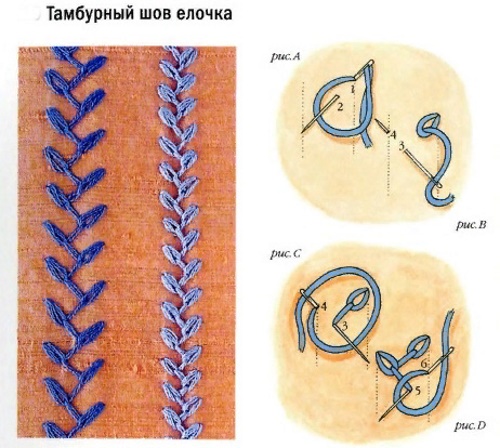
- Half-open chain stitch, which is also called "herringbone" or "twig". It has the appearance of triangular stitches arranged in a zigzag pattern.
- A variation of the semi-open chain stitch is a technique where several stitches are made to the right and left sides. This pattern is used to decorate clothing with plant ornaments.
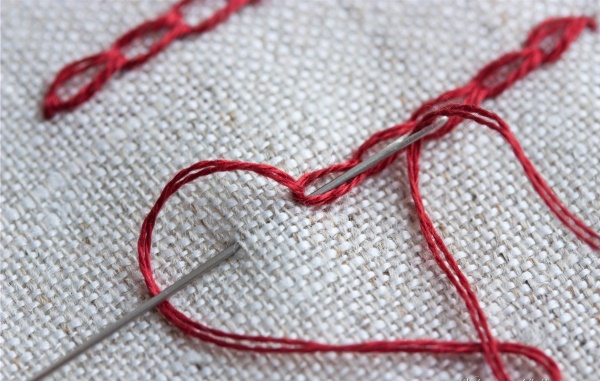
- A semi-open chain stitch that resembles a loop stitch for overcasting the edges of fabric. It is performed with the open side facing one way. If you perform 2 seams side by side in mirror image, you will get a pattern of a row of hearts.
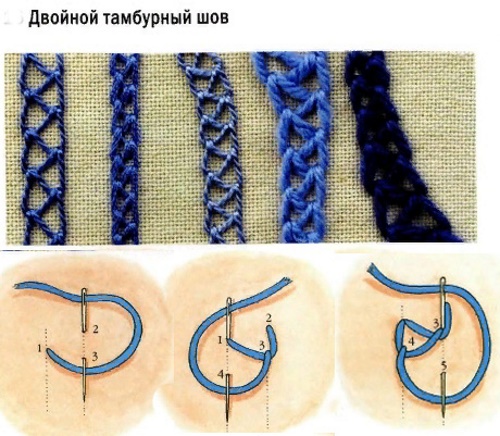
- Hungarian Chain Stitch. The voluminous double chain, made in a special way, looks very effective, which allows it to be used for decorating clothes.
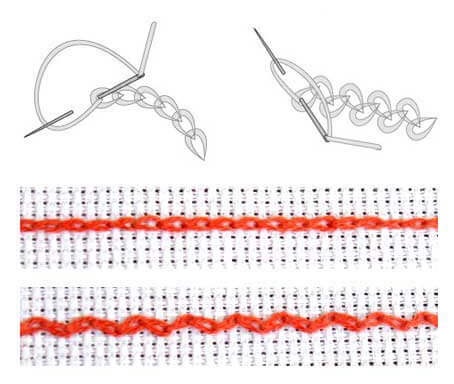
- Tambour "rope" or wrapped tambour stitch. It has a beautiful volumetric texture, so it is used to frame the contours of embroidery or applique. It is made on a stitched classic chain stitch with diagonal stitches that pass sequentially through each link.
- Chain stitch, sewn with a backstitch. This type of embroidery allows you to make a more voluminous, beautiful, even stitch. To do it, first lay a classic chain of loops, then make a back stitch in the opposite direction.
- Indian Tambour. Looks like a braided cord. It is done forward with a needle from top to bottom or from right to left. It is used for embroidering volumetric details. The loops are done in the opposite direction by passing the needle through the 2 previous links of the chain. The result is a very dense braid.
- Wide vestibule. It is also embroidered forward with a needle in a reverse chain, but the loop is pulled through the previous link in the chain.

- Checkerboard stitch. It is made with two colored threads. To create it, two threads of different colors are threaded into the needle at once. It is created using the technology of simple tambour embroidery, but each time the thread loops of different colors change places.
- Zigzag stitch. It is performed between two parallel lines. The needle is brought out alternately, first to the right side, then to the left.
- Scalloped chain stitch. It has the appearance of teeth and is used as decoration or for processing fabric edges.
- Spanish Coral Stitch or chain stitch. Looks like an openwork border. Has a complex structure and requires experience for embroidery.
Instructions on how to make a chain stitch with a needle
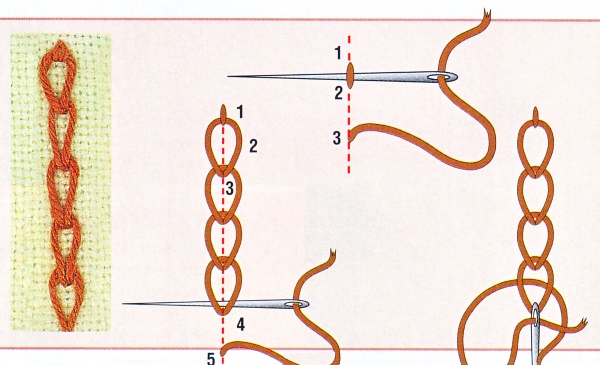
The tambour stitch with a needle can be done step by step by following the description. It is recommended to start learning by doing the classic version. The technology of all chains is based on the general principle of creating loops, but differs in the angle of the needle insertion and additional stitches.
To create a sample, it is better to use canvas, floss or thick twisted yarn.
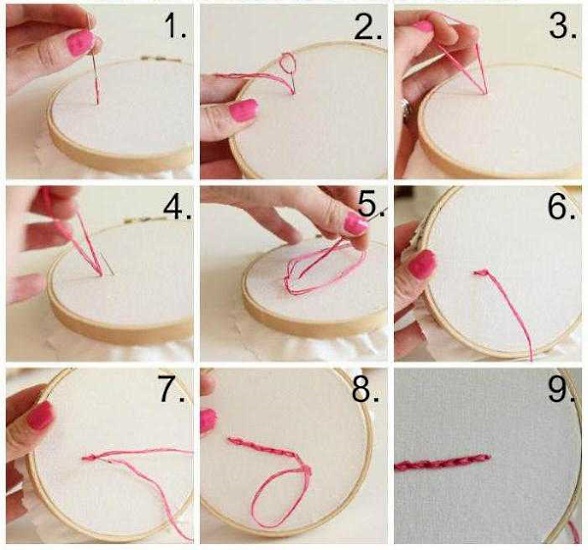
To initially secure the thread, use an invisible stitch or loop. To do this, do the following:
- The end of the double thread is tied with a small knot.
- The needle is inserted at the beginning of the seam from the front side and brought out back, in the direction of the embroidery line, through one thread.
- The needle is passed through the final loop with the knot and carefully tightened.
 To embroider the stitch you need:
- Place the fabric so that the stitch line runs from right to left or top to bottom.
- Place the loop along the sewing line, bending it from left to right or vice versa.
- Insert the needle into the place where the thread comes out, make a double puncture, bringing the needle out through 3 holes on the border in the 4th cell and pass the tip over the lying thread of the loop.
- Pull the thread tight and align the loop. Do not pull the thread too tightly, so as not to deform the pattern.
- Lay out the loop again and insert the needle from the front side, close to the previous thread exit.
- Insert the needle through the 4th hole and tighten the loop.
- Continue embroidering, following the description, until the end of the line.
- To secure the thread beautifully, take the needle out of the loop and bring it outside behind the loop rim, sticking the needle into the previous place where the thread came out. From the wrong side, secure with a knot for the nearest stitch.
 The chain stitch with a needle step by step on the canvas in the form of a wide line is performed as follows:
- First, you need to secure the thread with a small invisible stitch and bring the needle out at the same point to the front side.
- The width and length of each stitch will be equal to 4 cells.
- When working from the bottom up, you need to insert the needle strictly horizontally to the left of the place where the thread comes out into the 4th hole.
- The resulting loop must be laid out in the direction of the stitching.
- Next, you need to bring the needle out into the 4th hole, located strictly upwards horizontally from the thread exit, and pass it over the loop thread.
- Without pulling the thread too tightly, you need to insert the tip into the loop again and stick it into the 4th hole on the left.
- You can immediately make a double puncture 4 by 4.
- You need to secure it sequentially with a small stitch through the edge, first on the right side of the end loop, then on the left.
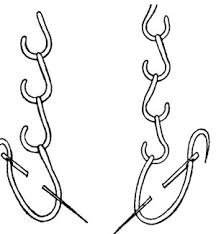 The herringbone chain stitch is made with a needle in the form of triangular stitches., located with open sides alternately to the right and left.
Step-by-step description of embroidery on canvas:
- First, you need to secure the thread with a small stitch and bring it to the front side.
- The stitch will have a width of 4 cells to the right and left. The stitch height will be 3 cells.
- To make a loop stitch, you first need to insert the needle through 3 holes into the 4th horizontally to the left.
- Next, you should lay out the loop and bring the needle back to the front side up through 2 cells into the 3rd, but not strictly vertically from the exit of the thread, but in the center of the stitch width (that is, into the 2nd hole to the left of the vertical).
- After this, you need to tighten the thread and insert the needle again, but now in a mirror image to the right.
- After finishing the line, you need to secure the edge.
- You can do openwork floral embroidery in the same way, but by laying several (2-4) triangular loops to the right and left.
 Loop chain stitch 4 by 4 squares wide. Sequence of execution:
- First, you need to bring the needle to the front side and count 4 cells horizontally and 2 cells vertically to the right. Insert the needle into the 2nd hole.
- Next, count 4 cells vertically from the beginning of the line and insert the needle into the 4th hole, passing the tip over the thread loop.
- Tighten the thread and repeat the previous steps.
- To embroider a border of hearts, you need to repeat the stitch in mirror image to the already stitched line, connecting the stitches with open edges.
Reverse chain embroidery. This technique is used in Indian Cord, Advanced Chain Stitch and Hungarian Chain Stitch.
Chain stitch with a needle step by step:
- First, you need to bring the needle to the front side, make a small stitch forward and bring the needle back a short distance in the direction of the embroidery line.
- Pull the thread through the small stitch and insert the tip into the last place where the thread comes out and bring it down in the direction of the sewing line.
- Pull the thread to form a loop.
- Repeat the sequence, constantly inserting the needle behind the base of the previous loop.
Hoop technique
A hoop is a device for stretching fabric during embroidery. They can have different shapes and sizes. There are hand-made round or oval models, or hoops on a stand. The tambour stitch, as a method of embroidery, is best laid on stretched fabric. In this case, it is easier to regulate the length of the stitches and the tension of the threads.
To secure the fabric in the hoop, you need to do the following:
- Place a larger diameter ring with the tension screw loosened in front of you.
- Place the embroidery fabric on top.
- Place the smaller ring on the fabric and press it together with the fabric into the larger ring.
- Turn the hoop over, tighten the tension screw slightly and gradually tighten the fabric. Tighten the screw again.
To embroider knitted fabric, it must be secured in a hoop together with a non-elastic lining. If you need to embroider a border along the edge, the fabric for embroidery is sewn on a sewing machine with auxiliary material and the structure is secured in a hoop.
To perform a tambour stitch with a needle, you need to learn the basic technique, a step-by-step description of which is presented in this article. Knowing the basics of embroidery, you can learn to create original interior items and decorate clothes.
Video instruction on the technique of performing the "chain stitch" stitch with a needle
Chain stitch with a needle: