Knitting technique of gloves knitting needles is simple. Beginners can use basic patterns and descriptions of product models. It is enough to select yarn, decorate gloves and a standard product will become exclusive.
Basic knitting pattern for women's gloves
Even a beginner needlewoman can knit gloves with knitting needles, the patterns of which are described in the article, it is enough to just familiarize yourself with the basic description of the manufacture of products. It is identical for all genders and ages and will differ only in size. Gloves are knitted on 5 mutually sharp knitting needles (stocking), in the direction from the wrist to the fingertips.
Various patterns are used for the accessory:
- dense;
- openwork;
- jacquard.
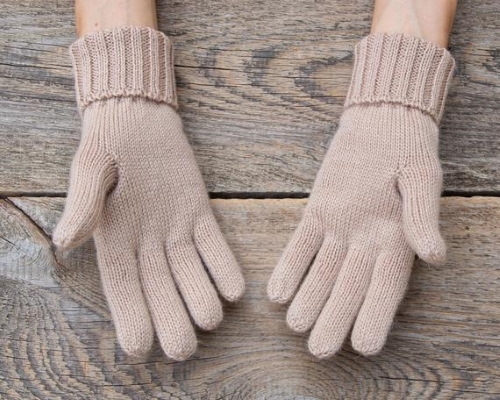
The yarn is selected:
- thin with a high wool content or completely natural (suitable for all models, regardless of age and gender);
- cotton (for women's models for special occasions);
- plush or boucle (for children's accessories).
It is not recommended to use thread with pile, as it rolls up a lot during wear.The yarn consumption for knitting a pair of gloves is 40-130 g, depending on the size and the chosen model. The work is carried out in accordance with individual measurements. If it is problematic to take measurements, you can use the standard data presented in the table.
Standard women's glove sizes and their corresponding number of loops:
| Size | 6 | 6.5 | 7 |
| OL | 17 cm | 18 cm | 19 cm |
| Number of stitches to cast on | 50 P | 52 P | 54 P |
| For the thumb wedge | 15 P | 15 P | 17 P |
| For the palm | 52 P | 54 P | 56 P |
| For the thumb | 17 P | 17 P | 19 P |
| Distance wrist-index finger | 15 cm | 15.5 cm | 15.5 cm |
| Length of thumb | 4.5 cm | 5 cm | 5 cm |
All descriptions use abbreviations:
- P – loop;
- R – row;
- LP – front loop;
- VP – air loop:
- 2V – 2 loops knitted together;
- H – yarn over;
- BP – thumb.
The number before the letter designation is the number of loops or rows that need to be completed.
Taking measurements
Gloves should fit tightly to the hand, so measurements and calculations play an important role.
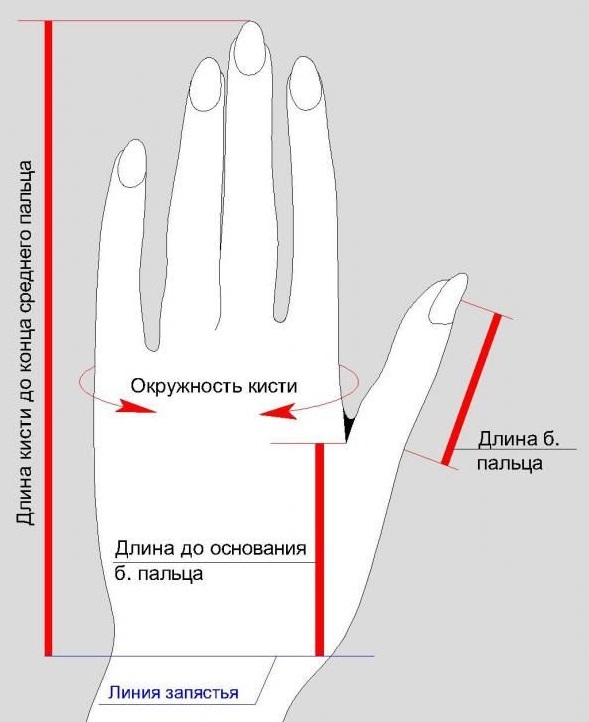
Measurements that will be required to create the accessory:
- OK (hand circumference) is measured with a tape measure in a circle, the tape is located from the beginning of the index finger, passes along the base of the little finger and reaches the starting point.
- Wrist length (WL) is measured in 3 directions: wrist-base of thumb, wrist-base of little finger and wrist-index finger.
- TTL (thumb length), distance from wrist to center of nail.
All measurement results must be recorded in order to correctly calculate the number of loops and rows for the future product.
To make calculations without errors, it is necessary:
- Knit a test sample using the pattern chosen for the gloves.
- After measuring it, calculate the density of the fabric by dividing the length of the sample in cm by the number of P used (for example, there are 2.53 P in 1 cm of knitted fabric).
- Calculate the number of P for the set: multiply the obtained work density by the OK obtained as a result of measurements (for example, 2.53 x 19 = 48.07 P).
- Reduce the result to a whole number (48 P), if the resulting figure is not a multiple of 4 (the number of needles on which they will be cast on), reduce it. In this case - 12 P on each needle.
Beginning of knitting
First of all, you need to knit the cuff of the product:
- It is necessary to cast on P on the knitting needles, the number of which corresponds to OK (48 P), distributing them evenly on 4 knitting needles (12 P on each).
- Start doing a classic 1x1 elastic band (alternating 1LP, 1 IP constantly) or 2x2 (2LP, 2 IP alternately).
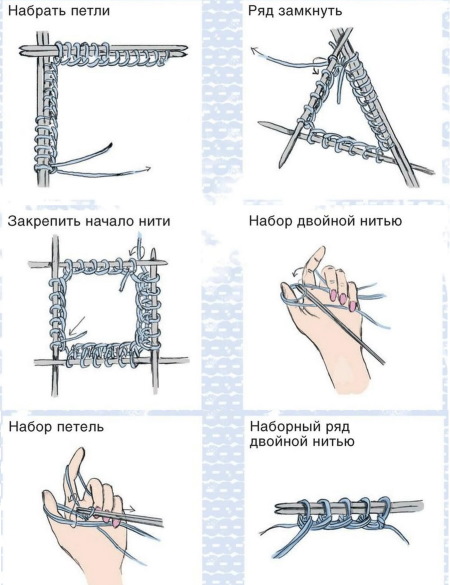
- The length of the cuff will depend on the model and the preferences of the needlewoman. It can be short (3-4 cm), long (10-12 cm), you can make a lapel from it, very long (up to 25 cm).
- The beginning of the row must be marked with a pin or marker.
- 1,2 knitting needles for knitting the back of the glove, 2,3 – for the palm.
Features of the right glove
The gloves differ only in the location of the BP and the expansion for its creation. The increases for it can be made immediately after knitting the cuff or by performing 2-3 R of the front surface. On the right glove, the wedge is knitted on the 3rd knitting needle from the beginning of knitting, marked with a marker.
Progress of work:
- Knit loops of 1 and 2 needles, at the beginning of 3: 1H, 1LP, 1H, the remaining loops with the front surface, on the 4th needle 9 LP, 1H, 3LP, 1H (4 P increased).
- Repeat every 3 rows on the 4th needle, do not finish knitting the number of rows in ascending order (1, 3, 5, and so on).
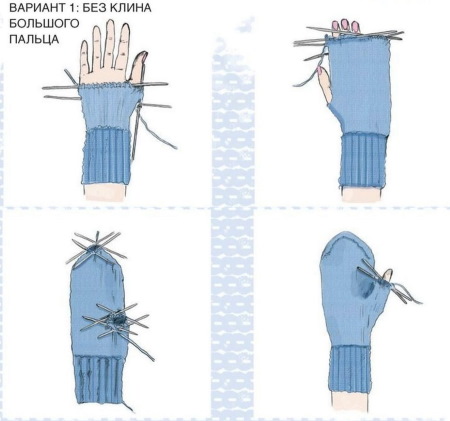
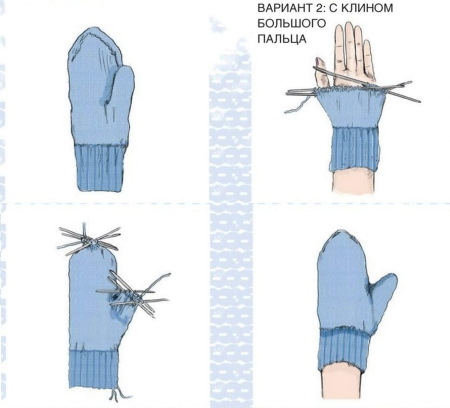
- Having knitted 6 cm, finish the increases (10 sts are formed on the 4th needle).
- Remove all the wedge loops onto a contrasting thread or pin, cast on VP, the number of which should be 2 times less.
- Decrease P on 4th needle: 2V knit LP around edges of thumb hole.
- Decreases should be done every 1 row until the number of loops reaches the original one.
Left Glove Features
The left glove differs in that the addition of P for the wedge begins on the 4th needle. It is made similarly to the right part, immediately after the elastic or by knitting 3P with the front surface.
Progress of work:
- Knit 11LP on the 4th needle, 1H, 1LP, 1H (2P increased).
- At the end of 1 needle add 2 more sts: 9 LP, 1 H, 1 LP, 1 H.
- Next, you need to do the work as for the right glove, repeating points 2-6 with adjustments for the number of knitting needles for the left hand.
Finger tying
To knit the fingers, the total number of loops (48) must be divided by 8 (6P). Each finger will have 2 halves (12P in total). Between the fingers, jumpers of 4VP are required.
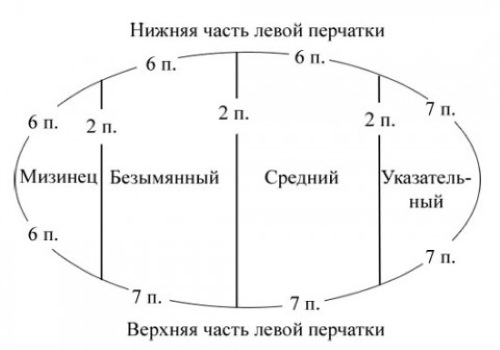
Progress of work:
- Index finger. Divide the 18 sts formed by adding the jumper onto 3 knitting needles, 6 sts on each. Knit 7 sts, remove the remaining sts, add 4 VP and distribute onto the knitting needles. Knit the fabric in a circle to the middle of the nail and gradually close the loops, making 2 V at the end of each knitting needle until 2 sts remain. Gather them with a needle, cut the thread and secure in the knitted fabric from the wrong side.
- Middle finger. In work 20P (12 + P 2 jumpers from VP) on 4 needles. Then knit the same way as the index finger.
- Unnamed. 10P + 4VP on 3 needles. Knitted as the previous ones.
- Little finger. 4P jumpers + 12P, divide into 3 needles. Knitting technique is the same.
- BP. P from an additional thread or pins transfer to 2 knitting needles, on 3 dial from the knitted fabric as many P as VP was dialed. The work is done in a circle and is similar to the previous ones.
Basic pattern for men's gloves knitting needles
Knitting accessories for men is similar to the process of creating a women's model.
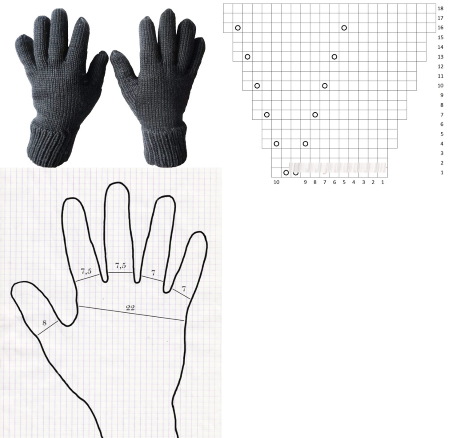
The work takes place in several stages:
- Knitting elastic (classic 1 by 1 or 2 by 2).
- Execution of the lower part of the brush (the main pattern).
- Marking the location of the thumb (using a pin).
- Knitting palms.
- Decreasing fingertips (by knitting 2 stitches together).
- Execution of BP.
In the process of knitting in a circle, rows are made only on the front side, and not on the inside. The cuff of such products is knitted short. The male tassel is larger, so the number of loops in the work will be different.
Correspondence of sizes and measurements for knitting men's gloves with knitting needles:
| Size | 7.5 | 8 | 9 |
| OL | 20 cm | 21.5 cm | 24 cm |
| Number of stitches to cast on | 56 P | 60 P | 68 P |
| For the thumb wedge | 17 P | 17 P | 19 P |
| For the palm | 60 P | 64 P | 72 P |
| For BP | 21 P | 21 P | 23 P |
| Length from wrist to index finger | 16 cm | 16 cm | 16.5 cm |
| Length of BP | 5 cm | 5.5 cm | 6 cm |
Basic pattern for knitting children's gloves
The procedure for knitting gloves for a child is identical to knitting men's and women's accessories.
The product will differ in:
- size;
- coloring (brighter tones will predominate);
- decor (pompoms, beads, patches, decorative laces, embroidery) or a pattern (children's theme).
A beginner craftswoman should start with gloves for a child over 6 years old: small sizes often cause mistakes. If it is not possible to take measurements, you can use the information provided in the table.
Standard parameters for knitting gloves for children:
| Size | 0 | 1 | 2 | 3 | 4 | 5 |
| Age | up to a year | 1-2 years | 3-4 years | 5-6 years | 7-8 years | 9-10 years |
| OL | 11 cm | 12 cm | 13 cm | 14 cm | 15 cm | 16 cm |
| Number of stitches to cast on | 34 P | 36 P | 38 P | 40 P | 44 P | 46 P |
| For the BP wedge | 11 P | 11 P | 11 P | 13 P | 13 P | 15 P |
| For the palm | 34 P | 36 P | 40 P | 42 P | 46 P | 48 P |
| For BP | 11 P | 11 P | 13 P | 15 P | 15 P | 17 P |
| Length from wrist to index finger | 7.5 cm | 9 cm | 10.5 cm | 12 cm | 13 cm | 14 cm |
| Length of BP | 2 cm | 2.5 cm | 2.5 cm | 3 cm | 3.5 cm | 4 cm |
Pattern options
You can knit gloves with knitting needles, the patterns of which are offered in the description of basic models, using the following patterns:
- simple and dense (garter stitch, stocking stitch, pearl stitch);
- openwork (they are especially good for thin gloves for special occasions made of cotton thread);
- arans and braids (they will make the product more voluminous and warmer).
Cuffs are usually made with classic elastic so that the product fits the hand more tightly and retains heat. The main fabric is made with various patterns, everything depends on the model and the imagination of the craftswoman. For convenience, the fingers are knitted with the front surface, with the exception of openwork gloves, where they are made with the main pattern.
Schemes and descriptions of glove models for beginners
You can knit gloves with knitting needles not only in the classic version. The patterns offered in the article make it possible to choose non-standard models of products.
These models are divided into categories:
- by purpose - for special occasions, everyday wear;
- by length - long, short and mittens (without fingers).
There are transformable models that combine the classic version of mittens and fingerless gloves. Some items are not knitted in the round, but on 2 knitting needles.
Short seamless on 2 needles
This is an original model of gloves, which is performed in turning rows on only 2 knitting needles instead of 5 and at the same time has no seam. For work you will need 1 skein of natural wool (in 100 g 300 m), 2 mutually sharp knitting needles with a diameter of 2 mm.
The work should be performed according to the description:
- It is necessary to cast on ½ of the number of loops for a standard model (29P). Work begins with the right glove.
- 1P requires knitting IP.
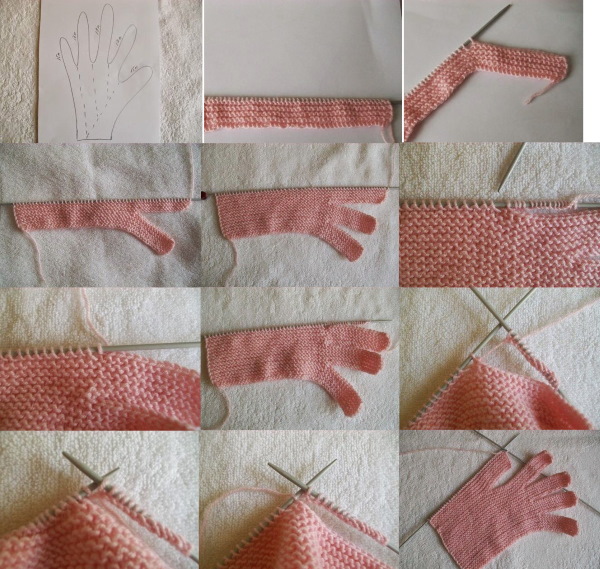
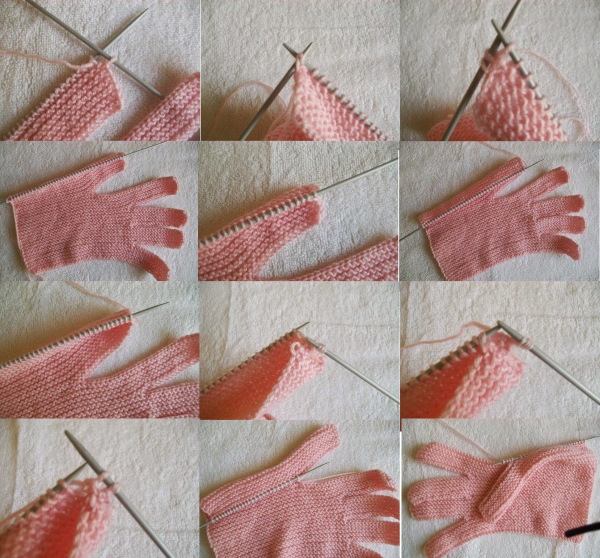
- Continue working in garter stitch: 1 Row LP, 1 Row IP, alternate until you have knitted a length equal to the desired hem of the glove (approximately 1.5-2 cm).
- Knit the last row of the fold as follows: 2V, H, alternate 2P.
- Turn the work. 1P all IP. The holes in the canvas are obtained, which then form a beautiful edge of the product.
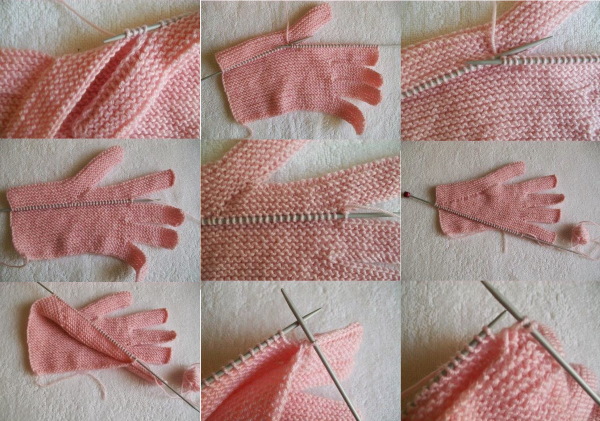
- You need to continue knitting with the front surface until you reach the beginning of the thumb.
- Next, you should start adding P: 27 LP, 1N, 1LP, edge IP.
- You need to increase P in each R on the front side, forming a wedge for the thumb.
- You need to repeat the same thing until you have 29 sts for the palm, 10 sts for the finger and 1 edge st on the knitting needle.
- Continue knitting without adding until the beginning of the little finger, divide the loops for the fingers in the order little finger-index finger: 7P, 8P, 8P, 9P, between them 1 free P, from which you need to knit 3 (32P in total).
- Each finger is knitted separately in turning rows, at the end you should decrease the loops and immediately start working with the opposite side of the little finger in reverse order, starting with adding P to the base, connecting each last edge loop of the row with the edge of the back side.
- Similarly, tie the ring, middle and index fingers.
- On the needles 29P.
- Make the thumb and start decreasing from the back of the glove, that is, you need to knit in a mirror image.
- After decreasing, proceed to knitting the cuff.
- Close the loops in the classic way, fold the cuff along the line marked with holes and secure with a needle.
- The left glove is knitted in mirror image.
Short without fingers
A very simple model, even for those who are just beginning to master the basics of knitting.
Progress of work:
- You need to cast on 40 stitches onto the knitting needles, dividing them into 4 parts (10 stitches each).
- Knit 19 rows with a classic 1 x 1 elastic (it is better to knit the fabric tighter so that the cuff fits well on the arm).
- Next, knit only LP in a circle for 2 cm (front stitch).
- Using a contrasting thread or pin, remove 8 sts and cast on the same number of VPs.
- Knit another 3 cm LP.
- The model ends with the same elastic band as on the cuff; 9 rows must be completed.
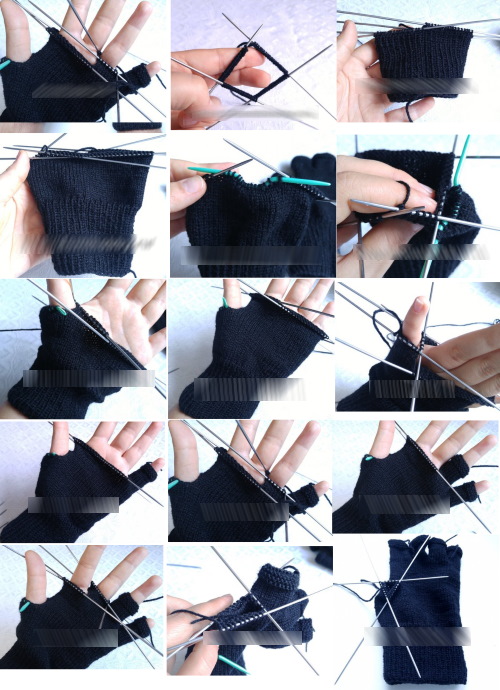
- Knit BP.
- The product can be decorated if desired.
Short fingerless gloves are ready.
Long model
Elbow-length gloves are incredibly popular. Not only are they feminine, but they are also incredibly warm. What you will need: mixed wool and acrylic yarn (200 m in 100 g), a set of 3.5 mm knitting needles.
Perform the work according to the description:
- Cast on 52 sts, dividing them equally between 4 needles.
- Work 2-3 cm with a classic elastic band (2LP, 2IP).
- Reduce 1P, divide the remaining loops into 3: 15P on one will be made with the main pattern (elastic), 15 on the second in the same way, 21P on the third, for knitting a braid according to the description.
- R1: 2IP, 9LP, 2IP.
- P2: repeat P1.
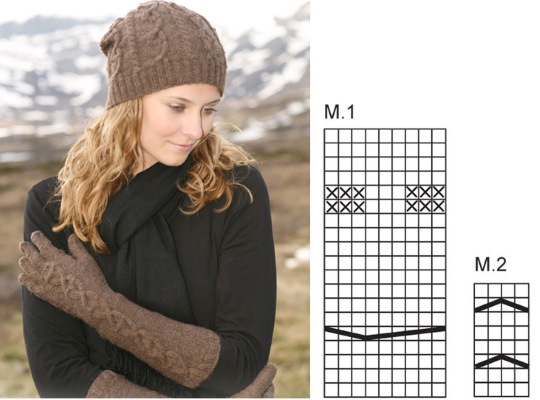
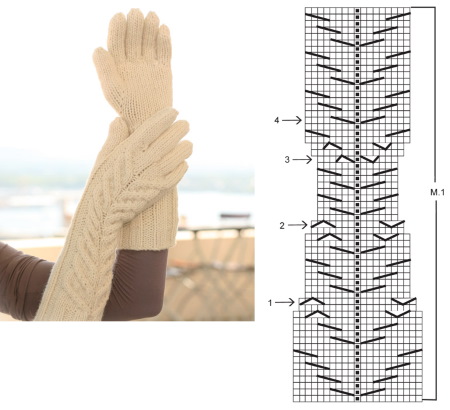
- R3: 2IP, 3P on an additional knitting needle before work, 3LP, 3P with an additional LP, 3LP, 2IP.
- P4,6: knit as P1.
- R5: like R3.
- When the fabric reaches a height of 10 cm, decrease P after every 3R, knitting 2V twice at the end of 1 needle and the beginning of 2.
- Finish decreasing and knit another 6-7 cm.
- Next, start knitting the fingers according to the standard pattern, distributing the loops from the little finger to the thumb: 11P, 16P, 16P, 16P, 16P, not forgetting about 2P for the jumpers.
Christmas with pattern
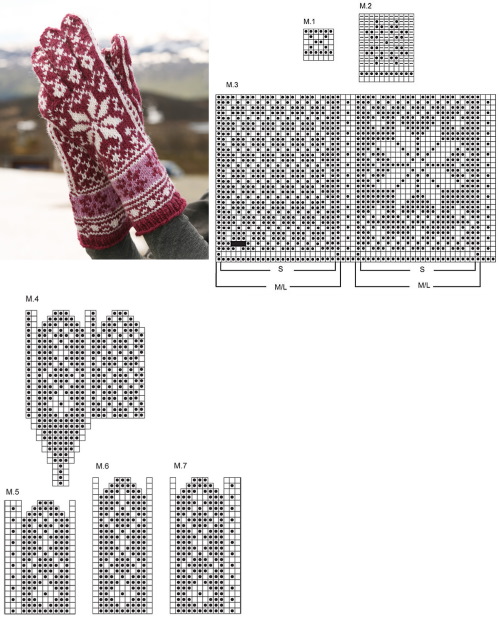
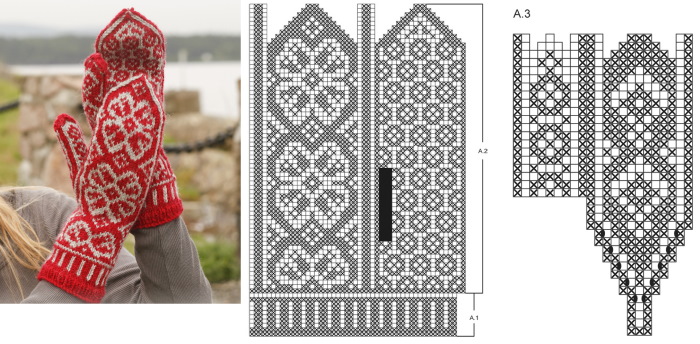
Knitting gloves with knitting needles, the patterns of which are presented in the article, and decorating them with a jacquard Christmas pattern on the eve of the holiday will be very appropriate. For beginners, a Norwegian snowflake pattern is suitable.
You will need yarn of the main color, for example, blue (in the description of the LP this color is designated by the letter C), contrasting white thread (in the description – the letter B), a set of hosiery needles.
Step-by-step description of the work:
- You need to cast on a number of loops on the knitting needles equal to the circumference of the wrist.
- Make the cuff with a classic elastic band.
- Move to the front surface in a circle, on the back of the hand with the help of a contrasting thread in the center make a pattern according to the description.
- R1: 5C, 1B, 3C, 1B, 3C, 1B, 5C.
- R2: 2C, 1B, 2C, 2B, 2C, 1B, 2C, 2B, 2C, 1B, 2C.
- R3: 3C, 1B, 1C, 3B, 3C, 3B, 1C, 1B, 3C.
- R4: 5C, 4B, 1C, 4B, 5C.
- R5: 1C, 4B, 1C, 3B, 1C, 4B, 1C.
- R6: 2C, 4B, 1C, 2B, 1C, 2B, 1C, 4B, 2C.
- R7: 3C, 4B, 1C, 1B, 1C, 4B, 3C.
- R8: 4C, 4B, 3C, 4 B, 4C.
- R9: 1C, 2B, 6C, 1B, 6C, 2B, 1C.
- P10 is similar to P8.
- P 11 is similar to P7.
- P 12 is similar to P6.
- P 13 is similar to P5.
- P 14 is similar to P4.
- P 15 is similar to P3.
- P 16 is similar to P2.
- P 17 is similar to P1.
- Further work is carried out according to the basic scheme.
Bright gloves for girls and boys
Knitting gloves with knitting needles, the patterns of which have instructions for knitting a wedge for the thumb, will be difficult for beginners right away. It is better to start with a simple model for a narrow child's hand.
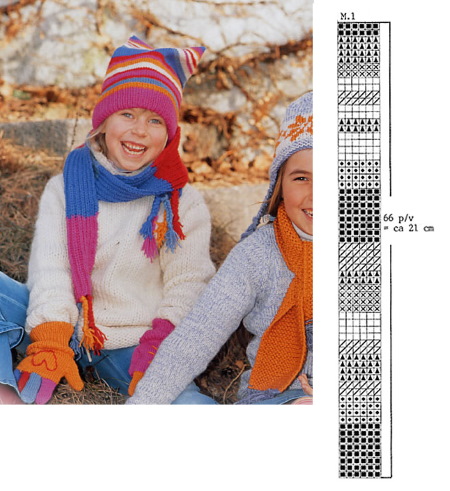
For work you will need yarn remnants of different colors, 5 pointed 2.5 knitting needles, scissors. It is desirable that the yarn be of the same thickness, so that the fabric is even. You can use any colors, taking into account the gender of the child. You can knit multi-colored striped cuffs, then using the same shades make each finger multi-colored.
Gloves are knitted according to step-by-step instructions:
- You need to cast on 40 sts (10 sts on each of the 4 needles).
- Start knitting the cuff using a classic 2 x 2 elastic band until the fabric reaches a height of 5 cm.
- Continue working, knitting the front loop in a circle, until the fabric, knitted with the front surface, becomes equal in height to the distance from the wrist to the thumb.
- Remove 5 sts for the thumb using a contrasting thread or a pin, cast on 5 ch and knit a length equal to the distance from the thumb to the end of the palm.
- Next, you can start making multi-colored fingers: you should distribute the loops into 4 parts.
- You need to start working on the index finger, and remove the remaining loops onto pins.
- The finger needs to be knitted in a circle, distributing the loops on 3 knitting needles and adding 1 stitch on the inside of the finger.
- When the fabric reaches the desired length, you need to decrease the stitches by knitting 2 together.
- The working thread is cut with scissors, leaving a 3-4 cm end. It must be hidden on the wrong side.
- Similarly, you need to tie the rest of the fingers, changing the color on each one.
- Next, you can start making the BP: remove the P located on the pin, pick up the same number by picking up through the knitted edge (10 P in total).
- Knit the required length in a circle, close the loops with decreases, hide the thread.
- Make the second glove in the same way.
- If desired, the product can be decorated according to your own taste.
Knitting gloves yourself with knitting needles is an opportunity to create an accessory to your taste, determining what their color, model and length will be. The manufacturing process will not take much time if you use simple patterns with detailed descriptions of instructions for knitting gloves.
Author: Lelya Tomina
Video about knitting gloves
How to knit gloves with knitting needles - diagrams:
