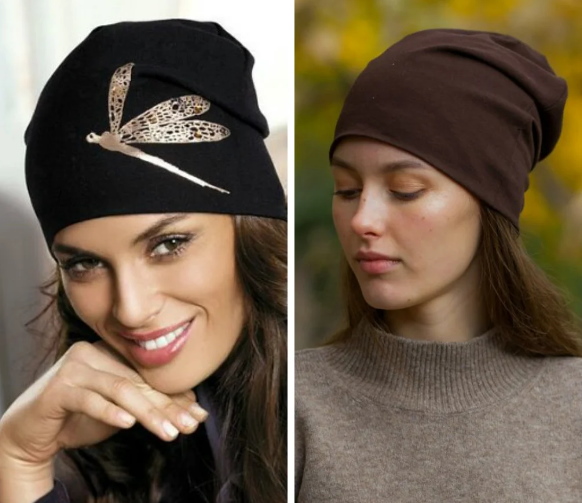
A beanie is a hat that fits tightly to the head with a bulge at the back. Suitable for sports and city walks in the cold winter, such headwear is made of wool or knitwear according to fairly simple basic patterns with a minimum set of materials at hand, decorated with rhinestones, a lapel or a pompom, and protects both children and adults well from the cold wind.
Description of features, how to sew
Beanie hat made of knitwear (even a novice dressmaker can sew this model) - an ultra-fashionable modern model of headwear, distinguished by:
- simplicity and conciseness of cut;
- variety of types (with pompoms or lapels);
- a wide choice of materials.
Suitable for any face type and compatible with a variety of clothing styles, this model fits snugly to the head, reaching down to the eyebrow level.
You can choose a beanie hat for any age and face type:
- For girls with a round face and large features, professionals recommend taking a closer look at models made of large knits and thick jersey with the obligatory addition of a pompom;
- for a square face with a massive chin, stylists advise choosing hats with a turn-up lapel;
- For those with an oval or elongated face shape, any type of headwear will suit.
The official history of the beanie hat dates back to the 16th century and the appearance of knitted warm clothing. According to another, alternative historical version, such a headdress appeared in Ancient Rome and served as a distinctive sign for a freed Roman slave.
Historians also note that at different periods of time the beanie hat was an essential attribute of sailors, students and workers, and got its name from the English word “bean”.
In contrast to their English colleagues, French etymologists believe that the hat owes its appearance to French students, who received the nickname "yellow-mouthed", as well as the name of the headdress, which sounds like "bejaunus".
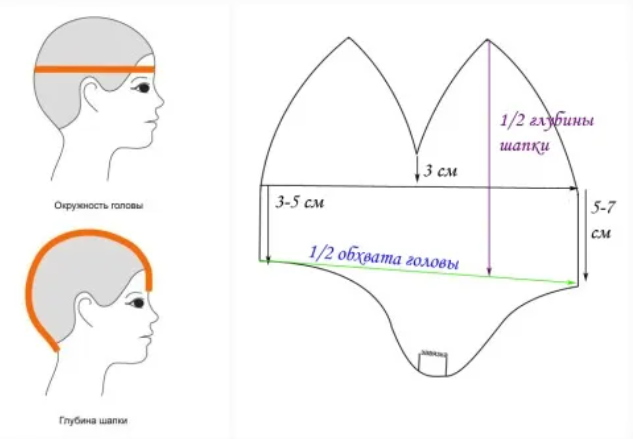
How to measure head circumference for a hat
Necessary materials
Beanie hat made of knitwear (you can sew such a product using a self-made or basic pattern) is quite simple to make.
Materials required:
| Element name | How to choose |
| Main fabric | Knitwear 40-50 cm long and 1.45 m wide |
| Lining | Fleece fabric, 45-40 cm long and 1.45 m wide |
| Additional materials |
|
How to choose fabric
Professional tailors recommend sewing beanie hats from well-stretched thick or thin knitwear, footer or ribana.
If desired, you can sew 2 beanie hats:
- made of lightweight, breathable material for warmer weather;
- made of thick knitwear - for the cold, autumn-winter season.
The fabric chosen for the lining should be:
- wear-resistant;
- low electrification;
- made from hypoallergenic materials.
Experts recommend choosing knitwear or fleece for the lining of a hat, 10-15 cm smaller than the main fabric.
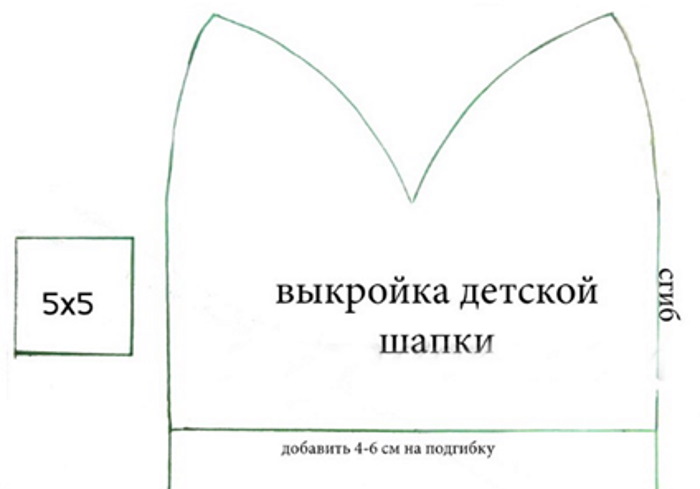
Construction of the pattern
The beanie pattern is based on the head circumference and stretch factor, which allows the finished model to fit snugly to the head.
Measurements used in making the hat:
| Measurement name | How to shoot |
| OG (head circumference) | The circumference to be measured starts at the center of the forehead and passes through the most prominent place on the back of the head. The average value is 54-58 cm. |
| GP (planting depth) | It is determined from the center of the forehead to the back of the head. |
| RH (rear width) | The distance from the earlobe to the line on the back of the skull is measured. |
The stretch coefficient allows you to correctly create a pattern taking into account the material selected for sewing and the size of the head and is calculated using the formula: Length before stretching / Length after stretching, and to calculate it:
- Taking a sample of the main fabric along the cross thread, you need to put 2 marks at a distance of 10 cm. Marks can be made with tailor's chalk/pencil or use pins for this.
- The fabric should be folded in 2 layers, stretched and the distance between the marks measured. When measuring, the fabric should be stretched so as not to change its pattern and texture.
For example, when stretching the fabric to 11 cm, the initial length of the segment of 10 cm must be divided by the final length of 11 cm to obtain a coefficient equal to 0.9.
If the fabric stretches slightly, the coefficient calculation can be omitted, taking the head circumference value as a basis.
The height of the pattern is calculated using the formula: GP (fit depth) / 2 + 3-4 cm. A more voluminous model allows for an increase to the formula within 6-9 cm.
To calculate the width of a product part, you need 1⁄4 of the OG (head circumference) * stretch factor.
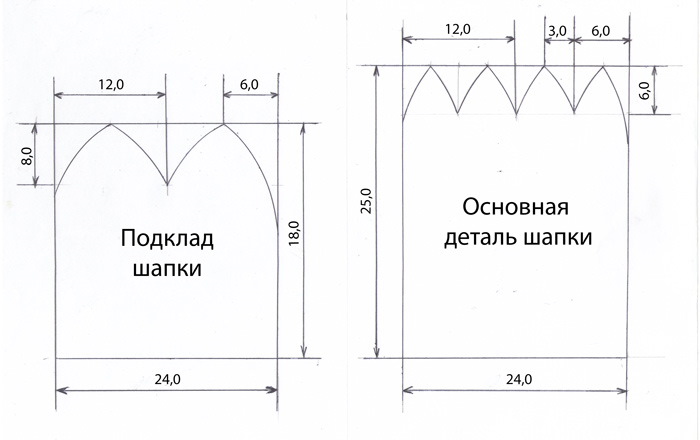
To model a drawing you need:
- Draw a rectangular geometric figure with sides equal to the width (DD1 and AA1) and height (AD and A1D1) of the model.
- Divide the height value in half and draw segments CC1, AC and A1C1. From the resulting value, you need to take 1/2 part to construct the line BB1.
- Measure 1.5-2 cm from point A1 to the left (1.5 cm for a child's hat and 2 cm for an adult's hat). The found value N must be connected to point B1.
- Find the value of N1 by setting aside 1.5-2 cm from point N to the left.
- Step back 3 cm from point B to the left, mark the value M, and then connect the curved line segments C, M and N1.
- If you want to create a lapel, extend the bottom border of the rectangle by 15-20 cm.
The product must be cut with a mandatory seam allowance of 1.5-3 cm.
Master classes
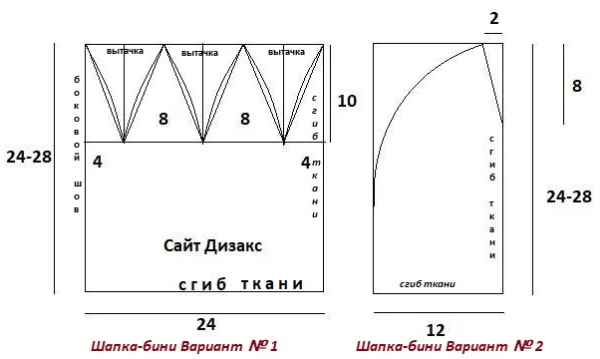
A knitted beanie hat (the product can be sewn from any dense or light, stretchy material) should fit tightly to the head and have additional volume at the top. To create it, you can additionally increase the DP (fit depth) value by 8-15 cm, and also make darts equal to 6-7 cm.
Knitted beanie hat

Scheme.
Classic version
To sew the product you will need:
- Prepare and iron the selected knitwear well. This is done so that the fabric can shrink as much as possible.
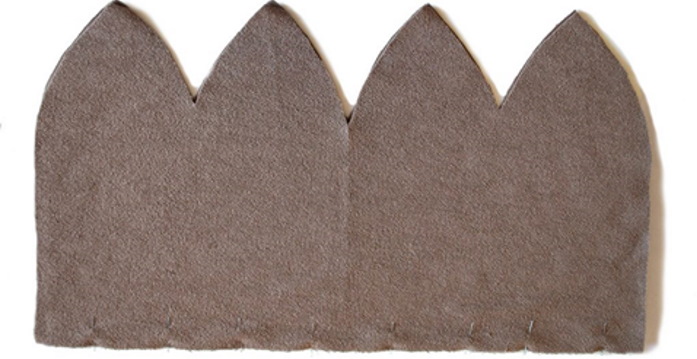
- Cut the pattern out of paper and glue it together.
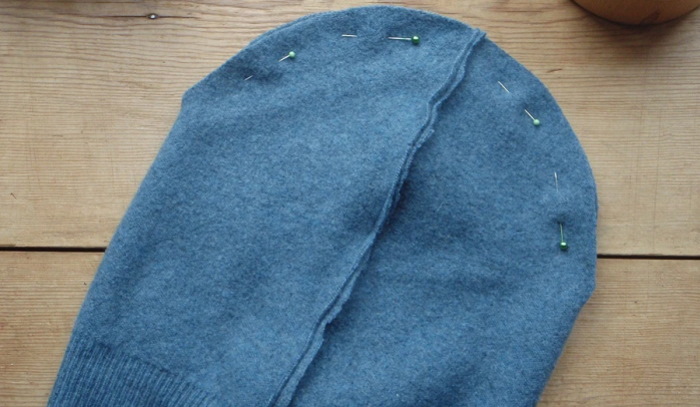
- Place the pattern on the material and pin it in place, drawing its outline.
- Cut out the top from the main and lining material so that the lining is 10 cm smaller than the main product.
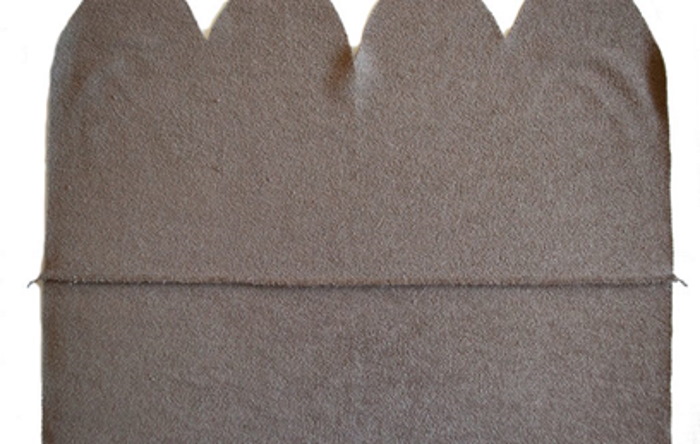
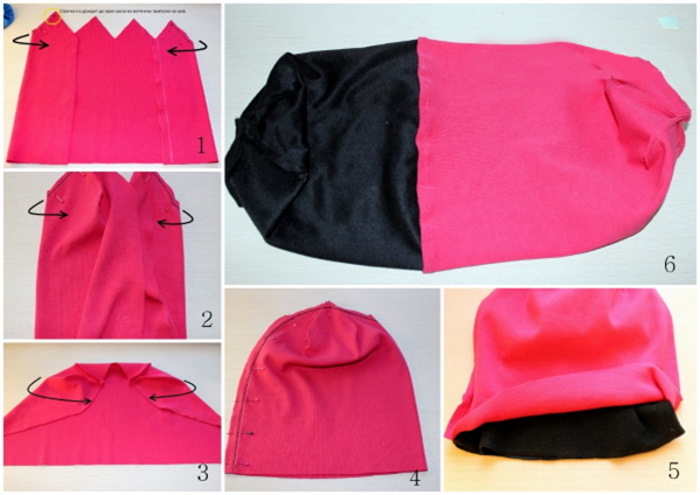
- Place the top and lining with the right sides together, align them along the bottom edges, pin and baste, then stitch on an overlock or sew with a zigzag stitch.
Knitted beanie hat. Sewing the product - Iron the resulting seam allowances towards the lining.
Knitted beanie hat. Sewing the product - To make the back seam, fold the pieces lengthwise, align them along the side cuts and stitch. The allowances should be pressed well, and then pressed to either side.
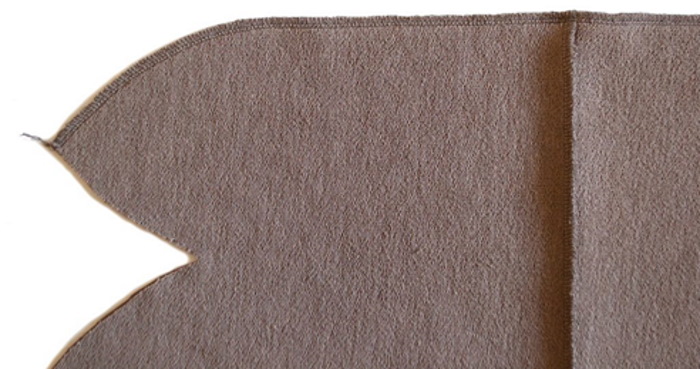
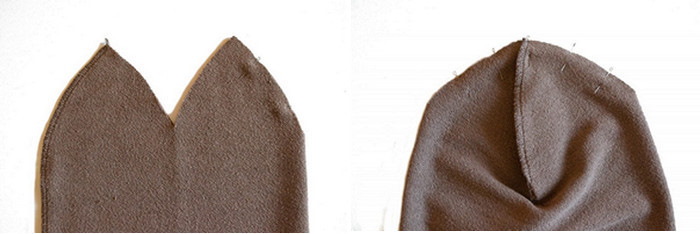
Knitted beanie hat. Sewing the product - To close the crown of the product, first sew the front seam, preliminarily align all the cuts, and then, having turned the hat so that its front and back seams are in the center, and the unsewn seams create a semblance of a semicircle, sew all the cuts with one seam. To prevent possible thickening at the central joint of the product, the allowances of the back and front seams should be spread out in different directions.
- Iron all seam allowances that form during sewing.
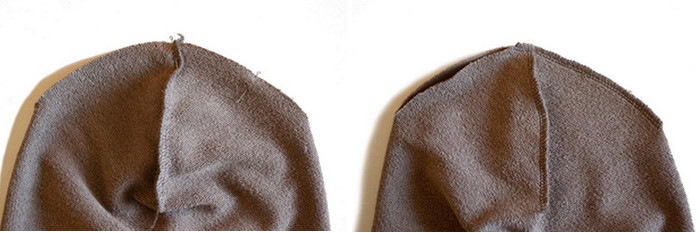
Knitted beanie hat. Sewing the product - Perform wet-heat treatment of the top of the finished hat, ironing out any resulting bulges.

Knitted beanie hat. Sewing the product - To process the top of the lining, make the front seam exactly the same as the back one, and then, having unfolded the model, align the upper edges and stitch them to the middle so that an opening remains for turning the product inside out. The resulting allowances must be smoothed out and ironed on either side.
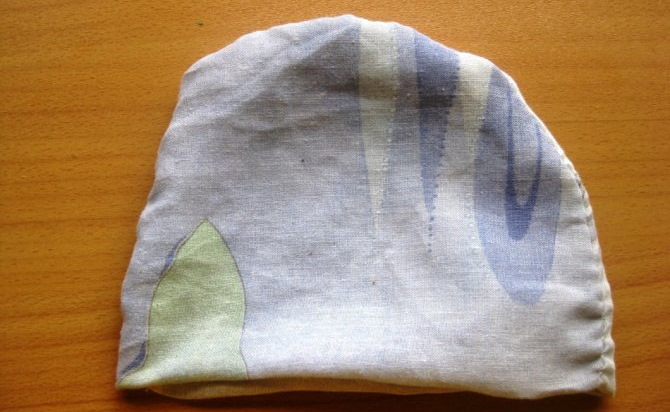
Knitted beanie hat. Sewing the product - Turn the finished product inside out. The opening for turning should be sewn up.
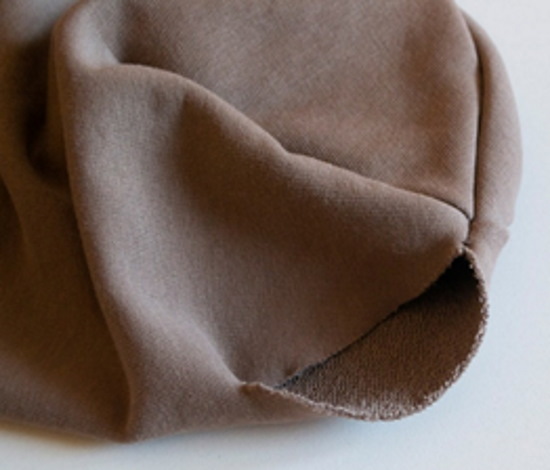
Knitted beanie hat. Sewing the product - Perform wet-heat treatment of the lining, turn it inside the hat and straighten it well.
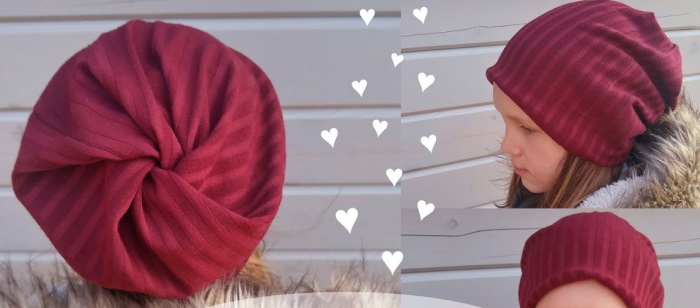
With a twisted crown
The popular twisted crown headdress can be made without a pattern using 60 cm of plain or printed knit fabric.
To sew you will need:
- Fold the fabric rectangle so that its stretchy side is folded in half. The right side here should be inside the fold.
- Sew the two edges along the longest side, leaving a gap of 3 mm for turning the product inside out.
- Fold the fabric in half and swap the two opposite corners on the top half of the folded fabric and connect them to the two bottom ones.
- Bend the two inner edges to the side, fold them together, pin them and sew with a circular stitch, constantly turning the workpiece along its axis.
- Turn the finished model inside out and darn the turning hole.
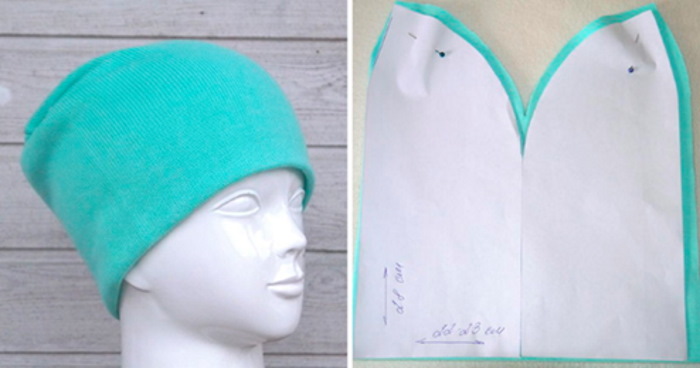
For a child
A knitted beanie hat (you can sew a children's model in 30-40 minutes) for a child requires the following for its production:
- thick or thin knitwear in the amount of 25 m;
- threads and needles;
- aquamarker;
- sewing machine;
- scissors.
When constructing a drawing of a children's hat, it is necessary to take into account the values of OG (head circumference) and GI (product depth). To model a headdress that falls on the ears, it is also necessary to take the measurement Шзш (Back of the neck width), passing from the ear to the back of the head.
When modeling a product, it is necessary:
- Divide the OG (head circumference) value by 4, and then subtract the stretch factor from the resulting value (0.5 cm for dense and 1 cm for elastic material).
- Draw a rectangular figure on tracing paper with a width corresponding to 1⁄4 OG and a length equal to 5 cm + GI (depth of the product).
- Step back from the left corner a distance of 2.5 cm to the left side and down 1⁄4 GI. Connect the obtained values to form a dart.
- Round the top corners of the central shape.
- Align the resulting piece on a sheet of paper along the side line with the fold line.
The length of the material used will depend on the method of cutting the product:
- a single-layer product is made from fabric corresponding to the length of 1 hat with an additional 10 cm allowance for the lapel;
- a two-layer model requires an increased volume of material;
- The double-sided hat is cut from knitwear in 2 shades, each taken according to length.
When sewing a product you need:
- Having laid out the cut rectangle on the fabric, cut out 2 pieces from it with a fold along the bottom. If there is a lining, 4 pieces are to be cut out.
- Place them with the right sides together, pin the edges and stitch with a machine stitch. Smooth out the edges and overcast with an overlock or zigzag stitch.
- Sew the dart, first aligning it with the previously made seams, and finish the edges with a zigzag stitch.
- After stitching the bottom of the product with an overlock, fold it inward by 2.5-3 cm and, stepping back 1-1.5 cm from the edge, sew with a machine stitch.
With a twist at the top
A knitted beanie hat (the item can be sewn for an adult or a child of any age) with a turn-up at the crown can be made without making a pattern.
To create it you need:
- Cut a 55 cm long piece from the material (OG value – 4 cm).
- Fold the rectangle in half, match the side cuts, pin them together and stitch with a straight machine stitch, leaving a 5 cm opening on one of them.
- To create a turn-up on the top of the vertically positioned rectangular piece, you need to align the upper right and lower left corners. Do the same with the other two corners.
- Move the 2 inner layers of fabric together and pin the outer ones together.
- Sew the pinned edges and straighten the folded edges of the product.
- Turn the sewn model inside out and sew up the opening left for turning by hand with a blind stitch.
Double-sided hat
A children's double-sided beanie hat can be made from two pieces of either the same or different colored material, and to sew it you need to take 70 cm of material.
To model the pattern you will need:
- On a sheet of graph paper folded in half, measure 1/4 of the head circumference from the fold line to the side and the desired length of the product upwards.
- On the resulting rectangle, step back 3.5 cm from the top fold line and draw a segment down equal to 1⁄4 DI (the length of the product).
- Connect the resulting points and smoothly round off the opposite corner of the rectangle.
When sewing a product, you should:
- When transferring the pattern onto paper, fold it down.
- When sewing the side seam, leave an unsewn area for turning the garment inside out.
- After sewing all the darts, turn the workpiece right side out and put all the parts of the product together.
- Decorate the hat as desired.
With ears
A knitted beanie hat with ears is sewn according to a straight pattern with vertical upper corners, which is a rectangular figure with a width equal to 1⁄2 of the OG (head circumference) - 2-3 cm for a tight fit.
The length of the rectangle here corresponds to the height of the hat, obtained by measuring the distance from the line between the eyebrows to the back of the head. Additionally, 10 cm are added to the pattern on each side for the ears and the lapel.

To create a hat you will need:
- Cut out the main part of the product from the material with a fold and seam allowance.
- Sew the side seams and turn the piece right side out.
- Having placed it on the table, mark the center point at the top and measure out segments 5-6 m away from it in different directions.
- Form folds 2 cm deep, directed towards the central fold.
- To secure the folds, machine stitch the vertical edge.
- Using an overlock, process the bottom of the product, and then, folding it by 2-3 cm, sew it on the machine.
To create ears, you can also use 2 darts symmetrically located in the upper corners of the product.
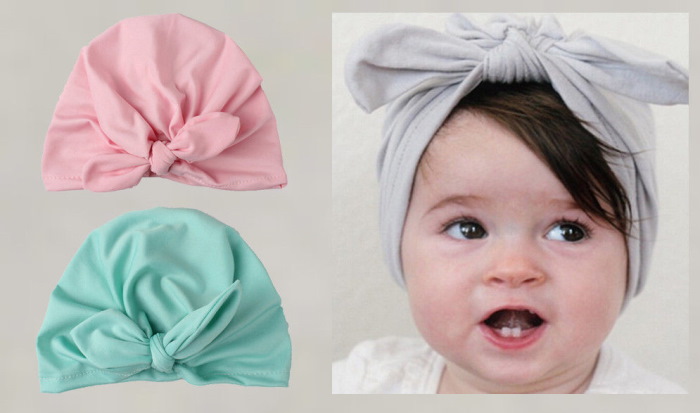
For a girl with a bow
An ultra-fashionable beanie hat for a girl can be sewn from ribana with the addition of lycra and decorated with a bow, rhinestones or knitted flowers.
When sewing a headdress you should:
- Fold the material in half (with the right side facing inward) and cut out a rectangle with a width corresponding to 1⁄2 of the OG (head circumference) + 3-5 cm. The length of the rectangle should be equal to: 2* DI (length of the product) + 15 cm (for the bow).
- From the remaining material, cut out the middle of the decoration (length 8-11 cm, width 7-9 cm).
- Having sewn the longitudinal seam of the product, it must be turned so that the bow is in the middle of the workpiece, and stitched along the upper edge, having first left a thread 11 cm long at both ends.
- Connect the corners of the product and tie the threads, then turn the hat inside out.
- Sew the middle of the bow to the back of the product, having first stepped back from the middle of the decoration in different directions by 4-5 cm.
- Secure the bow strip and sew it into the fold on the wrong side of the garment.
- After cutting the corners, machine stitch along the opposite edge of the model.
- Turn the model right side out and sew up the turning hole.
- The bottom of the hat needs to be processed on an overlock, folded over and machine stitched.
How to decorate a hat
If desired, you can decorate a beanie hat for a girl:
- pompoms;
- knitted or jersey flowers;
- applications or iron-on stickers;
- with bows or lace;
- rhinestones, brooch or beads;
- with a bright badge or patches.
Knitted pompom
To make a knitted pompom you will need:
- round base or fork;
- ball of yarn;
- scissors;
- thick thread.
To create a pompom you need:
- Wrap a rigid blank with a circle cut out in the middle with yarn. The fluffiness of the pompom will directly depend on the number of layers.
- Tie the cut yarn together with a thread pulled between the layers.
- Using scissors, cut the threads along the edge of the workpiece and remove the unnecessary template.
- Beat the finished pompom and trim it with scissors.
Fur pompom
A fur pompom for a beanie hat can be made from a piece of faux (natural) fur, and to create it you will also need:
- synthetic filler;
- scissors
- needle and nylon thread.
To make a pompom you need:
- Cut a circle out of fur and sew its edges.
- Fill the blank with synthetic filler.
- Tighten the stuffing hole and sew it up.
The finished knitted or fur pompom needs to be sewn to the base of the headdress.
A knitted beanie hat is an ultra-fashionable headdress made of heavy or lightweight material. Suitable for any age and clothing style, it can be sewn using a simple rectangular pattern, have a lapel, a fold, or be decorated with a fur pompom, protects well from cold wind and frost, and also corrects the appearance, lengthening the oval of the face.
Video on how to sew a knitted beanie hat with your own hands
DIY hat in 15 minutes.