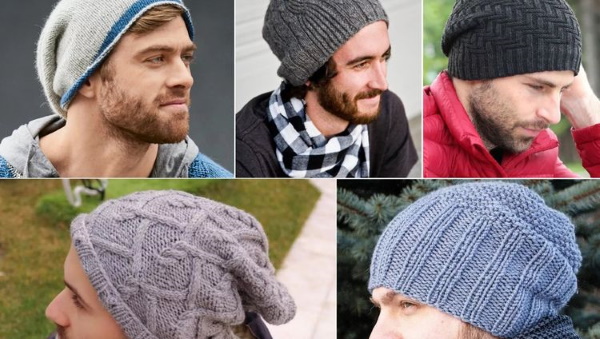
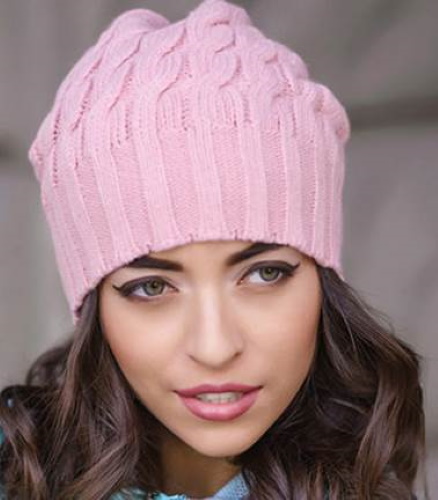
Beanie hats can be worn by both young people and those over 50 years old. This is a universal headdress in the wardrobe of both women and men. Thanks to its unusual elongated shape, with the help of a hat you can visually correct the line of the oval of the face, hide its rough features, and add a slight carelessness to the image.
The headdress is easy to knit. There are many master classes, patterns for making patterns that will help you make a hat in a few hours that is no worse than what branded accessory manufacturers offer.
Choosing a hat model
The hat can be tight-fitting or long and loose. In all cases, the baggy part of the hat will hang down at the back of the head.
Beanies are divided into types according to the following criteria:
- Seasonality. In winter, thick knitted hats made of thick wool yarn, mohair, angora, cashmere or merino are worn. In spring and autumn, light and thin threads are chosen - bamboo yarn, water-repellent materials, fleece, thin knitwear (cotton or silk), acrylic with a small addition of wool. Winter models are often voluminous due to the threads and knitting technology used. To ensure greater breathability, wide and openwork knitting is chosen for spring-autumn hats.
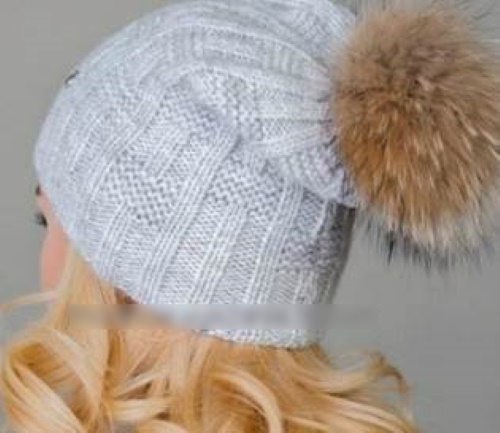
- Decor. Beanie is distinguished by its laconic design. Usually, volumetric patterns, yarn or fur pompoms, openwork motifs, rhinestones or embroidery, buttons are used for its decoration.
- Design. Usually, beanies are long hats, the top of which hangs almost to the shoulders at the back. But some models are made shortened so that the crown sticks out from the top and does not bend back. Also, design elements can be a lapel along the edge of the hat, increased volume in the middle, which makes the headdress look like a beret. Sometimes beanies are knitted with ears on top or braids on the sides.
Winter beanie models, which are often made double-layered to protect against wind, can be knitted in a two-color version or even with 2 different patterns: the first in a classic style, the other, for example, in a sporty one. Such a hat can be turned inside out, depending on the chosen style of clothing.
The most popular pattern chosen for knitting a beanie is pearl. Outwardly, it resembles a pearl scattering, not voluminous and smooth. To visually increase the volume of the headdress, braid motifs are used. Weaving should be chosen to decorate the hat for women who have a small head and small facial features.
Also popular are patterns:
- a combination of horizontal or vertical stripes (can be of different colors);
- harnesses;
- diamonds;
- kerchief pattern;
- rubber;
- front or back stitch.
No less interesting are patterns in the form of a spikelet or zigzag. Any of the motifs will be appropriate if you correctly calculate the size of the hat so that it fits perfectly: does not squeeze the head and is not too loose.
Conventional symbols in knitting patterns
The following abbreviations are used in the master classes:
- R – row;
- P – loop;
- IP – purl loop;
- LP – front loop;
- KrP – edge loop;
- UB – decrease;
- ND – yarn over.
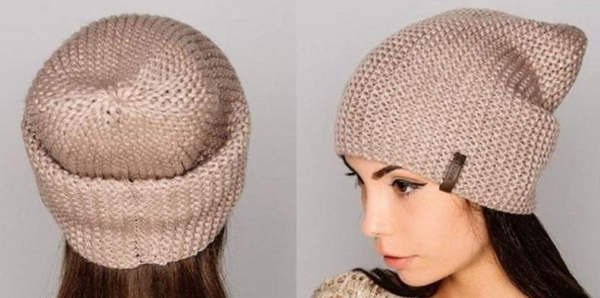
Garter stitch beanie
This is the simplest pattern, but it looks very decorative. A hat knitted with garter stitch will be appropriate both in a sporty look and in a classic style of clothing.
The headdress is knitted horizontally. At the end, the upper and lower parts of the fabric are sewn together. The number of loops depends on how high the hat should be. To accurately calculate its size, you must first knit a sample. The Beanie hat with knitting needles, the knitting pattern of which will be understandable even to beginners, is made from 5-6 identical blocks:
All loops are knitted both on the back and on the front side. The height of the hat can be adjusted by casting on more or fewer loops at the beginning.
When choosing yarn, you need to consider the season for which the headdress is being knitted. It is better not to use natural 100% wool, as it will irritate the skin on the forehead. It is better to give preference to semi-wool or NORKA threads (they contain 48% mink down and 52% goat down). Knitting needles are selected for the diameter of the yarn in exact accordance. If you knit with 2-ply threads, the Beanie will hold its shape better and its density will be higher.
If you need a hat with a lapel, you need to add additional loops to the number of loops you have cast on, the number of which will correspond to 8-10 cm. For a double lapel, you need to make a reserve of 16-24 cm.
For a classic size hat without a lapel, you need on average 100 g of yarn.
Knitting algorithm:
- Cast on 48 sts onto shuttle needles.
- 1-2 R: Knit 38 LP, leaving 10 LP unworked, turn work and knit 38 LP in the opposite direction.
- 3-4 R: knit 39 LP, leaving 9 P unknitted, turn the work and knit 39 LP in the opposite direction.
- 5-6 R: knit 40 LP, leaving 8 LPs unknitted on the left, turn the work and knit 40 LPs in the opposite direction.
- 7-8 R: knit 41 LP, leaving 7 RP on the left unknitted, turn the work and knit 41 LP in the opposite direction.
- 9-10 R: knit 42 sts, leave 6 sts on the left needle, turn the knitting and knit 42 sts.
- 11-12 R: knit 43 LP, leaving 5 LP unknitted on the left, turn the work and knit 39 LP in the opposite direction.
- 13-14 R: make 44 LP, without knitting the last 4 P on the left needle, turn the knitting and knit 44 P again.
- 15-16 R: knit 45 LP, leaving 3 RP unknitted on the left, turn the work and knit 45 LP in the opposite direction.
- 17-18 R: perform 46 LP, leave 2 P on the left needle, turn the knitting and perform 46 LP.
- Rows 19-20: Knit 47 sts, leaving 1 st unworked on left needle, turn work and knit 47 sts.
- 21-22 R: perform 48 LP in both directions.
This is an instruction for knitting one segment of the headdress. Continuing knitting, repeat rows 1-22 another 5-6 times, depending on the head circumference. It is necessary that the length of the finished fabric coincides with the head circumference. At the end, the loops are closed, and the edges of the hat are sewn with the same threads that were used for knitting. To decorate the edge of the hat, crochet it using the crayfish step technique.
Beanie with a pattern in the technique of a figured cord
For work you will need Unity Light (Vita) yarn, which contains 48% wool and 52% acrylic. The skein size is 100 g per 200 m. To knit the hat you will need 1 pack of yarn in color #6023. You will also need 2 sets of knitting needles #4.5 and #3.5, a knitting needle.
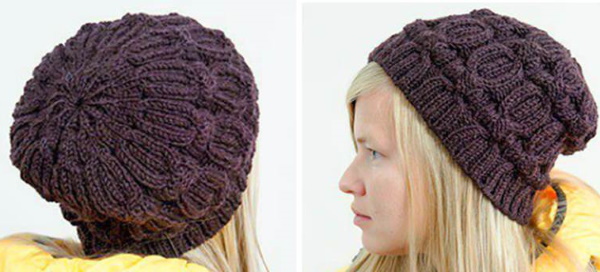
The horizontal knitting density is 2.9 P in 1 cm. The master class describes the instructions for knitting a headdress measuring 55-57 cm in girth. The finished Beanie is 50 cm wide and 23 cm high. Knitting begins from the bottom of the headdress to the crown.
To calculate the number of loops you need to take into account:
- product size;
- fabric stretchability;
- pattern rapport.
The width of the hat usually does not match the head circumference. It is made a little smaller, since the headdress stretches. To calculate the number of loops, you can use the formula: (Og - 7 cm) x Pg = (57 - 7) x 2.9 = 145 P.
Explanation of meanings:
- Og - head circumference;
- 7 cm – allowance for stretching the fabric;
- Pg is the horizontal knitting density (calculated based on a pre-knitted sample).
The pattern rapport is 12 P, so you need to check if their number matches what you got when calculating using the formula. If not, the value needs to be rounded. Since the master class provides an example where the approximate number of loops is 145, then 145:12 = 12.08. You can round the number to 12 rapports. These 12 rapports need to be multiplied by 12 loops in each: you get 144 P. To them you need to add 2 P (edge).
It turns out that you need to cast on 146 sts to start working (12 rapports of 12 loops each and 2 edge loops). To make the elastic band along the bottom of the headdress denser, start knitting with #3.5 knitting needles. When you move on to making the main motif, change the tools to #4.5. Advice: you can cast on loops using the usual method, but to get an even and neat edge, it is better to use the tubular or Italian cast on technique.
When casting on stitches as usual, the first row (zero) should be done with purl stitches. Since the figured cord pattern is based on a 2x2 elastic band, there is no need to knit the elastic band itself at the bottom of the headdress. After the first row, immediately proceed to the main motif.
Technique of knitting the motif
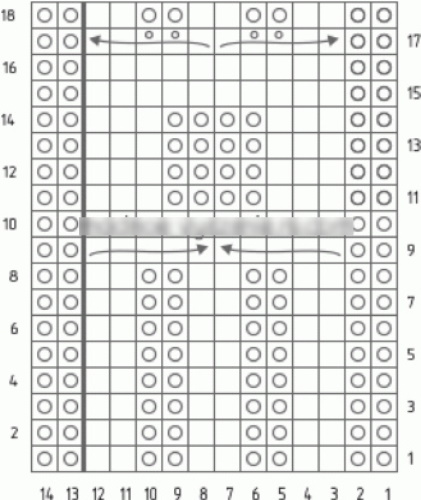
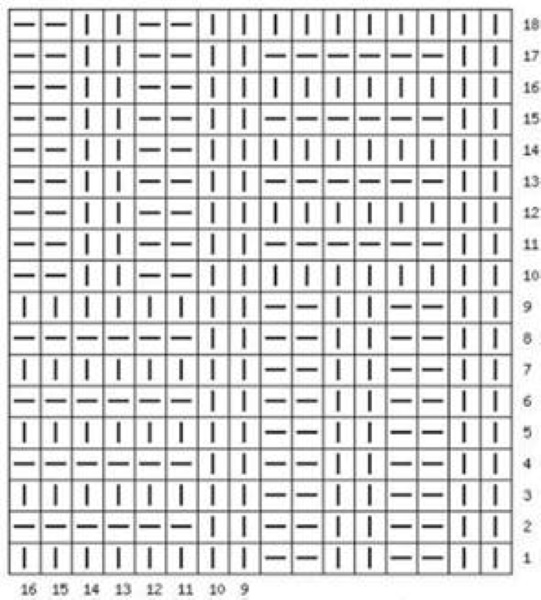
The knitting pattern is done according to the scheme:
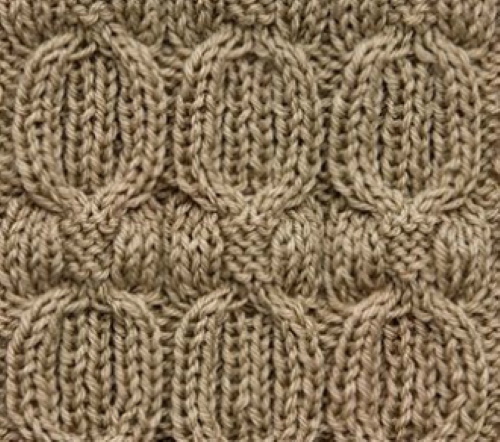
Explanation of symbols:
| Symbol | Meaning |
 | LP in the front row or IP on the back side. |
 | IP in the front row or LP on the back side. |
 | Cross with a right tilt (CRT): remove 3 sts onto a free needle behind the work, 2 LP, from an additional needle 2 IP, 1 LP. |
 | Left-leaning cross stitch (LLC): slip 2 sts to spare needle before work, 1 LP, 2 RP, 2 LP from spare needle. |
 | Intercepting loops with a right tilt (ILT): remove 3 sts onto a free needle behind the work, 2 LP, 3 LP from an additional needle. |
 | Intercepting loops with a left tilt (ILT): remove 2 sts onto a free needle before work, 3 LP, 2 LP from an additional needle. |
When performing the first rapport in a row, 1 KRP is removed, and the second is knitted as IP. The same is desired when knitting the last rapport in a row: the very last loop is performed as IP, and after it, the edge loop is also knitted as a purl. With this arrangement of loops, it will be easier to perform a connecting seam on the back of the hat.
From the first to the 8th row, knit with needles No. 3.5 to provide the elastic with greater density. From the 9th to the 36th row inclusive, work with needles No. 4.5 - this is the main part of the headdress. From the 37th row, switch again to tools No. 3.5.
Instructions for knitting a headdress:
- Cast on 148 sts onto the needles (2 sts in addition to the edge sts are added for pattern symmetry).
- Row 0: knit all stitches as if they were RP.
- 1 R: KrP, then repeat the motif 12 times to the end of the row *2 IP, 2 LP, 2 IP, 2 LP, 2 IP, 2 LP*, 2 IP at the end.
- 2 R and all even rows: make a pattern according to the fabric pattern (over purl stitches – WP, over front stitches – LP).
- 3, 5, 7 R: KrP, then repeat the motif 12 times to the end of the row *2 IP, 2 LP, 2 IP, 2 LP, 2 IP, 2 LP*, 2 IP at the end.
- 9 R: KrP, then rapport *2 IP, PPNL, PPNP*, 2 IP.
- 11, 13 R: KrP, then repeat 12 times * 2 IP, 3 LP, 4 IP, 3 LP*, 2 IP.
- 15 R: KrP, repeat the rapport 12 times *2 IP, 10 LP*, 2 IP.
- 17 R: KrP, then rapport *2 IP, PNV, PNL*, 2 IP.
- Starting from row 19, the pattern is repeated again from rows 1 to 18.
- 37-44 R: switching to knitting needles No. 3.5, complete the pattern according to diagram 1-8 R.
- 45 R: KR, 1 IP, then repeat *2 P remove to a free knitting needle in front of work, knit 2 IP together as LP behind back walls, 1 LP, knit loops from an additional knitting needle as LP, remove 3 P onto a free knitting needle behind work, 2 LP, knit 1 LP from an additional knitting needle, then 2 P together as LP behind back walls, knit 2 P together as LP*, KR.
- 46 R and all even rows until the end of knitting Beanie: perform the pattern according to the fabric pattern (over the purl stitches - WP, over the front loops - LP).
- 47 R: KR, 1 IP, then rapport *3 P together knit as LP with the central loop, 2 LP, 3 P together knit as LP with the central loop, 1 IP*, KR.
- 49 R: follow the pattern, over the purl stitches – WS, over the front stitches – LP.
- 51 R: KrP, 1 IP, then rapport *2 LP together, tilted to the left, 2 LP together, tilted to the right, 1 IP*, KrP.
- 53 R: KrP, 1 IP, then rapport * 2 LP together, tilted to the left, 1 IP*, KrP.
- 55 R: KrP, 1 IP, then rapport *1 LP, 1 IP*, KrP.
- 56 R: follow the pattern.
The remaining loops in the work need to be pulled together with a thread, fixed and the thread cut. In the end, it is necessary to sew the Beanie from the back using the mattress stitch technique.
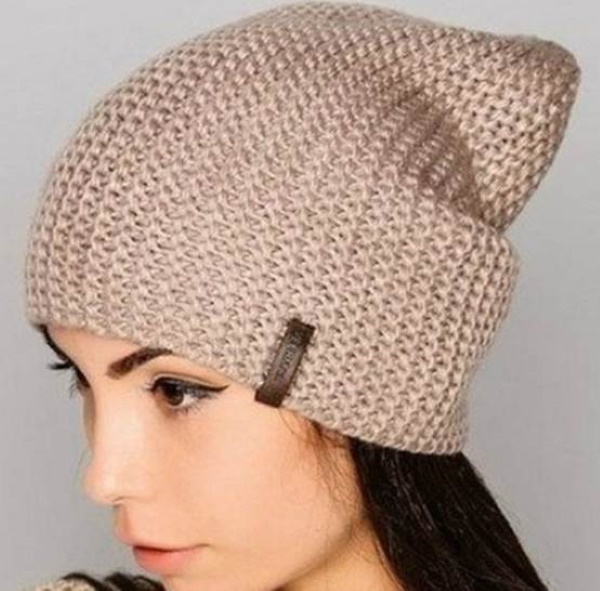
Chain Beanie
The Beanie hat with knitting needles (the knitting pattern is more suitable for experienced knitters) is knitted with large knitting. It is better to use knitting needles No. 5, so that it turns out more voluminous.

The yarn should be semi-wool, 250 m per 100 g. In the master class, the head is knitted with a thread in 2 additions. In total, 1 skein of yarn is required to create a size 56 Beanie. Its length from the crown to the bottom edge is 34 cm. Since the hat will be dense and it is knitted with large knitting, you will need to cast on only 49 P.
First, the first wedge is knitted:
- 1 R: perform all loops as LP, the last one – KR, performed as IP.
- 2 R: perform all loops as IP.
- 3 R: KP slip, then repeat until there are 6 P left on the needle on the left *1 IP, slip 1 P onto a free needle in front of the work*. The 6th P should be wrapped from back to front and the work turned.
- 4 R: repeat to end of row *1 LP, slip 1 P onto free needle behind work*.
- 5 R: work all loops as LP, without knitting 6 loops at the end. Work the 6th R as LP together with the wrap. The 5th R should be wrapped with yarn from front to back. Turn the knitting.
- 6 R: work all loops in the row as if they were RP.
- 7 R: knit a row of LP to the wrapped loop, which is performed as LP behind the front wall together with the wrap. 4 P. remain unknitted. The last of them must be wrapped from front to back, turn the knitting.
- 8 R: perform all loops as IP.
- 9 R: repeat the 3rd row until there are 4 sts left on the needle on the left. Work the loop with the wrap together from the back of the needle (lift the wrap from the back onto the needle and work these 2 sts as 1 IP). Wrap the 3rd st from back to front. Turn the work over.
- 10 R: perform the rapport to the end of the row *slip 1 st onto a free needle, yarn to the back, 1 knit stitch*.
- 11 R: work all loops as LP. Knit the 3rd P together with the wrap as LP behind the front wall. Wrap the 2nd P from front to back. Turn the knitting over.
- 12 R: perform all loops as IP.
- 13 R: make all loops as LP, without knitting 2 P at the end. Make the loop with the wrap as LP behind the front wall. The last loop is KrP, made as IP.
- 14 R: knit all loops as if to RP.
Knitting in a similar pattern is repeated 16 more times to make wedges. If you need to adjust the size of the Beanie hat, you can increase or decrease the number of wedges. At the end, you need to close the loops with knitting needles in the usual way. The loops of the crown are pulled together with a thread, fixed and the end of the thread is hidden inside the headdress.
Beanie with braids
In this version, the hat is knitted from thin threads so that the pattern is more pronounced. The pattern repeat is 12 P.
To work you will need:
- 150 g of yarn (20% wool and 80% acrylic, 135 g per 50 m);
- knitting needles No. 3.5;
- knitting needles No. 4, 5.
The hat is knitted with 2 folds of yarn.
Instructions for knitting a Beanie:
- Cast on 96 sts using needles size 3.5.
- Knit a 2x2 elastic band 6 cm high.
- Switch to needles #4.5.
- 1 R of the pattern: KR, then complete the rapport to the end of the row *2 IP, 6 LP, 2 IP, 2 LP*, KR.
- 2 R and all subsequent even rows are performed according to the pattern: over the front loop - LP, over the back loop - IP.
- 3-6 R: repeat alternation of rows 1 and 2.
- 7 R: make a rapport, starting with an overlap in a block of 6 LP *slip 3 P onto a free needle, knit the next 3 P as LP, make 3 LP from an additional needle, then according to the pattern 2 IP, 2 LP, 2 IP* to the end of the row.
- 8 R: knit according to the pattern: over purl stitches – RP, over front stitches – LP.
- 9-15 R: repeat according to the pattern of rows 1-6.
- 16 R: repeat row 7.
- Alternate rows until the hat is the desired length.
- Start decreasing the loops. In a row, all double IP are knitted together.
- Gradually make the braid width smaller by 1 P every other row.
- When there are 8 sts left, pull them together with thread and sew the crown, then sew the back seam on the hat.
Cut the thread and hide it inside the finished headdress.
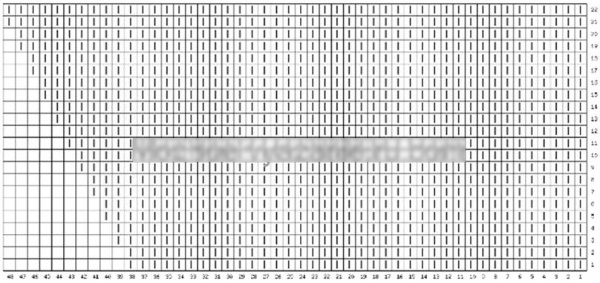
Abstract checkerboard pattern
The Beanie hat with knitting needles (the knitting pattern will be clear to beginners) is knitted from regular front and back loops. Although the headdress is single-layered, it turns out dense and warm. For work, you will need semi-wool yarn, 2-3 mm thick. The hat is knitted with knitting needles No. 5.
The pattern diagram shows only the odd rows, and the even ones should be knitted in the same way as the loops of the previous row: above the IP - purl, on the LP - front loops. The horizontal lines on the diagram show the purl loops, and the vertical ones - the front loops.
Beanie knitting algorithm:
- Cast on 80 stitches onto knitting needles.
- 1-15 R: knit with a 2x2 rib pattern.
- 16 R and further: perform the rapports according to the pattern until the length of the hat reaches the desired height.
- Decreases begin, where in row 1 you first need to perform decreases over blocks of 2 sts.
- 2 R: knit stitches according to pattern.
- 3, 5, 7, 9 Rows: Work 1 UB over each garter st block.
- 11 R: adjacent IP and LP are knitted together as LP, the remaining loops are knitted as LP.
- 13 R: knit all loops with UB: 2 P together using LP.
When the fabric is knitted, you need to pull the remaining loops with a thread, fix it and cut it. For decoration, you need to sew on a pompom.
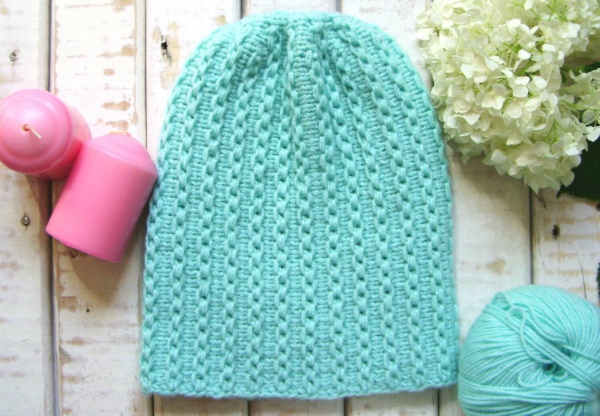
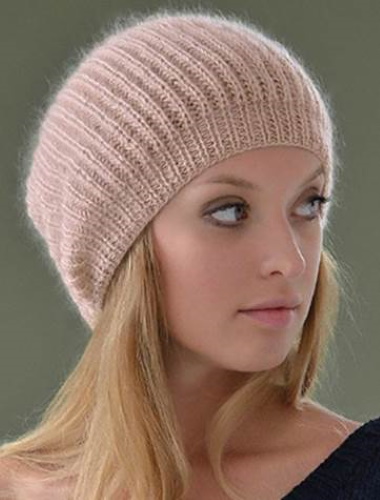
Spring Beanie Knitted with Rib
The Beanie hat with knitting needles, the knitting pattern of which is very simple, is made of thin threads. For work you will need 2 skeins of 25 g of Mohair Haze yarn (super kid mohair with extrafine merino) and 1 skein weighing 50 g of Fine Lace (alpaca + merino). You need to knit with knitting needles No. 3.25. The knitting density is 20 P per 56 rows, which in ratio is equal to a sample of 10x10 cm. The headdress is knitted with a double thread.
The master class uses a patent loop (PL), the execution of which is similar to a regular front loop. You need to insert the knitting needle from the right into the next loop of the previous row and perform LP. The loop of the current row must be dropped.
Knitting instructions:
- Cast on 75 sts.
- 1 R (front side): 2 LP, then repeat *1 IP, 1 LP*, perform the last KRP as LP.
- 2 R (wrong side): 1 LP, then repeat *1 IP, 1 LP* to the end of the row.
- 4-10 R: repeat alternating rows 1 and 2.
- 11 R: 1 LP, then rapport *PP, 1 LP* to the end.
- 12 R: 2 LP, *PP, 1 LP* to the end.
- Repeat alternating rows 11 and 12 until the hat is the desired height. Finish with a row on the wrong side.
- To form the top, knit 1 R: 1 LP, then repeat until there are 2 P left on the needle *PP, 3 IP together*, PP, 1 LP. You should have 39 P in your work.
- In the next row, continue decreasing: 1 LP, then repeat until the end *1 IP, 1 LP*.
- The next row is made with all loops with UB: perform 2 LP together, knit the last loop as LP. There will be 20 P. left in the work.
- At the end, all loops are knitted 2 together as IP. 10 P will remain.
At the end, all the loops need to be pulled together and secured. Sew the fabric at the back with a knitting needle. According to this pattern, you can knit thicker Beanie hats, but then you will have to take knitting needles with a larger diameter and reduce the number of loops you cast on.
Video on how to make a beanie hat with knitting needles
How to knit a beanie hat with knitting needles: