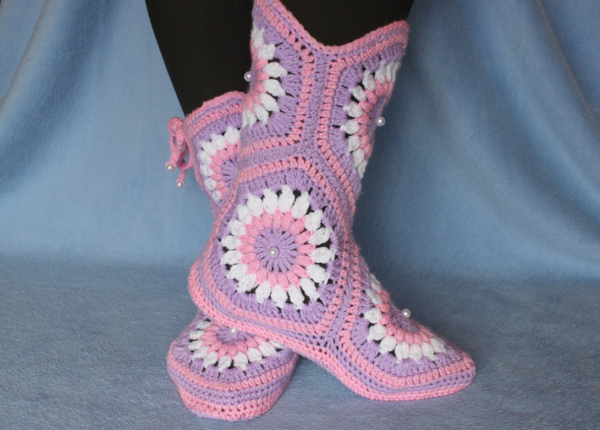
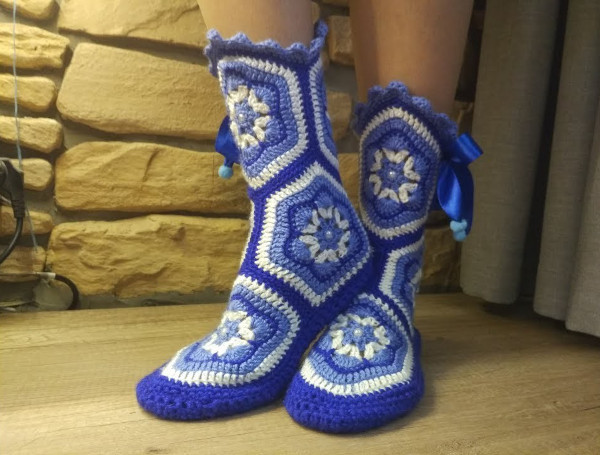
Hexagonal boots look unusual because they are made from unusual elements. 6-sided crochet with any pattern. It is not necessary to make all the motifs the same. To adjust the size of the boot in the hexagons, add or subtract the number of rows.
Features of hexagon boots
Crochet boots from hexagons are not difficult to knit, but to create them you need to have at least minimal experience working with basic knitting elements. Models of house slippers from such motifs look unusual. The model itself in the form of boots is high, so it sits comfortably on the foot, does not slip off, and is easy to put on and take off due to the elasticity of the yarn.
Since knitted house shoes play not only a decorative but also a practical role, it is better to choose warm and thick yarn. The optimal ratio would be 50:50% or 70:30% wool and acrylic. These threads are strong, hold their shape, and items made from them can be washed in a washing machine.
They are resistant to abrasion, and if you make boots with a felt insole, they will last for several years. If the sole is knitted from the same yarn as the slippers, it can wear out, snags will form on it when worn, as a result of which the insole will tear or unravel.
When crocheting, you should take into account the ratio of the tool diameter and the thickness of the yarn. The average knitting density will be obtained if you take the threads and hook of the same size.
If you choose a tool with a smaller diameter than the yarn, it will be difficult for it to grab the thread, the knitting will be dense, it will be harder to work with. In the opposite case, when the hook is thicker than the yarn, the fabric will be loose, its ability to retain heat will deteriorate, the boots will quickly stretch and deform.
Conventional designations in MK
The following abbreviations are used in the descriptions of the instructions:
- R – row;
- P – loop;
- VP – air loop;
- SS – slip stitch;
- PshS – lush column;
- CH – double crochet;
- С2Н – double crochet;
- С3Н – a column with three yarns;
- PS1N – half double crochet with one yarn over.
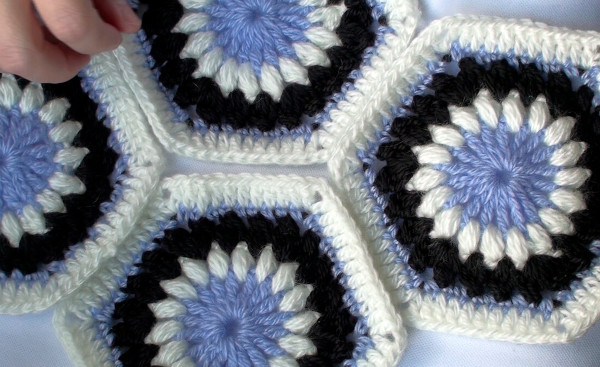
Hexagon boots with a simple motif
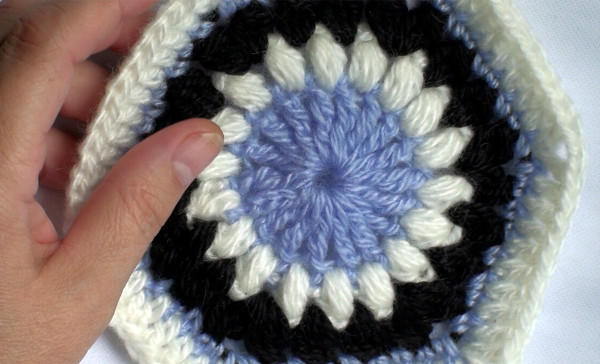
In total, to create the boots you need to knit 10 hexagons of the same size. The pattern on them can be different, but the knitting density should be the same.
The master class uses Karachai yarn in blue, white and black. For work you will need hook №3.5 or №4.
Crochet boots made of hexagons are knitted according to the algorithm:
- Start working with blue threads. Knit 1 VP into the ring and tighten it.
- 1 R: 4 lifting VP, knit 17 C2H into the ring. The lifting loops are counted as 1 column, so there are only 18 P in the row. Make a SS in 4 VP at the beginning of the row, tighten the ring so that there is no gap.
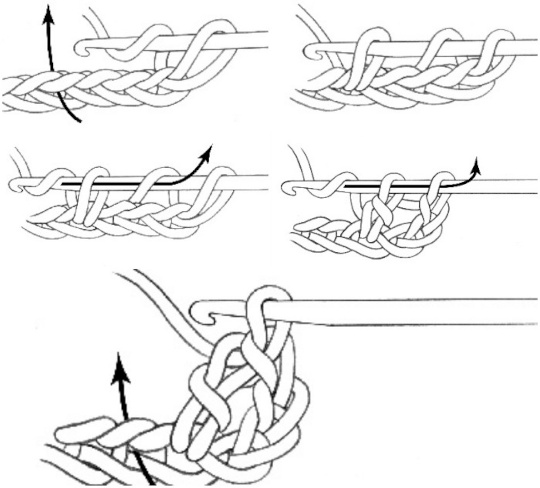
- 2 R: change the thread to white. Make 3 lifting VP. In the same loop from which the lifting was formed, knit 1 PshS (yarn over the hook, pull the thread out from under the loop of the lower row, yarn over the hook again, pull the thread out of the same loop again, yarn over and knit all the loops together). Next, make 1 VP, in the next gap between the columns of the lower row, make 1 PshS. Continue making PshS and 1 VP between them to the end of the row. Finish the row with 1 VP and SS.
- Bring the thread out into the arch.
- 3 R: Change to black thread. Make 3 VP. In the same arch, make 2 dc and knit all loops on the hook together. 2 VP between PshS. In the next arch, make 2 PshS, between which also make 2 VP. In each arch in the row, make alternation: 1 PshS, 1 PshS and 2 PshS, and between them always 2 VP. Continue to the end of the row. Finish with 2 VP and SS.
- Change the blue thread. Insert the hook into the arch, grab the uncut blue thread, pull out the loop, and tighten the black thread so that there is no gap between the posts of the previous row.
- 4 R: 1 VP, in the first PshS make 1 sc, then in the arch also 1 sc. Continue making sc in each single PshS and the arch. In places where 2 PshS are made, you need to make the corners of the hexagon. To do this, make 1 sc in the arch, 2 VP and another 1 sc in the same arch. Having knitted to the end of the row, you need to make a sl st.
- 5 R: change the thread to white and make 3 lifting VP. In each Sc of the previous row, make 1 C1H. In the arches of 2 VP, you need to make 2 C1H. Finish the row with SS.
- Make 1 VP, cut, tighten the thread, hide the end.
Next you need to knit 9 more of the same motifs for 2 boots.
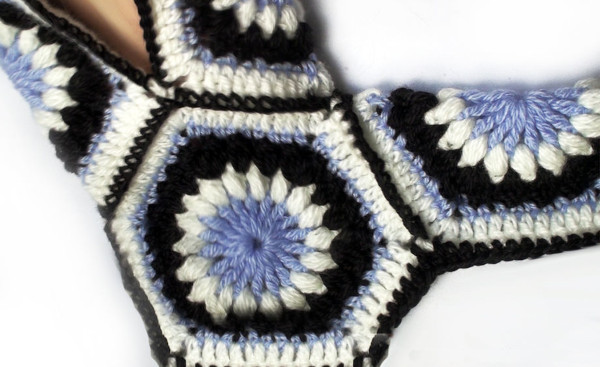
Assembling boots from hexagons
To assemble the boot, you need to sew the connected motifs together. This can be done with a needle or a hook using Sc. Start assembling from the top.
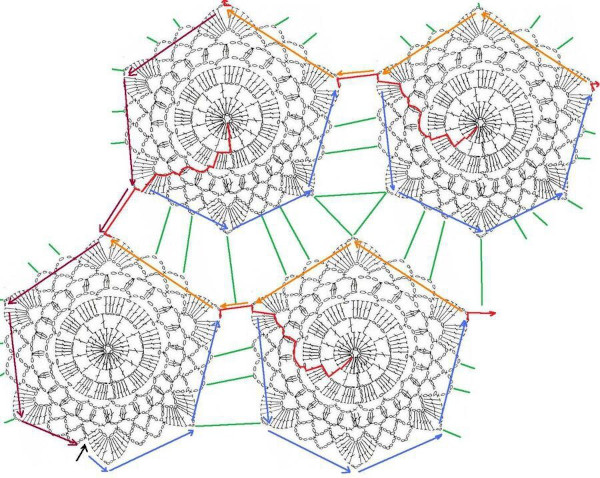
Scheme for assembling crochet motifs:
- First you need to connect the edges of 2 hexagons with black thread.
- Insert the hook into the corner of the first and second 6-sided shapes, make 2 VP.
- Insert the hook into the next loop of the first and second motifs and make Sc.
- Continue making sc to the next corner.
- Take the next 6-gon. Continue making sc along the top edge of the first motif and the edge of the 3rd.
- Attach the 4th hexagon in the same way using Sc. Having knitted to the corner, the thread needs to be cut.
- Place the 2 motifs on the left together.
- Then fold 2 motifs on the right.
- Turn the work over.
- Sew the edges of the bottom and left, then the left and right, and then the bottom and right hexagon.
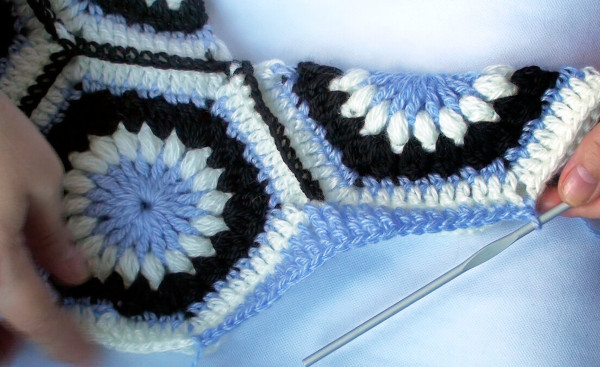
- Tie the top of the boot with sc.
- Next, you need to fold the 5th hexagon in half and sew it to the part of the boot where the instep will be.
- Sew along 2 edges of the 5th motif using sc.
- Next, proceed to tying the bottom of the boot with blue thread. Start the seam from the upper corner on the heel.
- Fasten the thread by catching the corner of the upper motif. Perform 1 VP.
- Work the next 2 sts as Sc, the next 3 sts as PS1N.
- Next make 3 C1H, 3 C2H.
- Next make 2 C3H, 3 C2H, 3 C1H, 3 PS1H, 3 Sc. You need to finish at the lower corner of the motif located on the foot part.
- Tie part of the sock with sc without cutting the threads.
- Knit a row on the other side of the boot in the same way, continuing knitting from the corner on the foot to the corner on the heel.
The thread needs to be secured and cut. The last step will be knitting the sole.
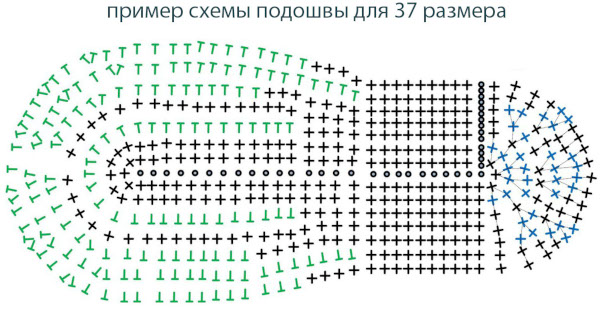
Knitting the sole
The boots will be comfortable and soft if the sole is made with a 2-ply thread. When crocheting with one thread, like hexagons, the pattern forms knots that are felt by the foot if you step on them. This can cause not only discomfort, but also become the cause of calluses after wearing the slippers for a long time. Therefore, the sole should be thicker and denser so that the protrusions on it are not felt.
Knitting algorithm:
- Place the white and blue threads together and make 6 VP.
- 1 R: 4 sc and in the last loop you need to make another 1 sc (increase). Turn the knitting.
- 2 R: 1 VP, 5 sc, and in the last loop another 1 sc. Turn the knitting.
- 3 R: 1 VP, 6 sc and 1 more sc in the last loop. Turn knitting.
- 4 R: 1 VP, 7 sc, increase in the last loop.
- 5 R: 1 VP, 8 Sc, make an increase in the last loop.
- 6-9 R: repeat the rows in the same way with an increase in the last loop.
- 10-16 R: knit rows without changes, not forgetting to make 1 VP at the beginning of each for lifting.
- 17 R: 1 VP, skip 1 P of the bottom row (decrease), make 1 Sc in the second loop and continue knitting them to the end of the row. There should be 11 P left at the base of the boot.
- 18 R: Make 1 more decrease at the beginning of the row after 1 ch lift. Continue the row with sc.
- 19-23 R: knit without changes 10 sc in a row.
- 24 R: 1 VP, skip the next loop and make a Sc in the second one, continue to the end of the row.
- 25-29 R: knit without changes 9 sc in a row.
- 30 R: 1 VP, skip the 1st loop and make a sc in the second, continue to the end of the row.
- 31-36 R: knit without changes 8 sc in a row.
- 37-38 R: do as rows with decrease. At the end there will be 6 P.
- Without cutting the threads, tie the sole with the same threads. To do this, you need to do 1 sc in the side part of each row.
- Fasten the thread, cut it, hide the end.
Knit the second insole in the same way.
Connection of boot and sole
Once the sole is ready, you need to attach it to the boot.
Sewing elements step by step:
- Place the sole and boot with loops facing each other. For convenience, you can secure the elements with pins.
- Grabbing parallel loops of 2 elements, tie them to each other, hooking 1 P of the boot and 1 P of the insole. Make the connection as Sc.
- After tying, secure the thread, cut it and hide its end.
The second boot is tied in the same way.
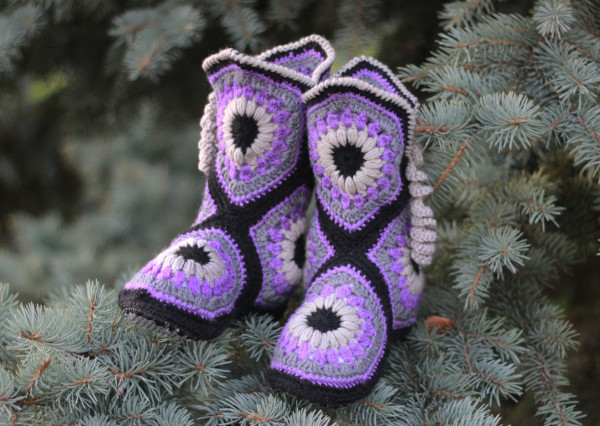
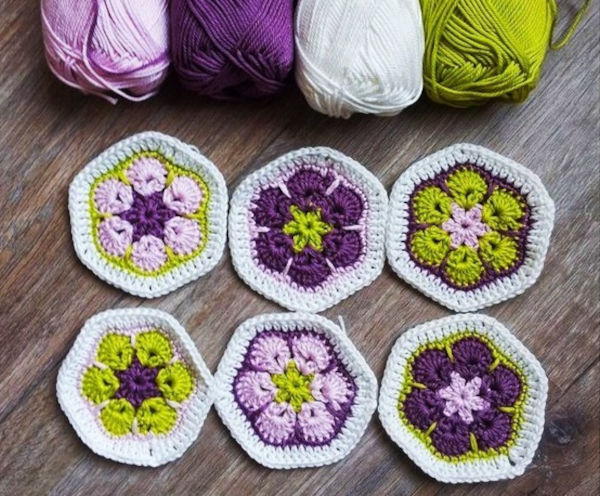
Hexagonal Boots with African Flower Motif
Crochet hexagon boots in this version are made from only 3 motifs for 1 slipper. Insoles are used as soles. The master class provides calculations for knitting boots of size 37 (insole length is 24 cm +/- 1 cm).
What materials are needed?
To knit boots you will need:
- threads of any color, consisting of 50% wool and 50% acrylic for product stability;
- a hook that matches the diameter of the yarn;
- thick nylon thread;
- 2 felt insoles (can be replaced with felt ones);
- 2 water-resistant insoles.
You can use 2 more felt insoles instead of waterproof ones. You can also use only 1 insole for each boot, but then they will be less soft and warm.
Calculating boot size
Crochet hexagon boots according to this master class are knitted for shoe size 37 (insole length is approximately 24 cm).
To calculate the diameter of the motif, you need to follow the instructions:
- The length of the insole must be divided by 2 (24: 2 = 12).
- Add 1 cm to the resulting number for errors (12 + 1 = 13).
- 13 cm is the diameter of the motif, its length from one corner to the opposite one.
If the number after calculations turns out to be fractional, where after the decimal point there is a digit of 5 or more, it must be rounded up. If the fractional part is 4 or less, the digit is rounded down.
You can adjust the diameter of the motif by adding rows while knitting.
Knitting a motif
The size of each motif can be adjusted by adding rows after completing the main pattern - African flower. When adding rows, you need to make increases in each of them at the corners of the hexagons. In total, you need to prepare 6 motifs for 2 boots.
Knitting algorithm:
- Make an amigurumi ring using the main color thread.
- Perform 3 VP.
- 1 R: Air loops of lifting will replace 1 C1H. Next in KA perform 1 C1H, make 1 VP. Then repeat the rapport 5 times: 2 C1H in a ring, 1 VP.
- Tighten the ring, make a SS at the end of the first row in the third chain stitch from the lifting column.
- Using connecting loops, move to the 3rd P of the row, which is located in front of the first arch from the VP of the lower row.
- Attach a thread of a different color using a SS into the arch.
- 2 R: make 3 VP, 1 C1H in the same arch, 1 VP and 2 more C1H. It turns out that the pattern repeat (2C1H, 1 VP and 2 more C1H) is made in each arch of the first row. No air loops are made between the repeats. Continue to the end of the row according to the pattern. There should be 6 repeats in the row. At the end, make a SS in the 3rd lifting P at the beginning of the row.
- Using connecting posts, move into the arch of the new row.
- 3 R: make 3 VP (they replace 1 C1H), in the arch make 6 more C1H (in other arches you need to make 7 C1H). Then in the next arch, skipping all the loops of the bottom row, make 7 C1H. Repeat the rapport for all corners of the hexagon.
- Change the thread to the main color. To do this, make a SS in the 3rd VP at the beginning of the row, capturing the thread of the new shade.
- 4 R: make 1 VP, in each next loop of the first petal make 1 sc. Then insert the hook into the arch of the 2nd row, pull out the loop, knit a sc. Then 7 sc of the next petal and again 1 sc in the arch of the second row. Continue to the end of the row.
- 5 R: now continue knitting in a circle. Without SS, knit 3 sc in the loops of the 5th row. In the 4th loop of the row (the top of the petal), make 1 sc, 1 VP, in the same loop of the top of the petal make 1 sc, and then 3 sc. Skip the loop that stretches from the second row, and in the next P continue knitting the rapport of the petals: 3 sc, in one loop 1 sc, 1 VP, 1 sc, 3 sc, skip the extended loop. Continue knitting to the end of the row.
According to the pattern, the motif is complete, but if you need to add rows to the desired diameter, they are done like this:
- Without VP to go to a new row, continue knitting in a circle. In the 6th row, perform Sc or C1N in each loop. At the corners of the hexagon, make increases: knit 2 in one loop.
- Add rows until the diameter of the motif reaches the desired size.
Insole binding
You need to start assembling the boot by tying the insole with nylon thread:
- First, you need to puncture holes in the insole so that you can easily thread the needle through them. You will need an awl for this. If there are 2 insoles on 1 boot, then they need to be glued together with silicone glue and 2 insoles need to be punctured at once so that the holes in them are located in the same places.
- It is more convenient to make punctures starting from the heel and moving towards the watch insole. You need to step back about 0.5 cm from the edge of the insole, and the distance between punctures should be about 0.4-0.5 cm.
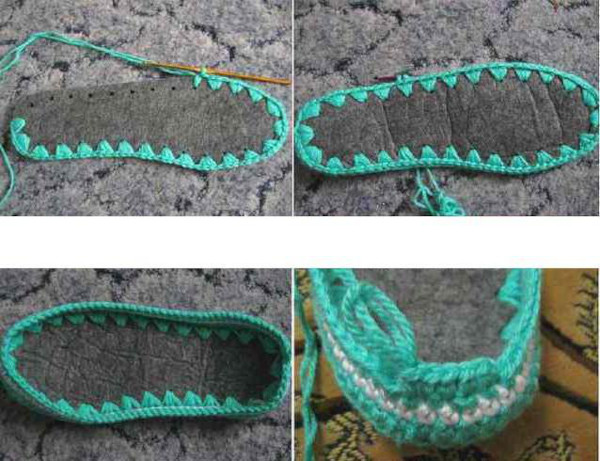
- For tying, you need a thin hook that will easily fit into the punctured holes on the insole. Insert the tool into the hole on the heel, pull the thread through the hole, tie a knot to secure the thread.
- Several seams need to be made in each hole on the heel so that the boot does not become deformed when worn.
- Make another 1 sc in the same hole where the knot is tied.
- In the next hole make 1 sc, pulling the thread through the first loop.
- In the same hole make another 1 sc, thereby increasing the number of loops in the row on the heel. These increases are needed so that the boot does not tighten and sits comfortably on the foot.
- In the next 3 holes you also need to knit 2 sc.
- Next, perform 1 sc in each hole.
- Once you reach the rounding on the top of the insole, you also need to make 2 sc in each hole.
- Finish knitting the insole edging to the end. On the curves, you need to make 2 sc in 1 hole.
- To connect the last and first columns (finish the row), you need to pick up the first 2 sc and knit 1 ss behind them.
- In the next loop make another 1 SS.
At the end, the thread needs to be tied into a knot, cut and hidden. The second insole is tied in the same way.
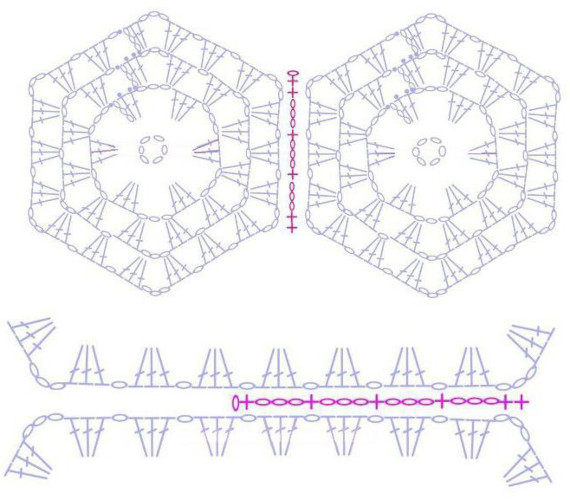
Combining boot motifs
Next, move on to connecting the motifs. They need to be laid out in front of you with the front side up. The top piece will be the toe of the slipper, the bottom ones will be the side elements. You will need to sew the edges that touch each other.
Crochet hexagonal boots are made with yarn of any color. To connect the motifs, it is better to use the same threads that served as the basis for creating the hexagons.
Step-by-step instructions for connecting parts:
- Fold the lower right and upper motifs together, with their right sides facing each other.
- Using a plastic needle, connect the elements on any side, stitching only 1 edge.
- You need to sew loop to loop to get an even seam.
- Without breaking the thread, sew on the 3rd motif, connecting the edges of the 1st and 3rd elements.
- Fasten the thread and cut it.
- Next, you need to stitch the boot at the heel. Fold the motifs in half with the right side facing inward.
- You need to sew 1 edge on the back of the boot.
- Fasten the thread and cut it.
Once the motifs are connected, you need to turn the boot right side out and move on to tying the bottom of the slipper:
- You need to attach the thread from the heel side, skipping 1-2 stitches from the seam line.
- The binding is done as SBN in 2 rows along the bottom edge of the boot. At the corners of the motifs you need to make 1 UB.
- To smooth out the angle of connection of two motifs, you need to knit 3 P (1 P from the first motif, 2nd P along the seam line and 3rd P from the second motif) high.
- The first column is knitted as a half-column with a yarn over, the second as a C1H, the third as the first. This technique will help to increase the line of the rise on the foot.
- The second row is knitted only with sc without decreases or increases.
Connecting the insole and boot
Next you need to attach the boot to the insole:
- Place the insole with the outer side facing down.
- Try the slipper on the insole, attach the parts to each other. First, from the toe side, you need to fasten the insole and the boot, then from the heel side.
- Then connect the side parts with pins.
- Using a plastic needle with yarn threaded into it, stitch the boot along the perimeter, starting from the heel. It is desirable that the loops along the edge of the insole and the boot itself match.
At the end, the thread needs to be tied in a knot and cut, and its end hidden inside the knitting. For decoration, you can make a binding of the boot from the ankle side. This should be done with yarn that differs in color from the main shade. After 1 row of ScN, you need to change the color of the thread to the main one, make the binding with another row, but already as C1N.
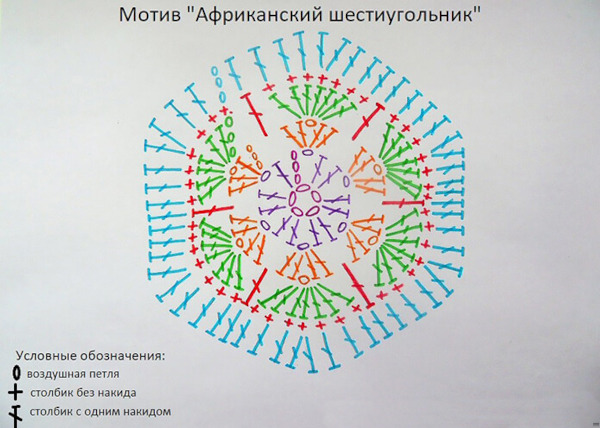
Hexagon Knitting Pattern Ideas
Since the motifs can be anything, you can draw your own pattern or choose from those offered in other knitting master classes.
Conventional symbols in diagrams:
| Schematic representation | Element name | Conditional abbreviation |
| Lush column | PshS | |
| Double crochet | C1H | |
| Double crochet on chain stitch | C1Nvp | |
| Double crochet in one loop | C1H in one loop | |
| Air loop | VP | |
| Single crochet | SBN |
Examples of motives:
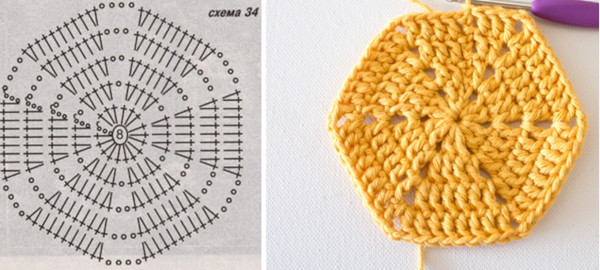
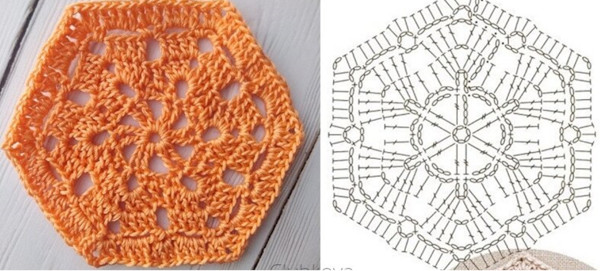
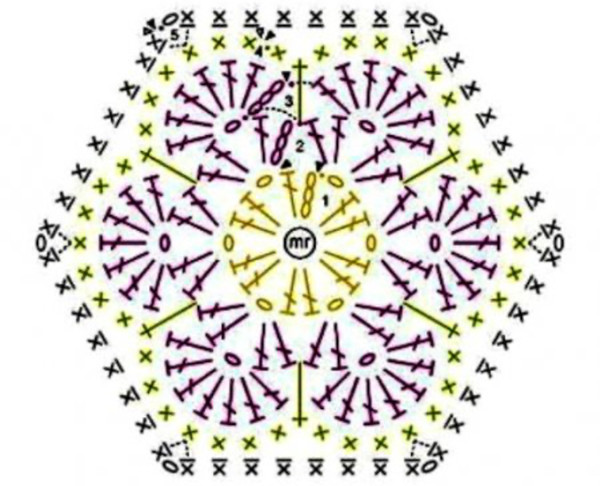
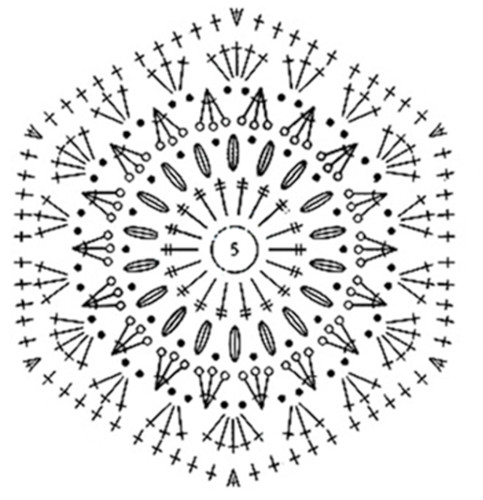
To knit hexagon boots, you only need basic crochet skills. You can choose any patterns based on the size of the insole.
Video about crochet hexagon boots
Master class on knitting slippers-boots from hexagons: