Bright balloons reaching for the sky delight both children and adults. If the young Those who love to draw will want to display them on paper, it won't be difficult to do. The main thing is to arm yourself with tools. In most cases, a simple pencil, an eraser, and a few colored pencils or paints are enough.
Drawing tools
Drawing a balloon begins with choosing tools and materials. For the first time, it is recommended to buy only what you can’t do without. This will help avoid buying unnecessary things, especially for beginning artists.
When choosing tools and materials, preference should be given to the best. Too cheap items can be of poor quality, and working with them will lead to disappointment.
Brushes
If you plan to create an image using paints, you need to pay close attention to the choice of brushes. These tools come in different shapes and sizes.
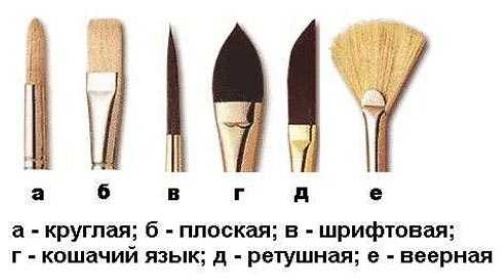
For example:
- round brushes, which have sharp ends and long bristles. They can be used to apply wide and thin strokes;
- brushes with short bristlesThey are easy to use and are well suited for painting small elements of a drawing;
- flat brushes. They are used when it is necessary to paint large areas. The length does not matter.
The material of the brush bristles can be as follows:
| Brushes | Description |
| Columns | Expensive, but strong and durable, these brushes create beautiful paintings. |
| Squirrel and synthetic | They are in the middle price category. Drawings created with their use are beautiful. Such brushes help to paint details and fill in well. |
| Eastern | This brush will spring. It is convenient to paint details with it. |
| From goat wool | They are soft and cover large areas well with wash. |
Pencils
It is more convenient to work with pencils than with paints.
Artists often give preference to them because they know about their qualities such as:
- economy;
- compactness;
- versatility.
The advantages of pencils include the following:
- they are enough to create a large number of drawings;
- the set is convenient to take with you on a trip;
- they are suitable for creating any drawing, regardless of its complexity and content. Often, 1 simple pencil is enough.
When choosing pencils, you should pay attention to the letters indicating the hardness of the lead:
- "N" is put on hard pencils. They are intended for technical drawings. The trace that they leave on the surface is pale and inexpressive;
- "IN" is placed on soft pencils. They are suitable for creating artistic drawings. Their lead contains less clay and more granite.
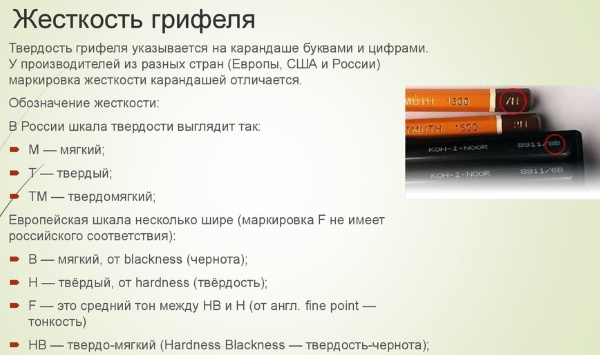
In addition to the letter, numbers are used to indicate the softness and hardness of pencils, which are located next to the letters. The smaller the number, the harder the lead, and the softer the lead, the more often you have to sharpen the pencil. A line drawn with a soft pencil is blacker and easy to smudge.
When choosing, preference should be given to those where the hardness is clearly indicated. Beginner artists will benefit from pencils "2B".
When using pencils of different softness to create drawings, it is necessary to make sure that black is the predominant color. At the same time, there is no need to expand the range of halftones too much.
Beginning artists are advised to heed the following tips regarding sharpening pencils:
- use a sharp knife;
- try to make the sharpening longer. In this case, the pencil will dull more slowly;
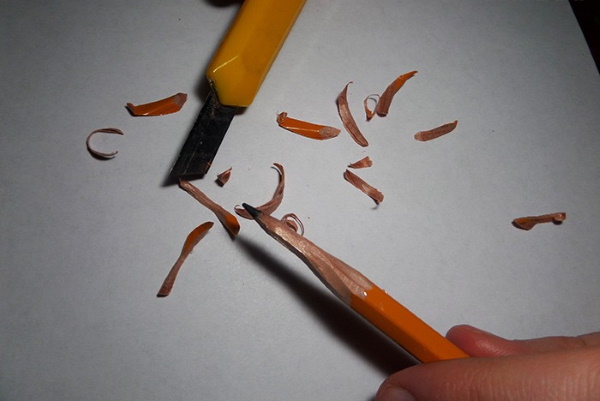
- When creating a large number of small details, sharpen the pencil as often as possible. Its tip should always be sharp. In this case, the lines will be thinner;
- When sharpening soft pencils, try to sharpen them so that the frame is well removed from the tip of the lead. Otherwise, it will scratch the base and the image may be damaged.
When using pencils with a soft lead, you should additionally use a tool called a fixer. It is needed to fix the lines: it helps to avoid smudging.
When drawing any object, you must remove unnecessary lines. They appear not only as a result of a mistake, the artist creates them to simplify the work. Therefore, in addition to pencils, you need to buy an eraser. Preference should be given to the one made of soft rubber. It removes pencil marks more effectively than others.
Among the varieties of pencils, one can distinguish types that have a wide lead, similar to a chisel. It is used by artists to draw broad lines. Simple pencils are usually used to create only sketches of drawings, and colored pencils are used for coloring. There are a huge number of them, and experimenting with them is an interesting activity.
For example, you can:
- mix 2 different colors to get a 3rd one;
- mix 3 or more colors. To do this, simply apply 1 color to the paper, then the 2nd and 3rd on top;
- connect colors in the following way: place dots of different colors next to each other on paper, the result will be an unusual effect;
- instead of dots, draw multi-colored lines. This is the technique used in the works of the famous artist Georges Seurat.
You can find graphite rods without a frame on sale. They, like simple pencils in a frame, can be hard or soft. Hardness and softness are indicated by the same letters and numbers. Graphite rods are leads. They are used in drawing less often than regular pencils, they are good for creating an uneven texture. With their help, you can quickly cover a large area.
Fountain pens
A hot air balloon can be drawn not only with paints or pencils, but also with a ballpoint pen.
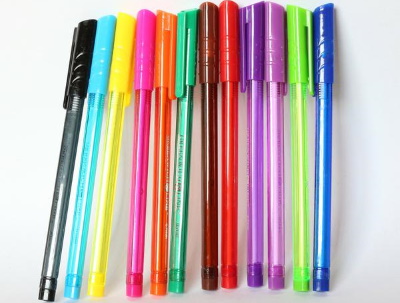
The varieties of such handles include:
| Type of fountain pens | Description |
| Feather | Most familiar to experienced artists. These pens are a holder and a removable nib. The best are steel removable nibs with a split tip. Depending on how much pressure is applied, different lines can be obtained. |
| Technical | They are compact, so they are easy to take anywhere. A special tip tube allows you to create lines of the desired thickness |
| Ballpoint | They are used to create drawings. The main thing is to ensure that when using them on paper, no blots are formed. The lines must be drawn qualitatively, without "slips" |
Watercolor
A set of watercolor paints does not necessarily have to be large. You can prepare 5-7 colors. They will be enough to create multi-colored drawings.
The main thing is to mix colors correctly to obtain new shades.
Gouache
Gouache paint is velvety. You can buy a small set of professional gouache for little money. In some cases, gouache can be mixed with watercolor.
Paper
The main material for creating a drawing will be paper. You need to choose paper that suits the paint. For watercolors, for example, special watercolor paper, for pastels - pastel.
If the drawing is to be done with pencils, you can use regular paper from a drawing album. The main thing is that the material is not too thin. Otherwise, it will suffer from the pressure of the pencils and eraser, which will ruin the beauty of the finished drawing.
Other materials
To work you will need the following additional tools:
- sharpener;
- paper towels;
- water containers;
- liners;
- watercolor pencils;
- sponges and toothbrushes. They will be needed after mastering the basics of drawing.
Master classes
The drawing of a hot air balloon can be made in different versions and using different materials and tools.
Balloons
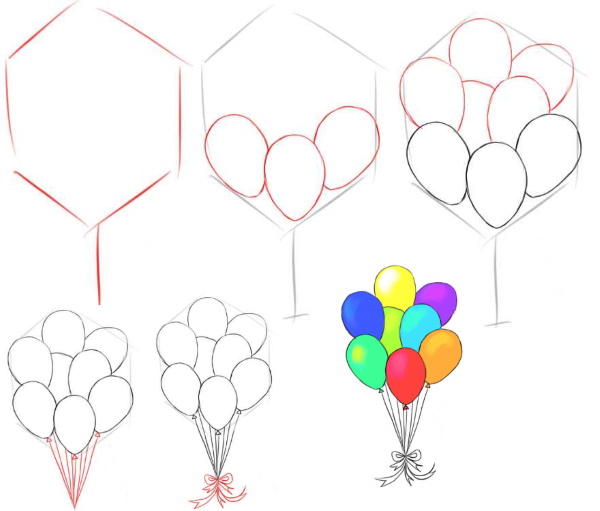
To draw balloons flying into the sky, you need to complete the following steps:
| No. | Stage | Description |
| 1 | Sheet Marking | Before drawing lines on paper, you need to visualize the dimensions of the object being depicted. In this case, you can mark the sheet using 8 straight lines drawn with a pencil. To do this you need:
|
| 2 | Drawing Balls | It is better to start from the bottom of the ligament. Here you can depict 3 balls at once:
Each ball should be shaped like an oval, tapering slightly towards the bottom. The side balls may extend slightly beyond the central one. Next, draw 5 more balls at the top of the hexagon. None of them should be fully visible: they are behind the 3 previously drawn. When drawing balls, the main lines can be drawn with light strokes at first. Then they can be outlined with clearer lines. In this case, the drawing will be neat and beautiful. |
| 3 | Drawing strings | Since the total number of balloons in the bunch is 8, there should also be 8 strings. The vertical line that was drawn at the beginning of this balloon drawing work will become the string that belongs to the central balloon. The other 7 strings should be located on the sides of it. They do not go vertically, but at a slight angle.
There should be small triangles where the strings connect to the balls. These are the tips of the balls. You don't need to draw all 8, 3 are enough - where the strings of the 3 front balls connect. The other 5 will not be visible. You can also add a bow near the strings, which will make the drawing festive. |
| 4 | Removing excess and coloring | First, you will need to remove the lines of the hexagon that was depicted in stage 1. After that, you can start coloring.
The choice of shades depends on your imagination and desire. The brighter the balls, the brighter the picture will be. Don't forget about the bow: it can also be colorful and bright. |
Hot air balloon with basket
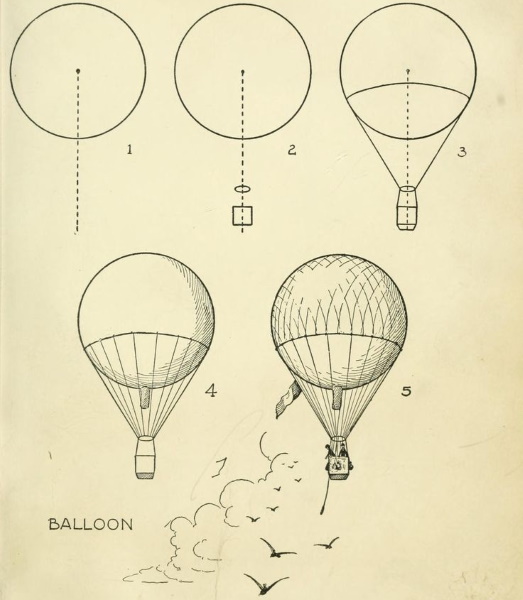
Drawing a hot air balloon with a basket can be done in the following steps:
- Draw 2 lines on the sheet: horizontal and vertical. They should intersect, forming a cross. The vertical line should go from the very bottom to the very top of the sheet. The horizontal line is not located in the center, but at the bottom of the sheet. The upper bar of the vertical should be longer than the lower one. The horizontal line can be made short: it is not necessary to draw it from one edge of the sheet to the other.
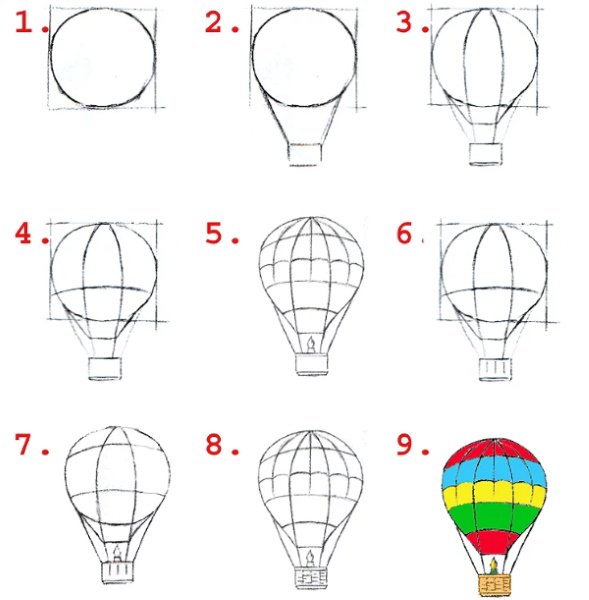
Drawing of a hot air balloon, step by step instructions. - Draw another short horizontal line. It should be slightly below the previously drawn horizontal line.
- After drawing the auxiliary lines, start drawing the ball. The starting point for its outline will be the upper end of the vertical line. The line indicating the outline of the ball should not be perfectly round, but stretched out to the sides and upwards.
- Draw a basket. It is worth remembering its size: it should be much smaller than the ball. You should start drawing the basket from the lower end of the vertical line. The basket, being a rectangular parallelepiped in shape, should be represented by several straight lines.
- The center of the basket will be the long auxiliary line drawn earlier. From it, on both sides, 2 lines should extend. On the right, there should be lines directed diagonally upward and to the right, and on the left, there should be 2 symmetrical lines, each directed upward and to the left. Both lines in each of these 2 pairs should be connected to each other by vertical lines.
- Draw diagonal lines from the basket to the ball. These will be the rafters.
- To make the ball not look flat and two-dimensional, but acquire volume, it is necessary to draw several lines on its surface. These lines should be parallel to each other. However, you should try to make them slightly curved. They start at the bottom of the ball, go up, slightly curve and rush to the top of the ball. The lines should be limited at the bottom.
- Make a circle a little further than the lines. The ropes that hold the basket will be attached to it. These ropes can be represented by many lines starting from the bottom of the ball and converging under it at one point. From this point, several ropes should be directed to different ends of the basket.
- Get busy with coloring. You can start with the sky. For this, use blue. You can leave some parts of the sky white when coloring. These will be clouds. The ball itself can be colored in horizontal stripes, for example, alternating a yellow stripe with a pink one. The basket should acquire a brown color.
- To increase realism and volume, add highlights on the surface of the ball.
Balloon with paints
A drawing of a hot air balloon flying in the sky can be done with gouache on a sheet of blue paper. In this case, you won't have to waste paint on drawing the sky.
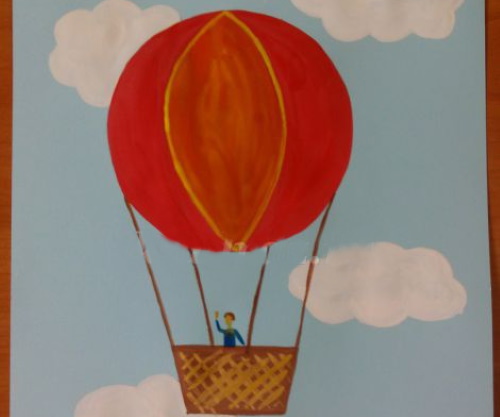
The stages of the image are as follows:
- Mentally divide the sheet into 2 equal parts - the upper and lower. The upper part will contain the ball, and the lower part - the basket.
- Draw a ball. To do this, draw a circle with a pencil at the top of the sheet.
- Draw a trapezoid at the bottom of the sheet: just below the ball. This will be the basket.
- Connect the 2 drawn elements. To do this, it is enough to draw 4 lines between them. 2 lines start from the upper right and upper left corners of the trapezoid and go up to the ball. The lines end at the point of connection with the ball. Draw 2 more lines from the trapezoid to the ball. They should be located between the 2 previously drawn ones.
- To show that the ball is not flat, but three-dimensional, draw 2 lines on it. They should go from the bottom of the ball to the top, slightly rounded according to the shape of the ball.
- Draw clouds. They can go behind the balloon or be next to it. If you do both, the drawing will become dynamic and realistic.
- Start working with paints. Prepare white gouache for the clouds.
- Paint the ball. You can choose red paint for the outer stripes, and paint the central part orange.
- The basket and the ropes that attach it to the ball are brown. The ropes are very thin, so you will need a thinner brush.
- Using ochre paint, make a beautiful pattern on the surface of the basket. It will be a lot of diagonal lines. First they are drawn in one direction, then in the other.
- Place a passenger in the basket. This could be a person. It is possible that the child would like to see a cute animal or bird in the basket.
An old-fashioned version of a hot air balloon
To depict the old version of the balloon, you need to follow these steps:
- Draw an elongated circle with a basket and ropes.
- On the 3rd part of the figure, make stripes starting from the top.
- In the middle part, mark 3 circles.
- Draw 3 sagging ropes at the bottom.
- Fill the entire area of the ball up to the ropes with a large number of lines.
- Draw a border. To do this, draw horizontal stripes in the central part above and below the circles, and form flowers with petals from the circles.
- Draw the basket using square hatching.
- Add 2 ropes to the sides of the ball.
- Make green and black stripes on top.
- Paint the flowers pink, their edges green, and make the background yellow.
- Paint the ropes green and the background underneath them grey.
- Draw pink petals at the bottom of the ball.
- Paint the basket brown.
If desired, any of the balls can be brought to life by drawing eyes and a smile on one side.
If the child is sad or does not want to sit still, you can offer him to draw a hot air balloon. The young artist will like this activity. It will help him imagine himself as a traveler flying over the world. In addition, the drawing work itself is very simple.
Video about drawing a hot air balloon
How to draw a balloon easily: