Pencil Drawings of Soldiers can be simple, and beginning artists can easily depict a defender of the fatherland on a blank sheet of paper. Before starting work, it is important to learn which pencils to use, how to correctly maintain proportions and what to color the contours with, and also read a few simple step-by-step instructions.
How to draw a soldier step by step on a blank sheet of paper?
The work begins with constructing a drawing. On the sheet, you need to schematically mark the axis (vertical line) to clearly understand where the middle of the body will be. Mark the width of the shoulders. You should also mark the approximate position of the arms and legs. In the area of the knees, draw a horizontal line.
All these lines should be drawn barely noticeable and do not press on the pencil. When the main contours of the body, head and limbs are drawn, the lines from the construction are erased with an eraser, so the pencil for the drawing should be sharpened and hard.
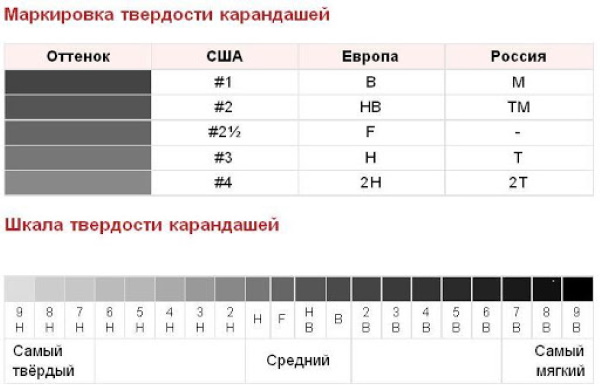
The table below shows the degrees of pencil hardness that you will need for the work, as well as a short explanation of which parts of the drawing they are needed for:
| Name | Peculiarity |
| 5N or 5T | For drawing up drawings |
| 2H or 2T | To draw the main contours |
| HB or TM | To highlight shadows and draw small details |
| B or M | For the final outline that will give the drawing clarity |
You will also need a white sheet of thick paper. Office sheets are not considered a good option. It is more difficult to erase a pencil from them. It is better to give preference to album sheets or special paper for drawing with pencils. The eraser for erasing lines should not smear the graphite on the paper. Experienced artists recommend purchasing a double-sided eraser with a soft and rough end. Drawing with a pencil is not difficult. Below is a detailed instruction, following which you can draw a soldier in a military uniform, in a helmet and with a weapon.
Head in a helmet
The head should be slightly above the axis that will divide the body into 2 halves. The outline should be drawn as an oval. The crown area should be made slightly wider than the chin.
2
How to draw a helmet on a soldier's head:
- It does not fit tightly to the head, like a hat. Therefore, the top part should be drawn slightly higher than the crown area. The edges of the helmet are located directly above the eyebrows, they are indicated by a thin horizontal line.
- The helmet has an uneven shape, so when drawing its edge above the eyebrows, you need to go slightly beyond the face and head, and draw the edges rounded down to the middle of the ears.
- Draw the helmet strap. It should go from one edge of the helmet to the other, above the ears, through the chin.

It remains to give the drawing volume; to do this, you need to shade a small area under the helmet.
Face
How to draw a face:
- Divide the oval in half with a thin vertical line from the middle of the forehead to the chin.
- Draw the next line in the middle of the oval, but horizontally. It will be a guide for drawing the eyes and ears.
- Now, use short horizontal lines to indicate the approximate location of the tip of the nose and mouth.
- Draw ears on the sides of the head. They will be visible only halfway. The lower edge of the ears, where the lobes should be, is parallel to the short line indicating the location of the nose. Draw the tops of the ears as if they were hidden under the helmet.
- Now you need to draw the eyes. The horizontal line should go through the middle of the eyeball. Two small ovals with pointed ends are drawn on both sides, at the same distance from the horizontal line. Small circles indicate the iris and pupils.
- Draw eyebrows above the eyes.
- When drawing a nose, it is not necessary to highlight the bridge of the nose. It is enough to mark the wings of the nose, the tip and the nostrils.
- Draw the mouth below. You don't have to draw a clear outline of the lips, it's enough to show the curve of the mouth and mark the dimple under the lower lip. It will add volume to the drawing and visually highlight the chin.
Carefully erase all the fine lines for constructing the face. Mark the beginning of the neck.
Torso in military uniform
In the place where the neck is indicated, draw a high collar. It should be slightly wider than the neck itself. A small distance should be left from the chin to the collar. Make the edge of the collar rounded, drawing the convex side inward.
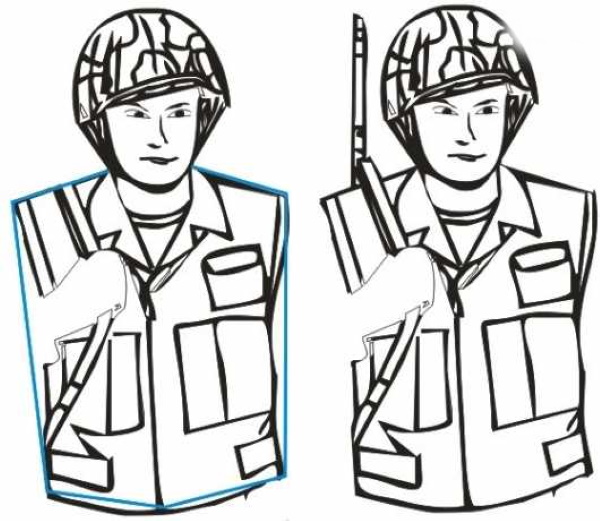
How to draw a torso:
- From the line indicating the width of the shoulders to the lower edges of the collar, draw the shoulders.
- Now mark the waist area and its width with horizontal lines. It should be slightly narrower than the shoulders.
- Draw another horizontal line just below the hip line; this is where the jacket will end.
- Now connect the edges of the waist and shoulder lines to form an inverted trapezoid.
- Connect the ends of the waist line and the edges of the tunic in the same way. Here you need to draw smoothly. The outlines of the military uniform at the bottom should not be too even, because the soldier's tunic does not stick out to the sides like a dress. It fits slightly around the hips, and the ends go to the sides just a little.
- On the top of the jacket, draw pockets, a belt, shoulder straps and sewing edges where the buttons are located.
It is important to remember that the buttonholes on the military uniform are on the left when the soldier puts the jacket on himself. Therefore, the sewing sides should be drawn correctly.
Legs
The vertical axis that divides the body in half should also divide the legs into left and right.
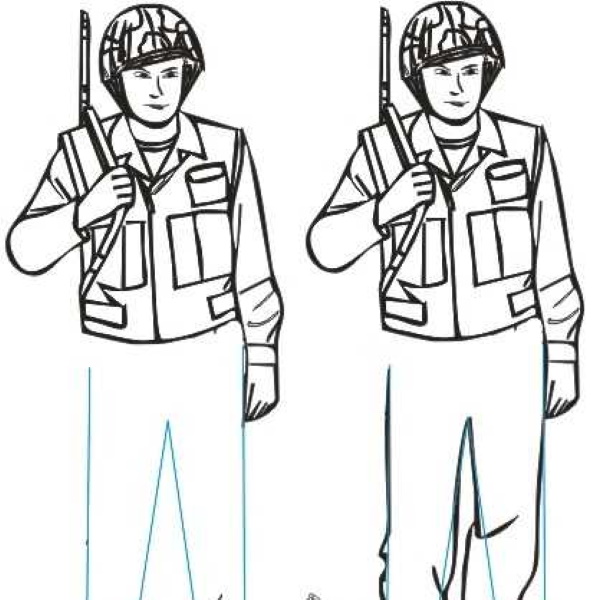
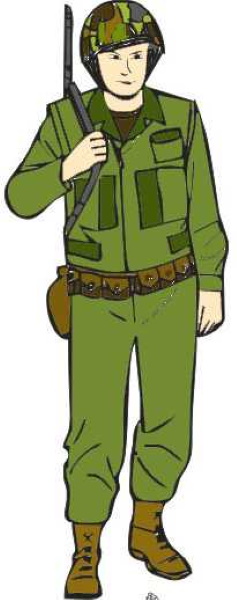
In this picture the soldier is in the USSR military uniform, so you need to draw breeches:
- Draw smooth lines from both sides of the jacket edges to the knee area. At first, the pants slightly widen into a small "bubble", and then narrow and almost fit the legs in the knee area.
- Draw arrows on the trousers with vertical lines a little closer to the axis.
- From the knees, upwards, draw small corners.
- Then draw the boots. The toes of the shoes should be rounded and look slightly in different directions. You also need to mark the dents on the boots where the foot bends when walking and running.
It remains to more clearly mark the line dividing the legs.
Hands
The lines indicating the position of the hands should be a couple of millimeters below the edges of the jacket.
This is the length of the arms including the palms:
- Draw cuffs on the arms at the hip level. They have the same shape as the collar: high, with a semicircular edge.
- Now, from the shoulder line to the upper edges of the cuff, mark the sleeves. The lines should be smooth. It is important not to forget that the sleeves on the uniform do not fit the arms either. They are drawn loose. Closer to the cuffs, the lines are rounded. There the sleeves narrow.
- You can also add a small loop near the cuffs. They will imitate folds of fabric.
It remains to draw the hands. It is enough to indicate the thumb and index finger, as if the soldier's hands are bent and relaxed. The palms are directed towards the pants.
Mesh on the helmet
You can draw a camouflage net on the helmet with neat, smooth lines. First draw lines at an angle to one side, then to the other. When drawing, it is important to remember that the net cannot lie too flat. In places where the helmet changes shape, the lines should be slightly uneven.
Machine
The weapon is behind the soldier's back. When not in combat readiness, the belt is thrown over the shoulder and passes through the chest. On the left, behind the shoulder, draw the barrel, on the right - the handle. The pencil drawing of a soldier in this master class is an image of a fighter of the Soviet Army.
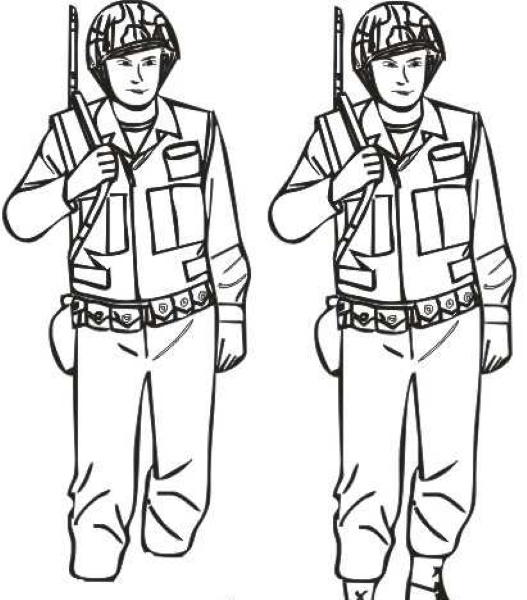
At that time, Soviet soldiers used the PPSh submachine gun, so the barrel and handle had to be of the appropriate shape.
Coloring
You can color the drawing with colored pencils, paints or felt-tip pens, or you can make it black and white using the same pencils as for drawing.
Light colors are shaded with hard pencils, and where brighter tones are supposed to be, soft ones are used. Shadows are highlighted with the softest pencil.
Coloring sequence in color:
- To add color to the skin, you need a pale pink shade. It is best to use a colored pencil or paints, because felt-tip pens are too bright.
- Completely paint the face and hands.
- Take a pencil one tone darker and highlight the shadow on the forehead, under the helmet, under the eyes, under the nose and lower lip.
- Paint the boots black, leaving a very narrow white line. This is to prevent the color from merging into a single spot, and to keep the legs separated.
- Dilute the paint or choose a pencil that will be close to the color of the tarpaulin. Color the uniform. Take a darker shade and highlight the area of the folds on the uniform (elbow bends, shadow on the pants and under the belts, as well as on the sides).
- Paint the belt brown, the one on the waist and the one that holds the machine gun.
- Make the shoulder straps red. And also highlight the star on the helmet with this color.
- Paint the buttons and belt buckle yellow.
Using the softest pencil, carefully outline the drawing and all the small details.
Easy and beautiful drawings of soldiers for copying with a pencil
Drawing a soldier with a pencil can be very simple. Just look at the picture and follow the short step-by-step descriptions to draw a soldier.
Easy drawing of a soldier by cells
How to draw:
- The drawing starts with the cap. Use an HB or TM pencil to outline 4 cells to get the part where the star is located.
- At the top, you need to draw the top of the headdress, a semi-oval. At the bottom, draw the visor and color it.
- Draw the head with ears and face.
- From the middle of the chin, count 3 cells in both directions and go down 1 line. Draw smooth lines. These will be the shoulders.
- Now draw arms 4.5 cells long.
- Designate the body. The length of the jacket should be 1 cell longer than the length of the arms.
- From the edges of the body, step back half a cell inward and draw a rectangle.
- Divide the legs with a vertical line and mark a line of buttons on the top of the form.
- Finish drawing the legs.
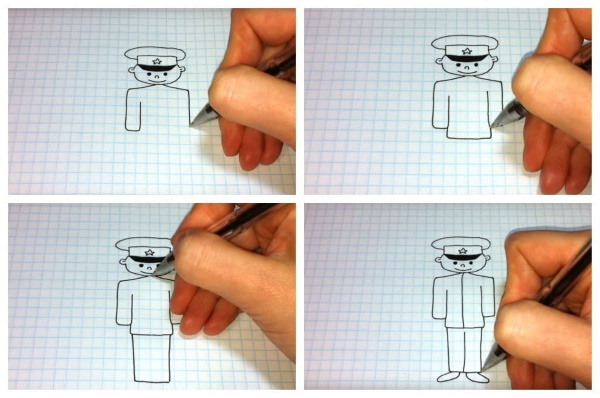
Finally, draw the soldier's hands and work on the small details on the clothes. Color the drawing with simple or colored pencils.
Russian border guard with a weapon
Step by step instructions:
- The work should begin with drawing the border guard himself, using a hard pencil. First draw an oval head and face.
- Draw the vertical axis by hand and make all necessary marks.
- Then draw a helmet with a rim and a belt.
- Draw lines down from approximately the cheekbones to draw the shoulders.
- Draw the left arm just below the hip, and the right arm up to the elbow. Then round the line, imitating the elbow.
- Draw the jacket, legs and boots.
- Add details: shoulder straps, belt, gun barrel and spots on the camouflage. It is important to draw the spots not only completely, but also their halves, as if they have a continuation and go back. Such spots can be seen on the legs, arms and at the bottom of the jacket, in the picture.
- Now you need to draw a dog. First the head with ears, then the muzzle. Then add the body, with knees and front paws with a chest.
- Finish drawing the leash and collar.
- Draw a pole behind the border guard and the dog.
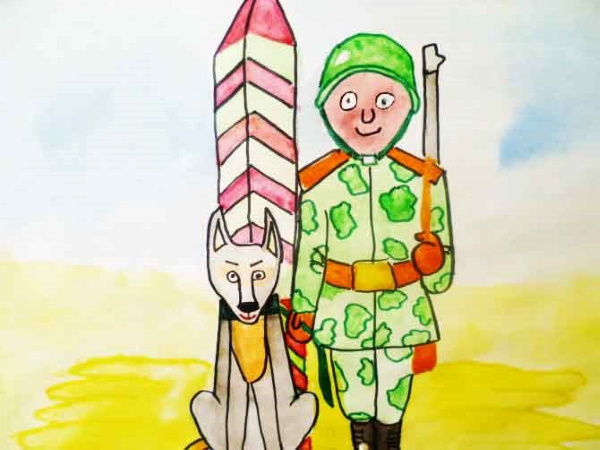
When coloring the drawing with pencils or paints, you should highlight the shadows, as shown in the picture. For this, the author used the same paint, only applying slightly more layers in those places where it is necessary. To make the drawing clear, all the details can be outlined with a black felt-tip pen or black gouache, using a thin brush.
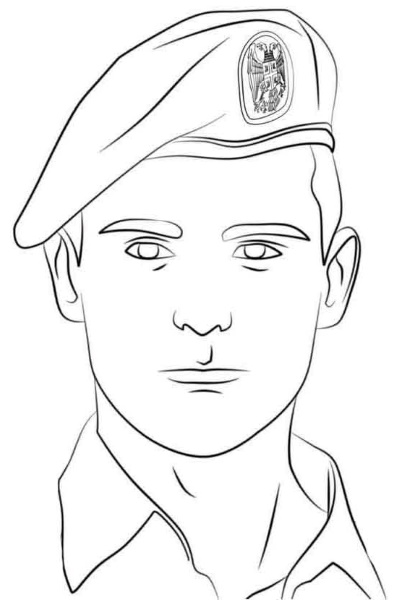
Portrait of a paratrooper of the Airborne Forces
The soldier's pencil drawing in the picture is a little more complicated than the previous ones, but is simple enough for a beginner artist to repeat. There are no shadows, colors or small details, only smooth contours.
How to draw:
- Draw the base of the head in the form of an oval.
- Use a hard pencil to mark out the construction of the face.
- Draw the eyes, outline the upper eyelid above them, and the hollows under the eyes.
- Draw wide eyebrows.
- Mark the wings, nostrils and tip of the nose.
- Use a smooth line to highlight the curve of the mouth and schematically indicate the nasolabial fold and the dimple on the chin, under the lower lip.
- Draw the ears and design the auricles with smooth lines.
- Now draw the beret. First draw a slightly wavy line across the forehead, then finish drawing the top of the beret. The hanging edge should slightly overlap the top of the ear.
- Draw folds on the headdress and the cockade.
- Draw 2 lines from the cheekbone line to draw the neck. Mark the Adam's apple and the protruding muscle.
- Finish drawing the collar.
- Erase all construction lines and outline the contours with a soft pencil.
The graphite of soft pencils is easily smeared if the hand touches a sheet of paper. To prevent this from happening, you should place a clean sheet of paper under your hand and try not to move it, but carefully shift it when you need to change the position of the hand.
Soldiers in caps full face
The construction of the face and head is done exactly the same as in the master class above.
There are only a few details that need to be changed:
- Draw the ears completely and design the auricles.
- Draw some hair on the soldier.
- Add the cap. It should be slightly shifted to the side. Draw the edges smooth, as shown in the picture. First draw the main part, then add the top, drawing the folds.
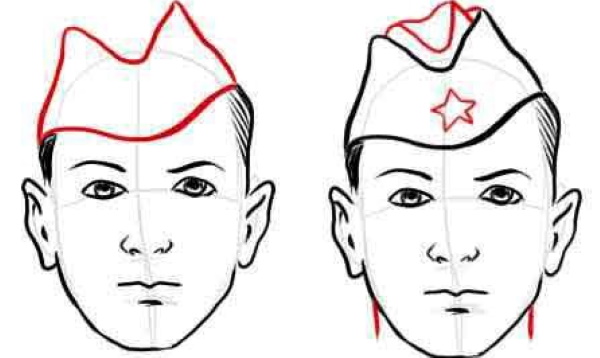
You need to erase the construction lines before the final outline, so as not to accidentally smear the soft graphite.
Soldiers in helmets in profile
Another outline drawing for beginning artists.
How to draw:
- Here you can break the sequence and start drawing from the helmet. Draw a semicircle, then use a smooth line to mark the edges, as shown in the picture above. Draw a bandage on the helmet. Short, smooth strokes will help make the drawing more voluminous.
- Now draw the back of the head, and then the face. Artists take the same oval as a basis, draw it slightly flat and at an angle.
- Highlight the bottom of the forehead, the bridge of the nose, the nose. Draw the lips and chin, as in the picture.
- Continue the drawing, indicating the neck. Draw the collar.
- Add a helmet strap.
- Draw the soldier's face, eyes, nose and lips.
- Add detail. Use short strokes to draw the hair on the back of the head and eyebrows.
- Place the remaining strokes as shown in the figure.
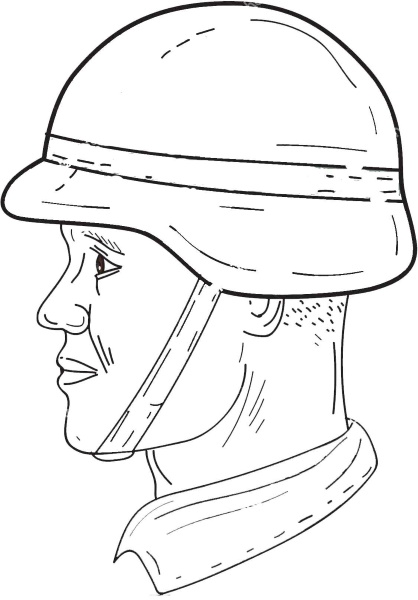
If you don't detail the picture, the face will look flat and unnatural. It is necessary to draw a line of cheeks, cheekbones and add strokes on the nose and neck.
A soldier of the Great Patriotic War with a gun
This drawing is better developed than the previous ones, so at first glance it may seem complicated. In fact, its kennels are simple, and beginner artists will be able to repeat them. The picture looks complex due to the color and competent highlighting of shadows.
How to draw:
- The soldier's head and body are drawn according to the construction drawing. It is important to note that the man is slightly turned to the side, so the axes based on the head need to be slightly shifted, and one shoulder should be made slightly shorter than the other.
- First, all the contours need to be drawn with a hard pencil. Then erase all the axes and start designing.
- Use a hard pencil to outline the shadows on the face and coat.
- Use a soft pencil to highlight deeper shadows, under the hat, on the weapon, in the sleeves, on the neck and belt.
- Trace the drawing.
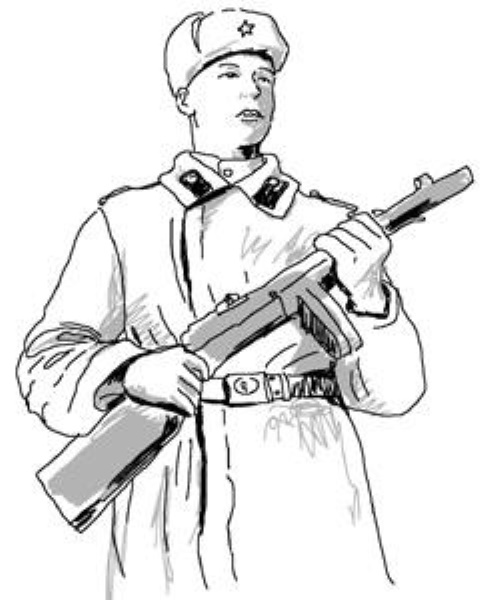
In such drawings, shadows are always highlighted before the final outline. If you change the sequence, there is a risk of accidentally smearing the contours. Such mistakes are difficult to correct, the drawing will turn out sloppy and dirty. It is not difficult to draw a soldier with a pencil, the main thing is to strictly follow the instructions and not forget about the construction drawings. Without these auxiliary lines, it will be difficult for novice artists to maintain proportions.
Video on how to draw a soldier
Simple soldier drawing for kids: