Anything for beginning artists drawings by cells It is more convenient to do it with a pencil. With this stationery you can not only quickly correct an inaccuracy in the image, without having to completely redo the work, but also create three-dimensional details of objects that are most often depicted in two dimensions.
To create a heart (regardless of the chosen variation), the artist, in addition to a simple pencil, will need a sheet of paper with a grid and 30-60 minutes of free time.
Heart outline
It is recommended to start creating a drawing of a heart (using a pencil on the cells you can depict both individual objects and multi-component pictures) from the outline.
The simplest options are:
- outline - a pigtail (a combination of lines running along one edge of a cell and areas where the cell is completely outlined);
- single contour (thin lines running exclusively along one of the cell's edges).
Both techniques are simple enough that even a person who has never done any artistic work before can master them:
| Contour option | The way it is drawn |
 |
|
 |
|
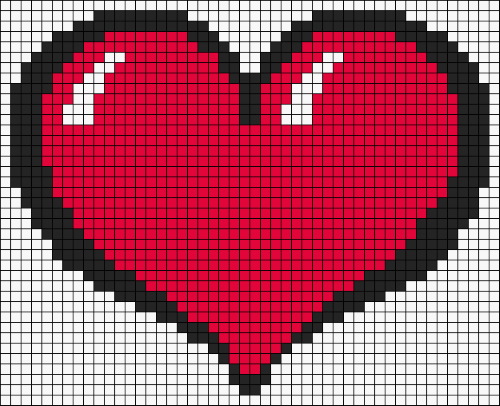
Symmetrical heart
To draw a symmetrical heart on a sheet of squared paper, you need:
 |
|
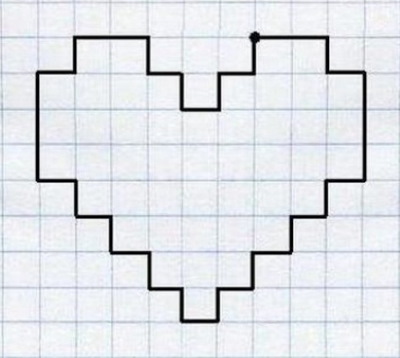
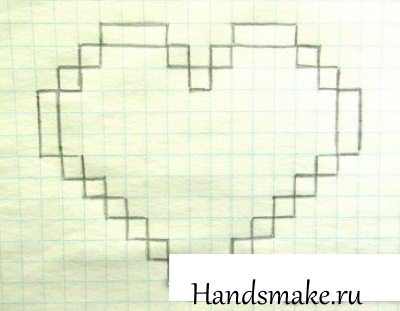
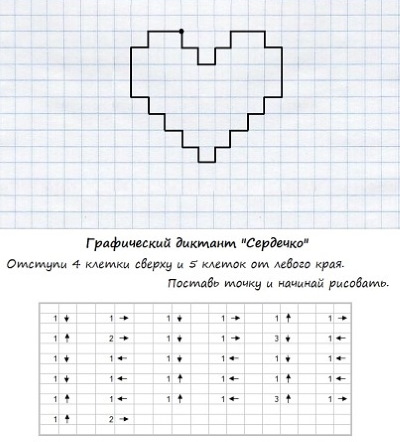
Asymmetrical
A drawing of a heart (you can learn to draw with a pencil on the squares at any age) will look more impressive if the halves of the main image are made asymmetrical.
To do this you need:
- Find the starting point for the right side of the heart. It should be located in the central area of the working surface.
- Color the cells following the suggested algorithm: 2 cells to the left, 1 cell up, 4 cells to the left, 1 cell down, 1 cell to the left, 1 cell down, 1 cell to the left, 1 cell down, 1 cell to the left, 5 cells down, 1 cell to the right, 1 cell down, 1 cell to the right, 2 cells to the right, 1 cell down, 3 cells to the right, 1 cell down, 2 cells to the right, 1 cell down, 2 cells to the right, 1 cell down, 1 cell to the right, 1 cell down, 1 cell to the right, 1 cell to the right.
- Finish drawing the second asymmetrical half of the heart, following the suggested algorithm:
from the starting point, output 2 keys up, 1 key to the right, 2 keys up, 1 key to the right, 1 key up, 2 keys to the right, 1 key up, 4 keys to the right, 1 key down, 2 keys to the right, 1 key down, 1 key to the right, 3 keys down, 1 key to the right, 5 keys down, 1 key to the left, 4 keys down, 1 key to the left, 3 keys down, 1 key to the left, 2 keys down, 1 key to the left, 2 keys down, 1 key to the left, 1 key down, 1 key to the left, 2 keys down.
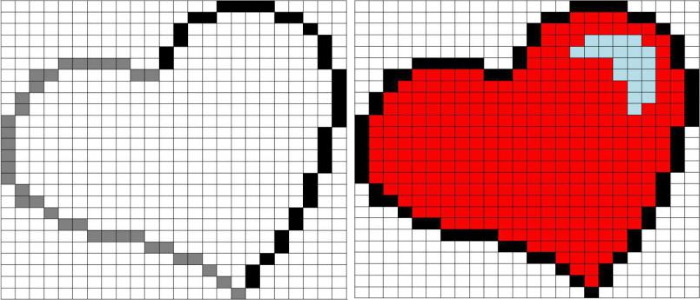
- Erase secondary lines. Make the heart outline more expressive.
- If desired, color the inside of the shape in 1 color, leaving a small area in the upper left part of the heart white (highlight).
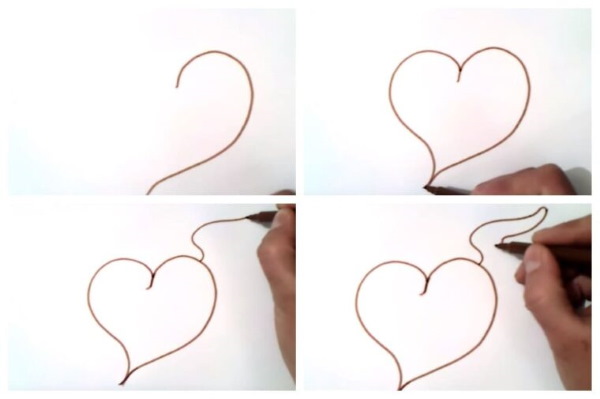
With wings
It is recommended to use an image with a symmetrical outline as the basis for the drawing of a heart with wings.
Asymmetry, despite the fact that it looks more impressive, will significantly complicate the process of creating details of the final picture and will require the artist to spend more time on the work.
The sequence of actions in this case looks like this:
- Draw the outline of a symmetrical heart. Color the inside of the shape, creating a highlight or shadow using a variation of pencil color.
- From the upper corner of the vertical edge of the heart, consisting of at least 5 cells, draw a horizontal line to the left, 2 cells long.
- Paint 3 cells diagonally, located on top of each other, towards the upper left corner.
- Draw a vertical line 2 shaded cells long.
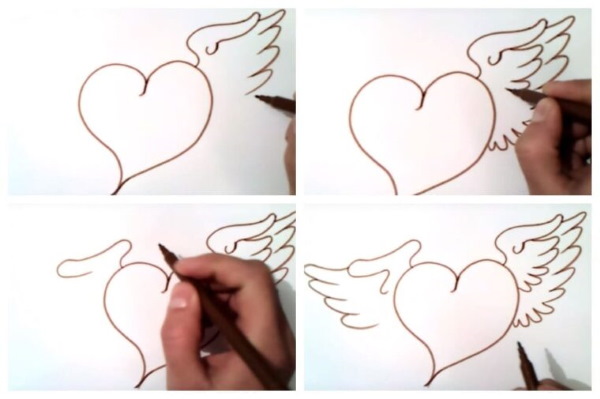
- Paint 2 cells to the left, moving them out from the upper left corner of the previous block.
- From the upper left corner of the previous block, draw a horizontal line to the left, consisting of 6 shaded cells.
- From the upper left corner of the previous block, draw a horizontal line to the left, consisting of 4 shaded cells.
- Repeat steps 7, shortening the horizontal block to 2 cells.
- Draw 2 more cells diagonally, placing them one above the other in the direction of the upper left corner of the working surface.
- Color 5 cells by moving the pencil vertically downwards.
- Move 1 cell to the right, then draw a vertical block consisting of 4 filled cells.
- Finish drawing the lower part of the wing by coloring 2 cells following each other in the direction of the lower right corner of the working surface.
- Draw a vertical block consisting of 2 painted cells.
- Repeat step 12.
- Draw the wing bend following the algorithm: 3 keys to the left, 1 key down, 1 key to the left, 1 key down, 5 keys to the left, 1 key up, 1 key to the right, 1 key down, 4 keys to the right, 1 key up, 1 key to the right, 1 key up, 1 key to the right.
- Repeat steps 2–15, mirroring the lines on the work surface.
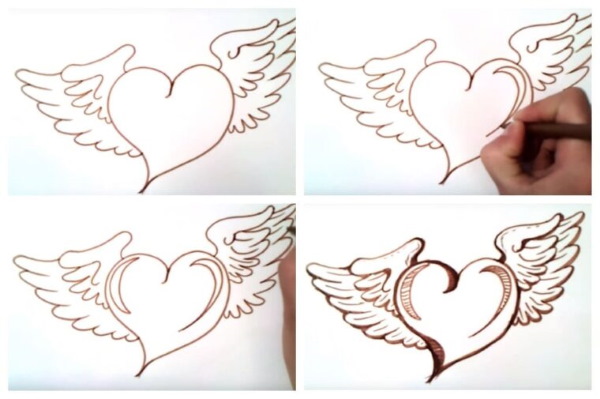
- If desired, color the wings or draw feathers on the inside.
Heart from a drop
Drawing a heart - using a pencil on the cells you can draw not only the main subject of the depicted composition, but also shadows, penumbras, and highlights.
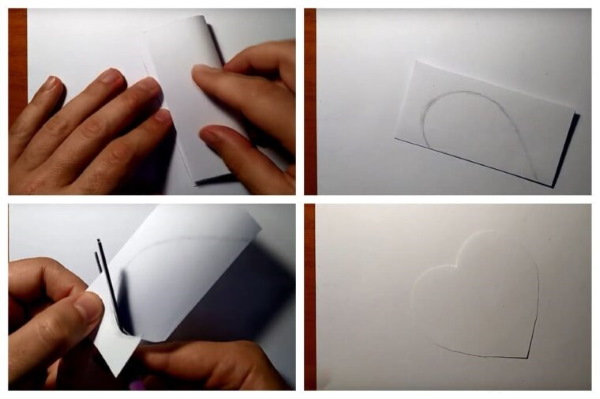
This drawing will be more realistic and impressive if you depict it as if it was formed by a drop of water:
- Cut a square out of paper, measuring 10 cm by 10 cm.
- Fold the cut out figure in half so that 2 identical rectangles are formed on both sides of the fold line.
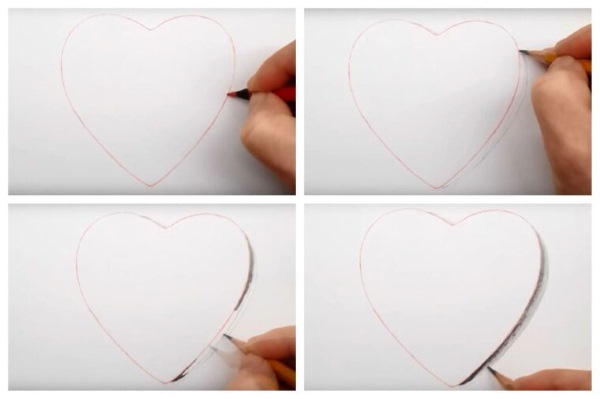
- Draw a symmetrical outline of the heart using any of the above algorithms.
- Cut out the figure shown using scissors without unfolding the sheet of paper.
- Place the cut out heart in the center of the work surface and trace its outline with a pencil.
- Use short strokes to create shadows on the inner surface of the image. The saturation of the shade should be maximum on the right side of the figure, and minimum on the left.
- Outline the heart to make it more expressive.
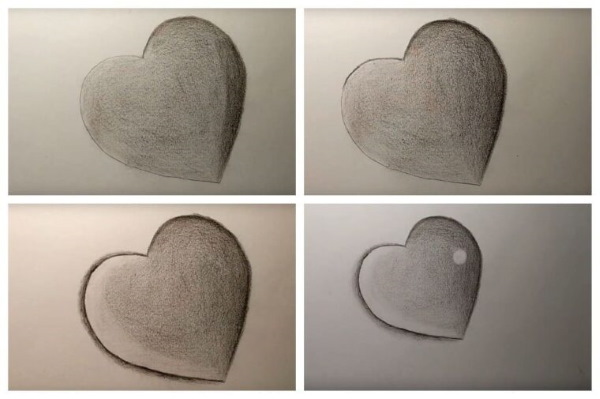
- Draw a line that follows the outline of the main figure, stepping back from the borders of the heart by no more than 1 cm.
- In the upper right area of the drawing, erase the strokes, thus leaving a small white oval.
- Blend the line that follows the outline of the main figure on the right side.
Volumetric heart
It is more convenient to draw a 3D heart using cells, which help to make the derivative lines of the image parallel, diagonal, straight, and also simplify the process of measuring their length by the artist in his work.
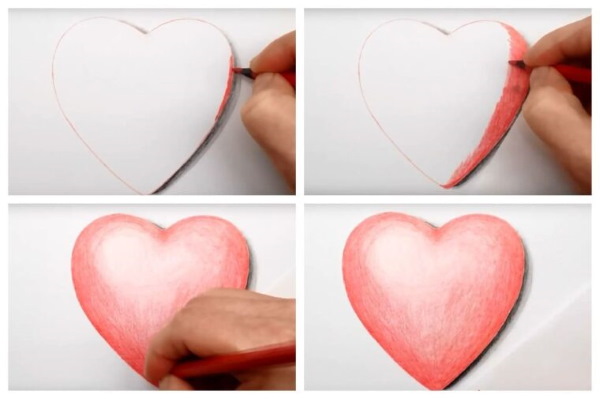
A three-dimensional figure can be drawn like this:
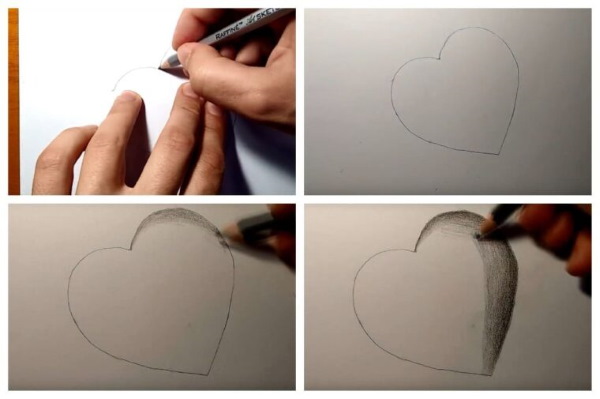
- Draw a symmetrical outline of a medium-sized heart, placing the figure in the center of the working surface.
- From the top point of connection of the generating lines, draw a vertical line 5 cells long.
- Using strokes, create shadows on both sides of the upper inner parts of the figure, bringing them together at the end point of the vertical line.
- Fill the remaining inner part of the heart with random strokes, distributing the transition of shade so that its saturation is maximum at the edges of the figure, and minimum in the center.
- Extend the shadows beyond the right border of the heart, stepping back from the main line by 3-4 cells.
- Using an eraser, reduce the intensity of the shadows to a minimum in the inner part of the heart, leaving only the left edge dark.
- Blend the shadows inside and outside the main shape.
- Draw horizontal lines across the work surface so that they do not intersect the heart.
- Connect the points of the lines located at the borders of the heart with even semicircles curved upward.
Cold
A cold or icy heart in cells is in the vast majority of cases drawn as part of a winter pattern composition:
- Divide the work surface into 25 equal squares, placing 5 of them in a horizontal row.
- Repeating the contour of the working plane, duplicate the borders, stepping back 2 cells from the edge.
- Find the central square. On each of its faces, depict 1 small heart, with snowflakes drawn on the upper parts. The acute angle of each figure is directed to the center of the square.
- Above each heart inside the square, draw an oval, later transforming it into a drop. It is also recommended to "cover" the upper part of the drops with snowflakes, or shade them chaotically.
- Decorate the remaining empty space with snowflakes and hearts in any order, without going beyond the outlined boundaries of the square.
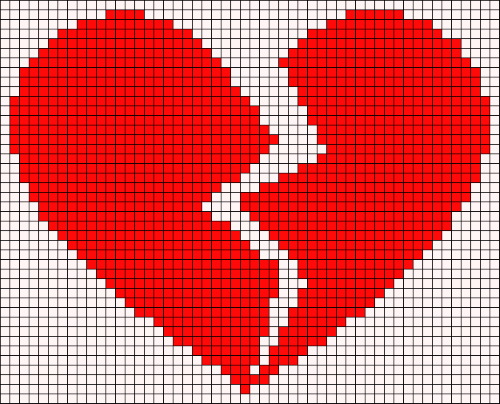
Broken
A broken heart drawing in pencil can also be created on a piece of paper lined with squares.
To do this, you need to use the standard algorithm:
- Find the starting point at the center of the work surface.
- Draw a horizontal block consisting of 4 shaded cells.
- Move 3 cells to the right. Draw a horizontal block consisting of 4 shaded cells.
- From the lower left corner of the left block, paint 1 cell diagonally down.
- Repeat step 4 in a mirror image.
- From the lower left corner of the last square, draw a vertical block 4 shaded cells long.
- Mirror image of step 6.
- From the lower left corner of the last square on the right, paint 6 cells down, placing them diagonally under each other.
- Repeat step 8 in a mirror image, increasing the number of cells to be painted to 8.
- From the lower left corner of the upper horizontal block, paint 4 cells down, placing them diagonally under each other.
- From the lower right corner of the upper left horizontal block, draw 3 shaded cells, placing them one under the other, parallel to the previously drawn line, also consisting of squares.
- From the lower right corner of the 2nd bottom square, draw 3 shaded cells, placing them one under the other diagonally downwards.
- From the lower left corner of the square 1, draw 3 shaded cells, placing them one under the other diagonally downwards.
- Without lifting the pencil from the paper, color another 2 cells, changing the direction by taking the lower left corner of the previously colored square as the starting point.
- From the upper left corner, move 1 shaded cell upwards.
- Connect the colored cells by drawing another square.
- If desired, paint the inside of the broken heart, leaving the space between the halves white.
Small
A small heart drawn in cells can be “brought to life” with the help of human facial features.
Step by step drawing:
- Draw the outline of the heart using the following algorithm: from the starting point, draw 6 cells to the left, 1 cell down, 1 cell to the left, 1 cell down, 1 cell to the left, 7 cells down, 1 cell to the right, 1 cell down, 1 cell to the right, 1 cell down, 1 cell to the right, 1 cell down, 1 cell to the right, 1 cell down, 1 cell to the right, 1 cell down, 1 cell to the right, 1 cell down, 2 cells to the right, 1 cell down, 5 cells to the right, 1 cell up, 2 cells to the right, 1 cell up, 1 cell to the right, 1 cell up, 1 cell to the right, 1 cell up, 1 cell to the right, 1 cell up, 1 cell to the right, 1 cell up, 1 cell to the right, 1 cell up, 1 cell to the right, 7 cells. up, 1 key left, 1 key up, 1 key left, 1 key up, 6 keys left, 1 key down, 1 key left, 1 key down, 1 key left, 1 key up, 1 key left, 1 key up.
- Draw squares measuring 3 by 3 cells to the left and right on both sides, taking as starting points the intersections of cells - 4 from above - 3 from the left and 4 from above - 3 from the right. Paint the inside of the squares, leaving 1 cell white in each figure in the upper right corner.
- Step back from the lower right corner of the right square 1 cell to the right, paint 1 cell, then step back 3 cells more and paint 1 cell again.
- Connect the shaded cells with a straight line consisting of 3 cells.
- Color the inside of the heart.
Big
If the final figure needs to fill a large part of the working surface, it is recommended to depict the heart consisting of smaller figures.
To do this you should:
- Draw the outline of a symmetrical heart using any of the proposed algorithms.
- Fill the inside of the figure with small hearts of random size, located at a random distance from each other.
- Paint over small details of the image.
- Outline the main figure.
A pencil drawing of a heart, regardless of its size and style of execution, will require less time from the artist if a person is guided by the cells when working on it. With the help of such pictures, you can decorate a personal diary, a daily planner, or use them as an addition to the decor of a residential or commercial space.
Video about drawing a heart
Drawing a heart with a pencil on the squares: