The hobby of drawing pictures on the squares will be interesting for both an adult and a small child. This is not only a fascinating creative process, consisting of the simplest stages of creating a picture, but also a proven way to relieve nervous tension, as well as brain development.
To ensure that the process of creating a drawing by cells is not tiring, tasks should be selected taking into account the artist’s interests, age, and personal preferences.
Materials for creating beautiful drawings
Every adult theoretically knows how to draw pictures using cells.
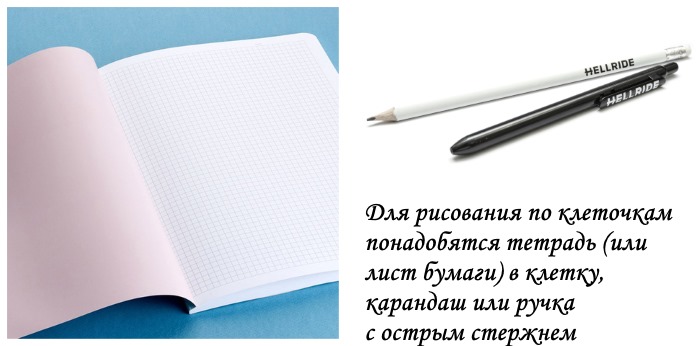
For the creative process you will need:
pencil, pen or marker with a thin lead;
sheet of squared paper;
a template for copying (if the artist is not sure that he knows the algorithm for creating a specific picture).
Simple art activities are beneficial for people of all ages. Adults can relax their overloaded nervous system, have a pleasant time, and also develop creative thinking and improve coordination skills by creating pictures on cells.
According to research by pediatricians and child psychologists, drawing on squares also has a beneficial effect on a child’s brain:
develops fine motor skills of the hands, which affects the quality of children's speech;
develops creative thinking and imagination;
lays the foundation for subsequent spelling literacy;
teaches how to strictly follow a given algorithm;
improves artistic skills (after several months of such activities, it will be easier for the child to create more complex pictures on paper);
minimizes the manifestation of hyperactivity;
eliminates excessive irritability and aggression;
develops perseverance, accuracy and attentiveness;
improving coordination of movements.
How to learn to draw by cells?
The “ancestor” of drawing on cells is traditional cross-stitching.
Therefore, the resulting pictures can be embroidered later, which will make the process of creating drawings even more exciting. Depending on the chosen drawing, the artist should decide on the required set of tools. If you plan to work with a black and white scheme, then preference should be given to a simple pencil, if colored - multi-colored pencils or felt-tip pens.
It is not recommended to use pens, especially gel pens, for drawing on the cells. Recreating the design on paper requires dense coloring of the cells, which can cause the paste to smudge, which will spoil the final result of the creative process.
Following the written algorithm or copying the sample drawing, you need to circle a specific number of cells in the corresponding row or column. After the general outline is created, you should start coloring the resulting picture.
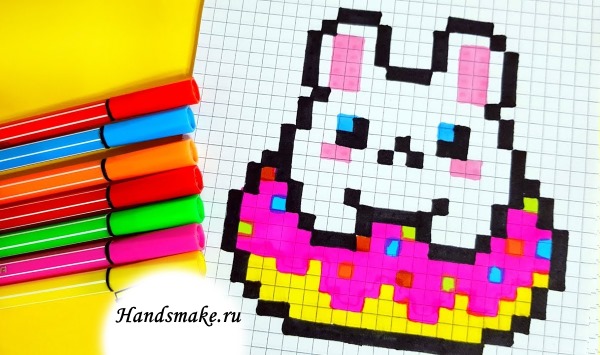
How to draw pictures by cells - first draw a picture with a pencil, then color it, for example, with felt-tip pens
For this, you can use one or several colors. If the drawn pattern is planned to be used for embroidery in the future, it is necessary to pay great attention to the details of the drawing (color scheme, background, secondary objects in the resulting picture).
Easy drawings on cells
You can draw pictures by cells both in a personal diary or notebook, and on a separate sheet of large format. When creating pictures in a small notebook, it is advisable to choose simple schemes. Otherwise, due to the lack of a large amount of free space, the drawing may turn out blurry and incomprehensible.
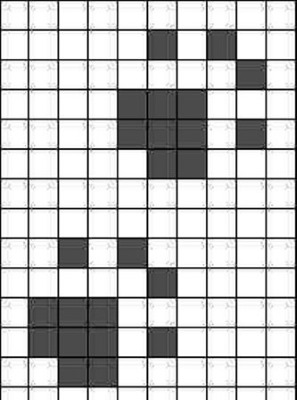
The most popular drawings for a personal diary are paw prints and a balloon.
Sample of a drawing by cells
Drawing scheme of the picture
Color 1 cell.
Move back 1 cell horizontally and paint another 1 cell.
Go down under the second cell and step 1 to the right, paint over 1 more cell.
In the third row, paint 3 cells so that the first cell in the 1st row is in the middle.
Repeat step 4 in the next row.
In the 5th row, paint 2 cells, stepping back 1 from the previous row.
Move down 2 rows.
Repeat steps 1 through 6.
Paint 2 cells in a horizontal direction.
Go down to the next line and move 1 cell to the left, paint 1 cell.
Skip 1 cell to the right in the same row and paint 2 cells in the horizontal direction.
In the 3rd row, move 1 cell to the left and paint 1 cell.
Move 1 cell to the right, remaining in the same row, and paint 4 cells in a horizontal direction.
Move down to the next row and paint 6 cells under the first cell of the previous row.
Repeat step 6 2 more times, thus creating the next 2 rows.
Under the last row, move 1 cell to the right and paint 4 cells.
In the next row, paint 2 cells in a horizontal direction so that 1 cell of the top row remains on each side.
Move down and paint 1 cell under the second from the previous row.
Repeat step 10.
Move 1 cell to the left and circle 1 cell.
Repeat step 12 2 times.
Paint one more cell under the cell of the previous row, thus creating 2 more horizontal rows.
Move 1 cell to the right and paint 1 cell.
Paint 1 cell under the cell of the previous row.
Repeat steps 15-16.
Repeat step 12.
Move 1 cell to the left and paint 2 cells horizontally to the left.
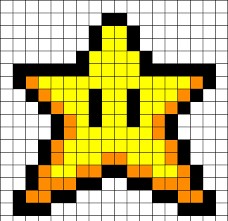
More complex grid drawings
How to draw pictures on the cells of increased complexity on a large sheet format, you can, having familiarized yourself with the table below. It is recommended to start the creative process with such pictures for adults, as for children they will be difficult.
Picture - sample
Drawing creation algorithm
Paint 2 cells in a horizontal direction.
In the next row, paint 4 cells so that there is 1 cell left on each side of the cells in the previous row.
Paint 4 cells under the cells of the 2nd row.
Paint 6 cells in the next row so that there is 1 cell left on each side of the 4 cells in the 3rd row.
Move 5 cells to the left and paint 16 cells.
Color 16 cells in the row below.
From the first cell of the top row, go down, step 1 cell to the right and paint 14 cells.
Repeat step 7, but paint 12 cells.
Repeat step 8, but paint 10 cells horizontally.
Paint 10 cells strictly below the previous row.
Move down one line, move 1 cell to the left and paint 12 cells.
Create a row similar to the previous one.
Repeat step 11, but paint 14 cells.
In the next row, strictly below the previous one, paint 6 cells in a horizontal direction.
After stepping back 2 cells, paint 6 more in the same row.
Move 1 cell to the left of the first in the previous row, paint 5 cells horizontally and, skipping 6 cells, paint 5 more in the same row.
Start the next row under the first cell of the previous row, painting 3 cells. Skip 10 cells and paint 3 more.
Color it using random colors.
Color 2 cells horizontally.
Move 1 cell to the left and paint 4 cells.
Repeat the previous row.
Move 1 cell to the right and paint 2 cells.
Move 10 cells to the left and paint 2 cells, then move 7 cells to the left and paint the next 4. Move another 7 cells to the left and circle 2 more.
Under the first group of cells, move 1 cell to the left and paint 4. Under the second group, repeat the previous row. Under the 3rd, repeat the actions performed under the 1st.
Under the 1st and 3rd group - repeat the previous row exactly. Under the 2nd - move 1 cell to the left and paint 6 cells.
Under the 1st group, move 1 cell to the right and paint 4 cells, under the second, repeat the previous row; under the 3rd, move 1 cell to the right and paint 4 cells.
Under the first group, repeat step 8, but paint 5 cells, under the second, move 1 cell to the right and paint 8 cells, under the 3rd, move 2 cells to the left and paint 5 cells.
Move 1 cell to the right of group 1 and paint 18 cells.
Repeat the previous row.
Move 1 cell to the right and paint 16 cells.
Repeat the top line 2 times.
Move 1 cell to the right and paint 14 cells.
Repeat the previous line 2 times.
Drawing ideas for personal diary
You can understand how to draw pictures by cells by reading the description of the algorithm for creating a picture or by looking at the sample.
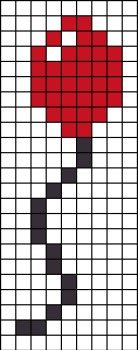
Examples for copying, for example, in LD, can be:
Picture - sample
Drawing scheme
Color 5 cells horizontally.
Move 2 cells to the left and paint 9 cells.
Move 1 cell to the left and paint over 11 cells.
Move 1 cell to the left and paint cell 13.
Repeat the line obtained in step 4.
Move 1 cell to the left and draw 5 cells to the right. Skip 1 cell, paint the next 3, skip 1 cell again and paint the remaining 5 in the horizontal row.
Repeat the line from point 6.
Paint 15 cells under the previous line.
Paint 4 cells, skip 1, paint 5 cells, skip 1 and paint the 4 remaining cells in the row.
Color 6th grade, skip 1, color 3rd grade, skip 1, color the remaining 5 grades.
Move 1 row to the right, paint 5 rows, skip 3 rows, paint 6 rows.
Repeat the line from step 11.
Move 1 cell to the right and paint 11 cells horizontally.
Move 1 cell to the right and paint 9 cells.
Step back 2 cells and circle 5 cells.
Paint 2 cells, move 7 cells horizontally and paint 2 more cells.
Move 1 cell to the left and circle 13 cells (4 on each edge should be colored).
Repeat the same line 2 more times (2 and 3 lines are painted on each side of 3 and 2 squares, respectively).
Move 1 row to the right, circle 2 rows, color 2 rows, move 3 rows, color 2 rows, circle 2 rows.
Under the previous line, circle 1 cell, color 2, skip 1, color 1, skip 1, color 1, skip 1, color 2, circle 1.
Under the previous line, circle 1 cell, color 4, skip 1, color 4, circle 1.
Below, circle 2 cells, color 2 cells, step back 3 cells, color 2, circle 2.
Move 1 cell to the right, circle 4 cells, color 1, circle 4.
Move 1 row to the right and circle 7 rows.
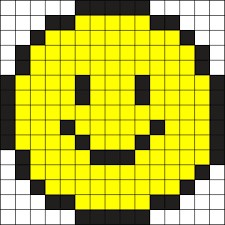
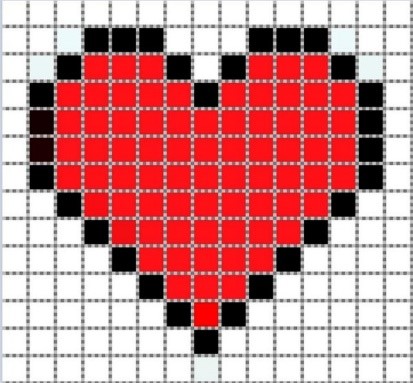
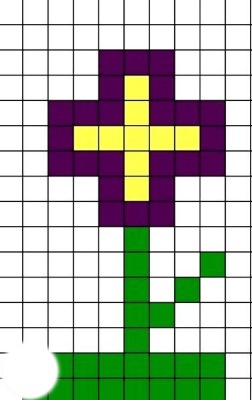
Color 8 cells in a horizontal direction.
From the 2nd to the 7th row, move 1 row to the left and paint 2 rows more than in the previous row.
In the 8th row, paint 8th row, skip 4th row, paint 8th row.
Color 7th grade, skip 6th, color 7th.
Repeat step 4.
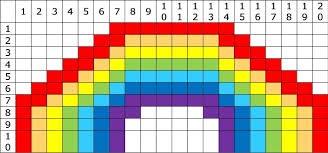
Color the rainbow in the appropriate colors.
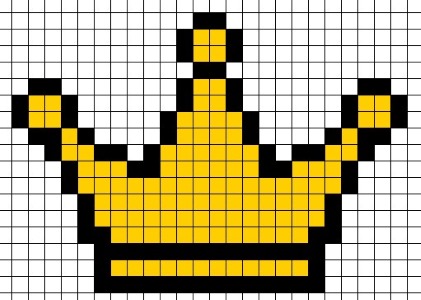
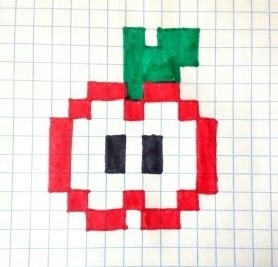
Approximately in the middle of the sheet, draw a horizontal line around 3 cells.
Step back 3 cells and paint 3 more in the same direction.
In the 2nd horizontal row, circle 5 cells so that the top 3 are in the middle.
Repeat step 3 with the second group of cells (in the second row, there should be an indent of 1 cell between the painted cells).
In the 3rd row, paint 13 cells so that on the side of the end of the top row, there is an additional 1 cell painted on both sides.
Paint 13 cells under the 3rd row so that 3 more rows are formed, similar to the third.
Step back 1 cell from the top of the previous row and paint 11 cells horizontally.
Step back 1 cell from the top of the previous row and paint 9 cells horizontally.
Step back 1 cell from the top of the previous row and paint 7 cells horizontally.
Step back 1 cell from the top of the previous row and paint 5 cells horizontally.
Step back 1 cell from the top of the previous row and paint 3 cells horizontally.
Paint 1 cell in the middle of the top row below it.
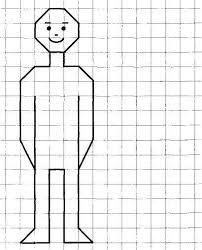
Draw a horizontal line equal to the length of 1 cell.
From its end points draw diagonals to the bottom row.
Continuing the line, outline the side edge of the next square below.
Draw diagonals for narrowing.
Connect the ends with a horizontal line.
From the ends of the line draw 2 perpendiculars (1 cell).
Draw horizontal lines on both sides in opposite directions.
Bring the diagonals to expansion.
Draw a vertical line down, 4 cells long.
Bring the diagonals to a narrowing point.
Repeat step 9, tracing the squares on both sides along the side edges (2 legs).
Extend the diagonals and connect them to the end point of the opposite line.
Draw the face, hair and clothes as desired.
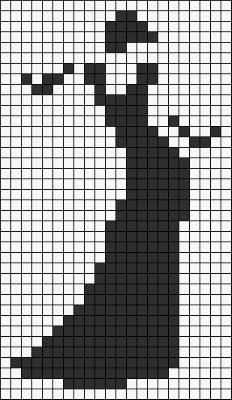
Color 2 cl.
Move 1 cell to the left and paint 4 cells.
Paint 5 cells under the previous line.
Color 2 cl.
Step back from the first row 4 cl. 1 down and 3 to the left, paint 1 cl., skip 1, paint 2, skip 3, paint 2.
Move 1 row to the right, paint 2 rows, skip 4, paint 1, skip 2, paint 2.
Move 6 cells to the right, paint 1, skip 2, paint 2.
Color 5 cl.
Move 1 cell to the right and paint 4 cells.
Color 4 cells under the top row, skip 2, color 1.
Move 1 row to the right, paint 4 rows, move 2 rows, paint 1, skip 2, paint 1.
Color 5 cl., skip 2, color 2.
Color 5 cl.
Color 6 cl.
Repeat step 15 3 times.
Move 1 cell to the left and paint 7 cells.
Repeat the previous line.
Move 1 cell to the left and paint 7 cells.
Repeat step 19 3 times.
Move 1 cell to the left and paint 8 cells.
Similarly, draw the required length of the dress, stepping back 1 cell to the left and drawing 1 cell more than in the previous line.
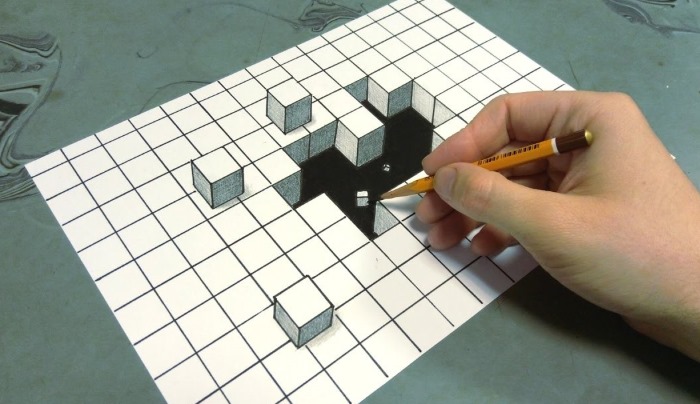
Mark 14 points at 2cm horizontal intervals at the top and bottom of the work page.
Connect the dots with vertical lines.
Place several dots at 2 cm intervals in the vertical direction along the side of the sheet.
Connect the dots with horizontal lines.
Find a square among those obtained using the given coordinates: from the upper left corner, move 9 cells to the left and 3 cells down. Put dots in the corners of the square.
From the initial position, retreat 6 cells to the right and down. Place dots in the corners of the figure found.
On the next line, move 5 cells to the right and place a dot in the corners of the square.
Move 1 cell to the right and skip 1 row down. Place dots in the corners of the square.
Connect all the dots in the picture.
Measure 4mm from the bottom of one of the squares up and mark this spot with a dot.
Based on this point, draw a horizontal line parallel to the connecting lines.
Measure 5 mm from the opposite base of the same square and draw a perpendicular line.
On the vertical line mark a point at 18 mm.
From the obtained point, draw a diagonal line to the corner of the square and a horizontal line to the right, 2 cm long.
Connect the horizontal line to the second corner of the square.
Draw another diagonal line parallel to the existing one.
Divide the lateral edge of the resulting plane with a diagonal line.
On the lower edge of the right square, mark a point with an indent of 3 mm and draw 3 diagonal lines.
Complete all missing lines from the rightmost diagonal.
Similarly, draw the 2 missing edges of the volumetric drawing.
Mark a point 7 mm above the top edge of the drawing on the left.
Draw a square from it, 2*2 cm in size.
Moving down a little, mark a point at 6 mm and draw a diagonal line to the resulting square.
Draw a horizontal line at 19 mm, from which also draw a horizontal line.
Similarly, draw squares in any places on the working page.
Trace the background horizontal and vertical lines without crossing the previously drawn squares.
Color the picture
Pictures on various topics
How to draw pictures on cells, you need to learn based on the place where they will be created (workbook, Whatman paper, personal diary), as well as the style of their execution.
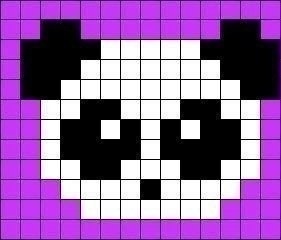
Drawing by cells
Description of creation
Paint 1 class, move 1 class horizontally and paint 2 class.
Repeat step 1.
Color the 4th row under the previous line.
Color 3 cl.
Move 2 cells to the left and paint 5 cells.
Move 1 row to the left, paint 1 row, skip 2, paint 1, skip 2, paint 1.
Move 1 row to the left, paint 1 row, skip 7 rows, paint 1 row.
Color 1, skip 2, color 1, skip 1, color 1, skip 2, color 1.
Repeat step 8.
Color 1 class, skip 7 class, color 1.
Move 1 row to the right, paint 1 row, skip 2, paint 1, skip 2, paint 1.
Move 1 row to the right, paint 2 rows, skip 1 row, paint 2 rows.
Color 3 cl.
Repeat step 1.
Move 2 cells to the left and paint 7 cells.
Repeat the previous line 2 more times.
Move 2 cells to the right and paint over 3 cells.
Repeat the previous line.
Move 1 cell to the right and paint 1 cell.
Paint 1 row under the previous one, step back 2 rows, paint 1 more.
Paint 1 cell below the top one, step back 1 cell, paint 1 cell.
Color 2 cl.
Color 1 class.
Move 4 cells to the left and paint 8 cells.
Repeat the previous line.
Drawing on squares can be used both as a temporary hobby and relaxation, and as a source of additional income. Full-fledged pictures, consisting of many squares, are painted with watercolors or gouache, and also sold for their subsequent transformation into embroidery patterns.
Based on the availability of sample pictures, one can learn to draw this way at any age, regardless of a person’s innate predisposition to fine art.
Article formatting:Natalie Podolskaya
Video about drawing by cells
How to draw pictures on cells - video instruction on drawing painted lips: