November 13 is World Kindness Day in many countries. Drawing competitions among children on the theme "Do Good" are timed to coincide with this day. The main goal of such events is to popularize volunteer and volunteer activities, and to develop moral qualities in young people.
There are many ways to do good: help the elderly and sick, feed animals, fight extremism and violence, protect the environment. Such competitions also help children express their emotions through fine art. This article discusses several master classes that will help you make a drawing for the competition.
Heart pencil drawing
The drawing on the theme "Do good" in the form of a heart is very popular, as it serves as the official symbol of the World Kindness Day. This symbol was specially created by a French artist. The simple drawing, which is offered in this master class, can be used as an independent illustration or as part of other graphic solutions, discussed below.
For work you will need a sheet of paper, a black, white pencil and a red one - one darker and the other lighter (or felt-tip pens). For convenience, the finished image of the heart is shown on the left.
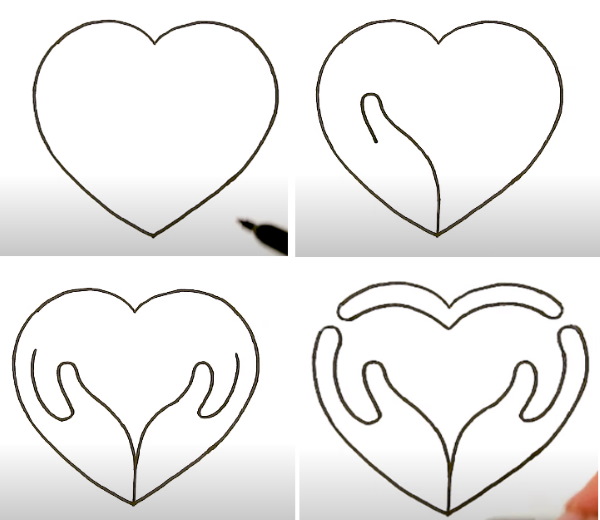
The step-by-step process of completing the drawing is presented below:
- Draw an arc at the top of the sheet.
- On the horizontal line passing through the top of this arc, mark a point at the same distance. You can also use a ruler to construct a symmetrical figure.
- Complete the top part of the heart by drawing a second arc through the marked point.
- Round off the left part of the outline by lowering the line.
- Bring the left part of the outline to the point that is under the center of the heart. To simplify the construction, you can first draw the guides and axes of symmetry with a simple pencil.
- Draw the right part of the contour in the same way as the left.
- Draw a short straight line from the bottom.
- Make an arc to the left as shown in the picture.
- Make a curve that will represent the thumb on the hand.
- Draw another arc at the bottom, parallel to the outline of the heart.
- Draw the same figure symmetrically on the right, having first marked the auxiliary points through which the line passes.
- Erase part of the heart outline as shown below. If the drawing is done with felt-tip pens or markers, you can use a white marker for this.
- Round off the resulting edges. You will get a stylized image of human palms.
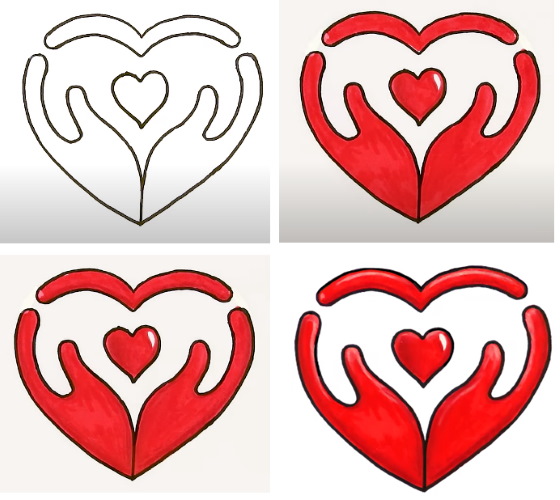
- Mark a point under the center of the heart. The distance should be the same as the width of the fingers on the palms.
- Draw two arcs, copying the outline of the heart, and connect them with a rounding.
- Mark another point at approximately the same distance.
- Draw a small heart from it.
- Color the inner heart red, leaving a white teardrop-shaped highlight on the right.
- The remaining elements are also painted bright red.
- Paint the edges of the contours with a darker color, giving volume to the figure.
- Use a white pencil to add highlights on the top of the heart and lighten the fingertips on the stylized palms.

This symbol can be drawn in a variety of ways, such as showing a heart with hands wrapped around it.
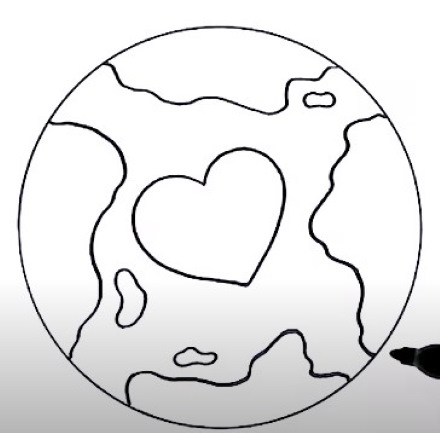
Globe and hearts
The drawing on the theme "Do good", presented in this master class, is also done using the symbol of World Kindness Day - the heart. This option is suitable for small children, as it is quite simple. Adults will help to make the outlines of the drawing, and the child will cope with the coloring on his own. For work you will need colored pencils or felt-tip pens.
The process of creating a drawing consists of the following step-by-step actions:
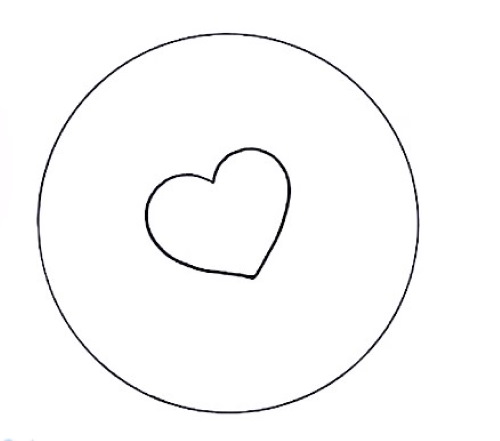
- Draw a large circle in the center of the album sheet. Its outline can be made in advance using a compass or by tracing some round object - a compact disc, a plate or a glass.
- Draw a heart in the center of the circle, tilting it slightly to the horizontal. You can also draw it strictly in the center.
- On the right, inside the circle, draw an uneven outline, this will be one of the continents. It is not necessary to achieve a realistic resemblance to the planet, you can show it conditionally.
- A similar procedure is done for the other sides, placing the "continents" diametrically opposite. The contours of the lines can be shown differently.
- You can also draw smaller islands between the continents.
- Color the heart in the center of the drawing pink and make the outline purple. You can replace pink with red.
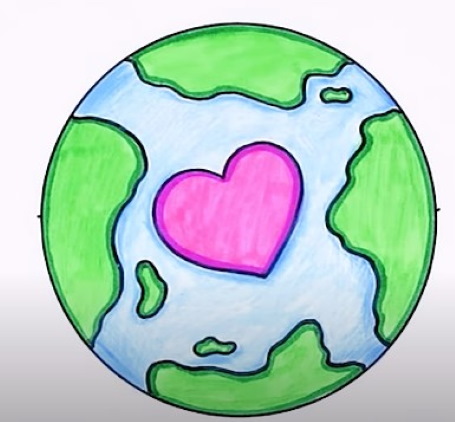
- Colour the continents and islands light green and outline them with a dark green pencil.
- Color the spaces between them with a blue pencil, darkening the outlines along the edges.
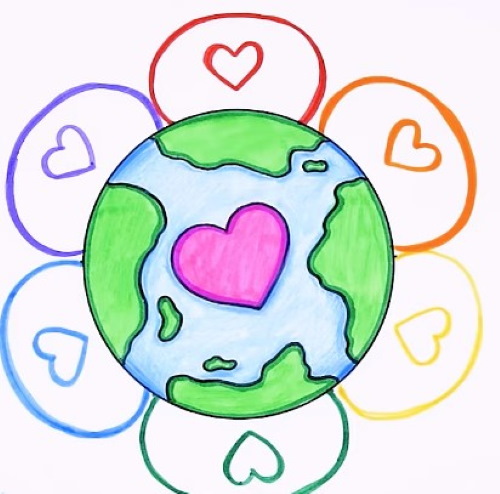
- Draw a semicircle and a heart inside it on top with a red pencil.
- Draw similar figures of the same size around the entire circumference of the globe. You can preliminarily divide the circle into 6 parts, outlining the contours with a simple pencil.
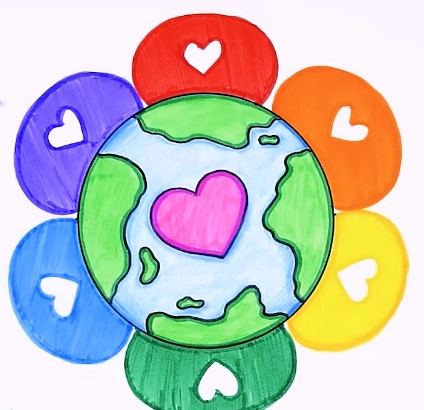
- Paint the semicircles with the appropriate colors, leaving white hearts inside them.
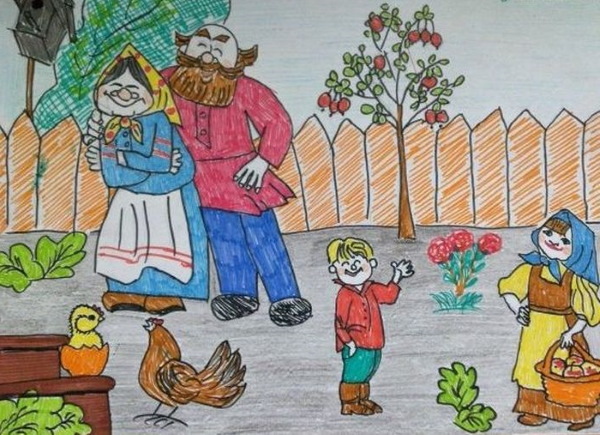
Help for the elderly
The drawing in this master class will be dedicated to such an act as helping the elderly. This option is well suited for children's competitions on the topic "Do good", but its implementation is more difficult and is recommended for children from 8 years old. For work you will need colored pencils or felt-tip pens, a sheet of paper, an eraser.
Below you can see the step-by-step process of its implementation:
- Draw a circle a little to the left of the center of the album sheet – the boy’s head and show the line of hair on his face.
- Draw his nose with a small arc and his mouth in the shape of a moon.
- Draw the eyes as circles and color in the lower part (these will be the pupils).
- Eyebrows should also be shown in the form of small arches.
- Draw the neck in the form of short segments.
- Draw a boy's T-shirt with short sleeves. The shoulder on the right should be slightly raised, as he is turned sideways to the viewer.
- Show your left arm straight and the other bent at the elbow.
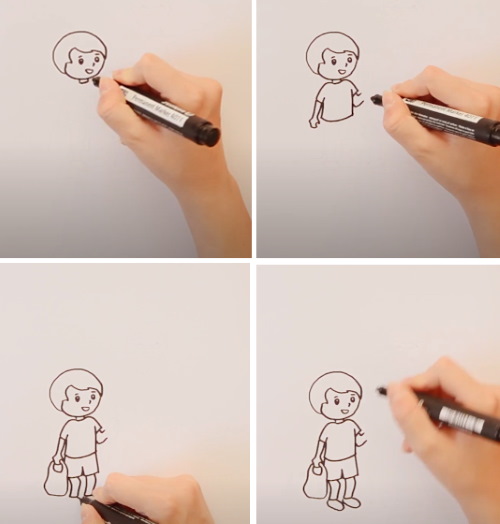
- Draw the boy's shorts and the bag with rounded contours that he helps carry to his grandmother.
- The boy's legs can be drawn straight or half-bent, showing movement.
- Draw the boy's boots in a simplified manner, in the shape of two ovals.
- The grandmother's face should also be depicted as an oval, and the neck and bun of hair as semicircles.
- Draw the sleeves of the grandmother's dress, show the sleeve that is further from the viewer.
- Continue the outline of the dress downwards in the form of a curved line.
- Draw the hands of the boy and grandmother. It is not necessary to depict the fingers, you can show the palms in the form of rounded lines.
- Show the woman's second arm bent.
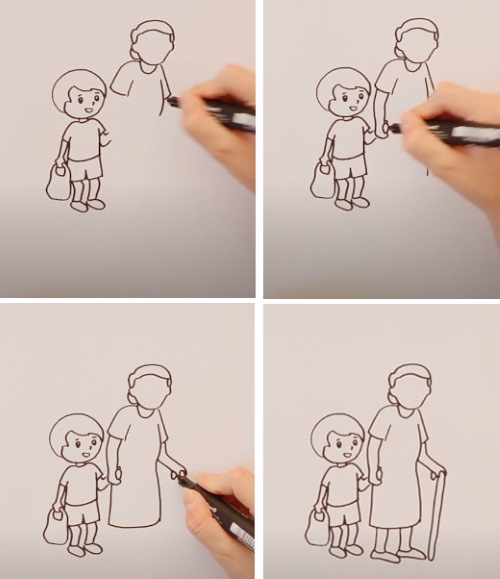
- Complete the outline of the dress.
- In the grandmother's free hand, draw her hockey stick with two straight lines, approximately to the level of the boy's legs.
- Draw her legs straight, and her feet also in the shape of flattened ovals.
- On the old woman's face, draw small eyes, glasses and wrinkles in the form of thin lines.
- Add the mouth and wrinkles radiating from the nose in the form of arcs.
- Color the grandmother's hair gray using horizontal strokes.
- Mark the segments on one straight line that will show the zebra crossing on the road.
- On the grandmother's side, make the same parallel lines at the same distance.
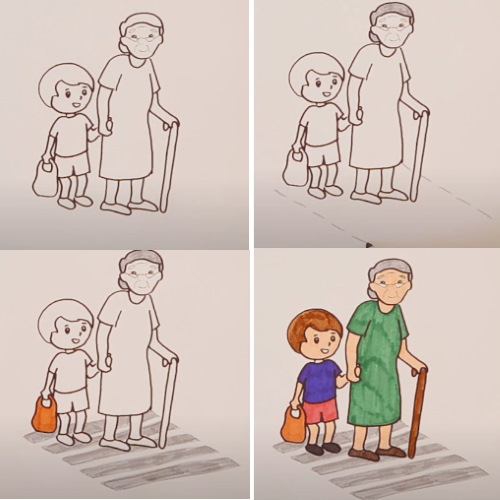
- Connect these lines with straight lines and shade the "zebra" in gray. Color the bag in the boy's hands light brown.
- Color the grandmother's dress with a green pencil, the boy's clothes with blue and red, the shoes with dark brown, the boy's hockey stick and hair with brown, and the exposed areas of the arms and legs, as well as the face, with light orange.
In the background of the drawing you can add a road, a bus, houses, a traffic light.
Feeder
A drawing on the theme "Do good" can depict help not only to people, but also to animals. This simple master class will show a bird feeder, and the illustration will also feature the traditional symbol of Kindness Day - the heart.
This simple drawing can be drawn by children who study in elementary school. It will require colored pencils or markers.
A bird feeder can be drawn as follows:
- In the upper right part of the album sheet, make an arc – the “head” of the bird.
- Draw it into a teardrop shape, depicting the bird's body.
- Draw a similar shape inside – a bird’s wing.
- Connect the outline of the body with a smooth line.
- At the top of the head, show the beak in the form of triangular shapes and the closed eye of the bird in the form of an arc.
- You can add a small "eyebrow" above the eye. Make a smooth line on the bird's belly.
- On the bird's wing, draw several wavy lines to represent feathers.
- Draw a triangle-shaped roof for the birdhouse under the bird.

- Show the side walls of the birdhouse as vertical lines.
- Connect them with a horizontal line, and draw a heart in the middle of the birdhouse.
- Show the bird's legs with two short segments.
- Show three small hearts “flying out” of the bird’s beak next to it.
- Draw two vertical lines from the birdhouse – the pole on which it is attached.
- Paint the bird blue, make the body darker (paint in several layers), make the beak yellow, the hearts pink, the birdhouse yellow (or brown), its roof red. You can paint the picture in other colors that you like.
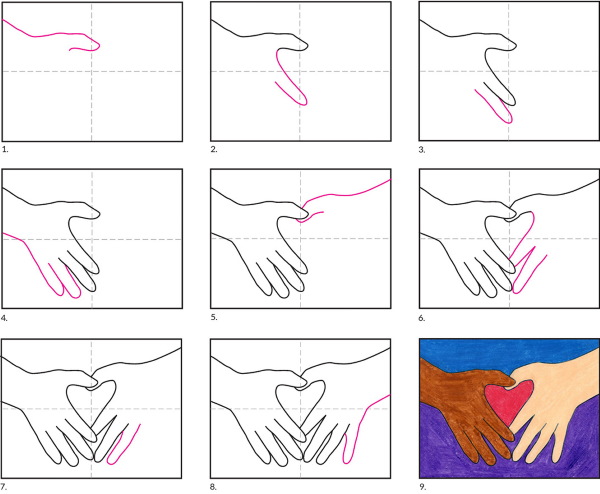
Heart from hands
Kindness can also mean friendship between nations, mutual assistance and the fight against racism and injustice. This version of understanding kindness will be played out in this master class. This drawing is easy to do, and you will only need colored pencils or markers for the work.
Step by step drawing process:
- Make a large heart in the middle of the sheet using the same techniques as in the first example.
- On the left side, draw a long arc – the thumb.
- Separate the second palm by continuing the curved line.
- On the same line as the previously drawn thumb, make another one, pointing in the opposite direction.
- Draw 3 more fingers in one row along the contour of the heart.
- Round off the contours of the fingers.
- Erase the outline of the heart on your fingers with an eraser.
- Use parallel lines to show the fingers of the second hand.
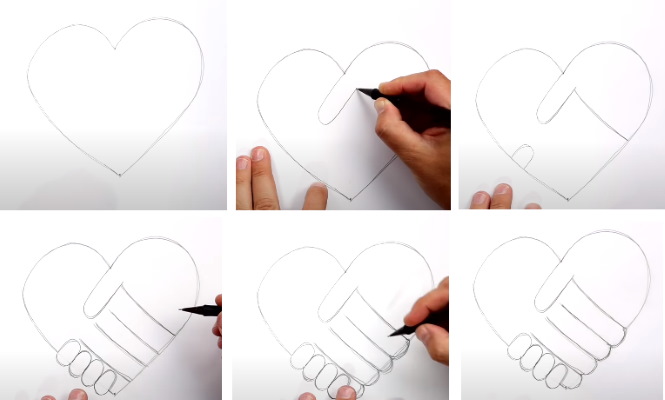
- Also round them off at the ends.
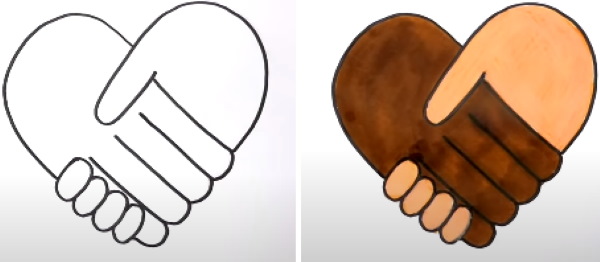
- Remove the extra lines with an eraser. You will get a sketch like this:
- Trace the finished outline with a black pencil or marker.
- Paint one hand dark brown (symbolizes the Negroid race) and the other light orange (symbolizes the white race of people).
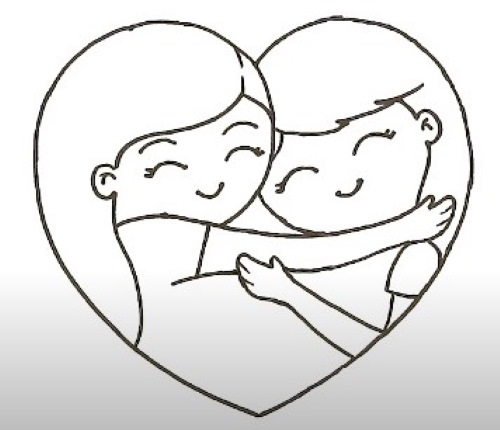
Friendship
The drawing on the theme "Do good", described in this example, is also made based on the outline of a heart. Inside it, two hugging girls will be depicted, and the composition itself shows strong friendship and mutual assistance between people. The drawing is made with colored pencils or felt-tip pens.

Step by step process of creating a drawing:
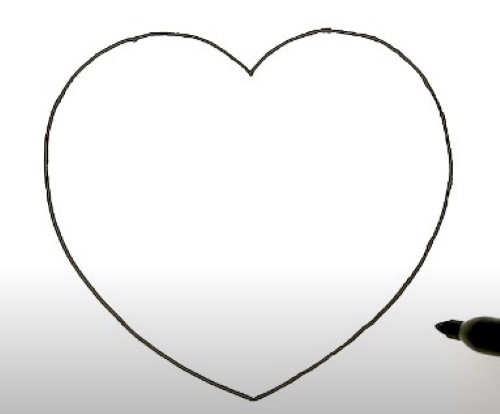
- Draw a “bird” in the middle of the sheet – the upper outline of the heart.
- Give the figure a more rounded shape. The heart should be quite large.
- Mark a point at the bottom under the center of the heart.
- Complete the outline of the heart.
- Continue the rounded line inside the heart from the top. This will be the head of one of the girls.
- Mark the hairline as shown below. You can first draw it with a simple pencil and correct it with an eraser, and then outline it more brightly.
- Draw the girl's shoulder in the form of a "wave".
- Finish drawing the girl's hand, "embracing" the second half of the heart. Show the fingers in a simplified manner.
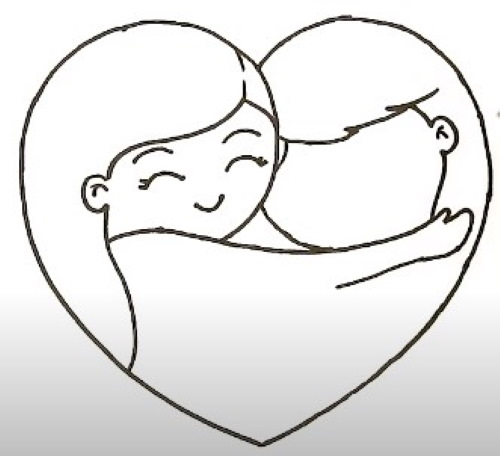

- Round off the head of the second girl on the right.
- Draw the outline of the hair and the notch for the ear with a broken line.
- Draw eyebrows, eyes and mouth of the girl on the left with simple arcs. Also add a line inside the ear.
- Similarly, draw the facial elements of the second girl in the right half of the heart.
- Use two short lines to mark the girl's shoulder on the left.
- Draw the girl's shoulder on the right as an oval and a short line.
- Draw her curved hand, making her fingers thin lines.
- Finish drawing the bodies with smooth arcs, as shown below.
- Draw a small heart in the center of the composition at the bottom. Color it in the colors shown in the finished drawing, or choose your own.
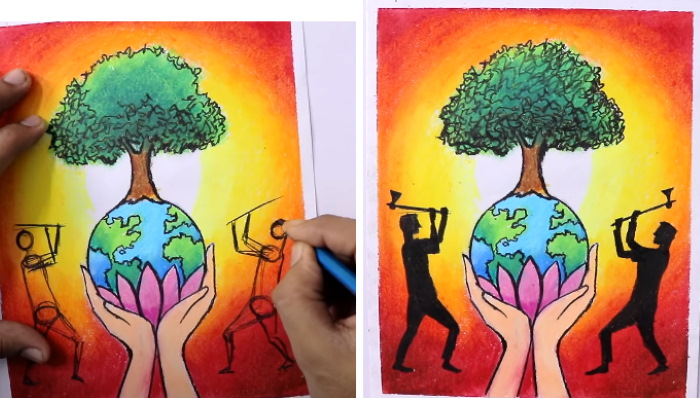
Respect for nature
In the illustration shown in this example, kindness is expressed in caring for the environment and preserving trees. The drawing will be done with other materials - using oil pastels. It is available in the form of bars and pencils, the latter form is more convenient for children's creativity.
Oil pastels allow you to achieve the same effect as when working with oil paints. They are cheaper and are made on the basis of mineral or vegetable oil. It is recommended to choose thicker and rougher paper for oil pastels. Pastels can be shaded like oil paints and get bright, saturated shades.
You will also need a simple HB graphite pencil, an eraser, a paper napkin for shading (or a piece of paper), and a graphite pencil with a hardness of 6B or 8B.
Below is a step-by-step process for drawing such a picture:
- Secure the sheet of paper to the table with paper tape.
- Draw a simple pencil outline of a tree at the top of the sheet in the form of a wavy line (for the crown). Draw the trunk with smooth diverging lines.
- Draw a circle under the tree to represent the globe. This can be done using a compass.
- Draw large petals along the bottom edge of the circle.
- Draw palms at the bottom holding the globe.
- Use wavy lines to depict the continents on the planet.
- Use a light yellow pastel pencil to color the stripe around the tree trunk.
- Duplicate this stripe with a darker shade of yellow.
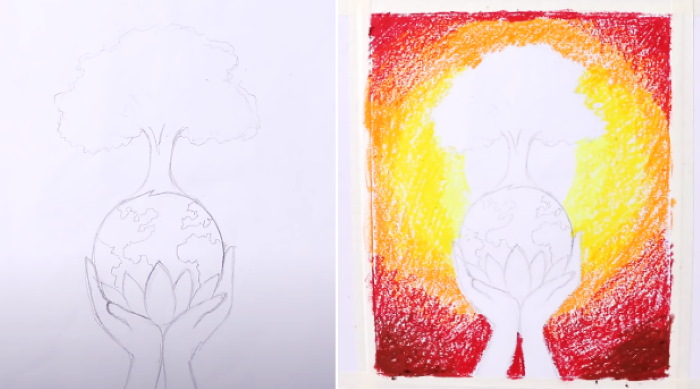
- Color the next ring around with an orange pencil.
- Paint the rest of the space around red.
- Add darker color strokes at the bottom corners of the sheet.
- Fold a paper napkin in several layers and shade the drawing without pressing hard. This will result in smoother transitions between colors. Hand movements should be in a circle so that only adjacent colors are mixed.
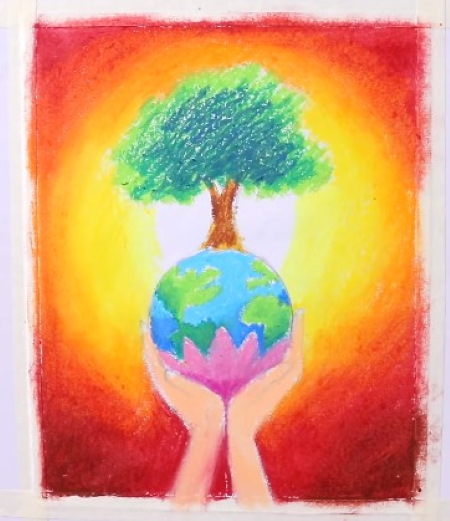
- Color the palms with light orange pastel.
- Paint the petals pink.
- Color the water between the continents with a blue pencil at the top of the globe and with a blue pencil at the bottom.
- Colour the continents in green and dark green.
- Use brown pastel to paint the tree trunk and its crown, first light green, then apply a second layer of dark green.
- Carefully shade the painted areas. The easiest way to do this is with a special shading tool or a piece of paper rolled into a tube.
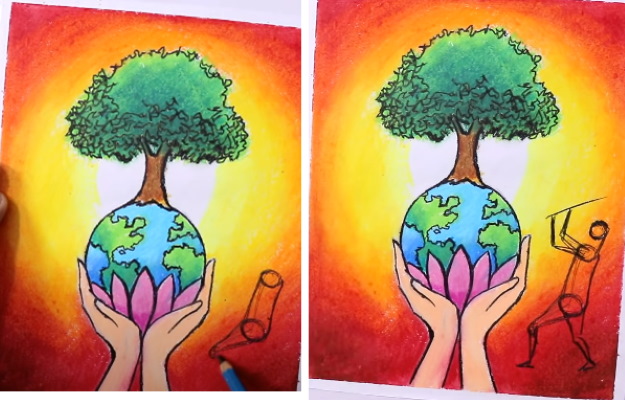
- Use a soft graphite pencil to draw the contours more clearly.
- Using a graphite pencil, draw the outline of the person on the right using simple geometric shapes as shown below.
- The result should be an outline of a person who wants to cut down a tree:
- Draw a similar human figure on the left.
- Colour the outlines of people with a soft graphite pencil or pastel.
Oil pastel is something between pencil drawing and painting. This material will allow the child to look at drawing in a different way and master new skills. Pastel can be applied in several layers, which allows you to get new shades of color.
You can also come up with other plots for drawings on the theme "Do good". For example, draw a mother and a child inside a large heart, show how a child helps his parents by doing homework, depict a white dove in his hands, which is a symbol of peace. Such compositions can be created using the objects discussed in these master classes.
Video drawing
Drawing on the theme Do good: