Simple drawing of a house can be represented by a pair of figures - 1 rectangle at the bottom and 1 triangle at the top. This drawing technique is used by small children. Older artists, striving to depict a believable structure, work out each element of the building in more detail.
Drawing tools
Drawing a house for children and adults before doing it will require the preparation of the following tools:
- pencils;
- handles;
- paints.
Pencils
When choosing a pencil, you should consider its softness. To do this, you need to pay attention to the marking. The thickness and brightness of the lines depend on the hardness of the pencil. It is also important not to forget to prepare an eraser, which will help remove unnecessary lines.
The following types of pencils can be used for coloring:
- regular colored;
- graphite;
- coal;
- Watercolor pencils. They are intended for use with watercolor techniques.
Watercolor
The main materials for watercolor painting are:
- paints;
- brushes;
- paper.

Paper will be the basis of any drawing. Depending on its texture, the paint spreads differently on the surface.
There are 3 main types of paper:
| Paper type | Description |
| Fine grained | It is produced by cold pressing. It is recommended to start with it for beginners who have not yet developed individual preferences. |
| Smooth | This paper allows paint to flow easily and can be used for fine detail work. |
| Torchon | This is a paper with a hard texture. Paint particles settle on its surface, creating interesting effects. |
Traditionally, squirrel brushes are used to work with watercolor paint. They are soft and have the ability to absorb a lot of water. They are convenient for filling large areas. When choosing, it is better to give preference to brushes with a thin tip, because they allow you to draw the smallest details.
Synthetic brushes have hard and elastic bristles. When painting with them, you get the feeling that the brush is always dry. However, they have the advantage of good elasticity.
When choosing paints, it is not necessary to give preference to expensive products. The color palette for a beginning artist does not necessarily have to be wide. For example, you can choose paints from the Nevskaya Palitra company. They are very popular among Russian artists.
As for foreign manufacturers, the most popular of them are:
- Winsor&Newton;
- Sennelier;
- Schminke.
Master classes
When drawing a house, whether simple or complex, you should follow the detailed descriptions of each step.
Simple house in cells
A drawing of a house for children can be created by cells. It will not take much time, but the image will be beautiful.
To work you will need the following tools:
- simple pencil;
- eraser;
- several colored pencils or gel pens.
The paper on which the drawing will be created should be lined horizontally and vertically. You can use a sheet of school notebook in a box.
The stages of drawing are as follows:
- At the bottom of the sheet, draw a horizontal line 11 cells long. From both ends of this segment, draw up 1 vertical line, each of which is 9 cells long. At the top, connect these 2 lines with 1 horizontal line. The result will be a rectangle.
- Find the center of the house. This is not difficult, since the length of the horizontal lines is 11 cells, the center will be on the 6th cell. To do this, you need to count 5 cells from one of the sides - left or right - and put a small dot in the middle of the 6th. Then, at a height of 6 cells from this point, you need to put another 1 and from it to the left and right draw 2 inclined segments. Each of them should pass so as to end in the upper corner of the main rectangle.
- The resulting isosceles triangle will become the roof of the house.
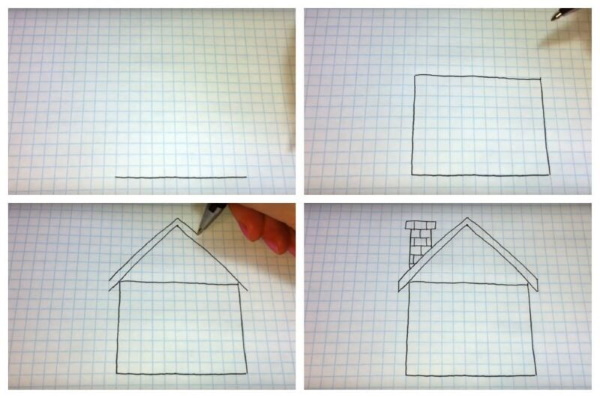
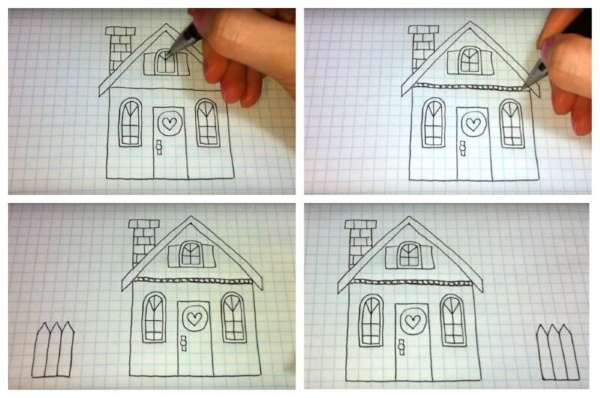
- Above each of the 2 diagonal roof lines, draw 1 line at a distance of approximately half a cell. The result will be 2 thin, slanted roof stripes.
- Draw a pipe. It can be depicted on the right or left side of the roof. To do this, draw 2 vertical lines at a distance of 2 cells from each other. At the top, connect these lines with 1 horizontal line. At the top, add another 1 small rectangle 1 cell wide. Then draw several short horizontal and vertical lines imitating the seams between the bricks.
- Draw a door, which is represented by a rectangle. It can be decorated with a window in the form of a circle or draw a heart for decoration.
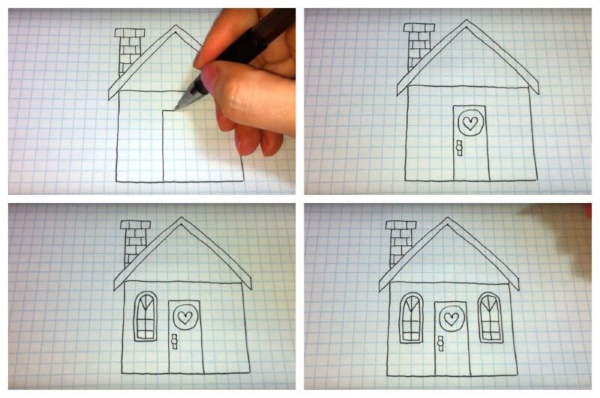
- Draw windows. They are also represented by rectangles. You can make their upper part rounded. It is important not to forget to add frames and glass. You can not limit yourself to windows in the lower part of the house, but add more on the roof.
- When the house is ready, decorate its garden area. You can add a fence on the left and right. It is easy to draw: for this, it is enough to draw a lot of adjacent rectangles, each of which goes into a corner at the top. You can add flowers growing in the yard.
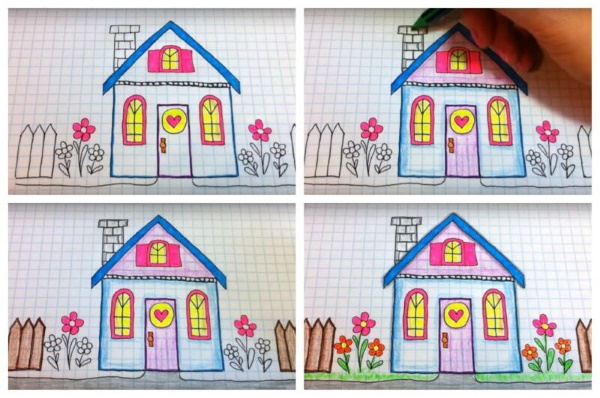
The coloring of the drawing can be as follows:
- Take colored pencils or pens.
- Trace the outline of the house with a blue pencil or a blue gel pen.
- Make the window outlines pink.
- Use pink to color the petals of flowers growing near the house.
- Make the door outline purple.
- Paint the windows yellow.
- Paint the fence brown and the pipe grey.
- Make the grass near the house and the stems of flowers green.
Drawing of a house for children - image by cells. - Paint the walls of the house like this: the upper part is purple, and the lower part is blue. When painting, do not press hard on the tools. It is enough to shade.
Fairytale house
The most beautiful and unusual buildings are in fairy tales. If a child wants to draw an interesting house, it is necessary to prepare an album sheet and several felt-tip pens.
A drawing of a fairy-tale house for children can be created in the following steps:
- Draw the roof. It should be in the shape of a triangle with slightly curved sides. The left part should be made slightly shorter.
- Add another identical figure under the drawn one. The ends of the two identical figures should be connected with short lines.
- When the roof of the fairytale house is ready, move on to drawing the lower part. To do this, draw an arced line on the left side. The same line, but shorter, goes on the right side. Connect both of these curved lines at the bottom with 1 horizontal.
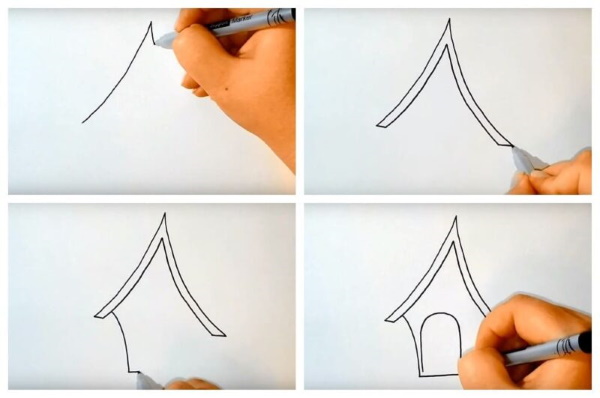
- Draw the contours of the door. It can be represented as an elongated rectangle, rounded at the top.
- Add important elements of the house. Decorate the door by adding several short vertical lines on its surface, imitating cracks in the wood. Draw a door handle, which will be represented by 1 small circle. Add a pair of hinges on the side, each of which is a small rectangle.
- Place a square window above the door. You need to draw frames in it.
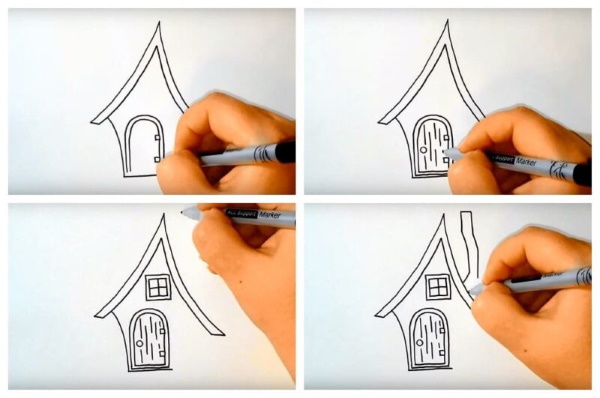
- On the right side of the roof, draw a long pipe that goes to the very top edge of the drawing. This element is fabulous, so you should give it some originality. The pipe can be uneven. In those areas where it bends, there should be stripes running across.
- Return to the house design. On the right side, draw another window, identical to the one drawn above. Under this window is a flower bed.
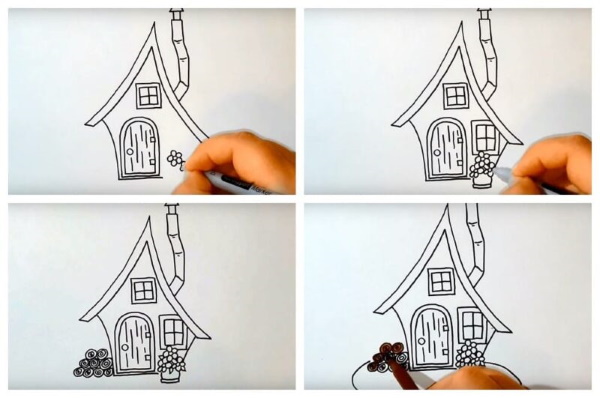
- Add a few more elements to the drawing. For example, draw a lawn and firewood lying next to the wall. Since they lie along the wall, they should be depicted as circles: it is enough to draw many circles laid out in several rows. In this case, the top row will be the longest, and as the height increases, the number of circles decreases. To make the firewood look more realistic, you can draw a spiral inside each circle.
- Start coloring the fairytale house. The chimney should be gray, the firewood brown, the roof orange, the walls yellow. The door should be light brown, the grass green. The windows can be colored blue.
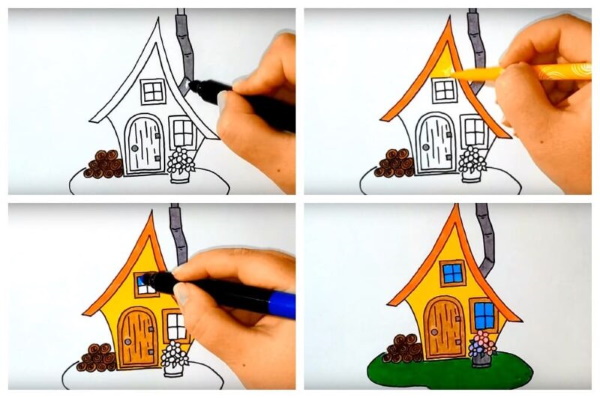
- Use bright colors for the flower bed.
House in perspective
The drawing of a house for children in a three-dimensional version is done using a simple pencil and an eraser. For coloring, you will need watercolor pencils and a black gel pen.
To create a log village house built in accordance with ancient Russian traditions, the following steps must be completed:
- Draw the contours. They are all represented by straight lines. Using a simple pencil, draw a horizontal line at the bottom of the sheet, then draw a vertical line running approximately in the middle. It should intersect with the previously drawn horizontal line at a point slightly to the left of the center.
- Draw the contours for the side wall. To do this, draw 2 segments from the vertical line. 1 of them passes in the lower part under the horizontal line, and the 2nd - in the upper part - respectively, above the horizontal line. Both segments are directed to the left. In this case, the upper one slightly tilts downwards, and the lower one has an upward tilt.
- On the left, at some distance from the main vertical line, draw another vertical. This will be one of the corners of the house.
- Repeat what was done in the previous stage. But this time, work is done on the right side of the drawing. In addition, the slanted lines should be longer and converge at 1 point, located near the right edge of the sheet of paper. Both lines should continue on the left side of the main vertical.
- Draw the roof. Its lower border will be the upper slanted line that runs from the left. This area should be highlighted by tracing it again with a pencil.
- From the left vertical line of the roof, start a segment that will indicate the slope of the roof. It goes up at an angle to the right. This segment will end at the point where it meets the right upper inclined line. At this point, the upper edge of the roof begins. It is represented by a straight line that goes to the left and has a slight upward slope. Having passed through the main vertical, the upper part of the roof ends on the right side of the sheet. Its end point is approximately in the middle between the main vertical line and the right vertical line.
- Draw a line segment that connects the upper right corner of the roof with the lower right corner.
- From the top point of the roof, lower a thin strip down. This will be the other side, which is not completely visible.
- Draw the foundation at the bottom and the logs at the corners of the roof.
- Create window contours. To do this, draw several parallel vertical lines along the wall. It is important to remember that objects that are farther away from the viewer seem smaller. Therefore, the distance between parallel lines should decrease as they move away.
- Draw the lower borders of the windows. The lines here should not be parallel. They are at a slight angle.
- Draw logs. To do this, draw many straight lines along the walls. The upper lines should be parallel to the upper contours of the windows, and the lower ones, respectively, to the lower ones.
- Draw many circles at the corners to represent the cuts of the logs.
- Create window frames.
- Draw a pipe located on the invisible side of the roof.
- When the house is almost ready, draw the surrounding landscape.
- Using a pen, trace all the contours.
- All lines drawn with a pencil can be erased with an eraser.
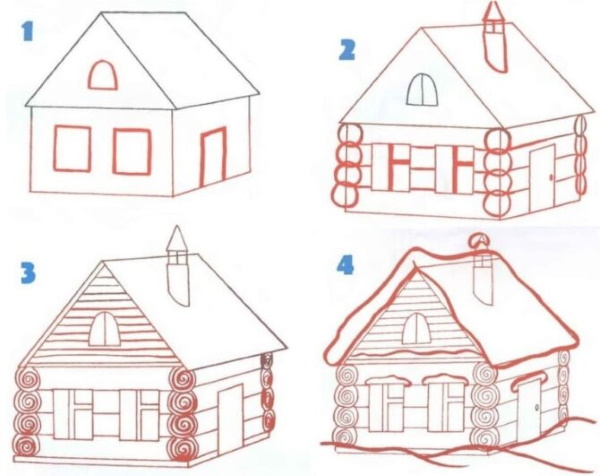
- Using watercolour pencils, colour the picture. The artist chooses colours at his own discretion. For example, the logs can be made yellow, the roof brown, the chimney red. The grass near the house and the leaves of the trees should be green. It is important not to forget to colour the sky blue.
- Use a damp brush to blur the design.
- Work on the painting again with watercolour pencils. As a result, the colours should become brighter and more saturated.
Architectural house
Drawing a house for children, taking into account all the architectural nuances, is a very difficult job. However, if you use the sketching technique, the drawing can be done quickly and beautifully.
To work, you need to prepare the following tools and materials:
- watercolor sheet;
- regular pencil;
- eraser;
- liner;
- brush;
- watercolor;
- palette;
- napkin;
- water.
The creative process goes through the following stages:
- Make a sketch. To do this, you need to find the center of the watercolor sheet and put a dot there.
- Starting from the point, divide the sheet into 4 parts.
- Draw a large triangle that will become the main element of the architectural house.
- Determine where the roof will be. This will be half the top of the main rectangle. In this place, you need to draw a horizontal line. On the left there should be a canopy, which should be shaped like a rectangle. Its sides do not reach the edge of the tiles a little.
- Draw long lines from the canopy that will become a prominent part of the building.
- Continue working with sketches. To do this, determine the location of windows and doors. One window can be made elongated, placing it directly under the roof. It should end approximately at the same level as the tiles. Below is a door with a balcony. It should be made long.
- Start working on the right side. Here you need to find the center and depict a window with a canopy. The 2nd window should be located at the bottom, and the 3rd - on the tiles.
- Add climbing plants. To do this, draw wavy lines starting at the bottom and ending near the upper floors of the building. Draw more houses on the side. Dividing the buildings into 2 parts, draw windows and balconies.
- Take a liner and use it to draw small details.
- The roof should have tiles presented in wave-like forms. Forged railings should be added to the balconies. Their pattern can be any, depending on the artist's preferences.
- Add bricks in some places. Use a liner to finish drawing the asphalt slab.
- Decorate the roof with a weather vane. It is important not to forget about the shadows on the canopies.
The coloring of the drawing takes place in the following stages:
- To fill the sky, mix 3 colors - blue, light blue, ultramarine. Apply the resulting mixture with light strokes. In some places there should be more blue pigment. Thanks to this, in the future, the work on creating clouds will be easier.
- Using burnt umber mixed with water, paint the entire structure. Darken the paint with sepia and apply it to the shadowed areas.
- Give the building on the right an ultramarine color.
- For tiles, it is better to use a color called "English red". Shaded areas should be highlighted with a more saturated shade.
- Decorate the windows. To get the color of the wooden shutters, mix orange with brown and add a little red. To paint the shadow areas, you can use the same color, but add a little brown to it. The same paint can be used to paint the building on the left.
- Use indigo to paint the windows.
- Paint the plants with green paint.
Children will enjoy drawing both a regular and a fairy-tale house. But village residential buildings built from wood have a special appeal.
Video on how to draw a house
How to easily draw a house for a child: