A drawing for children of the fairy-tale character Buratino will help to get to know the details of the hero's appearance and character better. Having a step-by-step example of the image before their eyes, children can repeat a drawing of any complexity, and also bring something of their own to it - other colors, additional characters or the plot of the drawing.
Before starting the drawing process, it is recommended to stock up on the following tools:
| What is needed | For what |
| Simple pencil | For children with a basic drawing level, hard or medium-hard pencils are recommended, as they leave a thinner mark. |
| Eraser | Erase excess and auxiliary contour lines. |
| Paper | The thickness is chosen depending on what the finished drawing is painted with. When using paints, thicker sheets of paper are used. |
| Liner or pen | Trace the finished pencil outline. |
| Colored pencils or paints | To add color to the finished drawing. |
Simple pencil drawing step by step
A drawing for children of the fairy-tale character Buratino is suitable for illustrating the fairy tale "The Golden Key" or "Pinocchio". Children with a basic drawing level of 5-6 years and older can draw it according to this instruction. If some lines do not work out, you can replace a complex element with another one or omit it.
Step by step:
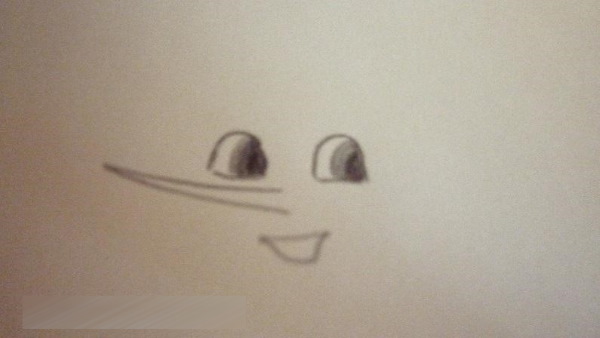
- The sheet is placed vertically. In the central upper part of the sheet, eyes are drawn as semi-ovals. To get your bearings with the size of the head and body, a pencil is placed vertically on the sheet. The length of the hero's body will be slightly longer than the pencil; these boundaries can be schematically marked with lines.
In the right corner of the eye, draw the pupil and iris. With a small indentation downwards, draw a sharp nose, starting from the middle of the face. Under the nose, draw a smiling mouth. It looks like a semicircle. The corners of the lips can be stretched, showing a wide smile.
- The face is outlined with an oval shape. At the top, the head is framed with hair made of shavings that resemble curls. The wide lines of each individual shaving are connected with pointed lines that curl inward.


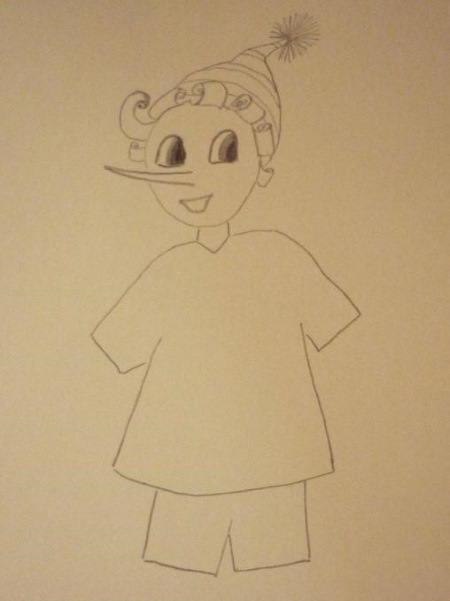
- On the head, a pointed cap with a fluffy bombon is depicted, which is shown with many thin lines. Thin horizontal lines are drawn in advance across the entire cap, so that at the end of the process it is easier to color the cap.
- Buratino's clothes are depicted as a jacket with short sleeves and short shorts. The clothes can be flared at the end or straight, depending on your preference. The sleeves and trousers can be much wider than the hero's arms and legs.
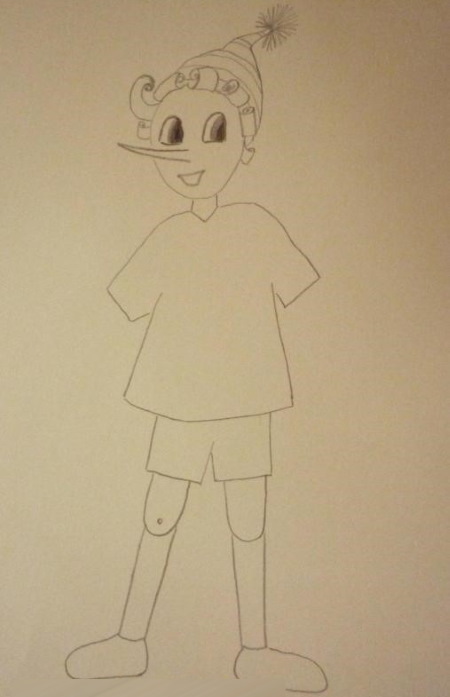
- Depict legs from 2 parts, which are connected in the knee area with a nail. To do this, draw short thin rectangles coming out of the legs and end them with a rounded line. In its center, mark the nails with a dot. Long narrow rectangles lead down from the knee. Draw boots with a round toe.
- They draw the hands, in one of them they show a golden key. The hands also have a joint at the elbow with a nail. Up to the elbow they draw the hands similarly to the legs. Then they draw narrow handles, spread out in different directions. The right hand remains free, it is depicted with a normal hand and fingers.
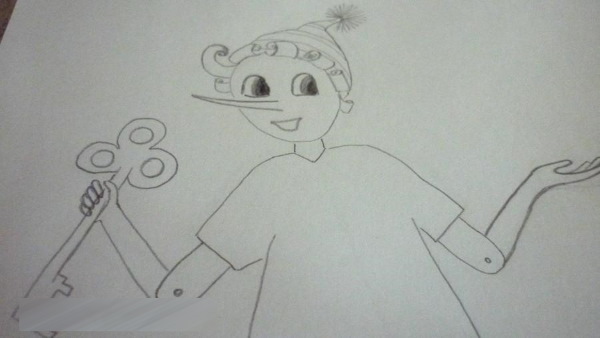
- In his left hand, Buratino holds a golden key. His fingers show four thin ovals on top of the key's base. The top of the key ends in a round pattern, while the bottom is depicted with square and rectangular lines.
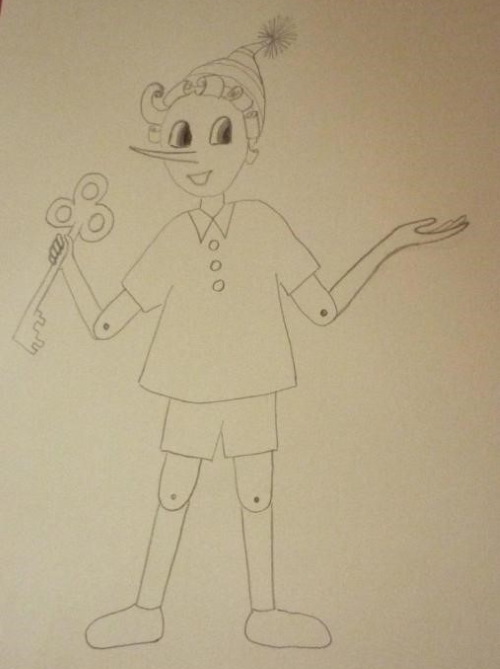
- They add details to the overall design: round buttons in the middle of the jacket, triangles to show the collar at the neck. They outline the overall contour, erase unnecessary details.
- The finished drawing is outlined with a liner or pen. They choose the method of coloring the character - paints or colored pencils. If pencils are used, they try to make sure that all the strokes are in one direction. To give the effect of volume, the edges of each fragment of the drawing are repeated in the same color, but with pressure, or a slightly darker shade is used.
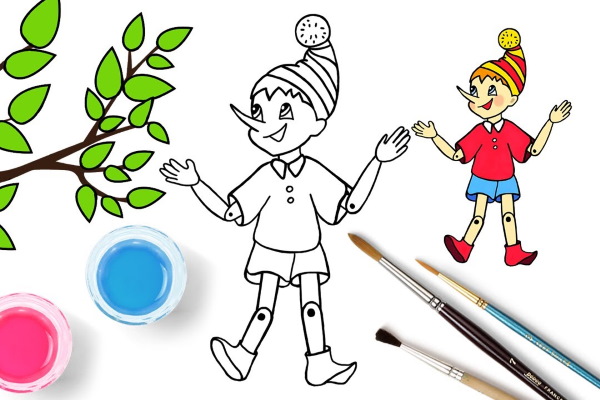
Simple drawing for beginners
A drawing of Buratino for children aged 5-6 years can be presented with simpler geometric shapes that are easy to repeat at the initial drawing level.
Step by step:
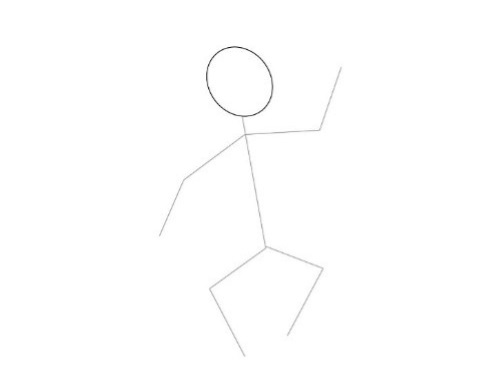
- They start with a schematic representation of the character’s figure: the head is shown in a circle and the body and the location of the arms and legs are shown in straight lines.
- Draw the outline of the clothes. On the head depict a pointed cap with a pompom at the end. Around the body, show a jacket with short sleeves in a rectangular shape, with short pants at the bottom.
- They add details to the character's figure. On the face they draw a long sharp nose, an arced smile and eyes with 2 circles with pupils. Curls peek out from under the hat in different directions. They are drawn in circles and wavy lines.
Add volume to the arms and legs. The right hand ends with a straight hand with straight fingers, Buratino holds a key in his left hand, so the hand is drawn in the form of a fist.
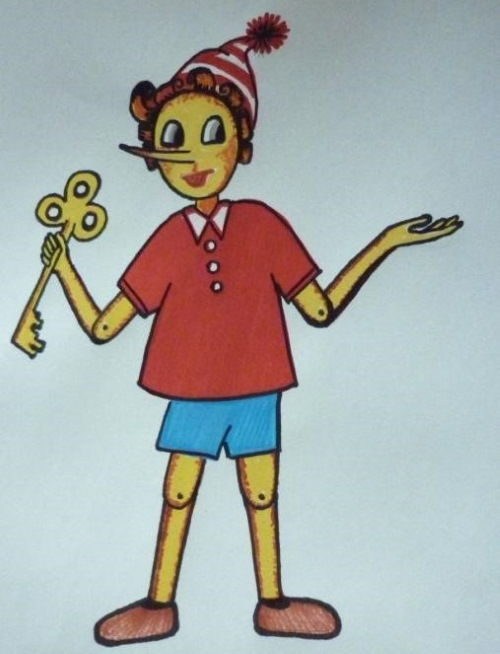
- Add small details to the drawing: a small semicircle depicts a slightly open mouth, circles of different sizes show buttons on the jacket and studs on the elbows and knees, curved lines show lapels on the jacket and fingers. A triangular collar is added around the neck. A small key is drawn in the right hand. Pointed shoes are drawn on the feet.
- Erase the auxiliary lines, outline the general outline with a pen. Color the drawing.
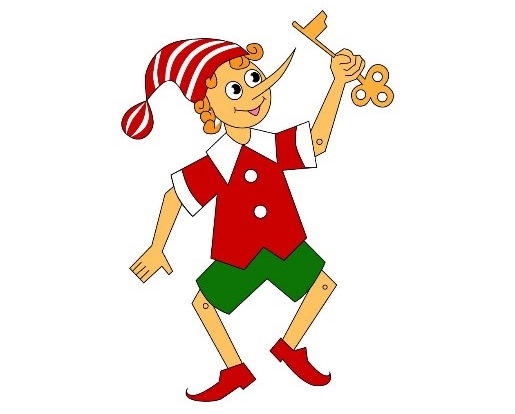
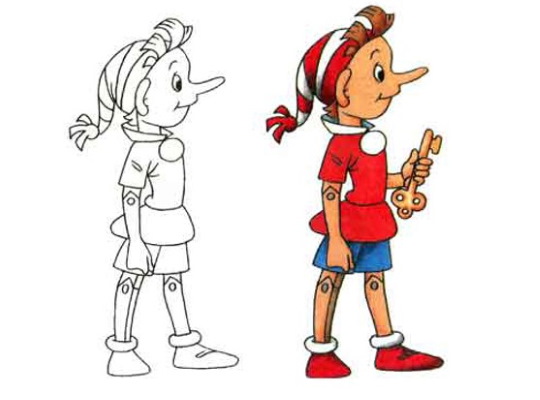
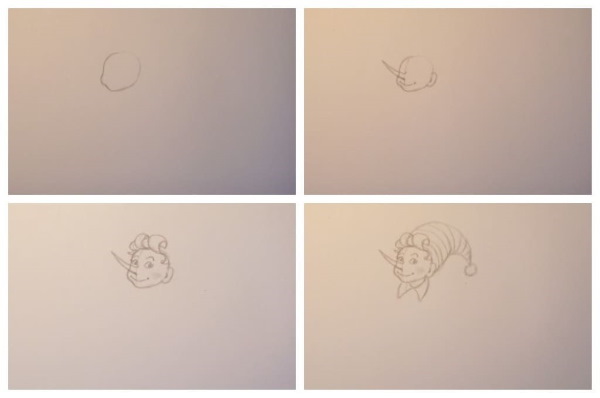
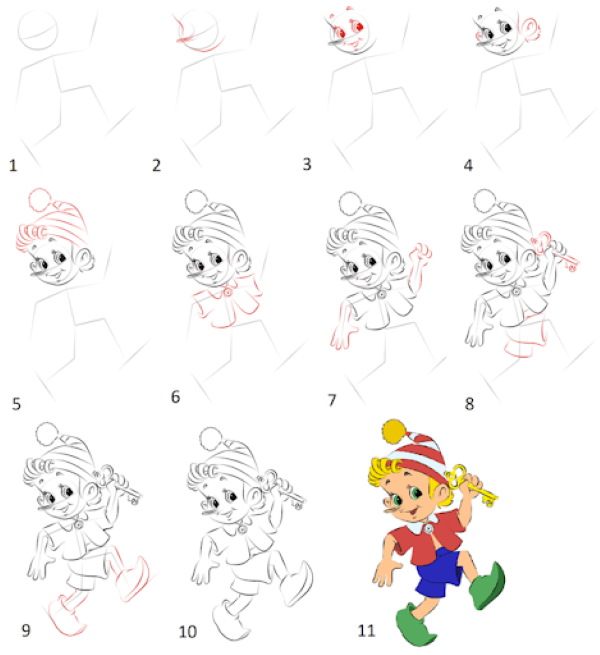
Drawing of a cheerful Buratino with a key
Drawing Buratino for children will help to get to know the fairy tale character better, and drawing details of the costume or face allows children to understand the character's character. If desired, children can draw other fairy tale characters next to Buratino and imagine them in a certain event or invented plot.
This step-by-step method is suitable for those who have a basic level of drawing. All key elements are depicted first with circles and ovals, gradually adding smaller details.
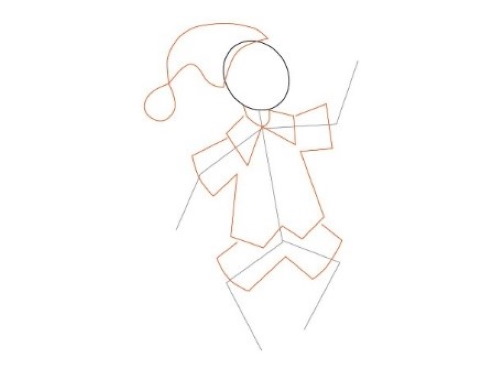
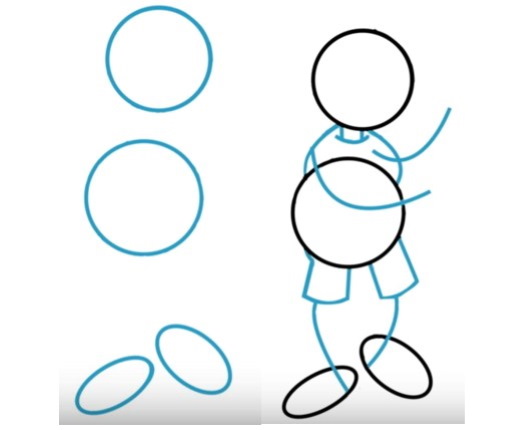
Step by step:
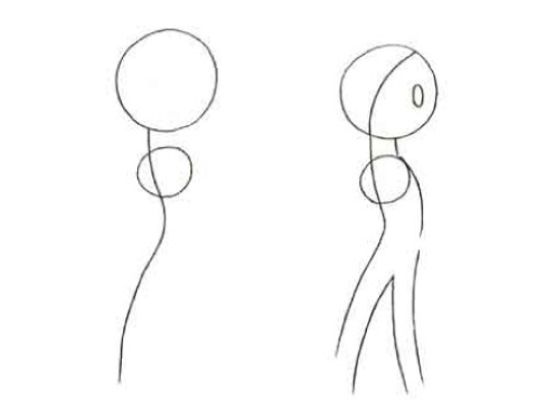
- The sheet is placed vertically and in the central upper part the character's head is schematically marked with a circle. A little lower and to the left a large circle is marked for the body. The feet are shown with 2 narrow ovals, located as in the picture.
- The hero's arms and legs are shown with rounded lines. Straight lines are used to draw a short neck that flows into shoulders and square pants.
- The trousers are drawn on the schematic lines, forming a short-sleeved jumpsuit. Volume is added to the lines of the arms and legs. The hair and curly shavings on the forehead are shown on the head with a smooth line. The legs end with voluminous boots. The hands are depicted with schematic round figures.
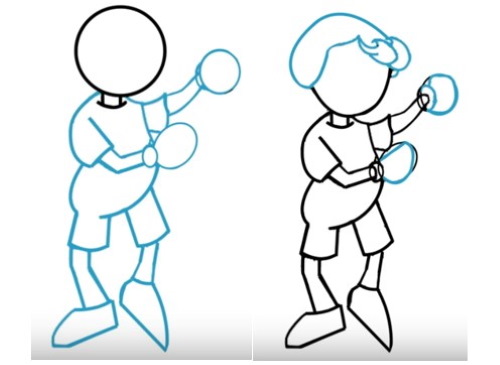
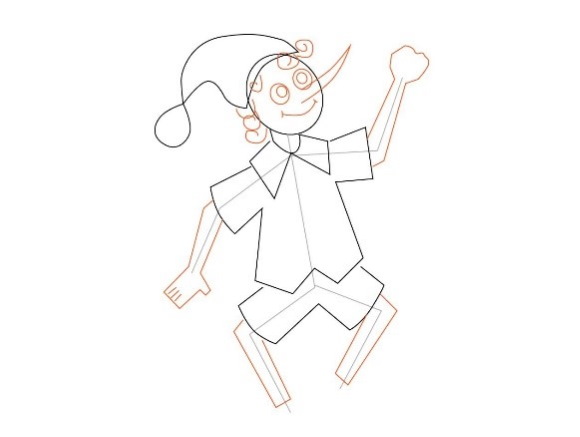
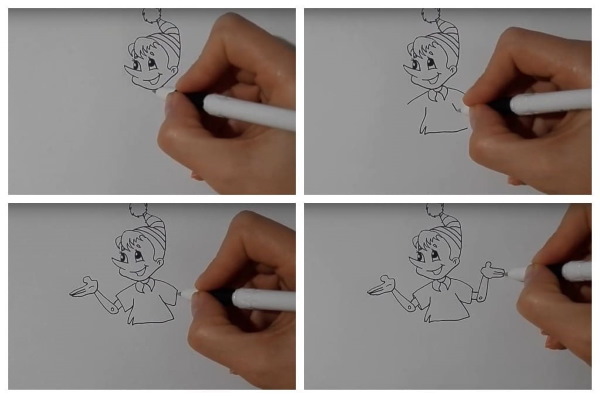
- The contour of the face is drawn in more detail, adding curves in the area of the chin, forehead and cheeks. Near the neck, a curved pointed collar is drawn. In the area of the bend of the elbows and knees, dots are used to show fastenings in the form of nails and additional lines, as in the picture.
- Draw a long nose, pointed to the right. On the head draw a hat with a long end and a pompom. A small round ear peeks out from behind the hat.
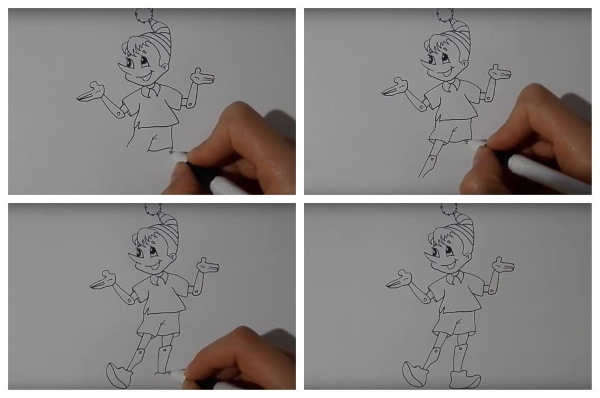
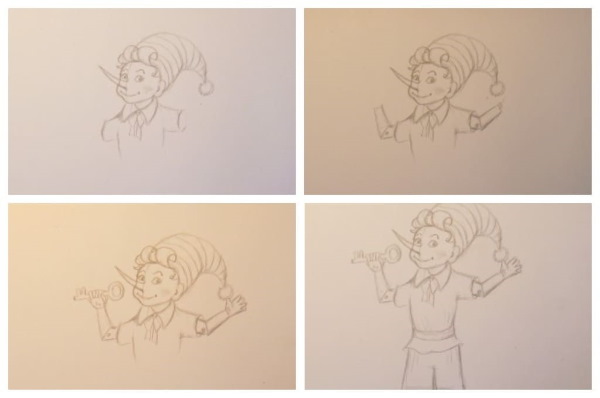
- The hands are drawn folded, so that a key can be depicted in them. The shoes are given more detail: horizontal lines indicate the bends, the outline is clearer.
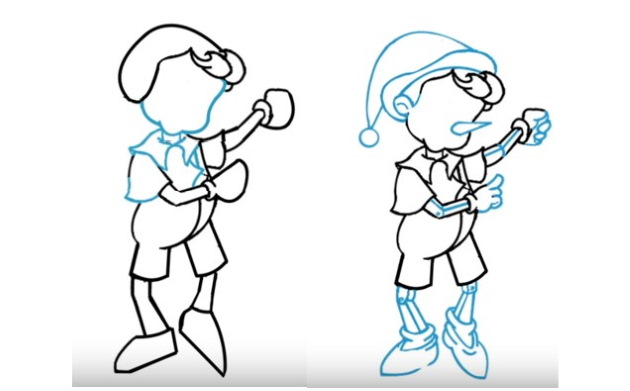
- On the face, the eyes are depicted as semicircles with pupils, and the eyebrows are shown on top with a short curved line. The smile is drawn as an arc with dimples at the ends.
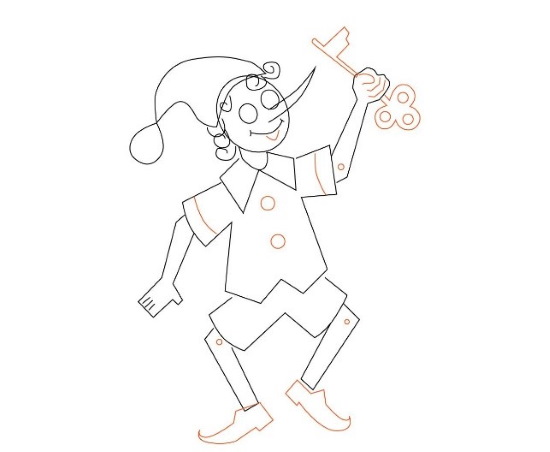
- Turn-ups are drawn on the trousers with a wide horizontal line.
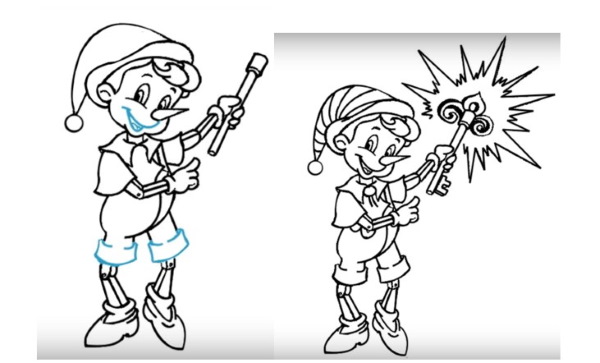
- A golden key is placed in the character's hands. The pattern on the end of the key can be drawn in any way. The key emits radiance in different directions, which is shown by zigzag lines.
- Erase extra lines, outline the contour and color the drawing with colored pencils or paints.
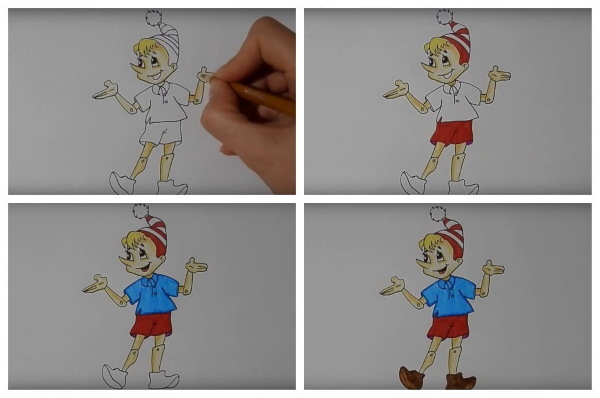
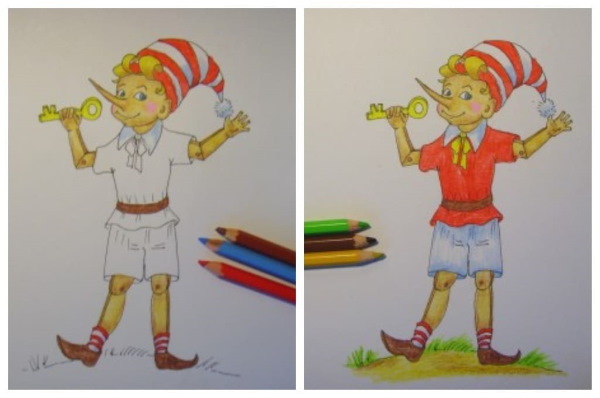
Drawing with colored pencils
A drawing of Buratino for children can be used as a creative task when studying a children's book. Children are asked to draw a literary character with a simple pencil and then color it with colored pencils.
This method is suitable for those who have average drawing skills and is aimed at children aged 9-10 years, because In the process you need to draw uneven and asymmetrical figures:
- They start with a schematic representation of the figure's direction. To do this, they mark the head with a circle and draw a line down from it, indicating the figure. Buratino stands sideways, so the viewer will only see one of his sides, this shoulder is marked with a small circle.
- Volume is added to the finished body diagram by drawing the neck, torso and legs. The hairline and eye line are marked.
- From the circle that represents the shoulder, draw down an arm bent at the elbow, the hand is schematically indicated as a trapezoid. The circle of the face is lengthened in the chin area. A long tip of the cap extends from the back of the head down. Shoes are schematically shown on the feet. The waist line is outlined.
- Small details are added to the drawing. A thin and long wooden nose is drawn on the face, a smile in the form of an arched line with a dimple at the end to show a smile. A pupil is drawn on the eye, an eyebrow is shown with a thin curved line above the eye. An ear is shown with a wide curved line on the side.

- A fringe emerges from under the hat, depicted as curved and expanding rectangles of different sizes. Stripes and a pompom are added to the hat at the end.
- At the joints of the legs and arms (at the elbows and knees), a nail is drawn in a circle and the connections of the wooden parts are shown with thin lines.
- The boots are given oval-shaped lapels. The outlines of the clothes are sketched out: a rounded collar and hem of the jacket, square sleeves and trousers.
- Erase unnecessary auxiliary lines and outline the general contour of the image. With short strokes depict folds on the clothes under the armpit, on the hat, on the legs and on the shoes.
- The character's left hand with the key is finished. Since the hero is standing sideways to the viewer, the hand is not fully visible. It is depicted slightly above waist level, the fingers are shown as small ovals around the base of the key. Buratino holds his right hand bent, only the thumb is visible.
- Color the finished drawing with colored pencils.
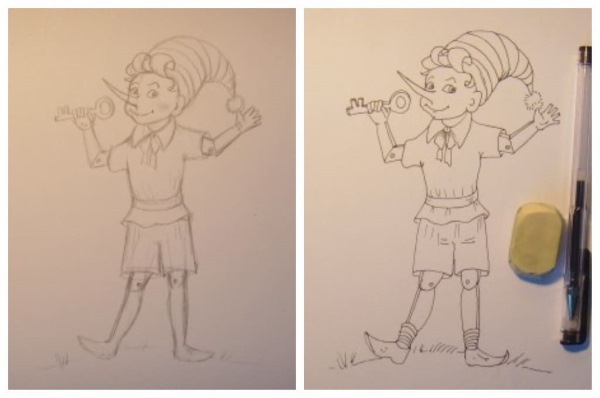
Drawing with pencils and felt-tip pens
A drawing of Pinocchio for children aged 10-12 years can be done using a more complex technique, using a simple pencil and felt-tip pens.

To add volume to the finished image, paint along the contour in a darker shade, showing the shadow:
- In the central upper part, draw Buratino's sharp nose, turned to the left. Above it, draw eyes and dark pupils in semicircles. Several eyelashes are drawn above the eyes. The eyebrows are shown with a short curved line.
- Draw the mouth with an arc, slightly indented from the nose down. Show the open mouth with a semicircle. Outline the face with a curved line. Draw the line from the nose, under the chin and up to the right. Finish the face line with a small semicircle, indicating the ear.
- The forehead of the character is covered with bangs. They are drawn with frequent zigzag lines of different lengths. They try to make the lines slightly curved to show the volume of the bangs.
- Above the head, draw a cap with a pointed end pointing upward. At the end of the cap, a fluffy pompom. Fill the cap with stripes. Draw a short, thin neck under the head.
- Draw a collar under the neck with triangles positioned in different directions. Draw a jacket with short sleeves. At the bottom of the jacket, you can show folds with short lines or zigzags of the hem.
- Thin arms are drawn to the sleeves, bent at the elbows. Here the joint with the studs is shown in the form of small circles. The hands are shown with a straight palm, the thumb is pointed upwards, the other fingers remain straight. The palm is shown with a short curved line. Make sure that the fingers are of different lengths.
- Draw square shorts under the T-shirt. Add 1-2 strokes between the legs to depict folds.
- Wooden legs peek out from under the shorts. The joints at the knees are divided by a line and a round nail is added. The leg widens slightly at the calves. The character's right leg goes to the side, the left one stands straight. The far part of the trouser leg is drawn to show the volume of the legs.
- Draw boots with pointed toes. An additional line shows the sole of the boots.
- Erase the extra lines. The general outline of the image is outlined with a black pen or liner. The character is colored with felt-tip pens.
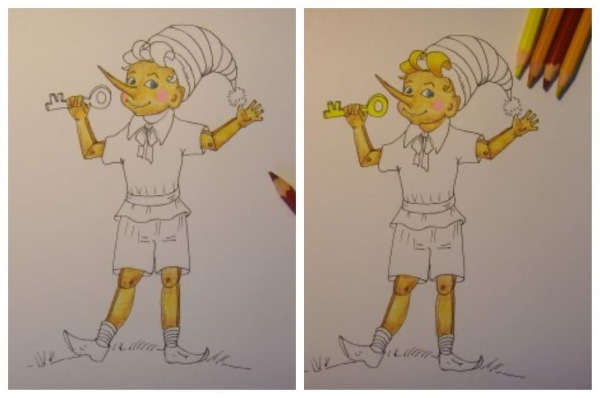
Realistic drawing for children from 10 years old
This drawing method is suitable for children aged 10-12 years or for those who have an intermediate level of drawing, since the process uses uneven lines and also respects the proportions of the body. For work you will need a simple pencil, a black pen and colored pencils.
Step by step:
- The head is drawn with an oval shape and additional volume is added in the cheek and chin areas.
- In the center of the right side of the head, draw a semicircle ear. For convenience of depicting the face in half a turn, draw a schematic vertical line slightly to the left of the center of the face. Focusing on this line, draw a sharp long nose of the character and a smile in the form of a downward curved line.
- The eyes are drawn with pointed ovals. The left eye is further from the viewer, so its size is slightly smaller. Depending on where the character is looking, the iris and pupil of the eyes are drawn in a circle. Make sure that they are looking in the same direction. The eyebrows are drawn above the eyes with short arcs.
- A lush curly fringe sticks out above the forehead in the form of shavings. It is drawn as a semicircle or a wavy line. The volume of each curl is shown with an additional line.
- The character's head is covered with a voluminous pointed hat with a pompom at the end. The hat is filled with stripes. A short thin neck is drawn under the head. Around it, a collar is shown with triangles.
- Straight lines are used to draw a jacket with short sleeves and schematically show the boundaries of the body. A bow with ribbons is drawn under the collar.
- Thin arms are drawn from the sleeves. To show that they are wooden, joints are drawn at the elbows and round nails are added. The arms are raised up.
- Pinocchio's right hand ends with a straight hand with spread fingers. The thumb is pointed to the side, a short curved line is drawn on the palm. The left hand is bent into a fist - the fingers are drawn as small narrow ovals. In the hand is a golden key.
- Draw the bottom of the jacket and the belt. The jacket is compressed under the belt, this is shown with a wavy line. Draw the trousers schematically.
- Thin legs in boots are visible from the trousers. The legs are narrowed in the knee area, the calves are widened. The left leg is slightly longer and directed to the side, the support is drawn on the heel. The right leg stands straight.
- Draw the general outline of the drawing and erase the extra pencil lines. On the pants and in the gathers around the waist, show the folds with frequent straight lines. Draw the joint of the wooden parts and the nails at the knees.
- Socks are drawn above the boots with frequent horizontal stripes. The space around the character is depicted with a horizontal line, and grass is shown with strokes.
- They begin to color the character. The face, arms, and legs are colored yellow. The area near the outline is shaded with orange and brown, using light pressure. The blush on the cheeks is drawn with a red pencil, using light pressure. The irises are colored blue. The golden key is colored yellow.
- The stripes on the hat and socks, the belt are painted red. The shadow on the white stripes of the hat and socks, on the pompom is shown in blue. The belt and boots are filled in brown. Shadows are added in black.
- The jacket is painted red. The pants and collar are shaded blue or light blue. The bow under the collar is filled with yellow and brown. The ground under the feet is painted yellow and brown. The grass is green and black.
Drawing Pinocchio for children can be done faster and easier if you follow some simple tips in the process:
- Sheet arrangement. The composition of the drawing and how many characters will be depicted are planned in advance. To make sure all the characters fit, the sheet is placed vertically or horizontally and each is schematically depicted with a simple pencil.
- Character's body proportions. The figure is drawn schematically with circles or straight lines and in the process of drawing the details, this outline is followed so that all parts of the body are correct.
- If you can’t redraw a complex drawing on your own, use carbon paper or redraw the character square by square, lining the sample in advance.
Video about drawing
Drawing of Buratino for children: