Those who have just started drawing will love the technique of drawing on squares in a notebook, it allows you to create complex compositions without any special skills. Both advanced artists and beginners in fine art can create beautiful drawings with a simple pencil. Unlike paint, pencil works are easier to modify, remove unnecessary things, add new ones.
Materials
To draw you will need:
- notebook sheet in a box. You can start a separate notebook, notepad or diary;
- simple pencils of different softness. For the outline of the drawing - HB (medium), for shading - H (hard) and B (soft). Not all manufacturers indicate the softness of the pencil on its surface, you can check it yourself. It is enough to draw a line on the paper, if it is thick - the pencil is soft, if the line is pale - hard;
- eraser. It should be soft and not rub the paper. It is necessary to take into account that the paper in the notebook is thinner than the album paper, a hard eraser can tear it.
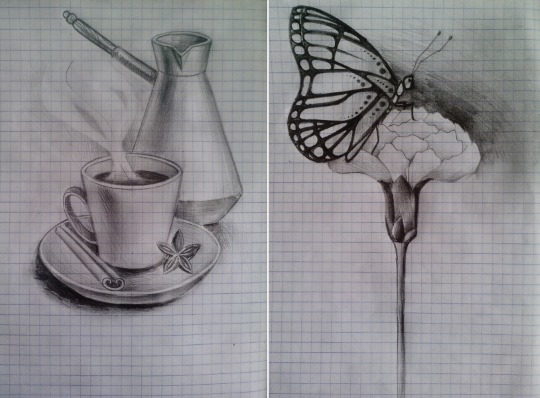
Draw a cup of coffee
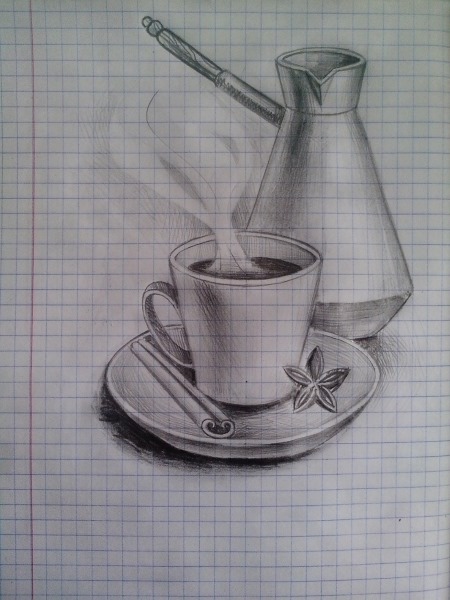
A composition of several objects is called a still life, a pencil sketch begins with construction. The picture shows a cup on a saucer, a Turk with coffee, star anise and a cinnamon stick. All the details are symmetrical, if you draw a line (axis) in the middle of the cup, it will divide it into 2 equal parts.
Drawings on the cells in the notebook should be placed in the middle of the sheet so that there is enough space.
How to draw:
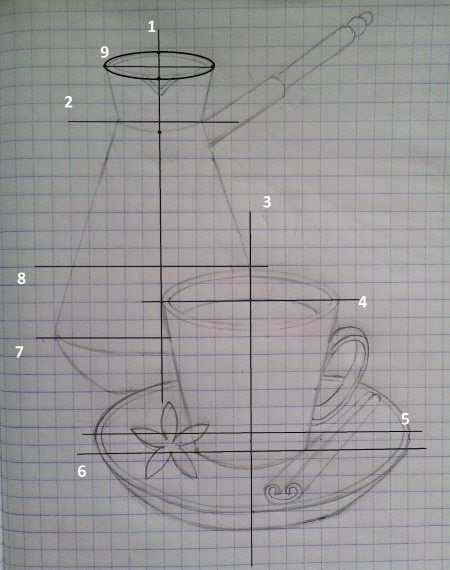
- It is better to start with a cup, placing it in the middle of the sheet. To draw it correctly, you need to draw a vertical axis (marked No. 3). On the axis, we measure 11.5 cells - this is the height. It is necessary to put the points where the beginning and end of the mug are, so as not to lose the size;
- The cup has a rim and a bottom, to draw them you need 2 more horizontal lines (No. 4 and No. 5). Line No. 4 is 1.5 cells below the top of the mug, line No. 5 is 1.5 cells above its bottom. There are 8.5 cells between them. (Fig. 1);
- To draw a Turk, you also need a vertical axis that starts from the left of the cup (line No. 1) and horizontal ones (No. 2, 9, 8, 7);
- The last horizontal line is for the saucer (No. 6). It is located at a distance of 1 cell from line No. 5;
Fig. 1.
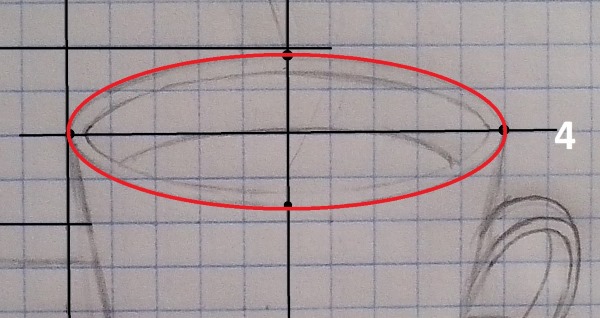
- To draw the rim of the mug, you need to step back 5 cells to the left and right along line #4, and 1.5 cells down. The resulting 4 points are connected to form an oval. The walls are 1-3 mm thick, so the rim will be voluminous. Another oval of a smaller size is drawn inside the oval. (Fig. 2);
Fig. 2.
- The circle narrows towards the bottom, its width at the bottom is 6 cells: 3 on the left, 3 on the right from the middle. The bottom is smoothly rounded at the bottom. The rim and the bottom are connected by lines at an angle;
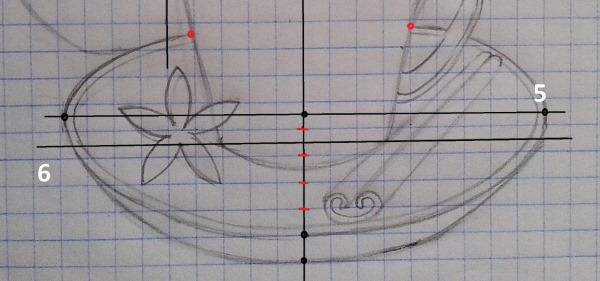
- The cup is on a saucer, its middle coincides with its axis (line No. 3). To draw it, you need to step back from the axis to the left and to the right by 9 cells along line No. 5. Down from line No. 5 you need to step back 4.5 cells - this is the lower part of the saucer, up count 3 cells - this is the upper part. All the dots are connected in an oval. (Fig. 3);
Fig. 3.
Please note! To ensure that your grid drawings in your notebook are neat, do not press down on the pencil while sketching.
Axes are the construction lines that are needed to draw the details correctly. They should be thin so that they can be erased later without effort.
- On the right side of the mug is a rounded handle 1-2 mm thick. On the saucer on the right is a cinnamon stick. It is easier to first draw a stick 1.5-2 cells wide, 5-6 diagonally long, then divide it lengthwise into 2 parts. In the front it is twisted like a pretzel;
- On the left is a star anise, its petals are symmetrical. The easiest way is to first draw its "skeleton" from lines, on top of which draw the star. For star anise and cinnamon, it is not necessary to measure the exact distance, an error of ½ a cell will not spoil the drawing. (Fig. 4);
Fig. 4.

- The last detail is a Turk with coffee. There are already lines No. 1, 2, 7, 8, 9 for it. The width of the upper rim is 6 cells (line No. 9), line No. 2 is 5 cells, line No. 8 is 10 cells. Line No. 7 is half visible, its length is 6 cells. By connecting all the dots, you will get the outline of the Turk;
- For the rim, you need to step back from line #9 up and down 1 cell, connect with an oval. The Turk, like the mug, is 1-2 mm thick, inside the oval there is another smaller one. There is a spout on the rim, which is drawn as a triangle in the middle. It is also 1-2 mm thick;
- On the right side of the Turk there is a handle, which must be drawn diagonally. If desired, it can be made non-solid, you can add details in the form of circles, ovals, and break it into several parts of different thicknesses. (Fig. 5);
Fig. 5.
- The vertical and horizontal lines used for construction are erased with an eraser. The pencil outline remains;
- Now the drawing is flat, you can add volume by shading with simple pencils of different softness. At first, in order not to darken the drawing, it is better to use a hard and medium pencil (H, HB). The shading can be in the form of a grid, at an angle, horizontal, vertical;
Tip: Before shading your drawing, it is advisable to practice on a separate sheet of paper. The hand will have time to get used to it and will move confidently. If you can't make neat strokes the first time, they come out too rough, you can rub them a little with your finger.
- On the left, the cup and the Turk remain light – here is the light, on the right, the shading is darker – this is the shadow. The handle of the mug is on the shadow side, so it is dark;
- Use a hard pencil to shade the saucer. The main thing is not to overdark it, it should remain light. It is better to apply the strokes gradually, starting with the lightest tone. You should darken gradually, applying 2-3 layers of shading on top of each other;
Tip: The shading should follow the shape of the object. If you need to draw an elongated object, the strokes will go along it. If you need to draw a circle, the strokes should go around the circle. If you need to draw a Turk, the strokes will be vertical along it.
- The cinnamon stick needs to be shaded with a hard pencil, drawing a line down the middle along the stick. On the star anise, add dark centers and outline with a wide line with a soft pencil;
- The Turk and the mug cast a shadow, the dark spot underneath them needs to be shaded;
- To draw steam from coffee, you need to shade the background on top of the cup with a pencil H or HB, and blend it with your finger. The background should remain light, but not white. Using a grater, “draw” a winding line. The eraser wipes off the pencil, resulting in a white line on a gray background;
- The darkest part is the coffee in the mug and the shadow under the saucer, for these I used a pencil with softness B.
Flower and butterfly
Streamlined forms prevail in images of living nature. Straight lines "like a ruler" are not typical for plants and animals. Lines in the drawing should be smooth, sharp angles should be avoided.
How to draw:
- In the middle of a squared notebook sheet, you need to draw a flower stem, which will also be the axis. Width - 1 cell, height - up to 17 cells;
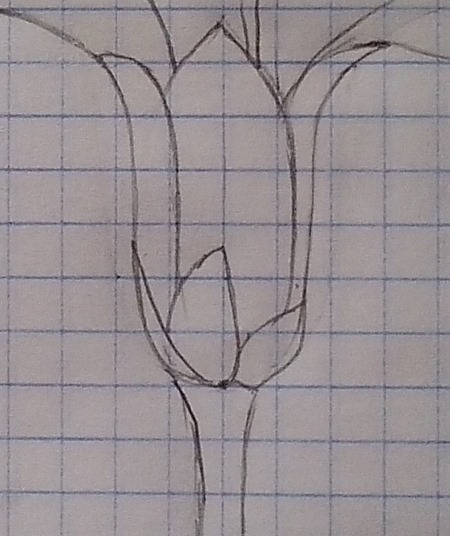
- At the top is a bud from which a flower blossomed, its width is 3 cells, height is 6.5. It is divided into several leaves that cover each other. They narrow towards the top. (Fig. 7);
Fig. 7.
- The flower bud is up to 10 cells high and 16 cells wide. On the right is a butterfly that will cover part of the petals. The petals are arranged in several rows. The bottom row has 4 petals, the second from the bottom has 4, the third from the bottom has 2, and the top row has 2. The petals of each subsequent row are arranged between 2 petals of the previous row, in a checkerboard pattern. (Fig. 8);
Fig. 8.
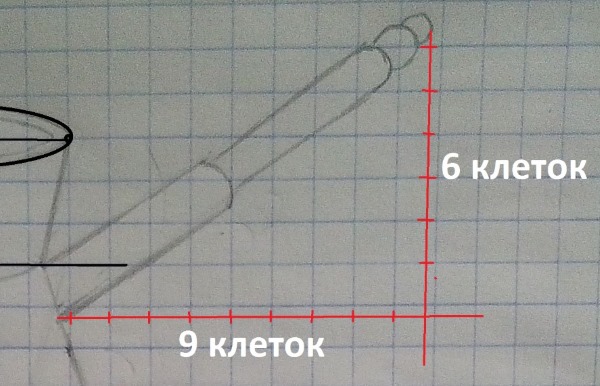
- The butterfly's body is placed at an angle relative to the bud. The lower point is located at a distance of 5 cells from the middle of the flower, the upper one is on the axis. On top of the body, you need to draw a rounded head, it is not necessary to make a perfect circle. On the head, whiskers are drawn with 2 sticks. (Fig. 9);
Fig. 9.
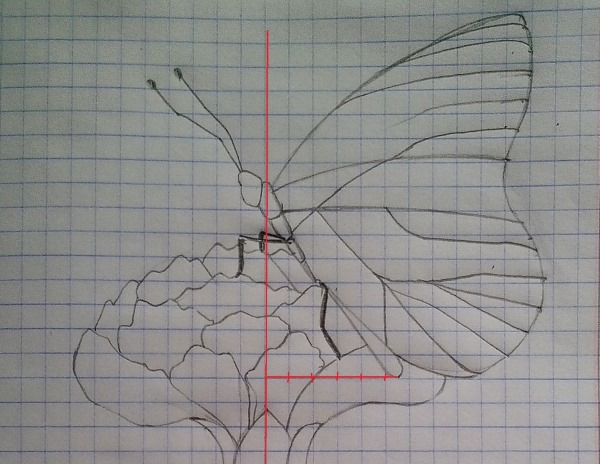
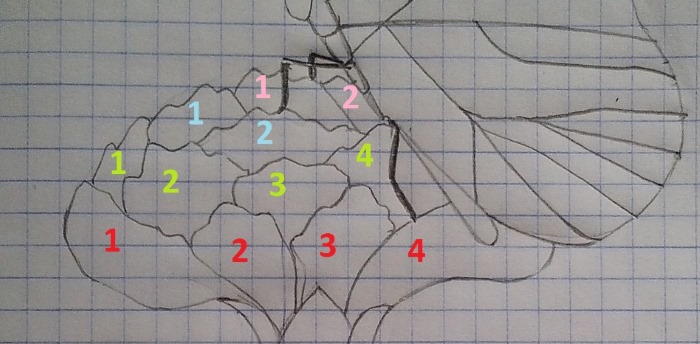
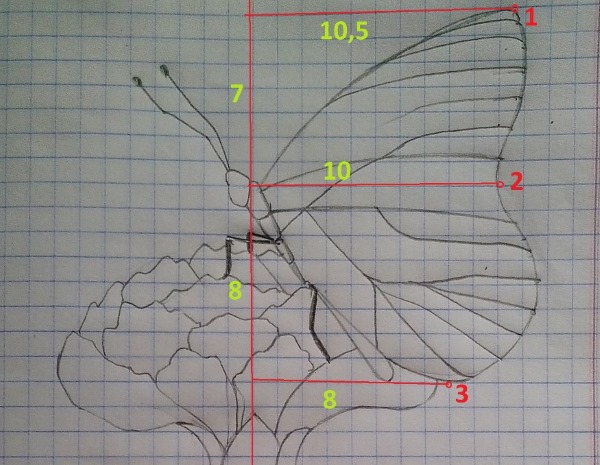
- To draw a butterfly wing, there must be 3 vertex points. You need to step back 10.5, 10 and 8 cells from the axis, you will get points 1, 2, 3. The height between points 1 and 2 is 7 cells, between 2 and 3 - 8 cells. (Fig. 10);
- Points 1, 2, 3 are connected by a smooth line. On the wing, you need to draw lines that will be the basis for the pattern. They go up and down the wing, crossing each other. It is not necessary to copy, you can make them larger or smaller;
Fig. 10.
- Next, you need to carefully shade the stem, bud and butterfly with an HB pencil. You don't need to make them too dark, they should be a little different in color from the paper;
- Using a hard pencil (H), without pressing, darken the base of the petals. You don’t need to paint the flower completely, it should remain white. The bottom row of petals is in the shadow, so it is darker. The top row of petals is in the light – it remains white;
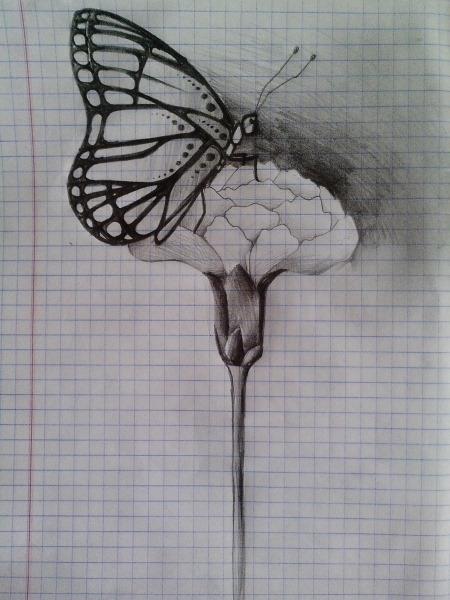
- Using a soft pencil (B, B2), draw lines on the butterfly's wing, the line thickness should be 1-2 mm. In places where they intersect, corners are formed that need to be rounded. Between the stripes, you can add patterns in the form of a series of decreasing dots;
Advice: The pattern on the butterflies can be anything, you can make it dark with light stripes.
- A shadow needs to be added to the bud and stem. Strokes are made along the stem with a soft pencil, the 2 outer leaves of the bud are darkened. The butterfly's legs need to be outlined;
- A white flower on a white background blends in, it needs to be highlighted either with an outline or by darkening the background. To make the background darker, it is better to use an HB pencil and apply shading around the flower in several layers. (Fig. 11);
Fig. 11.
- To make the background soft, without a rough grid, you need to rub the hatching a little with your finger. If the pencil accidentally goes onto the petals of a flower or a butterfly, you can wipe it off with an eraser.
Advice: To make the drawings on the cells in the notebook larger, you can choose not 1 cell, but a square of 2x2 cells as a unit of measurement, the drawing will become 2 times larger.
Drawing by cells is simple and convenient, any notebook or notepad will do. For those who want to draw, but do not know where to start, drawing in a notebook is the best option. You can depict any object on a notebook sheet, the cell will help not to get confused and bring the drawing to the end.
Author: Petrova Olga Vladimirovna (olgago)
Article formatting:Natalie Podolskaya
Video about drawings by cells
Drawings by cells in a notebook:
https://www.youtube.com/watch?v=j-QHxhnH6yQ