History testifies to the appearance of dolls more than 4,000 years ago. Today, even for beginner needlewomen, making a doll with their own hands helps to realize their talents, use them in the development of their child.
The idea of the doll: preparation of materials, tools
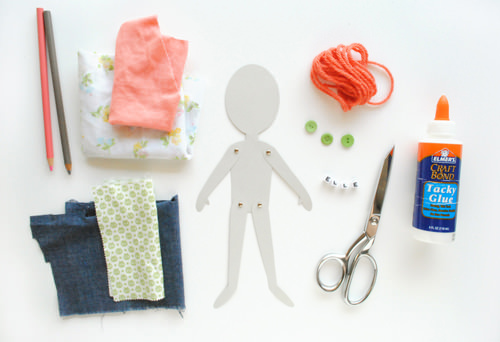
Modern techniques of such hand made products are presented in different types: play for children, amulets, ritual, theatrical, interior. Making dolls with your own hands, both for beginners and experienced craftsmen, is preceded by the preparation of the necessary materials/tools.
Namely:
- product diagram, paper pattern with shape and size indicated;
- natural fabric of a neutral color for sewing the body of the product and colored fabric for clothing;
- stuffing (synthetic padding, holofiber, small fabric scraps, etc.);
- leatherette, felt (for shoes);
- strong cotton threads in the same color as the product for sewing on its parts and wool/mouline threads for embroidering the nose and mouth;
- acrylic paints and brushes for face painting (if necessary);
- scissors;
- needles;
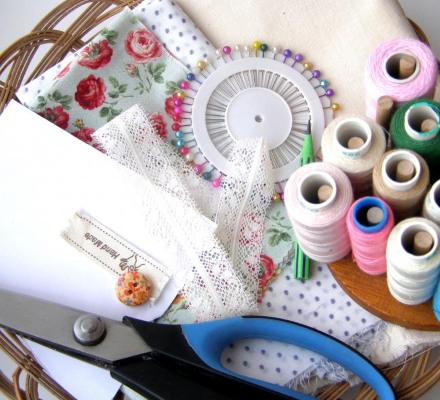
- decorative elements (buttons, beads, lace, etc.);
- auxiliary means for filling the doll's "body", filling and turning out parts (stick, bamboo skewer);
- multi-colored crayons, pencil, disappearing marker for marking fabric;
- sewing machine.
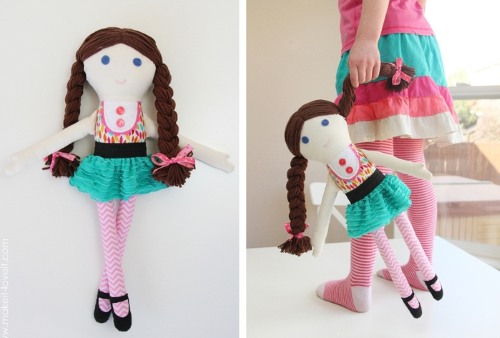
Sewing a textile doll with your own hands
It is important to consider that a doll created with your own hands for beginners must necessarily consist of the following actions:
- Making a pattern of a product on paper using a ready-made template or your own measurements.
- Transferring the paper pattern to the fabric with chalk/marker, and when cutting it out, creating seam allowances (0.5-1 cm). In order to avoid size differences, the legs and arms are cut out on a piece of fabric folded in half.
- Attaching the limbs to the cut out body (legs on both sides at a distance of up to 2 cm, and arms – up to 12 cm from the bottom) and stitching.
- Place the second half of the body cut out on the fabric (inside with the right side), first by hand basting, and then sewing with a machine. For further turning of the workpiece, the upper part of the back remains unstitched.

- Turning the body blank with limbs inside out, filling it with prepared material and adjusting the density using sticks and skewers.
- Stitching (by hand) the remaining open hole (the resulting seam will be covered by hair).
- Making hair and attaching it to the top of the head; shaping the face.
- Sewing clothes according to pre-prepared patterns with allowances on the side cuts for seams up to 1 cm, on the top - up to 3 cm. When making shoes, it is necessary to provide front/back slits for putting them on and holes for lacing.
Fabrics for designer dolls
Experience of skilled craftsmen shows that for those who are just starting to create dolls with their own hands, it is best to use previously used clothes. Experienced needlewomen do not neglect such second-hand goods along with the remains of new fabrics.
In all cases, these should be fabrics made of cotton, wool, knitwear, leatherette, natural silk, and leather.
It is very important to combine materials of different types, textures, plasticity and color palettes. The main requirement is their naturalness, attractive appearance, and absence of artificial dyes.
Tilda and its varieties
The first Tilda doll was created by hand by a young Norwegian designer, Toni Finagher, in 1999. This is one of the toys that even for beginner needlewomen creates rich opportunities for making various products.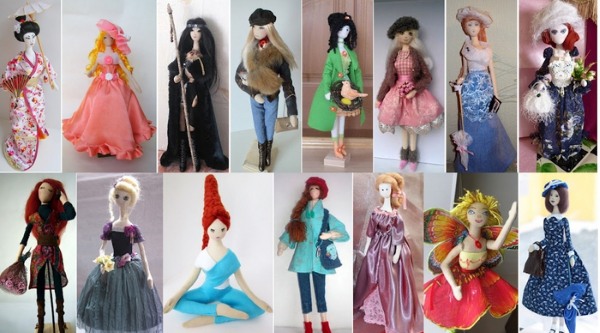
A distinctive feature of the handmade tildomania style is the use of environmentally friendly materials, the unusual smooth lines of the "body" and the sizes of its parts. These are an elongated torso and limbs; a small head, a pastel face with miniature beady eyes, a nose, a mouth; bright rosy cheeks.
The desired colors can be achieved using natural dyes (tea, coffee, powder, pencil lead, etc.).
The fillers are synthetic fluff, synthetic padding, holofiber and even calcined cereals. The arms/legs are attached by sewing/buttoning them. Pure wool yarn, floss and other natural materials are used for the hair. The outfits always include colored prints, various accessories, ruffles and lace.
Tildomania has found application in the production of dolls in different images (blonde, brunette, country, romantic, etc.). Along with dolls, there are various toys of this stylistic direction in the form of fairies, angels, various animals, as well as soldiers, airplanes, etc.
Such products can be used not only as children's toys, but also as interior decoration elements and creative gifts.
We make hair and hairstyle for the doll
The process of hair extensions consists of the following stages:
- Selection of material: yarn for knitting/felting, natural wool, combed flax, sheet felt, tresses used for hairpieces, synthetic hair, satin ribbon. Each of these types has its own application features, requiring a separate master class.
- Preparing additional tools to existing scissors, sewing machine/needle, tape measure/centimeter. This is adhesive tape; tissue paper; DVD case/ruler; hot glue - for yarn, universal - for synthetics.
- Determining the length: long, short, medium. For a baby, it is better to make a doll with short hair. For older children, long-haired toys are suitable for interior decoration.
- Formation of hair, its attachment to the doll's head consists of the initial "construction" of the strands. This is done using a DVD box, onto which strands of the required length are wound, glued, fixed, and then cut. After several manipulations with different amounts of yarn according to the location of the glued parts, sewing the threads to the tissue paper, strands should be obtained that are attached to the fabric head.
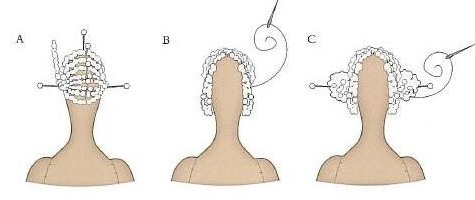
- Creating a hairstyle with straight, wavy, curly hair. For hairstyles with straight hair, new yarn is suitable, and with curls, waves - synthetic threads or from loose knitted items. At the same time, the use of initially straight threads allows you to create different degrees of curliness of hair by briefly winding them on a small wooden rod.
The correct choice of material, length, and hair fastening allows you to vary your hairstyle: shortening, braiding, creating "tails", etc. Mixing multi-colored strands helps to achieve original combinations when creating a harmonious image of any doll.
How to make a doll face
There are different options for creating volume, reliefs, facial expressions using the stocking technique, overlays on the forehead, chin, cheeks, nose, sculptural textiles. The first step in creating a doll's face is painting it with paints. Waterproof acrylic dyes are best suited for this, which form a film on the fabric similar to rubberized.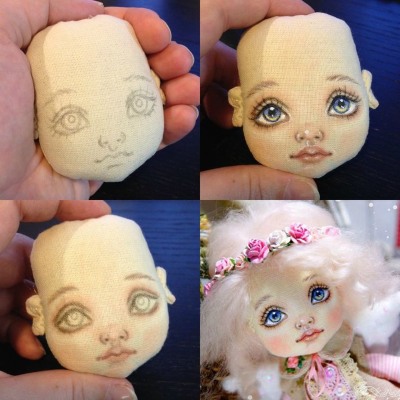
In addition, they are distinguished by a large color palette. First, it is necessary to draw on the head filled with padding polyester/holofiber, eyes, nose, contours of the lips with a clear designation of their corners, chin. After checking the symmetry of the location of these parts, with the help of a long needle and strong thread, "tightening" is carried out to form the necessary depressions/bulges of the face.
This unique analogue of stitching thick blankets allows you to create the necessary size and shape of the nose, the cut of the eyes, the roundness of the face as a whole. After this, using a brush, the face is toned with oil paint or pastel in different halftones for the pupils and whites of the eyes, eyebrows, wings of the nose, lips, cheeks.
Master class: Waldorf doll
A properly made Waldorf doll made by hand for beginners and experienced needlewomen is a chance to take advantage of the achievements of the most widespread alternative pedagogy in the world.
Its popularity is due to its focus on the systematic development of the child's personality, the creation of a natural play environment, favorable conditions for introducing creativity, culture, and spiritual development. The distinctive feature of this simple-shaped doll is a hard head, a soft body, clear design of movable limbs, and the roundness of all outlines.
The proportions of the model are determined by the correspondence of the anatomical and physiological structure of the baby’s body at different periods of development.
The "face" of a baby doll can change from a dispassionate, neutral expression to a pronounced one in a "growing up" product. This allows the toy to be imbued with different feelings, stimulating its imagination. Together with it, the baby seems to receive an adequate idea of his real body.
It is important to know that a Waldorf doll can be made exclusively by hand and using only natural materials!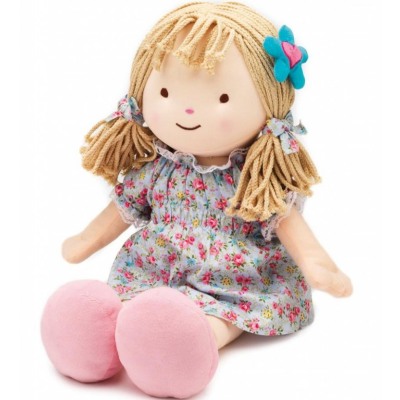
The dimensions of the doll when creating a pattern should correspond to the age proportions of the child's body. For children under 2 years old, the head is from 1/3 to ¼ relative to its length, respectively: from 2.5 to 4.5 years - 1/5, and for 5-year-olds and older - 1/6. For one-year-old children, it is recommended to sew butterfly dolls, corners in bags, diapers.
They lack hair, distinct facial features and limbs, while "growing up" dolls already have them. The overall dimensions of the pattern increase on their own.
Then you need to select the necessary materials for sewing the body, clothing, stuffing, hair (threads, white and flesh-colored knitwear scraps, sheep wool, sliver, straw, yarn). It is not recommended to use heavy, dense, although natural, cotton wool as a filler.
One of the most popular options for making a doll for the smallest ones with a size of up to 15 cm consists of the following steps:
- Preparing the head and neck. Make a small ball (up to 8 cm in diameter) of yarn-wrapped stuffing, place it in a couple of strips, wrap it up and “insert” the resulting head into the sock/bandage. The neck should be tied with thick, strong threads, and the bottom part should be sewn up. Then a piece of light knitwear should be used to cover this inner head.
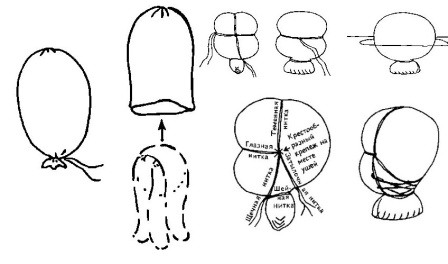
- Hair making It can be done in the form of a wig sewn onto the head ("hugs") or securely fastened strands ("braids"). In both cases, the stitches should be tight to avoid the head fabric showing through. Many craftswomen place a cap on the head instead of hair.
- Preparing the body and arms. The patterned blank (body with sleeves and legs) is half filled with sliver/small straw/yarn. Then the head is tightly inserted and sewn on. The resulting corners are folded in, and prepared circles resembling fists are sewn to the ends of the hollow sleeves.
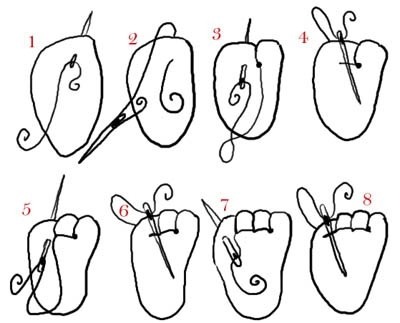
- Face embroidery with simple stitches from floss (eyes, mouth, nose, cheeks).
Features of the teapot doll
More than 200 years ago, a unique detail of the tea ceremony appeared in Rus' - warmers with porcelain painted faces and insulated fluffy skirts. Today, handmade teapot dolls are used as a colorful part of the interior. To create a doll, you will need fabric, insulation, scissors, threads, floss, needle/sewing machine, and decoration details.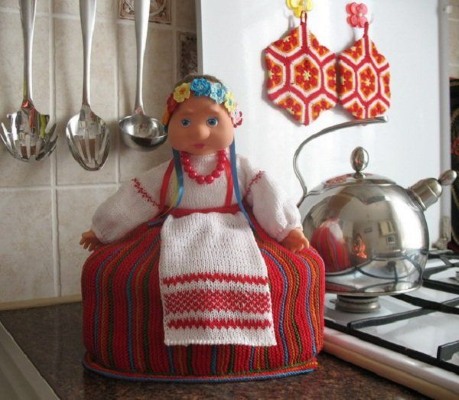
The work process consists of the following actions:
- preparing a doll pattern according to the height/volume of the teapot, transferring it to the fabric for cutting out the details and then sewing them together (except for the bottom);
- turning the workpiece inside out, placing the filler inside;
- preparing the lining and stitching it with the filler, leaving an opening;
- sewing both pieces together around the circumference, and then turning them inside out through the hole – completely;
- making a wig from floss and gluing it to a head with a rouged face, painted eyes, lips, and eyebrows;
- sewing clothes (dress, apron with frills, lace, buttons, etc.);
- complete decoration of the doll and placing it in the required place.
Motanka or amulet doll
These dolls have long been considered keepers of the hearth and travelers, intermediaries between living and future generations. The skirt they wear represents the earth, the ribbon and scarf represent the heavens, the shirt represents the present, future and past of life. Ancestors passed them down from generation to generation.
Important points are the winding of threads on the svarga (face) without eyes, eyebrows, nose, lips in the form of a sacred cross. It is here, on the symbol of the mother of God Lada, that the main magic of the doll is concentrated. It is noteworthy that all parts of the body, hair, clothes are tied with threads (crosswise) in the direction of the sun's movement without cutting them.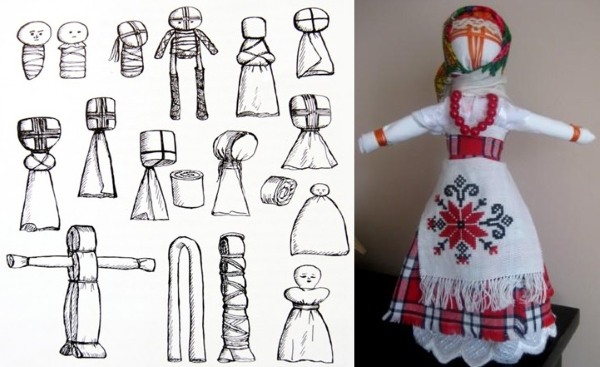
The work should be done in a good mood for one day. All this contributes to a happy fate, resistance to diseases and damage, taming natural phenomena (drought, rain). Each turn symbolizes filling the doll with energy potential.
There are 3 types of motankas:
- swaddling clothes (for newborns);
- dolls in wedding dresses, which were intended for young wives before the birth of a child;
- Beregini - fertile, herbal, zhelannitsa, Easter, willow, etc. They had to be located near the house or on its eastern part.
How to sew a doll from nylon tights
Making such a toy does not require special materials and skills. Here you will need tights/stockings made of nylon, synthetic padding, threads (for sewing, knitting), a needle, scissors, pieces of fabric, ribbons for clothing. Along with interior "stocking" products in the form of fairy-tale characters, children's play dolls are popular. Even beginners can make them.
Step by step instructions: doll from a nylon sock
The most accessible way is to make a doll of a simple shape.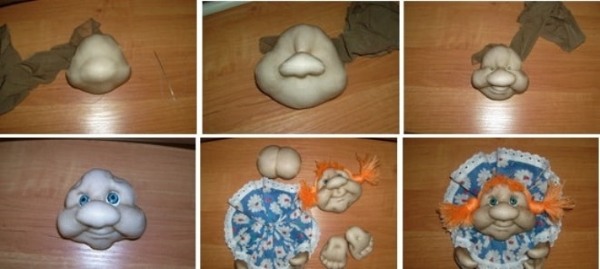
The algorithm of actions is as follows:
- fill the sock with synthetic padding and tie it;
- mark the place of the neck with a rare stitch, then pull it together and wrap it a couple of times with threads;
- to form a nose, place a small circle on the head and pull it together;
- mark circles for the legs with stitches and tighten them;
- make a hole-navel at the place of the sock seam by threading a needle from the back and grabbing nylon from the tummy. The buttocks are marked in the same way;
- ears and cheeks are made by pulling the threads together in the right places, the eyes and eyebrows are embroidered with threads, and beads are used for the eyes;
- the doll's smiling mouth is made using red thread (the needle is inserted through the top of the head, where the knot will be);
- the handles are made from scraps of excess nylon on the head, and then sewn to the body;
- hair is made from nylon socks of the desired color;
- The clothes are made of fabric, the socks are of different colors.
This technique will be the first step to mastering more complex models.
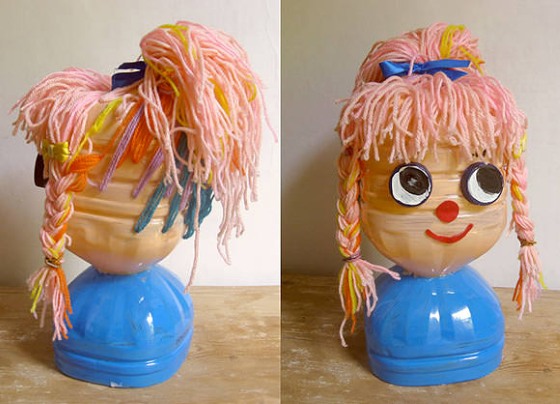
Dolls from plastic bottles
The variety of doll making methods is made possible by combining different materials with light plastic bottles of different volumes. They can be used both as a frame and as the main component of a toy for children of different ages.
There are different model options, namely:
- baby rattle - a small bottle filled with water, cereals, beads, peas. This sounding container needs to be "dressed" in a case with the shape of funny animals, fairy tale characters, angels, etc.
- Baby doll for children 1-3 years old. A bottle with a capacity of up to 1 liter, dressed in a cover will serve as the body. The head is made from a nylon stocking filled with padding polyester, where a nose is formed using a needle and thread. The limbs are made in the same way. Then the eyes from toy fittings and hair from yarn are glued, and all body parts are sewn to the body.
- A girlfriend doll for preschoolers is made from the smallest bottle. First, you need to cut out 2 circles of fabric of different diameters to cover the neck and the rest of the bottle. The handles attached to the body are made from a piece of rope (up to 20 cm) sewn in the middle, with sleeves-"lanterns" sewn on the ends. The rag head is made in the image and likeness of the previous one or according to your imagination.
These examples can be supplemented with users' know-how or with your own methods of creating exclusive models.
Author's frame doll
To make the doll's frame, use aluminum/copper wire (length about 30 cm), of the same or different diameters. Make 2 loops on it, 12 cm long (for the head, body) and 16 cm (for the legs). When making a doll's frame up to 50 cm in size, up to 2 m of wire is required.
The head is made separately from a part of a sock/tights with further formation of the oval and parts of the face, attaching the eyes, hair from yarn/an old wig. Palms from pieces of wire, loops at the ends of the legs for shoes are wrapped with synthetic padding/insulating tape (the thickness is arbitrary).
A piece of sock/tights is put on the palm blank, on which the outlines of fingers and nails are embroidered, and leatherette "shoes" are put on the legs. The head is sewn onto the body covered with synthetic padding. The final touch is sewing clothes and putting them on. The appeal of such a doll is in the mobility of different parts of the body, modeling its different positions.
Cut out a doll from paper
This method of making dolls has been popular for over 200 years. The blanks for them were colorful images on cardboard of characters in luxurious outfits. During the times of shortage of toys, paper dolls were their alternative. Today, they are considered as an opportunity to realize the creative potential of children and adults with the least economic costs.
The creation of different models consists of drawing a silhouette on thick paper (a box of candies/shoes), cutting it out along the contour and coloring it. Then follows the production of clothes, accessories with fastening by bending several "flaps" on them. Here you can give free rein to the imagination of the kids themselves.
How to make a 3D paper doll
One of the newest methods of manual creation of volumetric toys is the use of 3D technology. For volumetric models, flat templates of princesses, Disney/fairytale characters, angels, animals, birds, etc. are used, printed on thick paper. These can be either independent figures or inserts in books.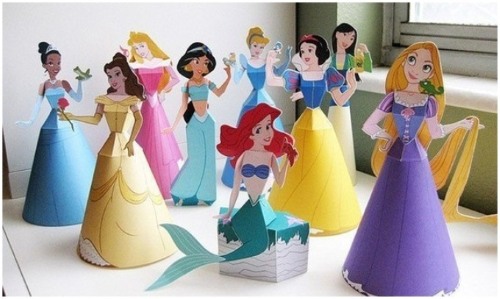
When designing them, the following are used:
- gift colorful paper,
- fabrics,
- glue,
- threads,
- buttons,
- decorations
- other available materials.
Among the most acceptable techniques are:
- modular origami,
- kusudami.
Each of them can be done in different ways, which you can learn about in virtual master classes. As a result of borrowing the experience of others, you can create original creations that are different from each other, capable of becoming both toys and interior decorations, author's collections, and an exclusive gift.
Any of the methods of making a doll with your own hands expands the possibilities of expressing your individuality. For beginners, this is a kind of test of patience, an opportunity to realize your fantasies. It gives experienced craftswomen a chance for further improvement, and allows children to reveal their talents and appreciate work.
Video: DIY Doll for Beginners
How to sew a doll with your own hands, watch the video:
DIY Tilda doll, master class:
🙂 🙂 😀
This site inspires me, I will come here every time