Children often draw animals, but some of them may seem difficult to do. Therefore, it is better to start with something simpler. For example, it is worth considering step-by-step drawing of a mouse for children. This small rodent is often found in fairy tales, cartoons.
Along with teaching drawing, you can tell your child about the characteristics of mice, their differences from rats, and other interesting facts. You should start drawing with easier patterns, and when your child has studied them, you can move on to more realistic images.
What you need for drawing
The choice of materials depends on the child's skills and talent. If he or she is good at drawing lines and can color without going beyond the outline, then colored markers will do.
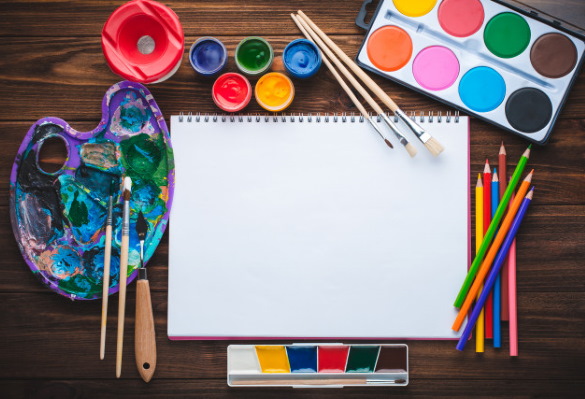
For the initial stage, it is better to choose the following tools:
- Simple pencil. Don't choose one that is too hard. It is easier to work with a soft pencil. In addition, it can be erased more quickly if necessary.
- Eraser. It is also better to choose a soft one. It should not rub the paper too much, as many corrections may be required at the first stages.
- A set of colored pencils. They are needed for subsequent coloring of the finished drawing.
Coloring can also be done using paints, gouache or felt-tip pens. It all depends on what the child likes to use more. For older children, the black and white drawing technique is suitable, when a simple pencil is used to create shadows and detail the drawing. This allows you to get a more realistic 3D image.

The drawing process can be divided into 3 main stages:
| Stage of drawing a mouse | Brief description |
| 1 | It is necessary to decide on the dimensions of the future drawing and outline its boundaries. |
| 2 | Drawing the main part of the picture – the body of the mouse. |
| 3 | Creation of small elements (ears, tail, eyes and paws). |
| 4 | Coloring the picture. |
Simple pencil drawing
Draw a mouse (step by step for children, it is easier to make a sketch than to copy from a ready-made image) using a pencil using different techniques. There are several options for creating simple images.
Simple drawing of a mouse from the side
Before you start creating an image, it is worth practicing doing it correctly yourself.
For example, you can use the following simple step-by-step instructions:
- Using light movements, create the borders of the future drawing. They should be barely noticeable, so that you can understand what size the drawing will be.
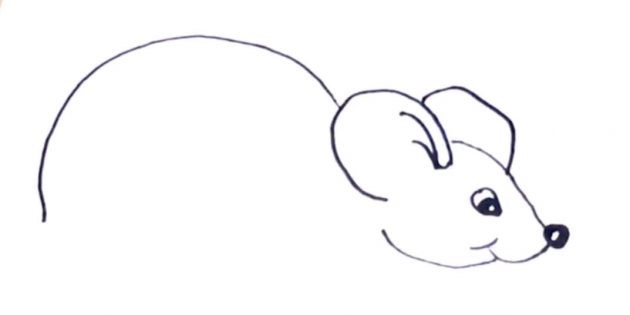
- Starting from the left side of the sheet, draw a semicircle that gets larger as you move to the right.
- At the bottom, draw a slightly curved line to create the body of the future mouse.
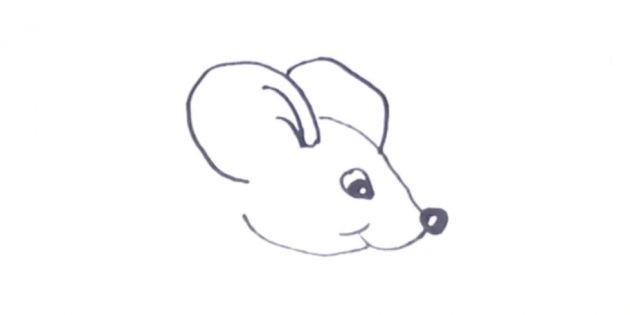
- Draw the ears closer to the left side (where the muzzle will be).
- At the tip of the muzzle, put a thick dot or draw a small circle to indicate the nose.
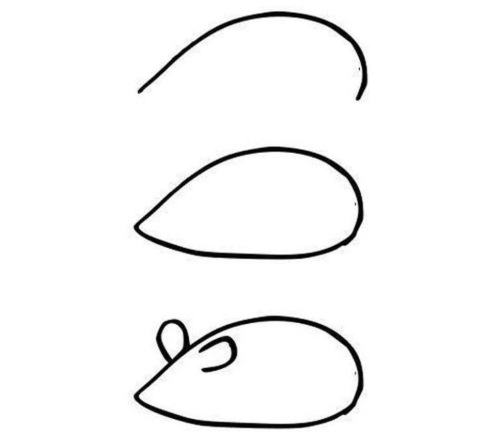
- Also place a dot closer to the ears, where the eye should be.
- Finish drawing the mustache.
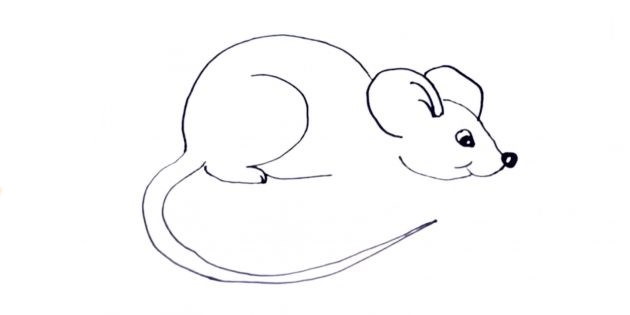
- All that remains is to draw a few flattened ovals at the bottom of the body (these will be the paws) and a curved line (the tail).
Another option for drawing a mouse from the side
There is another simple way to draw a funny, smiling mouse using a simple pencil or a dark marker.
The algorithm of actions is as follows:
- Draw half a drop from left to right, and draw a straight line at the bottom.
- On the right, draw the ears. They can be quite large and make up about 1/3 of the body.
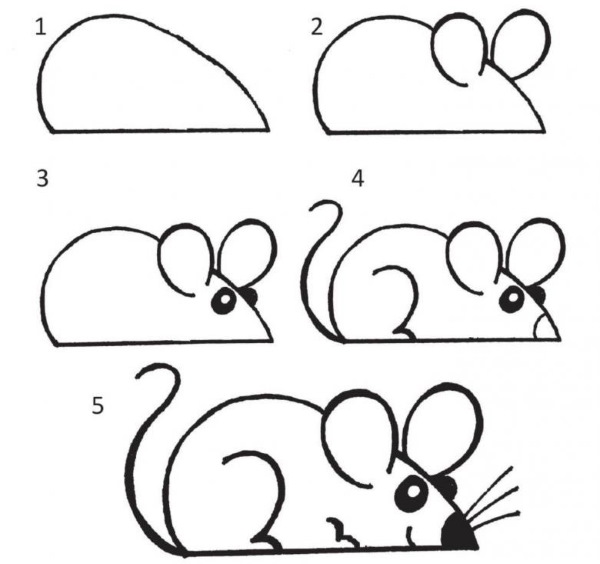
- Draw 2 eyes (one inside the body, and the second should go beyond its borders). After that, you can paint them, but leave white dots in the middle. This will create highlights. Thanks to such a simple move, the eyes will look like shiny beads.
- Draw a line on the right side, creating a triangle inside the body (this will be the nose) and shade it.
- Draw the paws. The easiest way to do this is to take the numbers "3" as a basis and draw a larger and smaller paw, as shown in the picture below.
- All that remains is to draw a smile on the face and a tail raised up.
If you can't create a drawing as in the instructions the first time, it's enough to repeat it several times. When the child is satisfied with the image, you can move on to coloring. If you managed to cope with the simplest drawing schemes quickly, you can complicate the task a little.
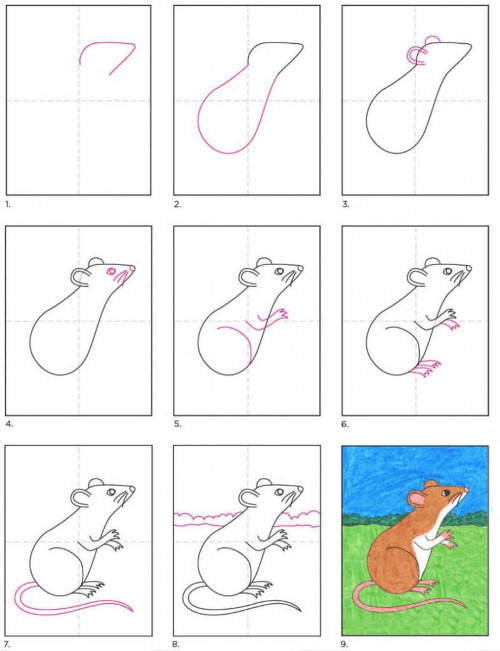
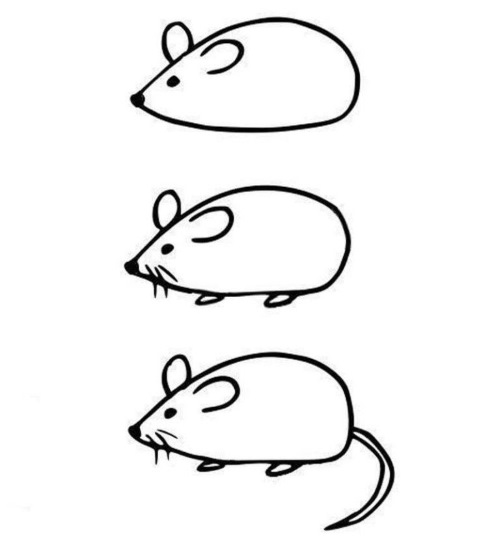
Simple Pencil Drawing of a Field Mouse
We draw a mouse step by step for children, at the same time telling about the features of different types of rodents. For example, in the country or in the village you can often see field mice.
They are small and love to climb into houses to get some cereal and other food. These rodents have a characteristic fur color that allows them to hide well in the field, which is how they got their name.
To draw such a mouse, you need to follow these steps:
- Draw the base with simple lines. At this stage, you should have the approximate area of the body, ears and tail.
- Bring out more details, give the body a more realistic shape, draw a sketch of the paws. You will also need to give shape to the head.
- Continue to detail the drawing as shown in the image below.
- Paint the eye, leaving a white dot to create a highlight, draw the antennae and a few dots around.
- Color the image using colored pencils or paints. The colors should be chosen according to the tone of the field mouse's fur, so preference should be given to orange-brown tones.

There are many other drawing schemes that can be learned very quickly.
Mouse made of drops and circles for children
Step-by-step drawing of a mouse is interesting not only for children, but also for adults.
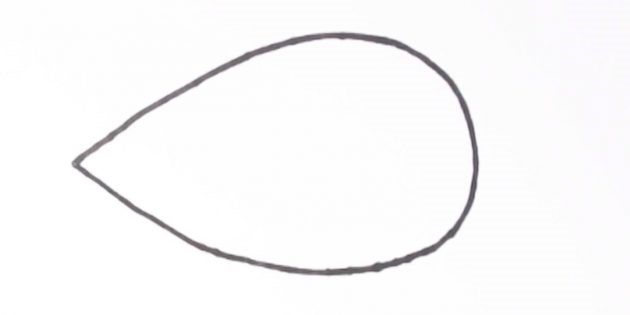
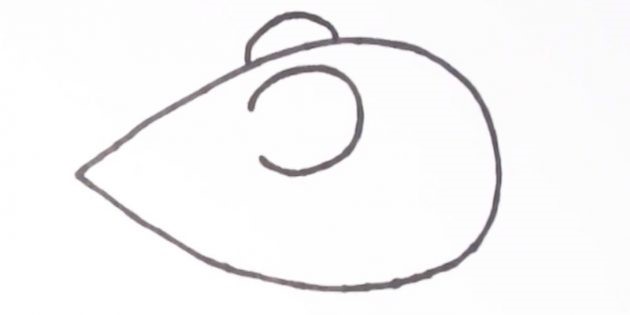
You can create images from the simplest shapes, combining them correctly, you will be able to create a funny rodent. The sequence of actions is as follows:
- Draw a drop with an acute angle that points to the left.
- Approximately in the middle (but a little closer to the sharp edge) draw the mouse's ear in the form of a broken circle. Another arc needs to be drawn so that it extends from the edge of the drop.
- On the left side of the drawing, closer to the sharp edge, put a dot (the mouse's eye). In the very corner, draw a small circle (this will be the nose). To depict the mustache, it is enough to draw three horizontal, short lines.
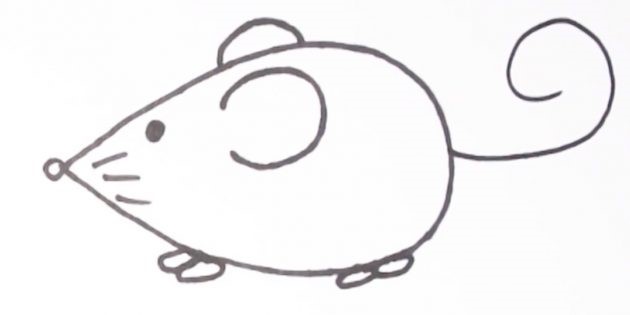
- Draw 2 flattened ovals at the bottom of the drop. This will make the paws.
- All that remains is to draw a curved tail, starting from the center of the drop line on the right side.
Such a simple image without unnecessary detailing is easier to color. The body can be colored gray, and the ears and paws - pink.
Mouse face
So far we have looked at simple techniques, which usually don't pay much attention to the mouse's face. But we can move on to more complex drawing. Thanks to this instruction, you will be able to create a mouse's face, like in cartoons.
To do this you will need:
- Draw a small arc with its ends pointing upwards. Add a circle on the right side and color it so that there is a white dot in the middle. This will be the nose.
- Draw a rounded line from the top of the nose, and another smaller one from the left part of the arc to create a smile.
- Draw another arc at the bottom, which will mark the lower border of the muzzle. Above the small arc, draw a drop that widens at the top. This will be the eye. Its half (closer to the point of the drop) needs to be painted over, and a highlight should also be left.
- Above the eye, draw a large semicircle, and behind it another one. Inside the first ear, draw several slightly curved horizontal lines (one should be shorter than the other). This will make the ears look more realistic and allow you to use more different colors when painting.
- From the middle of the ear, draw a large arc, thereby indicating the mouse's back. It should be strongly rounded and be 2 times larger than the head.
- From the end of the created semicircle (on the left side) draw another curved line and bring it almost to the mouth of the mouse. Inside it, you need to draw another line. This will make the tail.
- Draw an arc under the back, with its ends pointing to the left. This will be the rodent's thigh. Draw a broken oval below to form the paw. There is no need to draw the fingers. It is enough to put one short line to indicate them. Another line should be drawn from the finger area, indicating the abdomen. There is no need to extend it to the muzzle.
- To the right of the belly, draw a smaller paw, without a hip. A simple semi-oval and a line to indicate the fingers are enough.
Mouse with cheese
Many children know that mice love cheese (although in reality it is not such a favorite treat for them). Therefore, you can complicate the task and create a whole scene, for example, how a mouse reaches for a piece of cheese.
To do this, you need to follow these steps:
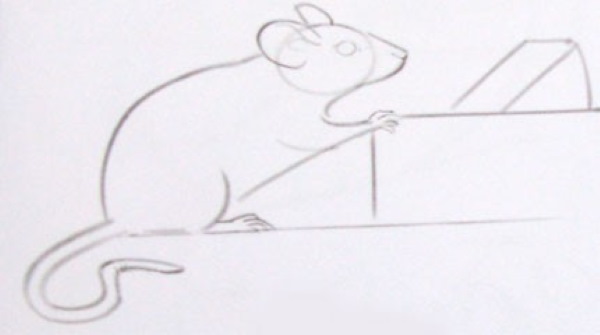
- Pressing lightly on the pencil, draw the base line on which the mouse will be located. Using the same method, draw the block on which the rodent rests, the head, ears, abdomen line, spine. At this stage, only a sketch is created to understand the direction of the image and then begin to draw it in more detail.
- Press a little harder on the pencil, outline the main shapes. You need to round off the head areas, shape the ears, draw the eye. Also at this stage, add the paws, partially draw the fingers. The mouse seems to be reaching for the cheese. At this stage, it needs to be depicted as a three-dimensional triangle lying on the surface of the bar.

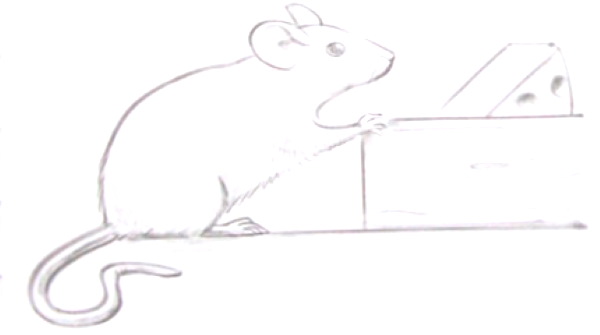
- Remove extra lines with an eraser and outline the main shapes again. Also at this stage you need to add shading that depicts fur, paint the eye, leaving a highlight.
Additionally, you can add some shadows, make the tail and paws more detailed. On the cheese, you need to draw several circles. You can add shadows inside them, then the holes in the cheese will look voluminous.
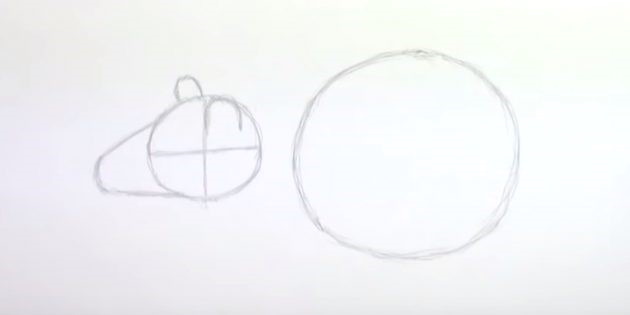
Realistic mouse with a simple pencil
If all the previous schemes have already been studied and seem very simple to the child, then you can create an image that will be as close as possible to a real mouse. Similar techniques are used in art schools. For work, you will also need only a simple pencil (medium hardness) and an eraser.
Let's draw a mouse (step by step for older children) in the following simple steps:
- Draw a large circle that will mark the back of the mouse or rat. To the left of it, draw another circle, 4 times smaller than the first. This is the head area. When creating a sketch, do not press hard on the pencil. It is not necessary to stick to one line. The main thing is to ensure that the circles are fairly even.

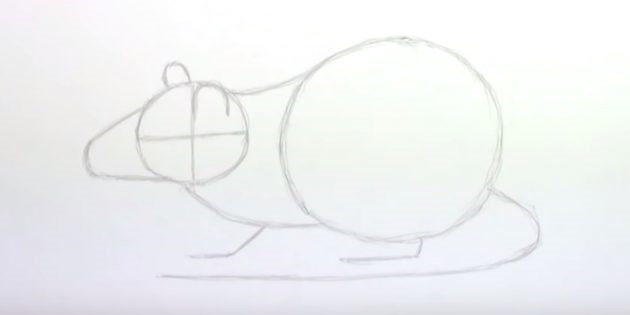
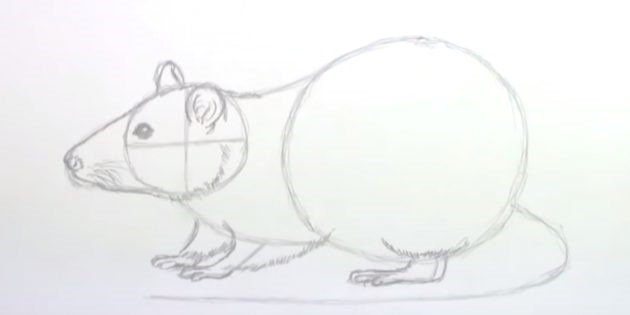
- Draw 2 intersecting lines inside the small circle, and draw a muzzle in the shape of the letter U to the left of it. In the upper right triangle of the head, you need to draw an ear. It should not go beyond the edges of the circle. From the line of the upper left corner of the head, you need to draw a semicircle, thereby indicating the second ear, located on the other side.
- Connect the large and small circles with lines. The upper one should be slightly concave, and the second one, on the contrary. In the center of the lower line, you need to draw a sketch of the front paw, and from the middle of the outer part of the second circle, draw the back paw. Also at this stage, you need to mark the tail with a curved line that reaches the front paw.
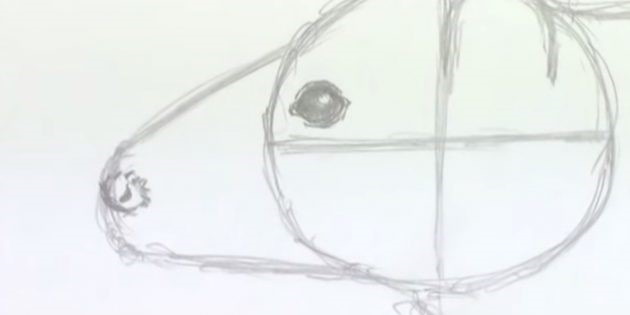
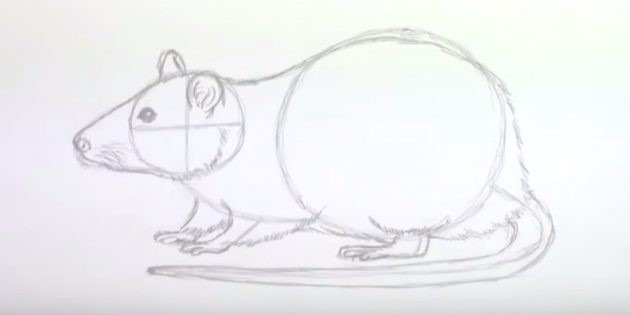
- Move on to a more detailed drawing of the muzzle. To do this, in the upper left triangle closer to the circle line, you need to draw a slightly elongated eye and color it. At the same time, it is necessary to leave a glare and it is desirable to darken the pupil a little on one side. On the muzzle, closer to the edge, you need to depict a nostril. It is most convenient to use hatching for this.
- Starting from the nose, moving to the right, highlight the head area with hatching. You need to connect all the parts more smoothly. On the right side of the nose, you need to highlight the mustache. At this stage, you also need to draw the ears, creating a shell inside.
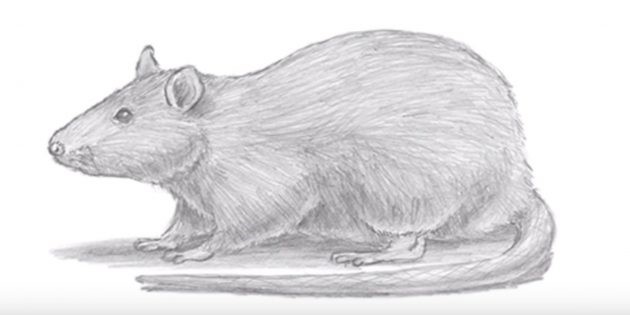
- Draw the front paws. First, you need to connect them to the body, and then add fur using hatching. You also need to shape the back paw. At this stage, you should not delete the sketch, since without it it will be more difficult to determine the correct location of the rodent's body parts. But you can add more fur. Its lines should be at an angle and parallel to each other.
- At this step, you need to connect the tail and the back of the body so that it does not look so round. In a rat, this area will be more elongated, and in a mouse, as shown in the picture below. It should be remembered that the rodent's tail is not covered with fur, so it does not connect to the back with one smooth line.
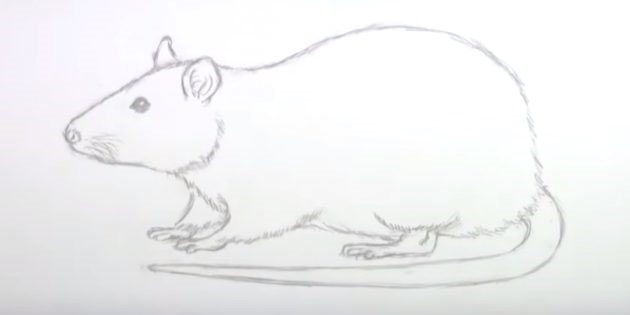
- Now you can delete all the sketch lines. If the eraser accidentally touched the necessary elements, then you should finish drawing them.
- It's time to work with shadows. First, you need to highlight the darkest parts - the inner part of the ear, the area under the head, the belly, the lower part of the tail.
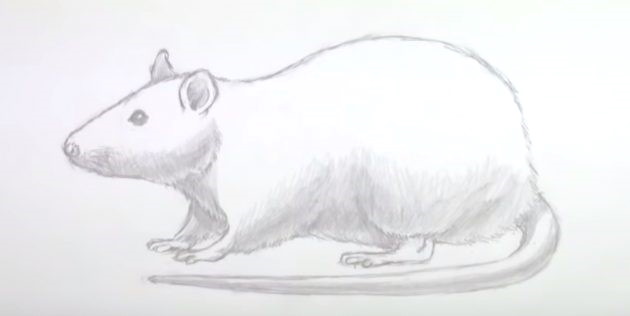
- Now you can add some more detail to the image. To do this, you need to draw fur all over the rodent's body. You can draw a shadow under the mouse to make the image more voluminous.
If it is difficult for a child to shade the inner part of the image, then you can resort to one trick. It works only with soft pencils. To create a smoother transition from the dark part of the drawing to the light one, that is, to create a gradient, it is enough to draw a darkening quite thickly, and then smear it on the light part with your finger.
This step-by-step drawing of a mouse is suitable for children of different ages. The first schemes can be used if the child still draws poorly and does not yet understand volumetric forms. The last scheme is used by older children. Thanks to it, you can understand how the light falls on the image, where shadows should form.
Video about drawing
Let's draw a mouse step by step for children: