Hair bands and hair clips are essential accessories for any owner of long hair. They can help complete the image, give it brightness and catchiness. And hair bands and hair clips made with your own hands are the author's handiwork, giving the image and originality.
Hair band base
The base of a homemade hair elastic can be obtained in two ways:
- buy in any store;
- do it yourself.
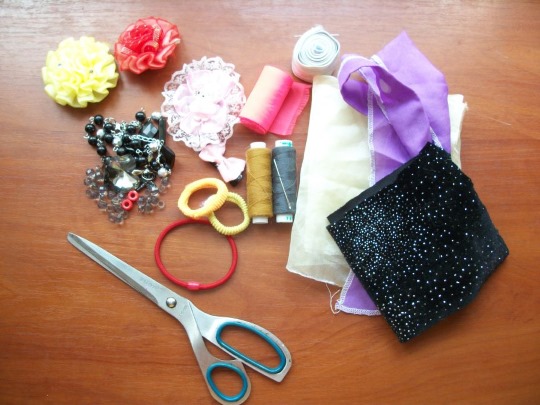
The materials needed to make the elastic band base yourself are presented in the table.
| Materials | Quantity |
| elastic band (15 – 20 cm) | 1 pc. |
| a piece of fabric (2-3 times longer than the desired elastic) | 1 pc. |
| threads | 1 cat. |
| needle | 1 pc. |
| pin | 1 pc. |
| scissors | 1 pc. |
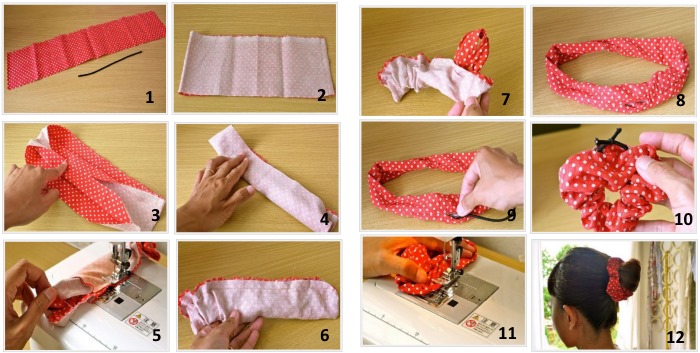
Step-by-step production of the base of a hair elastic:
- First, you need to fold a piece of fabric in half lengthwise, and then sew it along the edge.
- Next, the stitched piece needs to be connected with the holes facing each other and sewn along the edge, leaving a gap for turning.
- The next step is to turn the resulting workpiece inside out.
- Next, an elastic band is inserted into the workpiece, and a pin is put on the end of it for convenience.
- Then it needs to be tied into a knot.
- The final step is to sew up the remaining hole.
The resulting model can be used as a regular hair elastic or as a basis for a more sophisticated and complex design.
A selection of the best master classes on creating rubber bands with your own hands
A DIY hair elastic is a unique decoration, as it is an author's work. There are many variations in the manufacture of various hair products.
Below are the best master classes on how to make your own hair bands, which even novice craftsmen can implement.
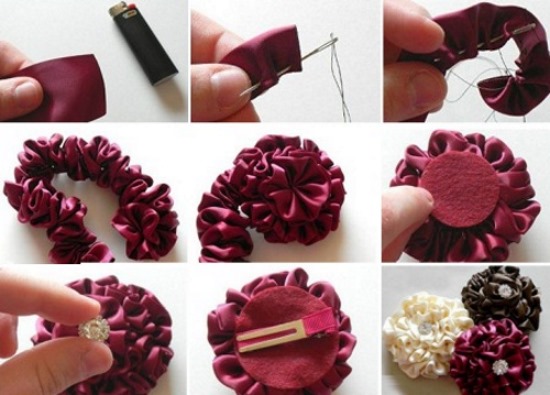
Flower elastic band
The materials needed to make the flower elastic band are presented in the table.
| Materials | Quantity |
| satin ribbon (25-30 cm) | 1 pc. |
| base for elastic | 1 pc. |
| lighter | 1 pc. |
| tweezers with long rounded ends | 1 pc. |
| glue gun | 1 pc. |
| felt sheet | 1 pc. |
| scissors | 1 pc. |
| beautiful bead | 1 pc. |
Step-by-step production of the base of the hair elastic:
- The first step is to cut a 5 cm long piece of satin ribbon.
- Then, the edges of this section must be cauterized with a lighter so that the tape does not unravel.
- Next, the resulting piece of satin needs to be folded in half with opposite ends facing each other to form a triangle. Then it needs to be folded in half again with opposite ends of the base so that a triangle is formed again.
- The next step is to use tweezers to clamp one end of the triangle and carefully cut it off with scissors, then burn it with a lighter.
- The result was a shape with a top sticking up.
- Then, using tweezers, you need to pull the top down through the middle of the resulting shape and tighten it.
- Next, the edge of the top needs to be folded down to the bottom of the base, pressing them together with tweezers.
- The next step is to take a lighter and burn the top and base together so that they are connected to each other.
- The petal is ready.
- Next you need to make 4 more of these petals.
- Then a small circle is cut out of felt, which serves as the base for the future flower.
- The next step is to glue the petals to the base using a glue gun.
- After this, use a glue gun to glue a beautiful bead into the middle of the flower.
- The flower is ready.
- Next, you need to make a mount for the elastic. To do this, cut out a circle from felt, smaller than for the flower.
- Then this circle needs to be folded in half and using scissors you need to make small cuts on both sides (stepping back a little from the edges).
- The next step is to cut a strip of satin ribbon approximately 1 cm wide and 3 cm long. Then you need to burn it at the edges with a lighter.

- Then 1 edge of the resulting ribbon needs to be threaded through the hole made in the fastening for the elastic band. Next, the base for the elastic band is put on the ribbon, and after that, the second edge of the satin ribbon is threaded through the second hole in the fastening.
- Then the edges of the satin ribbon are glued to the elastic band mount using a glue gun.
- Finally, use a glue gun to apply a generous amount of glue to the resulting elastic band mount and then glue it to the flower.
- The elastic flower is ready.
Fabric model of elastic band
DIY hair ties made from fabric, despite their simplicity, have their advantages. They are distinguished by their strength and durability, since they do not have decorations that can come off, tear off or ruin the thing by catching on it.
The materials needed to make your own elastic band fabric model are listed in the table.
| Materials | Quantity |
| elastic band (25-30 cm) | 1 pc. |
| ruler | 1 pc. |
| pencil | 1 pc. |
| pin | 1 pc. |
| glue gun | 1 pc. |
| piece of fabric | 1 pc. |
| scissors | 1 pc. |
Step-by-step production of a fabric model of a hair elastic:
- From the selected fabric you need to cut a strip measuring 40*8 cm.
- Then one end of the strip needs to be folded by 0.5 cm and immediately glued with a glue gun.
- Next, you need to fold the fabric in half lengthwise, with the right side facing inward.
- After this, you need to either iron the fabric or press it hard with your fingernail to create the effect of an iron.
- Then you need to unfold the fabric and use a glue gun to apply glue along one side, leaving 0.5 cm from the edge.
- Next, you need to quickly press the second side of the fabric so that the hot glue penetrates all layers of the fabric.
- The result was a shape similar to a pipe.
- The next step is to open the end of the pipe that was not bent at the beginning and glue it to make it easier to turn out. You need to wait until the glue dries completely.
- Then you can start to turn the pipe out. At first you can do it with your hands, and then you can help yourself with a pencil.
- Next, the end that was glued to turn the pipe inside out must be carefully cut with scissors to again create a pipe with open edges on both sides.
- Next, take a piece of elastic (about 20 cm), and put a pin on one end of it to make it easier to pull through the tube.
- After this, you need to unfasten the pin and tie the ends of the elastic into a knot.
- Next, the knot needs to be pushed inside the pipe so that it does not interfere with further work. In this case, the seam that was made with a glue gun should be located outside the resulting rubber band.
- Then the untreated end of the pipe must be pushed inside the treated edge by about 1 cm.
- Next, you need to move the folds as far as possible to make it convenient to work.
- Next, you need to open the hole and apply glue inside it in a circle and then press it well.
- At the end, you should evenly distribute all the folds around the circle and the elastic is ready.
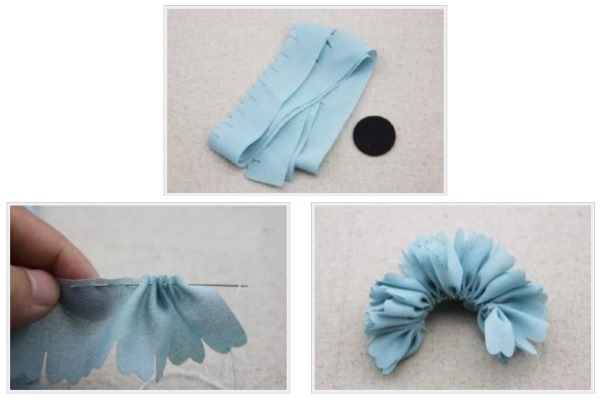
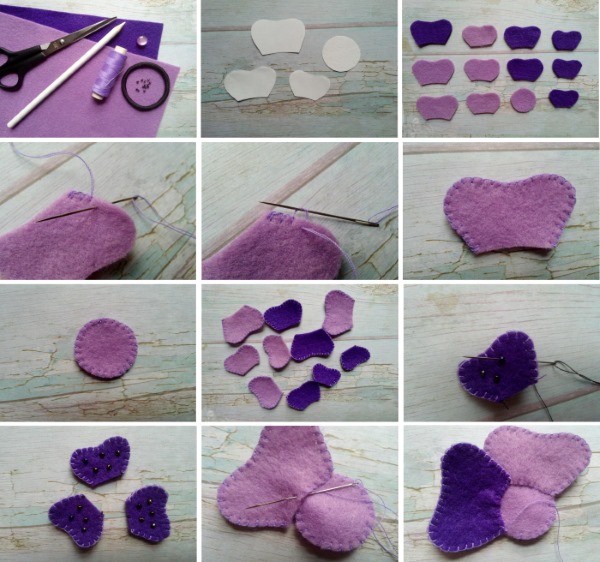
Model of elastic band with petals
The materials needed to make your own elastic band with petals are listed in the table.
| Materials | Quantity |
| colored satin ribbon 2-2.5 cm wide for petals | 1 m |
| green satin ribbon 4-5 cm wide for leaves | 15 cm |
| stamens to decorate the center of the flower | 2 pcs. |
| felt base 3 cm in diameter | 1 pc. |
| rubber | 1 pc. |
| rep or satin ribbon 12 mm wide | 7-8 cm |
| glue gun | 1 pc. |
| scissors | 1 pc. |
| lighter | 1 pc. |
Step-by-step instructions for making a hair elastic:
- From the colored satin ribbon you need to cut out 4 cm long pieces for the future petals. You will need 24 of them.
- Next, at the level of the middle of each segment or a little less, you need to cut the top tape along the edges on both sides so that the top resembles a triangle with a wide end.
- After this, the cut edges must be treated with a lighter.
- Then the petal is folded. At the base, you need to make a fold and fasten it with a lighter. There should be 24 such petals.
- The leaves are made from green satin ribbon. To do this, you need to cut out a piece of it about 4-5 cm long.
- Next, the tape needs to be folded in half with the right side facing inward and the fold immediately heated with a lighter.
- The next step is to use scissors to shape the resulting ribbon into a leaf, and then treat the cut edges with a lighter.
- The edges of the tape must be stretched in both directions during processing.
- Then, at the base, you need to make folds to give the sheet additional volume, and fasten them with a lighter.
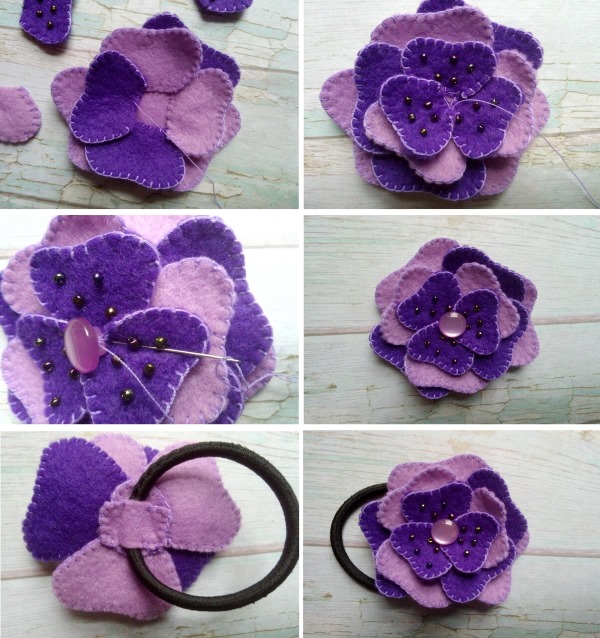
- Next comes the assembly of the flower. First, you need to glue the first 6 petals together using a glue gun.
- Next, the second layer of petals is glued to the first in a checkerboard pattern.
- Next, in the same order, the remaining 2 layers of petals are glued to the previous rows.
- Then the middle of the flower is decorated with stamens. To do this, the base of the stamens needs to be treated with a glue gun and then they need to be inserted into the middle of the resulting flower and pressed well.
- The excess edges of the stamens must be cut off with scissors, then processed with a glue gun and pressed well onto the flower.
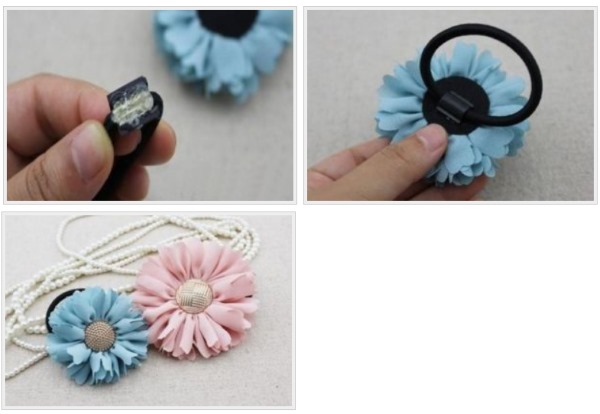
- The next step is to glue the green leaves to the bottom of the flower using a glue gun.
- Next, take a felt base with a diameter of 3 cm, fold it in half and then make cuts on it along the width of the elastic band.
- Next, the elastic is glued to the base with a glue gun, which must be additionally secured with a 12 mm wide tape. To do this, the edges of the tape are threaded through the previously made holes in the base and then glued to it with a glue gun. Excess pieces of tape must be cut off with scissors and cauterized with a lighter.
- The last step is to apply a generous amount of glue to the felt base for the elastic band, then glue the flower to it and press it firmly.
Satin bow
The materials needed to make a satin bow yourself are listed in the table.
| Materials | Quantity |
| colored satin ribbon (40*1.2 cm) | 1 pc. |
| cardboard blank | 1 pc. |
| scissors | 1 pc. |
| clothespins | 2 pcs. |
| lighter | 1 pc. |
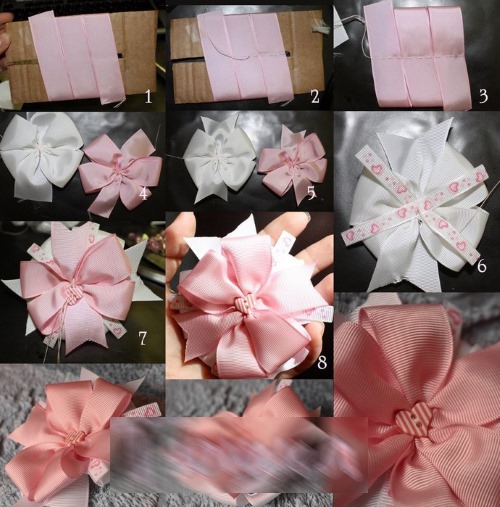
Step-by-step instructions for making a satin bow:
- First, you need to make a blank out of cardboard. To do this, you need to cut out a rectangle 8*4 cm from a piece of cardboard. Then, approximately 5 cm down, it needs to be divided into 5 parts, cut them, and cut out the middle strip completely.
- Next, you need to place the ribbon on the blank with the front side, secure one end with a clothespin and then form the future bow. To do this, you need to wrap the ribbon around every 2 strips of the blank alternately.
- When forming a bow, each turn must be turned over.
- At the end, the last turn is also attached to the cardboard blank with a clothespin, and the remaining part of the ribbon is threaded through the bow in the middle and pulled down.
Then its end is pulled up again through the missing strip in the workpiece and tied into a knot.
- Next, you need to remove the clothespins. When tightening the bow, it is important to make sure that its end also faces the front side.
- Next, the bow is removed from the cardboard blank.
- The final step is to trim off any excess from the ends of the tape with scissors and burn it with a lighter.
Simple leather elastic band
The materials needed to make a simple leather elastic band yourself are listed in the table.
| Materials | Quantity |
| any skin | 1 pc. |
| hair elastic (thin) | 1 pc. |
| paper template (any template design of your choice) | 1 pc. |
| pen | 1 pc. |
| scissors | 1 pc. |
| glue gun | 1 pc. |
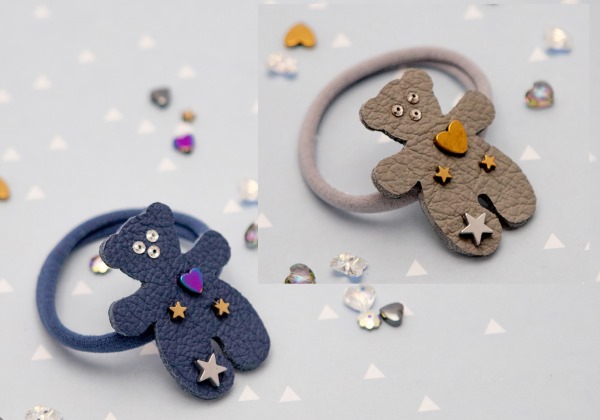
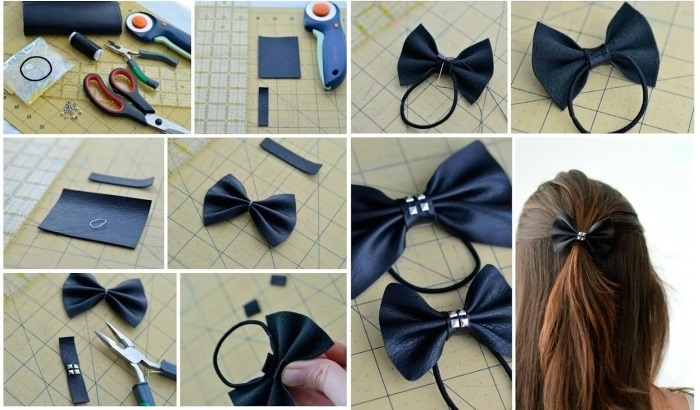
Step-by-step production of elastic band from leather:
- First, you should trace the template onto a piece of leather using a pen.
- Then you need to cut out the outlined design on the leather with scissors.
- The leather element must be glued to the hair elastic with a glue gun. The elastic is ready.
Decorating a hairpin with rivets
The materials needed to decorate the hairpin with rivets are presented in the table.
| Materials | Quantity |
| barrette | 1 pc. |
| felt | 1 pc. |
| a piece of leatherette | 1 pc. |
| pattern for a hairpin (can be drawn on a regular sheet of paper) | 1 pc. |
| rivets | 1 pack. |
| glue gun | 1 pc. |
| scissors | 1 pc. |
| pen | 1 pc. |
| thread | 1 cat. |
| needle | 1 pc. |
Step-by-step instructions for decorating a hair clip with rivets:
- First you need to trace the template on a sheet of felt.
- Then you need to cut out only the middle of the workpiece using the template.
- Next, using a glue gun, you need to glue the rivets to the felt sheet all over the workpiece.
- After this, you need to cut out the workpiece with scissors.
- Next, using the same template, a piece of leatherette is cut out.
- Then, using a glue gun, apply a generous amount of glue to the leatherette and felt pieces, and then everything needs to be joined together.
- A hairpin is attached to the felt blank, and a leatherette blank is attached on top of the hairpin. Everything needs to be pressed tightly so that the glue holds the parts together well.
- To make the edges of the hairpin look neat, they need to be stitched with thread, tightening the ties well.
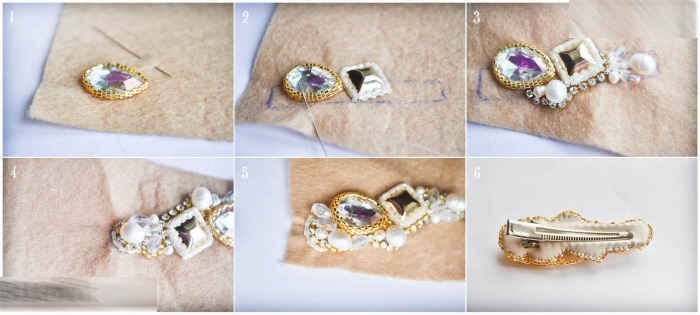
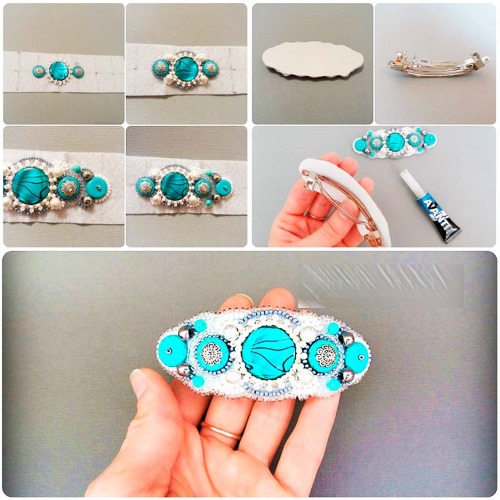
Beautiful beaded hairpin
The materials needed to create a beautiful beaded hair clip are listed in the table.
| Materials | Quantity |
| automatic hair clip | 1 pc. |
| Bead spacers | 14 pcs. |
| pearl beads 6mm | 16 pcs. |
| beads 2 mm | 14 pcs. |
| the fishing line is thick | 1 cat. |
| scissors | 1 pc. |
| lighter | 1 pc. |
| needle | 1 pc. |
Step-by-step creation of a beaded hair clip:
- The fishing line needs to be pulled through the hole at the edge of the automatic hair clip and tied into a knot. The excess fishing line needs to be cut with scissors and its edge cauterized with a lighter.
- Next, 8 pcs. of 6 mm beads and 7 pcs. of bead spacers are strung onto the fishing line every other one and then distributed evenly over the hairpin.
- Then the end of the fishing line is pushed through the hole at the other end of the automatic hair clip and tied into a strong knot.
- Next, 8 pieces of 6 mm beads and 7 pieces of bead spacers are strung again.
- All beads and spacers are distributed evenly over the clip, and the end of the fishing line is again threaded through the opposite hole of the automatic clip and tied into a strong knot.
- Next, you need to unclip the automatic hair clip and remove the middle part from it.
- After this, the fishing line must be passed through the outermost bead and then wrapped in a circle around each row of beads and bead spacers in one direction and then back so that all the beads lie flat and tight.
- Next, the fishing line is again threaded through the hole in the hairpin and returned through the outer bead.
- Then you need to string a 2 mm bead on the fishing line and wrap it around a row of beads, then you need to put on another 2 mm bead and wrap it around a row of bead spacers in a circle, and so on until the end.
- Next, using the same pattern, you need to return to the opposite side of the hairpin.
- After this, the fishing line needs to go along the bottom row of fishing line (under the base of the hairpin) and tie a tight knot. Next, the excess edges of the fishing line need to be cut with scissors and burned with a lighter.
- At the end, you need to fasten the middle part of the hair clip back and the decoration is ready.
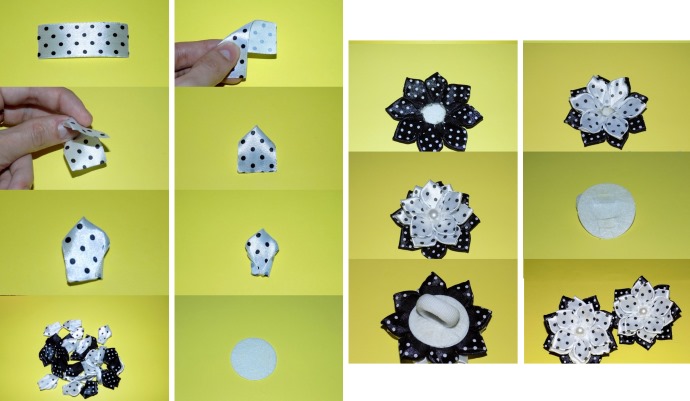
Elastic band with buttons and ribbons
The materials needed to create the elastic band with buttons and ribbons are listed in the table.
| Materials | Quantity |
| satin ribbon in 2 colors (1 piece measuring 7*2.5 cm) | 12 pcs. |
| button for decoration | 1 pc. |
| thread | 1 cat. |
| scissors | 1 pc. |
| glue gun | 1 pc. |
| needle | 1 pc. |
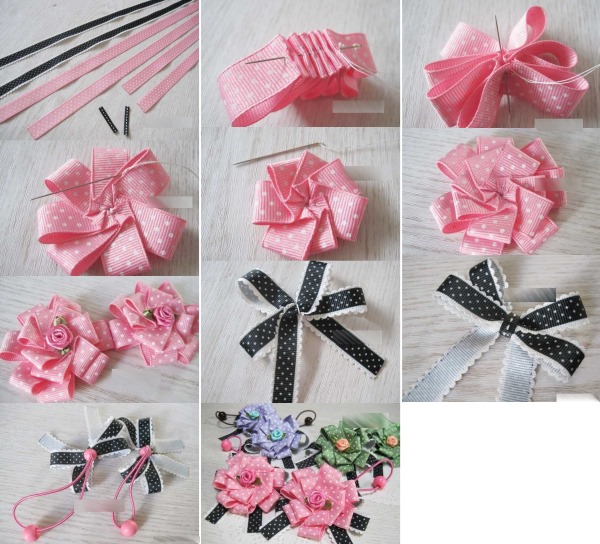
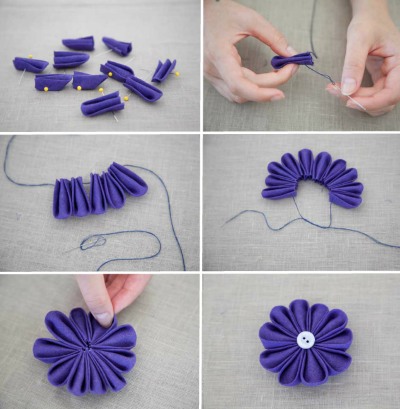
Step-by-step production of elastic:
- A piece of satin ribbon of each color must be folded at a 90˚ angle so that the distance from each edge of the ribbon is the same.
- The tapes must be placed on top of each other so that one of them is 4-5 mm lower than the other.
- Then they should be folded in half, the ends should be folded from one edge to the other, and then sewn with thread.
- You need to make 6 of these petals. All the petals are made on one thread, thus forming a flower.
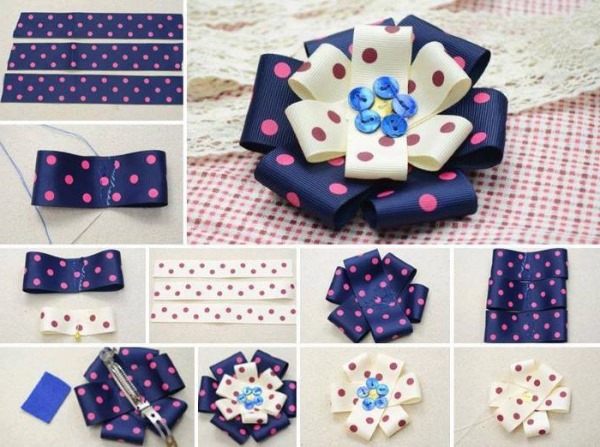
- Once you have finished with the petals, you need to tie a tight knot with the thread and cut off the excess ends of the thread with scissors.
- All petals need to be straightened out to give them volume.
- After this, the flower needs to be glued to the base using a glue gun.
- The last step is to apply glue to the center of the flower and glue on a beautiful button for decoration.
Plastic elastic band
The materials needed to create a plastic rubber band are listed in the table.
| Materials | Quantity |
| plastic | 1 pc. |
| rubber | 1 pc. |
| clear varnish | 1 cat. |
| glue gun | 1 pc. |
Step-by-step creation of a rubber band from plastic:
- Any design of your choice must be applied to a piece of plastic.
- Next, using a glue gun, you need to glue the plastic to the rubber band.
- Finally, the plastic should be covered with clear varnish so that the design will last for a long time.
Elastic band on felt base
Hair elastics made by hand should be made with high quality and neatly.
In order to secure a flower or a bow to an elastic band, you need a good base. One of the most convenient bases for making elastic bands yourself is made of felt.
The materials needed to create the elastic band on a felt base are listed in the table.
| Materials | Quantity |
| felt | 1 pc. |
| ruler-stencil | 1 pc. |
| scissors | 1 pc. |
| 12mm wide grosgrain ribbon | 4-5 cm. |
| lighter | 1 pc. |
| glue gun | 1 pc. |
| rubber | 1 pc. |
Step-by-step creation of a hair elastic:
- On a sheet of felt, using a ruler-stencil, you need to draw a circle of the desired size and then cut it out with scissors.
- Next, the cut out felt circle needs to be folded in half and, stepping back a little from the center, make small cuts on the fold with scissors.
- The next step is to cut off 4-5 cm of grosgrain ribbon, and then process the edges with a lighter.
- Then one end of the grosgrain ribbon must be threaded through the slit in the felt base.
- After this, using a glue gun, glue is applied to the felt and one end of the tape is pressed firmly onto the felt so that it sticks.
- Next, returning to the other side of the felt, between the cuts, you need to apply glue and immediately glue the elastic.
- The ribbon is then threaded through the elastic and pushed through the second cut in the felt base. Like the first end of the ribbon, it needs to be glued to the felt base using a glue gun.
- At the end, all excess tape or felt must be trimmed with scissors and then processed with a lighter. The elastic band on a felt base is ready.
- The final step is to glue the desired decoration (flower, bow, stone) to the felt base using a glue gun.
How to make an elastic band from threads
The materials needed to create the elastic band from threads are listed in the table.
| Materials | Quantity |
| 3 balls of thread in pink, green and white | 3 pcs. |
| rubber bands for bracelets | 4 pcs. |
| hair elastic | 1 pc. |
| scissors | 1 pc. |
Step-by-step creation of elastic band from threads:
- You need to wind a pink thread around 3 fingers of your hand. To make it lie freely on your fingers, you need to spread them a little, and not tighten the thread.
- Then, on top of the wound thread, you need to wind green threads, and then add white threads.
- Next, on top of the white thread, you can wind a little more green and pink threads.
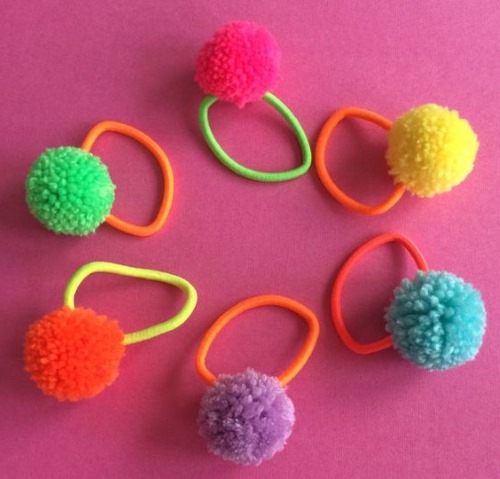
- The next step is to remove the resulting winding from the fingers and tighten it well in the middle with rubber bands for bracelets. For strength, you should take 2 rubber bands at once.
- Then you need to attach a hair elastic to the future pompom.
To do this, you need to take 2 rubber bands for bracelets again, intertwine them with a hair band, and then put them on the middle of the pompom.
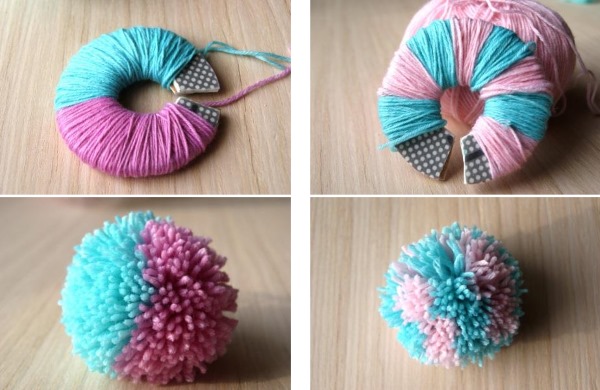
- Next, you need to pull the hair elastic a little to tighten the elastic bands on the pompom well.
- After this, you need to cut the future pompom on the side with scissors. You need to make sure that all the loops are cut.
- The final step is to trim the pompom to form it into the desired shape and size, and to remove any protruding threads.
Hair tie made of fuzzy wire
The materials needed to make a fuzzy wire elastic band are listed in the table.
| Materials | Quantity |
| pink chenille wire | 6 pcs. |
| pink chenille wire | 1 pc. |
| hair elastic | 1 pc. |
| rubber bands for bracelets | 2 pcs. |
| pliers | 1 pc. |
Step by step instructions for making a hair tie:
- 6 sticks of chenille wire need to be connected together and then aligned.
- After this, you need to add green chenille wire to them, shifting it slightly upwards so that the future leaves turn out to be different sizes.
- Next, having marked the middle, you need to secure it with two rubber bands for bracelets so that nothing shifts or falls apart during the work.
- Then you need to use pliers to clamp the middle, and after that the wire needs to be bent in half.
- After this, you need to put a hair elastic on it and, for reliability, you should slightly twist the chenille wire so that a loop is formed.
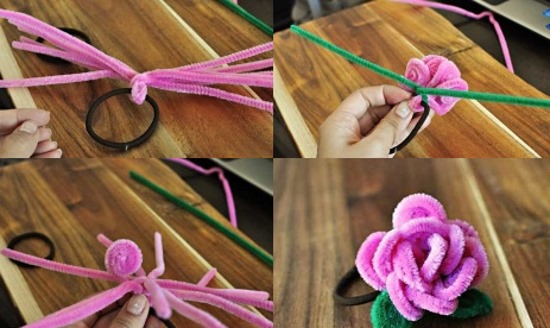
- Next, all ends of the wire must be distributed evenly around the circumference.
- Then you need to bend the end of the wire with pliers, and then twist the spiral with your hands. These actions need to be done with all ends of the wire.
- Next, you need to distribute all the resulting petals so that the flower looks like a rose.
Rubber bands in kanzashi technique
DIY hair bands using the kanzashi technique are becoming popular today.
The materials needed to create an elastic band using the kanzashi technique are listed in the table.
| Materials | Quantity |
| light pink satin ribbon 2.5 cm wide | 1 cat. |
| dark pink satin ribbon 2.5 cm wide | 1 cat. |
| dark green organza 2.5 cm wide | 1 cat. |
| light green organza 2.5 cm wide | 1 cat. |
| pink felt | 1 pc. |
| double stamens (green and pink) | 2 bunches. |
| scissors | 1 pc. |
| tweezers | 1 pc. |
| candle | 1 pc. |
| hair elastic | 1 pc. |
| thread | 1 pc. |
| needle | 1 pc. |
| glue gun | 1 pc. |
Step by step instructions for making a hair tie:
- From the satin ribbon you need to cut 24 pieces of 5x2.5 cm in size.
- After this, the upper corners of the rectangular section need to be folded down towards the center, and then fixed over the fire.
- Next, the top corner of the triangle should be flattened slightly to separate the front wall of the fabric from the back.
- Then you need to clamp the corner with tweezers so that only one side of the petal is clamped, and then you need to fix the corner over the fire.
- Next, turning the triangle with the smooth side towards you, you need to fold it in half. After that, the center of the petal is clamped, and its corners are turned down. Then the sides of the corners are raised to the top and connected to the center of the petal.
- Next, you need to trim the petal at the base and fix it over the fire. The bottom of the petal needs to be trimmed again at an angle and fixed over the candle.
- There should be 24 of these petals made from light pink ribbon and 3 of dark pink ribbon.
- Next, from the organza of the first and second colors, you need to cut out pieces measuring 5.5*2.5 cm.
- The segment must be turned vertically and bent 2 times at an angle. Then the segment must be covered with the sharp angle with the free edge of the tape.
- The lower edges of the sheet need to be folded to the center of the base. The excess ends of the tape are cut off with scissors, and the sheet is sealed over the fire.
- There should be 12 leaves each made from dark green organza and light green.
- From pink felt you need to cut out a circle with a diameter of 3.5 cm.
- Light green leaves should be glued in a circle to the felt base using a glue gun.
- Double green stamens should be folded in half and glued between light green leaves.
- 10 pieces of light pink petals are glued between light green leaves.
- For the next row, you need to sew 8 pieces of light pink petals using a thread and a needle.
- After all the petals are put on the thread, the needle should be passed through the first petal, while the thread should not be pulled too tightly. The thread is secured between the first and second petals.
- Also, light pink petals of row No. 3 are sewn together in the amount of 6 pieces and dark pink petals of the central row in the amount of 3 pieces.
- Next, you need to apply glue to the glued petals as close to the base as possible, and place the petals of row #2 on top. The petals of row #3 are glued in the same way.
- Then the double pink stamens need to be folded in half, connected together, and having trimmed their edges, inserted into the middle of the sewn central row of petals. After that, they need to be fixed with glue on the back side.
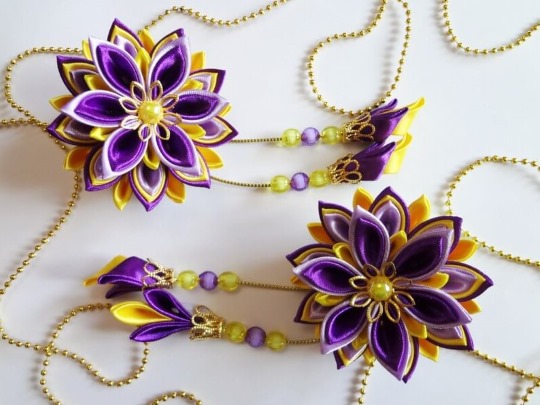
- Next, using glue, you need to glue the central row of petals to the flower.
- Finally, the dark green leaves are glued to the back of the flower so that their corner is between the light green leaves.
- The final step is to glue the base of the flower with the elastic band to the flower using a glue gun.
Hair bands and hair clips are one of the most common accessories in the fashion world. As can be seen from the above material, by making them with your own hands, you can not only get an exclusive and original decoration, but also choose them for a specific image.
Article formatting:Natalie Podolskaya
Video about making hair bands
DIY Hair Bands: