Drawing caterpillars in various artistic techniques helps develop children's imagination, and also helps improve their memory and hand-eye coordination when writing. Adults need to know what materials and tools can be used for classes, and should also consider several drawing options with detailed descriptions.
What you need for drawing
List of tools needed for drawing:
- simple hard-soft pencil;
- eraser;
- sharpener;
- black marker or felt-tip pen;
- set of art brushes;
- palette for mixing paints;
- a container with clean water for washing brushes.
You can color the drawing using any tools, the main thing is to choose the right paper.
| Paper type | Sheet density | Tools and materials that can be used for drawing |
| Writing | 68 g/m2 | Simple pencils |
| Office | 80 g/m2 | |
| Album | 100-120 g/m2 | Colored pencils, felt-tip pens |
| Watercolor | 200-250 g/m2 | Watercolor |
| Drawing | 200-300 g/m2 | Gouache, felt-tip pens, pencils |
The higher the paper density, the less susceptible it is to deformation from moisture. Therefore, watercolor, drawing and album sheets are suitable for drawing with paints. To draw with felt-tip pens, you also need thick paper. Thin sheets can soften from a wet rod and tear when applying dense hatching.
How to draw a caterpillar with a pencil step by step
A caterpillar (a drawing for children over 10 years old can be done in a realistic style), drawn with a pencil, despite the lack of color, can turn out beautiful and look like a real one.
How to draw:
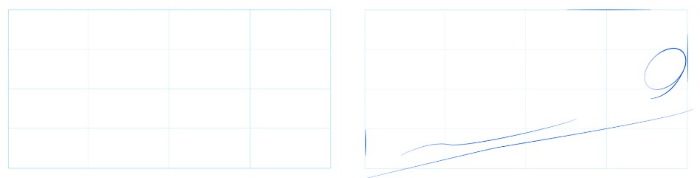
- Place a sheet of A4 paper horizontally in front of you.
- Without pressing on the pencil, schematically depict the shape of the caterpillar's body.
- Starting from the tail, draw the folds of skin. Closer to the head, they should increase in size.
- Draw the head small.
- Use an eraser to erase all unnecessary lines.
- Trace the outline of the drawing, pressing lightly with the pencil.
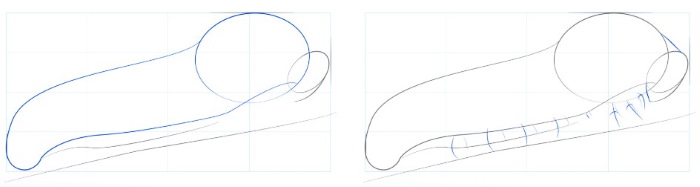
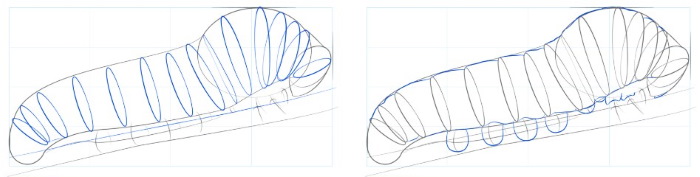
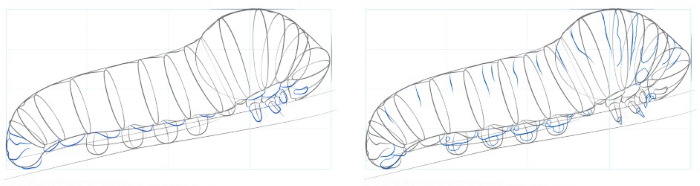
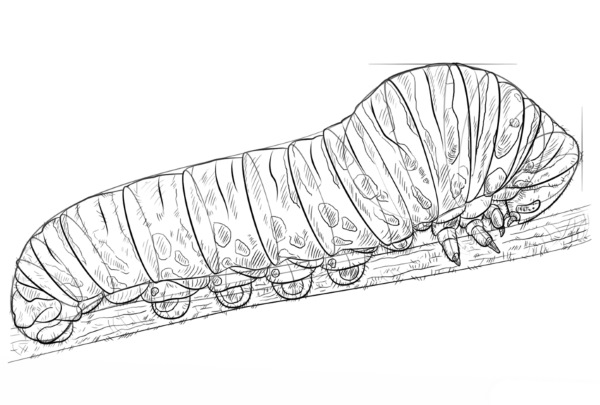
- Draw semicircular paws closer to the center of the body.
- Draw 2 pointed paws near the head.
- Draw spots on the caterpillar's body. The largest ones should be located in the middle of the body, and the smaller ones on the tail.
- Draw a branch under the caterpillar.
- Use light strokes to show the shadow on the branch.
Use an eraser to clean the background.
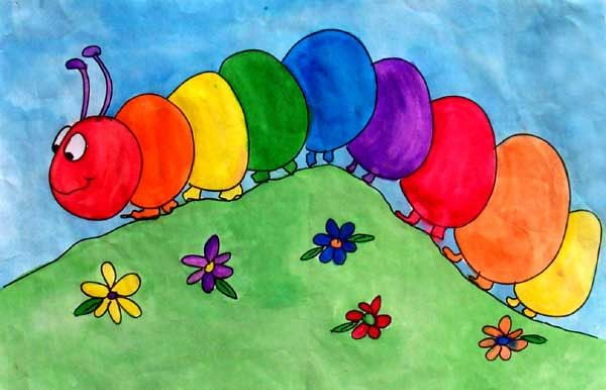
Colorful caterpillar, watercolor painting
Preschool children can be offered to draw a multi-colored caterpillar using only 3 primary colors: yellow, blue, red. This is a good opportunity to demonstrate to the child how to get other shades by mixing paints. For mixing, you can use a plastic palette, glossy cardboard, or a white ceramic dish.
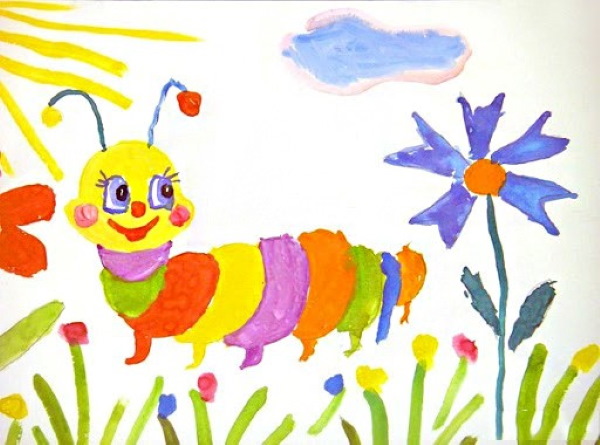
How to draw:
- Draw a round head with a pencil.
- Draw the caterpillar's neck in the form of a semicircle.
- Finish drawing the rest of the body. In the middle they should be larger than at the beginning and at the tail.
- Draw the paws.
- Draw chubby cheeks on the head.
- Erase extra lines.
- Draw the antennae.
- Add large eyes with irises and pupils.
- Draw the nose, mouth and indicate the blush on the cheeks.
- Draw a flower in the background.
- Add cloud.
- Use yellow paint to draw a sun with rays in the left corner.
- Color the caterpillar's head yellow.
- To get pink for painting the neck, you can mix white paint with red in equal proportions. If there is no white in the palette, then red should be diluted with water and painted over the selected area. The watercolor will be absorbed into the paper and you will get a pale pink color.
- The next 3 parts of the body can be painted in primary colors.
- To get an orange hue, yellow must be mixed with red in a 2:1 ratio.
- Color the caterpillar's body and legs, alternating the primary colors.
- Mix blue and white paint in equal parts. Use a thin brush to paint the irises of the eyes.
- Outline the eyes with blue and color the pupils.
- Draw a mustache. The ends of the mustache can be decorated with colored balls.
- Paint the mouth, nose and blush with red paint.
- Draw green blades of grass at the bottom. Add bright flowers.
At the end of the work, you can offer the child to mix the paints themselves to draw a cloud. You need to get blue and pink colors.
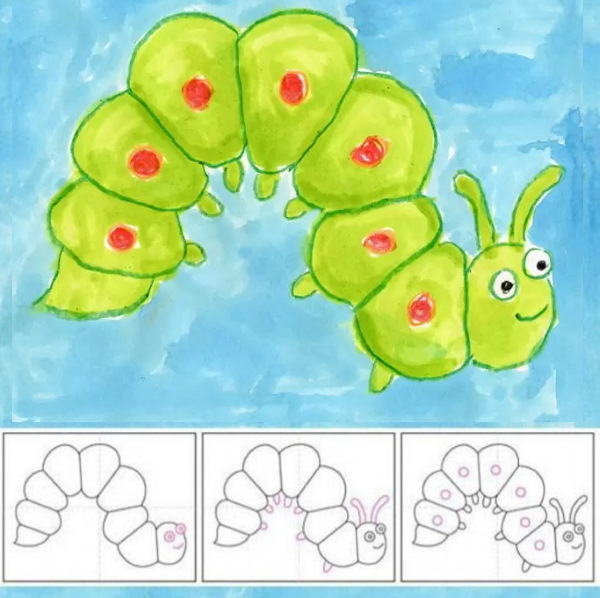
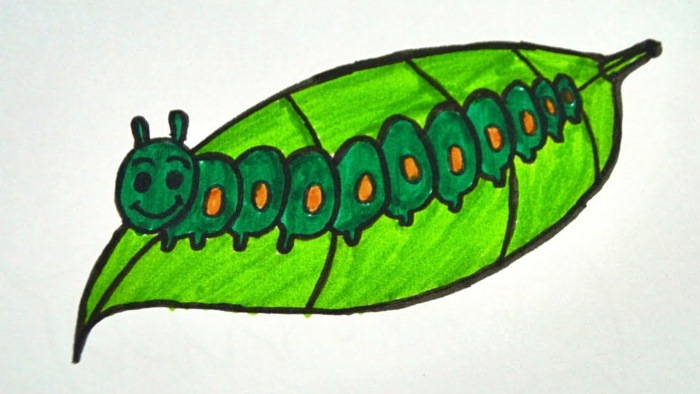
Gouache drawing
The caterpillar (the drawing for younger children should be large) can be depicted in the drawing as circles of different diameters. By coloring simple shapes, you can teach your child to designate shadows with paint.
For work you will need gouache of 6 colors:
- orange;
- green;
- blue;
- red;
- brown;
- black.
How to draw:
- Without pressing on the pencil, draw a line that will indicate the position of the caterpillar's body.
- Draw a round head.
- Draw the rest of the body parts as circles. Place them so that the auxiliary line goes through the center of each circle.
- Draw eyes on the caterpillar.
- Draw a leaf under the caterpillar.
- Use an eraser to erase extra lines.
- Paint the leaf with green gouache and paint the caterpillar with orange.
- Dry the drawing.
- Mix orange paint with red in a 2:1 ratio.
- Add a drop of brown to the resulting shade.
- Darken the lower part of the caterpillar's body and head, applying light strokes from bottom to top.
- Mix green paint with 2 drops of brown. Mark the shadow on the sheet.
- Paint the caterpillar's eyes blue.
- Dry the drawing.
- Using a thin brush with soft bristles and black gouache, outline the drawing.
- Draw pupils in the caterpillar's eyes.
Draw a line on the leaf to indicate its edge, as well as the veins.
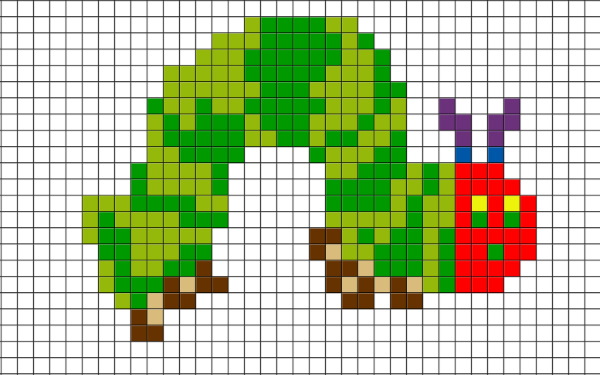
By the cells
Such pictures can be drawn in notebooks and personal diaries. The creation of the drawing begins with the bottom row. The cells will be counted from left to right.
Using a simple pencil and a ruler, you need to select a rectangle measuring 13 cells in height and 22 cells in width. For further work, you can use colored pencils or felt-tip pens. Each point corresponds to a row number.
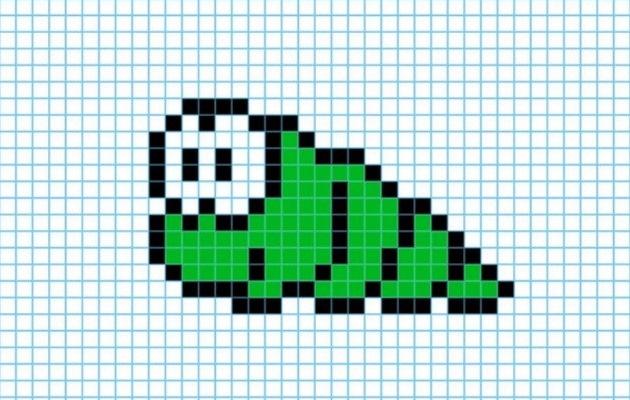
How to draw:
- On the bottom row, skip 5 cells, paint the next 3 cells black. Skip 2 more cells. Paint the next 3 cells black, skip 1 cell, paint 3 more cells black. Skip 1 cell, paint the next one black.
- New row: skip 2 cells, the next 4 will be black, 2 green, 2 black, 3 green, 1 black, 3 green, 1 black, 3 green, 1 black cell.
- 1 blank, 1 black, 4 green, 1 black, 3 green, 1 black, 3 green, 1 black, 3 green, 1 black cell, 1 green, 1 black, 1 empty cell.
- 1 black, 5 green, 1 black, 4 green, 1 black, 2 green, 1 black, 3 green, 2 black, 2 empty cells.
- 1 black, 10 green, 1 black, 3 green, 1 black, 2 green, 1 black, 3 empty cells.
- 1 black, 1 green, 1 black, 1 green, 2 black, 5 green, 1 black, 3 green, 1 black, 1 green, 1 black, 4 empty cells.
- 1 blank, 1 black, 1 blank, 1 black, 2 empty cells, 1 black, 5 green, 1 black, 3 green, 1 black, 5 empty cells.
- 1 black, 6 empty cells, 1 black, 3 green, 1 black, 2 green, 1 black, 7 empty cells.
- 1 black, 1 blank, 2 empty, 1 black, 1 blank, 1 black, 2 empty cells, 1 black, 5 green, 1 black, 8 empty cells.
- 1 black, 1 blank, 2 empty, 1 black, 1 blank, 1 black, 2 empty cells, 1 black, 2 green, 3 black, 9 empty cells.
- 1 black, 6 empty cells, 1 black, 1 green, 1 black, 12 empty cells.
- 1 blank, 1 black, 1 blank, 1 black, 2 empty cells, 3 black, 13 empty cells.
- 2 empty cells, 4 black, 16 empty cells.
Parents can use this instruction to conduct a graphic dictation. Such activities develop the child's memory and also improve counting skills.
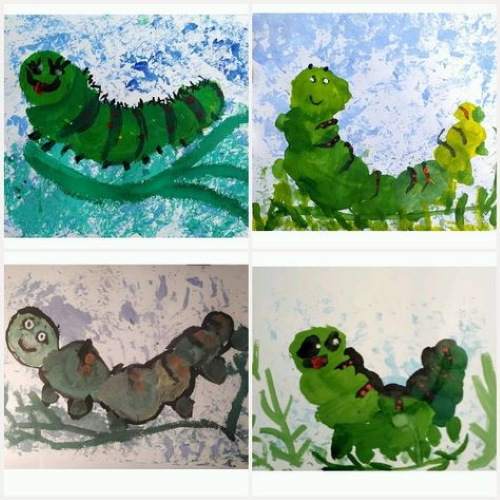
Finger painting
Finger painting is suitable for children from 1.5 to 4 years old. This activity develops fine motor skills and color perception. For work, you need to use special paints that do not cause allergies and are easily washed off your hands with warm water.
How to draw:
- The parent should mark the position of the caterpillar's body with a thin line using a simple pencil.
- Mix dark green and yellow on a palette. Do not stir the paint until it is uniform. You need to make sure that yellow stripes and specks appear in the green drop.
- Dip your child's index finger in paint and imprint it on the tip of the caterpillar's tail.
- All the following circles should be large, so now you need to use your thumb. Imprint it on the paper one by one, constantly wetting it in paint. The child should arrange the prints so that the auxiliary line goes through their middle.
- When the drawing is half done, the paint should be divided into 2 parts. Add 2 drops of blue to 1 of them. Print the next 5 circles in this color on the drawing. Then you can use yellow-green. The caterpillar will have blue spots on its back.

- Dry the drawing.
- Dip your index finger in red and draw a small circle with it. This is the caterpillar's head.
- Dip the tip of your index finger in yellow paint. Draw eyes.
- Dip your little finger in green and draw the caterpillar's legs and pupils.
- Using a thin brush, paint the remaining paws using brown paint.
- Draw purple antennae.
Use a black marker to draw hairs on the caterpillar's back.
Drawing with felt-tip pens
A caterpillar (a drawing for children over 7 years old can be done by creating a sketch not with a pencil, but with a black marker), drawn with felt-tip pens, will turn out colorful.
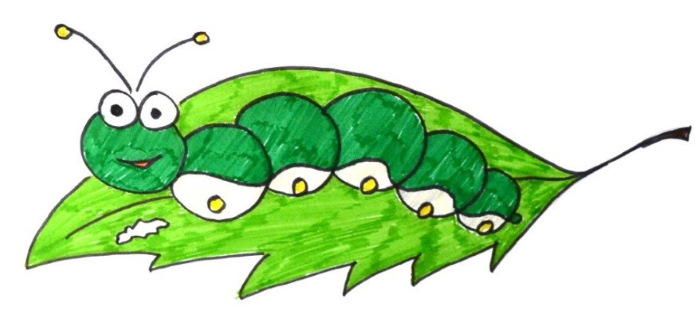
How to draw:
- Draw a round head using a simple pencil.
- Draw other parts of the body in the form of circles. The circles near the tail should be smaller.
- At the bottom, using a smooth line, mark the white part of the body.
- Draw the caterpillar's mouth, eyes, antennae and legs.
- Draw a leaf under the caterpillar. Its lower edge is depicted as a zigzag line.
- Finish drawing the gnawed hole in the sheet.
- Use a light green marker to color the leaf, drawing strokes from its base to the top.
- Paint the caterpillar's head and the upper half of its body dark green, drawing diagonal lines.
- Paint the paws yellow.
- Color the mouth with a red marker.
- Use a black marker to draw pupils on the caterpillar.
Trace the outline of the picture.
Stained glass design
You can decorate a glass cabinet door with such a bright picture, or draw a caterpillar on the glass of a photo frame. Before starting the classes, you need to remove the glass and degrease it with a special solution. Then you will need to draw a picture template on paper.
Procedure:
- Using a simple pencil, outline the curve of the caterpillar's body.
- Draw a large head.
- Add the rest of the body parts.
- Draw the paws.
- Draw 3 small hills under the caterpillar.
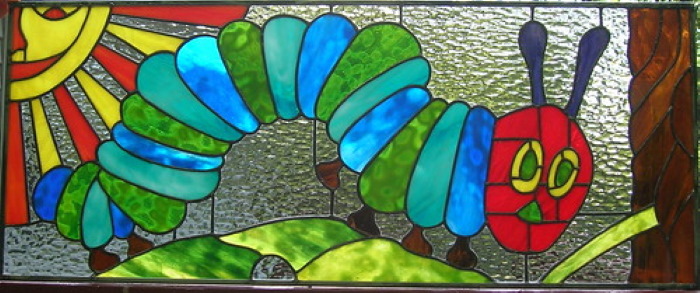
- Draw a sun with rays in the upper left corner. Draw an eye, nose and mouth for him.
- On the right, draw a tree trunk and a blade of grass sticking out.
- Draw the caterpillar's eyes and antennae.
- Trace the outline of the drawing with a black marker.
The sheet of paper with the drawing should be placed under glass.
How to color:
- Outline all the contours with black paint.
- Dry the glass.
- Fill all areas with paint, except for the hills and grass. The paint should be applied starting from the outline, repeating the shape of the picture element, smoothly moving towards the center. The black outline will prevent the paint from spreading.
- The hill and the blade of grass need to be painted differently. Fill the right sides of all the hills with yellow paint. Before it dries, apply green on top, with rare strokes. Completely fill the unpainted areas with green paint.
- By analogy, you need to paint the protruding blade of grass. Apply dark green color at its base and along the edges. While the paint is not dry, fill the empty space with yellow.
- Dry the drawing and insert the glass into the frame.
The effect of iridescent paint is noticeable in the photo. This is because the glass where the drawing is made is smooth, and on the other side it has a relief surface through which light penetrates and leaves a shadow pattern on the picture. On ordinary, smooth glass, the drawing will be no less beautiful, but there will be no patterns on it.
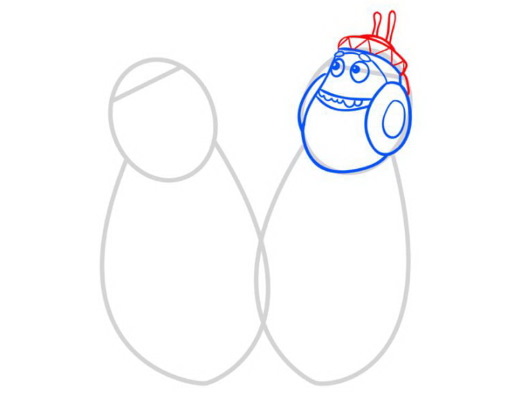
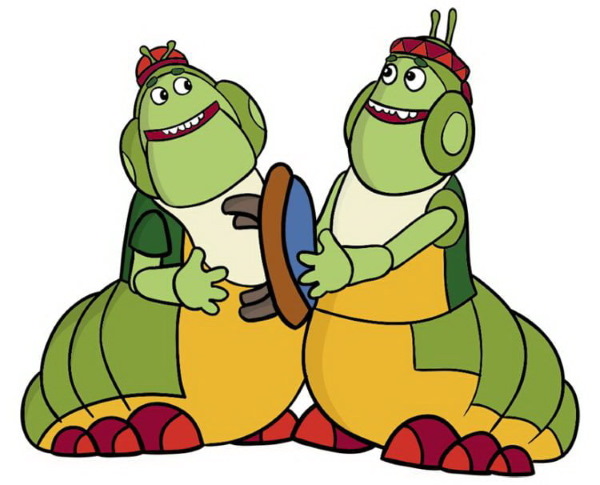
Caterpillars Vupsen and Pupsen
Vupsen and Pupsen are characters from the cartoon "Luntik".
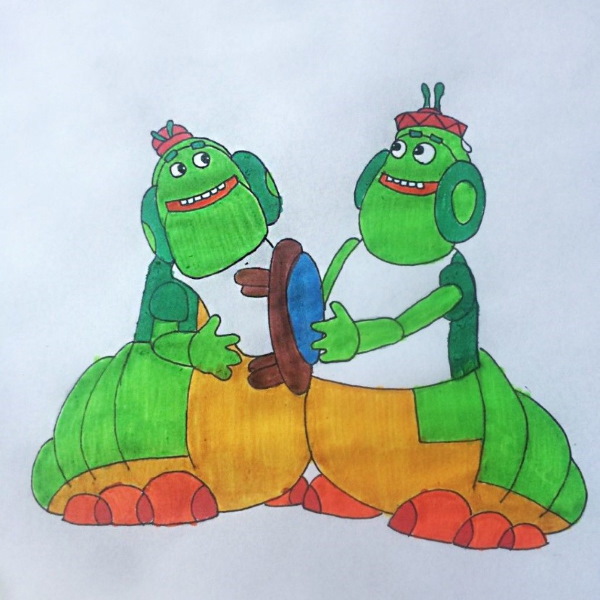
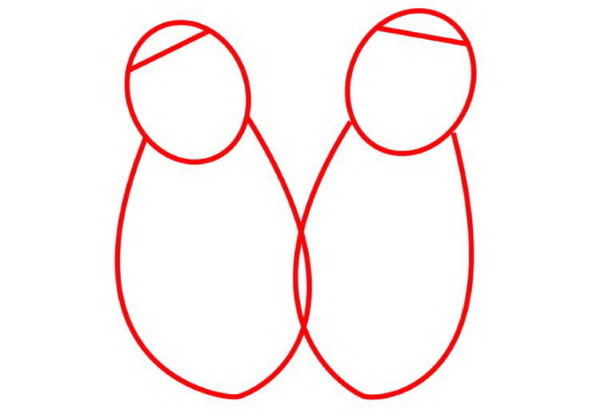
How to depict them on paper:
- Use a pencil to draw 2 small, elongated ovals. These will be the heads.
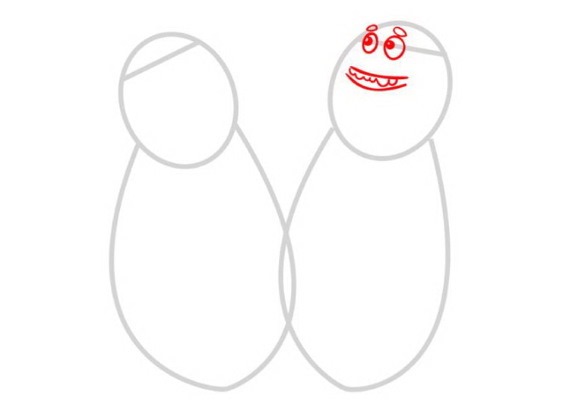
- Add plump cheeks to each caterpillar.
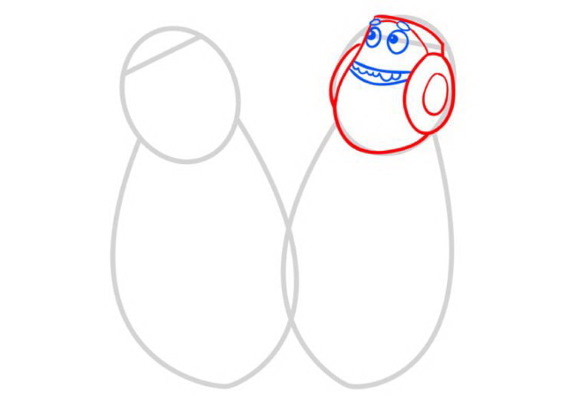
- Draw the eyes, eyebrows and hats.
- Add antennae.
- Draw mouths and teeth inside them.
- Highlight the massive lower jaws.
- Draw large bodies in the form of ovals.
- Draw their shape.
- Add tails to the caterpillars.
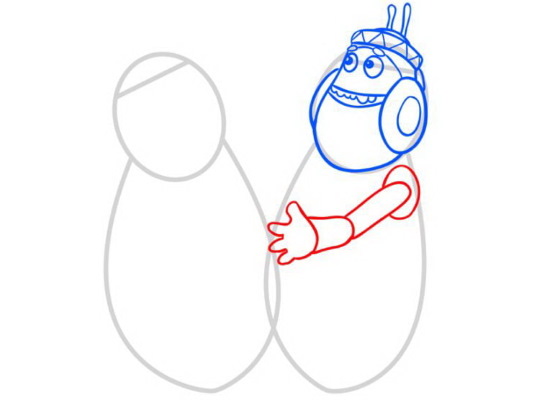
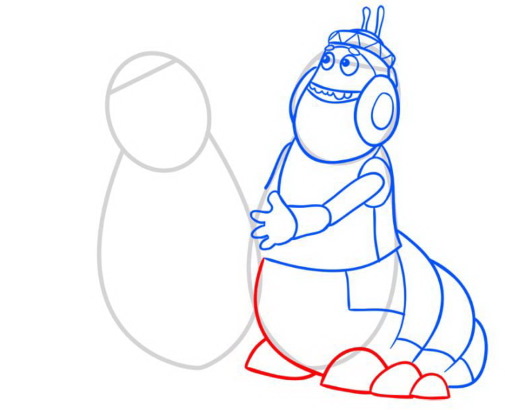
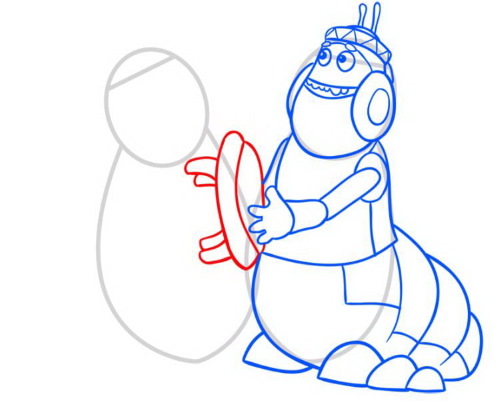
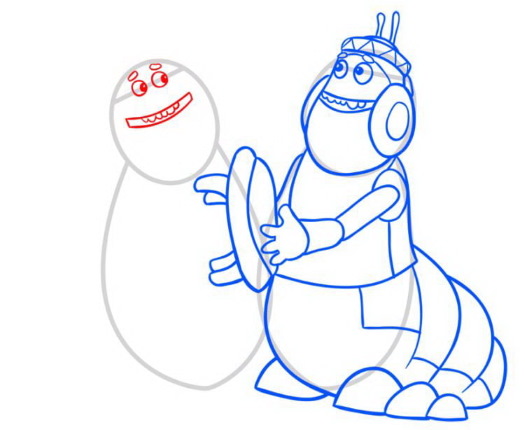
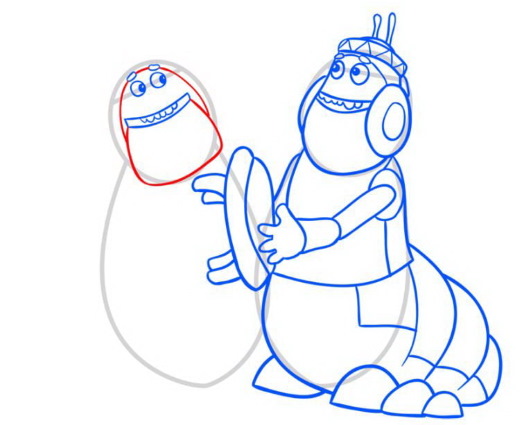
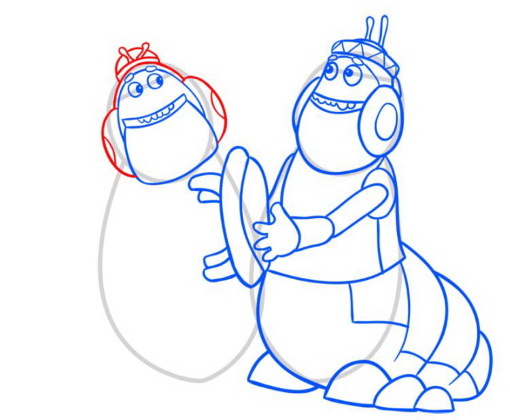
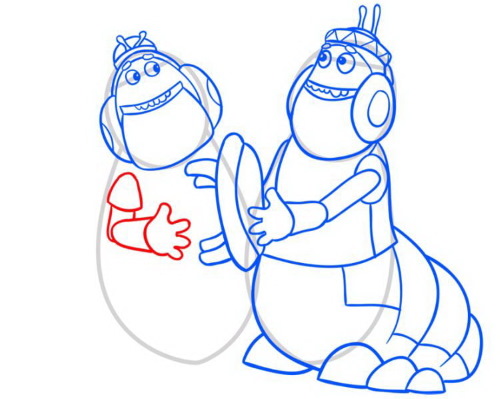
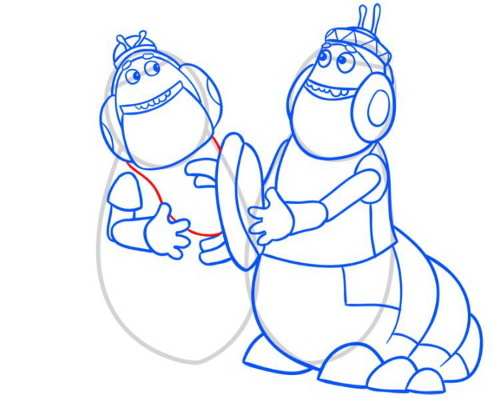
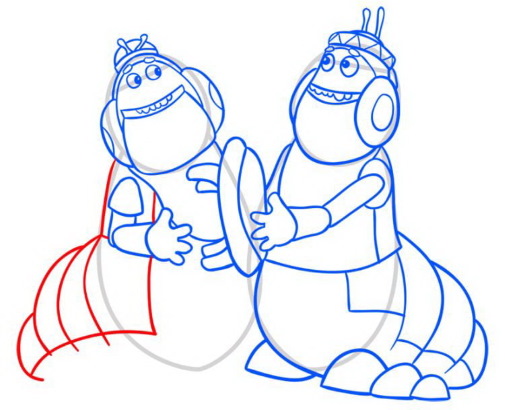
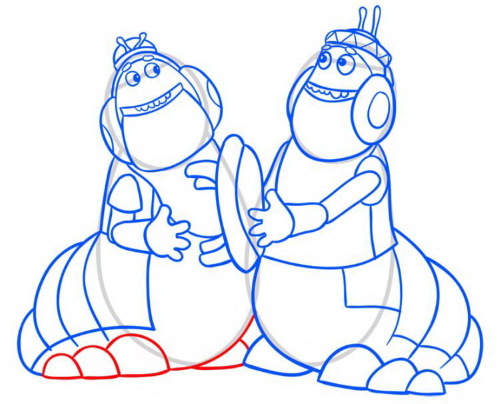
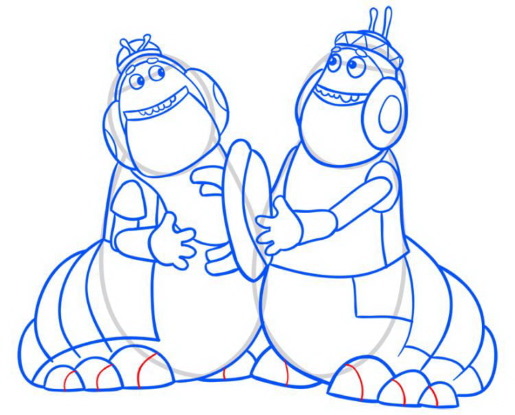
- Use smooth lines to mark the boundaries of the abdomen on the caterpillars’ bodies.
- Draw 4 semicircular paws.
- Draw clothes and bibs for the caterpillars.
- Finish drawing the hands and the object they are holding.
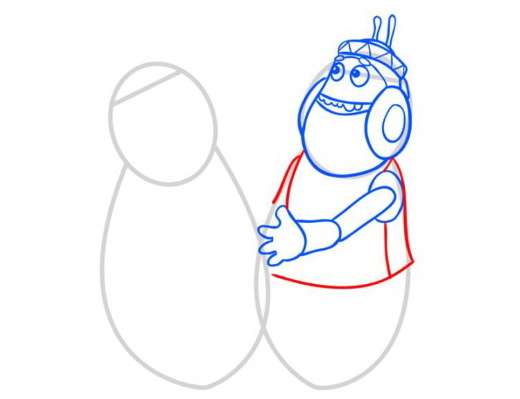
- Use an eraser to remove excess lines.
- Trace the outline of the drawing.
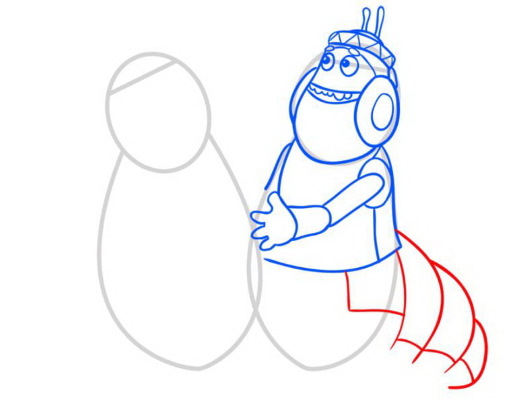
You can color the picture using any materials.
Caterpillar from the cartoon "A Bug's Adventure"
The caterpillar (the drawing for children under 6 years old should be done together with adults), depicted in the picture, is a character from the cartoon about the adventures of the ant Flik.
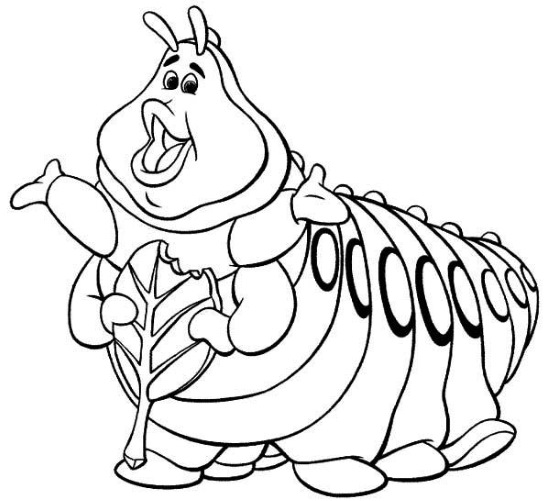
How to draw a caterpillar like this:
- Using a simple pencil, draw a small elongated oval, placing it vertically at the top of the sheet. This is the base of the head.
- Find the center of the oval. Draw 2 semicircles at the top and bottom. The one that is in the visa should be smaller.
- Draw the shape of the head more clearly, connecting the figures with smooth lines.
- Draw a thick fold on the neck.
- Complete the sketch of the caterpillar's body shape.
- Draw all the other folds on the body. They should be wide near the belly, and narrow closer to the back.
- Draw 6 paws under the belly.
- Draw 4 more paws on the chest. In the lower pair of paws, draw a large leaf with a bitten edge.
- Use an eraser to erase all unnecessary lines.
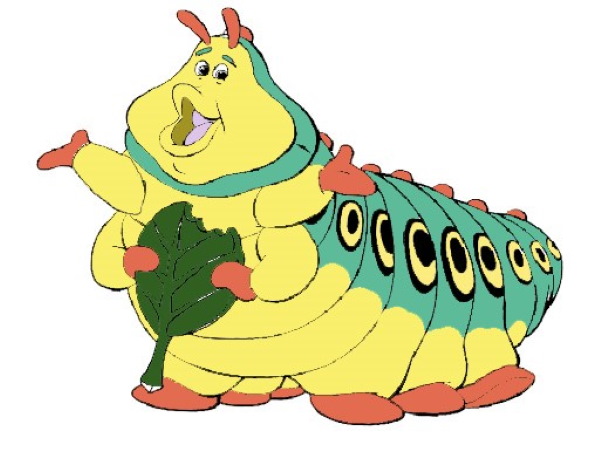
- Draw small eyes and eyebrows on the caterpillar.
- Draw the antennae.
- Draw the upper lip, then the lower one.
- Draw the tongue inside the mouth.
- Draw round patterns on the side of the caterpillar. The largest circles should be located in the center of the body.
- On the back, depict spikes in the form of semicircles.
- Draw veins on the leaf that the caterpillar is chewing.
The picture can be colored using any materials. It is important to follow the color scheme, as the color of this caterpillar is its distinctive feature, which allows you to recognize the character.
Tips for young artists
To make your drawings beautiful, you need to know a few secrets:
- Excess watercolor paint can be carefully soaked up with a cotton pad.
- When mixing paints, you need to use a palette to see the shade you are creating in advance. Mixing colors on the paper where the drawing will be done can ruin it.
- You can only outline drawings made with paints with a marker after they have completely dried.
- Finger paints can be easily removed from your fingers with wet wipes, so you don't have to go to the bathroom every time you need to change colors.
Drawing caterpillars is useful not only for developing fine motor skills and the child's imagination. This activity allows him to expand his knowledge of the world around him. In the process of drawing, adults should tell children about what caterpillars are, what they eat and when they turn into butterflies.
Author: Ekaterina Frolova
Video about drawing
Caterpillar drawing for kids: