Half a hundred, crocheted without a yarn over, is considered an auxiliary element, it even has a second name - a connecting loop. This method is often used to connect a chain of air loops into a ring, tie an element (for example, an arch) to the main fabric or sew two parts.
However, the half-column also has independent potential, since when done correctly it produces an effective pattern in the form of braids, reminiscent of the “chain stitch” in embroidery.
Tools and materials
The half-double crochet stitch is a knitting technique that fully confirms the popular wisdom: “What looks simple is the most difficult.”

The point is that such a column is easy to make once, as a connecting loop or several times for practical purposes to assemble a product, but if you need to make a beautiful row with a half-column braid or knit the entire product using this technique, you will have to make an effort.
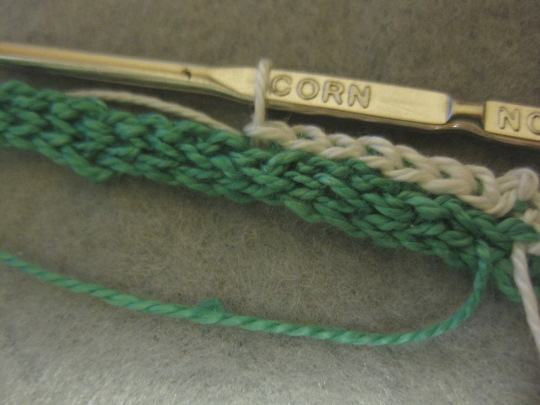
The column has a very small height, the work moves slowly, so special attention should be paid to the selection of the hook and yarn, so that the materials and tools do not slow down the process even more. The hook should move very easily. For this, it is better to choose medium-thickness or thick threads, but with a smooth surface.
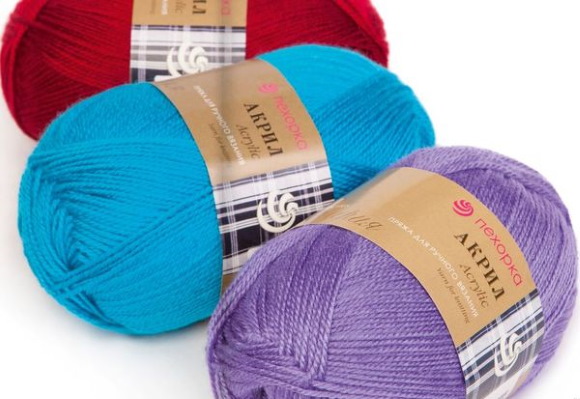
The following types of yarn are suitable for the half-column:
- acrylic with added wool;
- not very thin cotton threads, you can knit with yarn like “Iris” or “Narcissus”, but the work will be very long and painstaking.
The choice of hook is also important. A hook that is too thin will catch and fluff up the thread, and the pattern chain will be so small that it will be difficult to work with. At the same time, a very thick hook will be impossible to fit under one of the loop threads.
You can choose the right tool by placing the thread in the hook barb and pulling it slightly. If the thread completely occupies the notch, without going beyond the edges, but also without dangling, then the hook is suitable. The easiest way to work with a half-column is to use metal hooks in the range of No. 2 - 3.5, and yarn of the appropriate thickness.
The half-double crochet is the easiest basic knitting method to master. However, to make several rows of this single crochet beautifully and neatly, you need to practice many times, analyze which hook and which wool is more convenient for a particular craftswoman to knit with, and practice the hand movement.
How to knit
To learn how to knit a regular half-column, you need to cast on a few air loops and then follow the simple instructions:
- First, you need to insert the hook into the second loop from the hook, skipping the lifting loop.
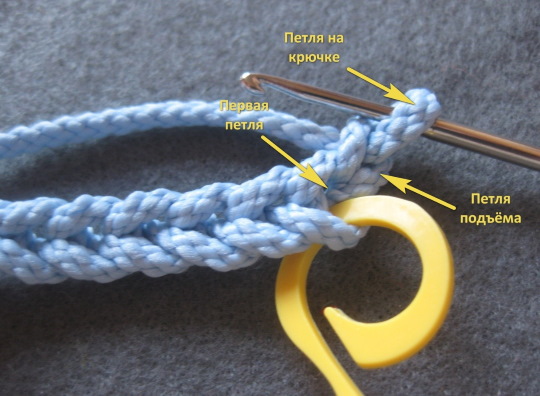
For a half-column, 1 loop is also left for lifting, just like for a regular column.
- Then you should pick up the thread with the hook and pull it in one motion through the loop of the chain and the loop on the hook.
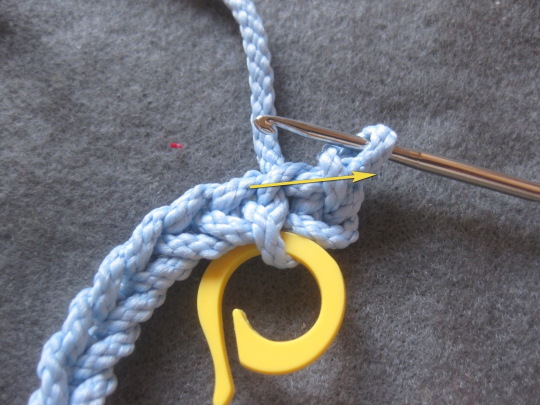
It is this 1 movement that needs to be automated in order to knit a half-column quickly. The classic single crochet differs from the half-column in that it is performed in 2 movements.

- This should be continued until the end of the row, knitting each loop. Then you should make a lifting loop, turn the product over and continue the pattern.
It is important to decide right away how the hook will be inserted to grab the thread.
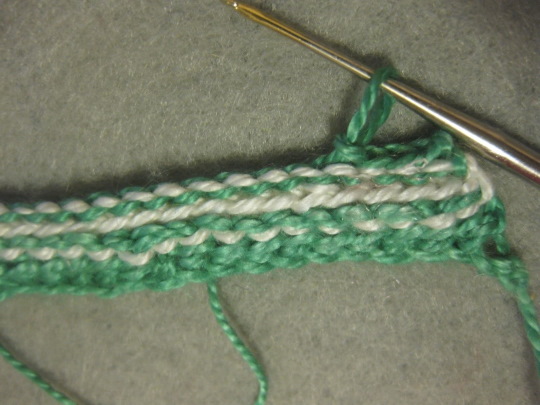
You can pick up the entire braid of the previous row (i.e. 2 threads), but it is difficult to knit this way, as the knitting is very dense. The second way is to pick up only the front wall of the braid (1 thread), this way it is easier to knit.
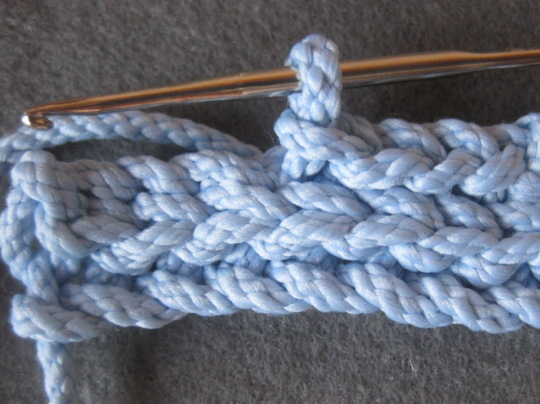
A half-double crochet stitch with this knitting method and color change gives a completely different pattern on the front and back sides. On the front side, these will be braids, and on the back side, braids and stitching along the sides of the row.
On the diagram, the half-column is designated differently - if it is a connecting loop, then with a black triangle or circle, if it is just a half-column without a crochet, then with a vertical stick.
However, there is no clear division of functionality, and all three symbols are in use. In addition to the symbols, knitters need to master the basic abbreviations of basic techniques in order to quickly understand knitting instructions and create their own plan.
Abbreviations to remember:
| Knitting technique | Abbreviation |
| Air loop | VP |
| Single crochet | SBN |
| Half double crochet | Mon |
| Half double crochet (slip stitch) | PP |
| Double crochet | SN |
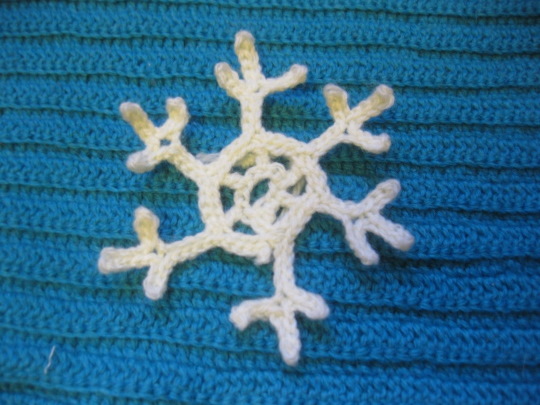
Decoration "Snowflake"
Even a beginner needlewoman can knit this patterned decoration in half an hour. To make the craft, you only need to master air loops, a double crochet, and a half single crochet.
An openwork snowflake can be attached to any woolen clothing or household item (potholder, hot water bottle), and a standard item will become original and acquire a winter color. You can also attach a string to the snowflake and hang it on the Christmas tree. Also, children really like to play with knitted snowflakes, launching them down.
Materials and tools:
- White or any pastel colored yarn (medium thickness), such as baby yarn (acrylic with added wool).
- Hook No. 2.
Manufacturing process
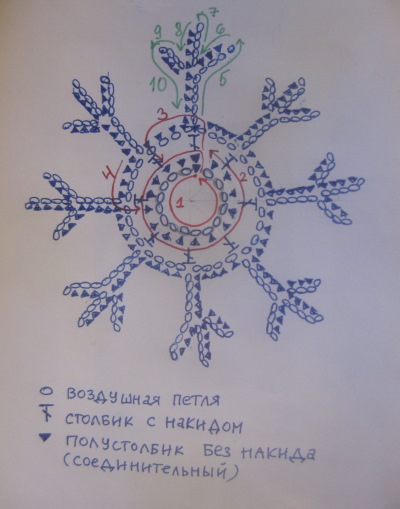
The half-double crochet is the main technique in this product, as it gives a beautiful smooth braid, emphasizing the structure of the snowflake. It is better to crochet the first snowflake strictly according to the pattern, then you can change the elements, for example, add partitions and rays.
How to knit:
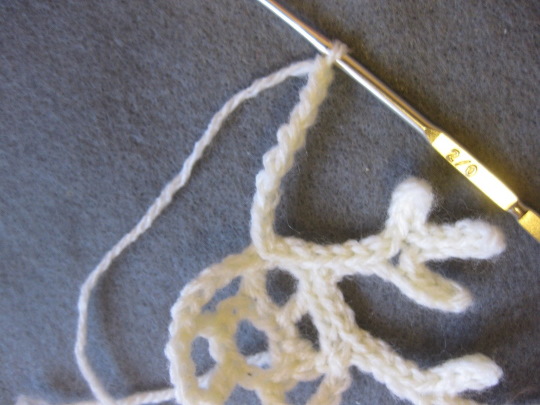
- First, knit 11 air loops, connect them into a ring with a connecting loop (half-column). The ring is tied with half-columns without a crochet.
- From the last half-column, you need to make 1 double crochet. Make 4 air loops, and through one loop knit a double crochet, you get the first arch.
- Next, you should repeat this algorithm 5 times, if all the loops are counted correctly, then all the arches will be the same, the last 4 air loops are attached to the first double crochet with a connecting loop.
At the next stage, rays are created, each ray is knitted in 3 stages:
- Knit 9 air loops, in the second row make 3 half-columns without a crochet, starting from the second loop from the hook.
This is the first of 3 branches of the ray.

- Then knit 5 air loops, make 4 half-columns, without knitting the lifting loop. The second branch is ready.

- Make 4 more air loops, from the second loop from the hook knit half-columns without a crochet to the ring, continue to make half-columns along the ring to the next partition (column with a crochet). Then knit the next beam using the same algorithm.
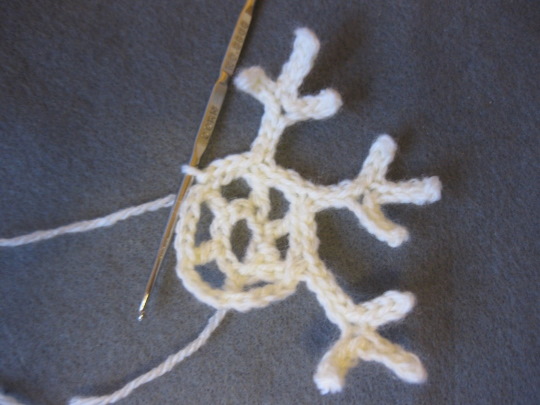
When all six rays are ready, you need to hide the thread on the back of the product or make a loop out of it.
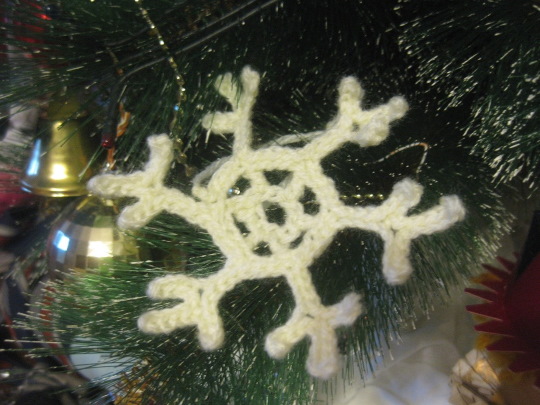
The snowflake can be sewn on as decoration or hung on the tree. A small snowflake can even have plastic eyes.
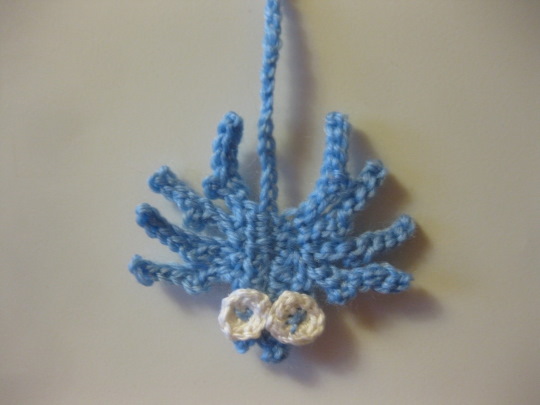
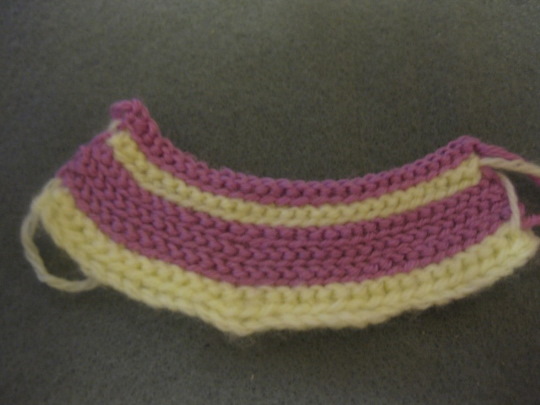
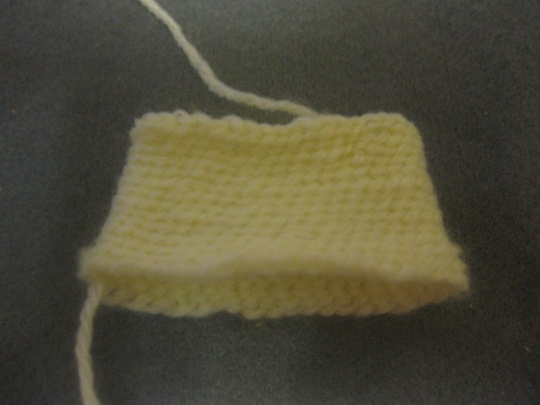
"Spider on the Web"
The bookmark "Spider" is a wonderful little souvenir for a friend, a colleague's child or for yourself. It will be more fun to study with such a thing. In addition, by increasing the size of the product, you can prepare original decorations for a theme party.
A beginner craftswoman will spend about 40 minutes on the product. To knit a bookmark, you only need to master a few techniques - a chain stitch, a half-double crochet, a classic single crochet, a double crochet and a slip stitch. The main element is the half-double crochet, as this technique clearly shows the interweaving of the web and the insect's legs.
Materials and tools:
- Yarn of any color in one thread (cotton or acrylic with added wool), medium thickness.
- Hook #2, hook #1.
- White cotton yarn or a piece of felt for the eyes.
- Needle with a large eye.
- The book is a model.
Manufacturing process
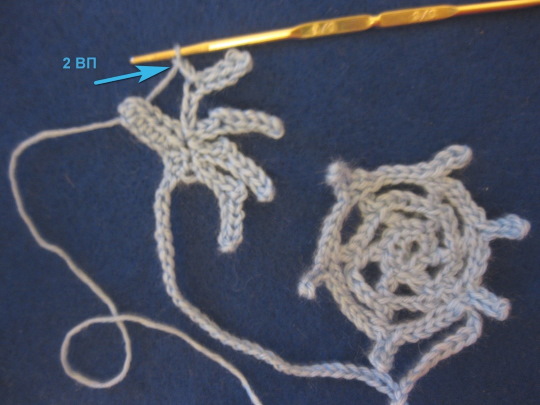
Making a web
The web is knitted according to the following algorithm:
- First, make 6 VP, connect them with PP into a ring. Tie the ring with half-columns without a crochet.
- In the third row, make 1 CH, from it 4 VP, through 1 loop make another 1 CH, fasten it to the ring through the loop, get the first arch, repeat the algorithm 5 times.
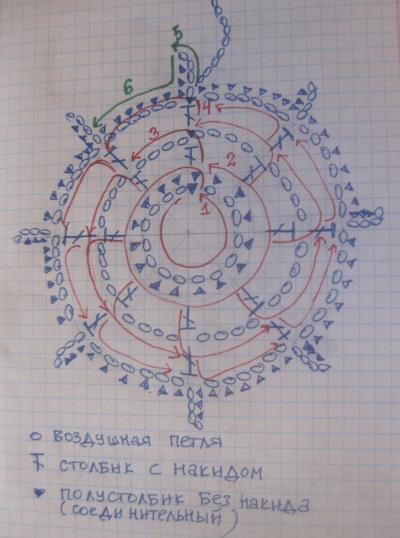
- In the fourth row, make 6 more rays and 5 arches, respectively. Next, knit 1 CH, from it 6 air loops, then 1 CH, attach it to the web in the place where there was a CH in the previous row. Repeat this 5 times. This is the optimal size of the web for the bookmark.
- Next, make rays of the web along the edges, creating the illusion of attachment. In those places where there were double crochets in the previous row, make 4 VP, tying them with half-double crochets, continuing the tying in a circle until the next ray.
- At the final stage, make a thread from the web to the spider from about 55 VP, the cord can be longer or shorter depending on the size of the book.
Making a spider
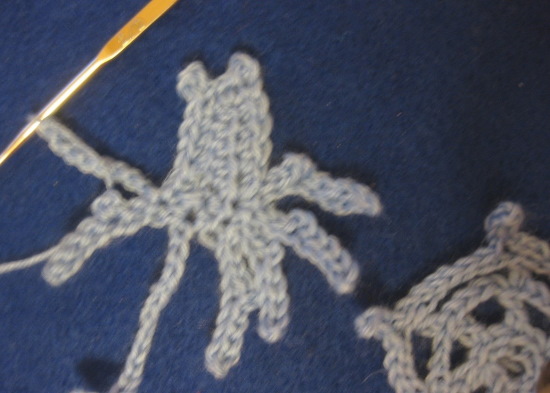
The spider can be knitted using this model, the number of loops can be changed as you go, based on your preferences - for example, the legs may be longer and the body larger:
- 6 PS, starting from the second loop from the hook (knit on the air loops of the cord), this is the body part.
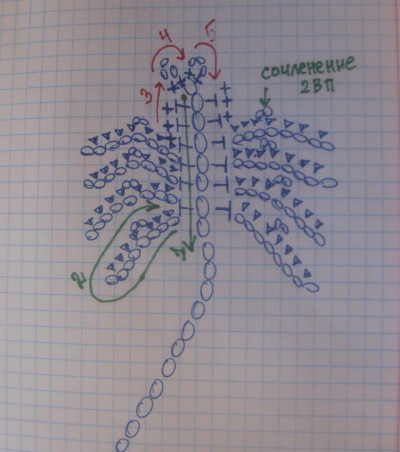
- For the 1st paw, knit 8 VP, make 4 PP from the second loop from the hook, knit 2 VP, attach them to the same loop with a connecting post, this is the articulation of the insect's paw (bend), then knit 3 PP. The last post is attached to the body, it turns out that the next paw is made through one loop.
- The remaining three paws on this side are knitted according to the pattern of the first paw.
- Next, make the spider's head. Knit 3 sc in half double crochets of the previous row. After that, make the spider's chelicerae (2 protrusions in the front part of the head). In 1 loop, knit 1 sc, then 3 VP, then in the same loop 1 sc. You get a protrusion, the second protrusion is knitted according to the same pattern in the next loop. Then make 6 ss, as on the other side at the very beginning.
- The spider's legs on this side are knitted in exactly the same way as the first four.
- Finish knitting 3 sc on the head.
- At the end, secure the thread, but do not cut it.
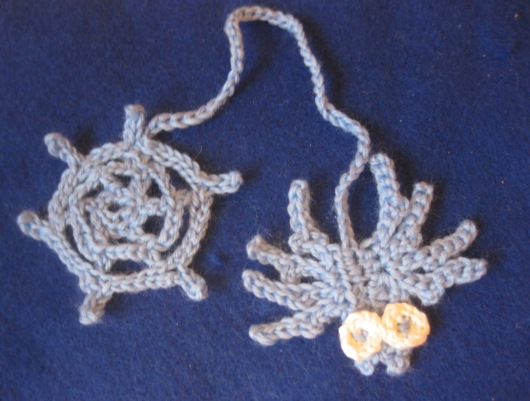
- You can attach eyes made of white felt or crocheted cotton threads to the spider's body. The eyes are sewn on using a large-eyed needle and the remaining thread of the main color, while marking the pupils.
The bookmark is ready. At the end of the work, it is better to put it under something heavy for a while so that the lines straighten out. Using the same principle, you can make bookmarks in the form of other animals - for example, fasten an octopus and a shell, then the octopus will have tentacles with suction cups, and the shell will be in the form of a spiral, which is convenient to knit with a half-column without a crochet.
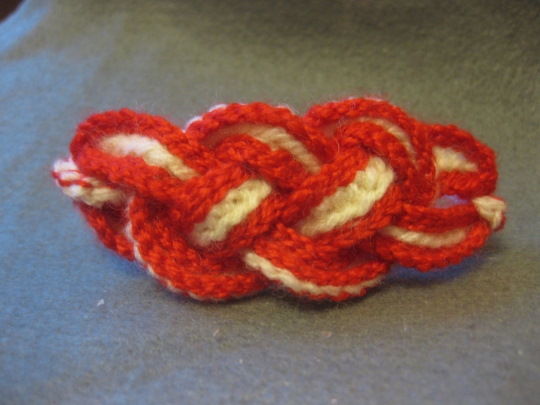
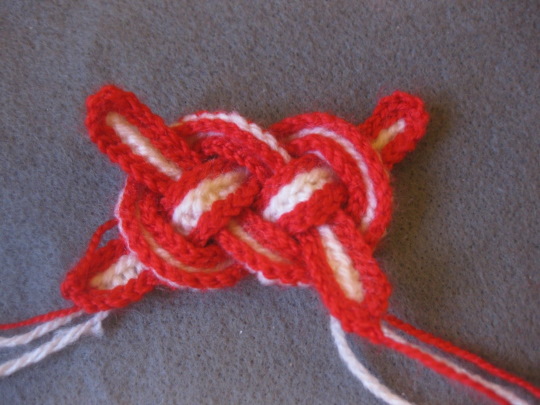
Celtic Passion Knot Bracelet
Knowing the basic knitting techniques allows you to create an original accessory in an ethnic style in a couple of hours. The color of the bracelet can be matched to any outfit.
A knitted bracelet will look especially impressive when paired with a loose, coarse-knit vest or a tight-fitting wool sweater. A bracelet made of rainbow-colored cotton threads will complement a summer outfit of a T-shirt and a floor-length skirt.
You can knit a necklace in the same style to go with the bracelet. You can also decorate a headband, hat or bag with a knitted Celtic knot. To knit this item, you only need to know two techniques - air loops and a half-column without a crochet.
Materials and tools:
- Yarn of two colors - red and white (cotton or acrylic with wool), not very thick.
- Hook No. 2.
- Training cords.
Manufacturing process
At the very beginning, you need to calculate the size of the bracelet. If the goal of the work is to tie both the knot and the strap at once, then for the bracelet you need to take two wrist sizes.
With a wrist volume of 36 air loops, you need to knit 72 VP. Even if the bracelet is loose, this can be adjusted. No less interesting is the option when the knot is made separately, and an interesting strap is attached to it. In this case, at the start, dial a chain of air loops that wraps around the wrist, plus another third (for example, 36VP + 12 VP = 48 VP).
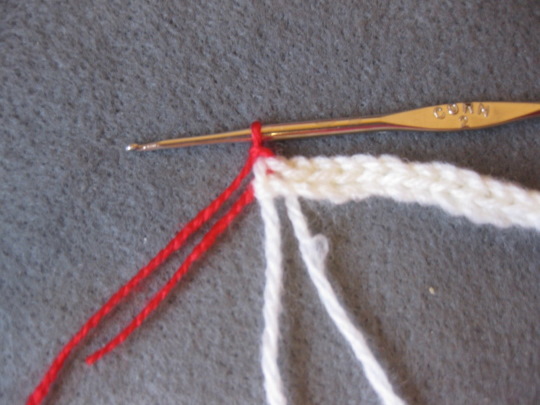
In this case, the work proceeds according to the following scheme:
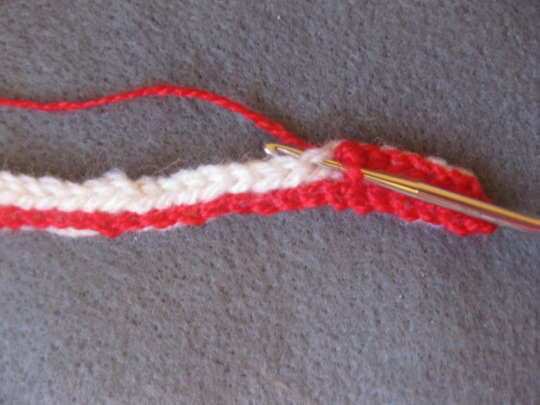
- 1 row – 48 VP with white threads, plus 1 VP for lifting.
- 2nd row – from the second loop after the thread on the hook, knit the entire row with half-columns without a yarn, capturing one thread. The work is done with white threads. On the last loop of the row, introduce a new color, pulling the red loop.
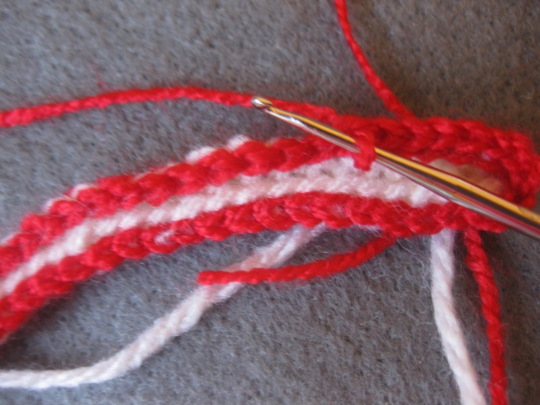
- Row 3 - then turn the product, make 2 half-columns without a yarn in one loop, and continue tying with half-columns along the other side. It is very important to insert the hook only under 1 thread, from the front side it will look like the back wall of the braid segment. At the end of the row, at the top of the figure, make two half-columns in one loop again.
- Row 4 – continue tying on the other side with red color.
- Rows 5 and 6 are knitted similarly, you only need to put the hook under the red thread. You get an even knitted ribbon with relief braids. On the other hand, the pattern has interesting stitches that will be visible on the sides of the bracelet.
- The second ribbon is made using the same algorithm. When knitting with a half-column without a yarn over from the back, a completely different pattern is obtained, so it is important to clearly track under which thread the hook is inserted.
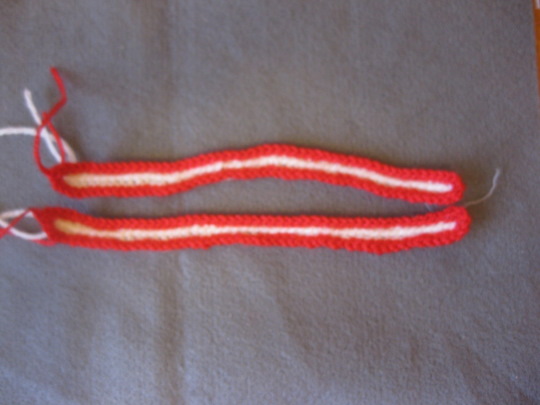
- Before twisting a knot from identical knitted ribbons, you need to experiment with multi-colored laces or thick threads.
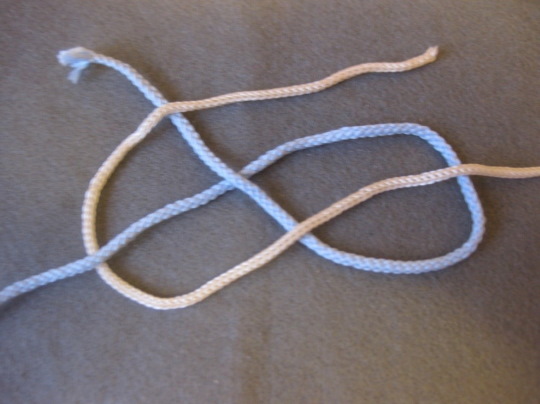
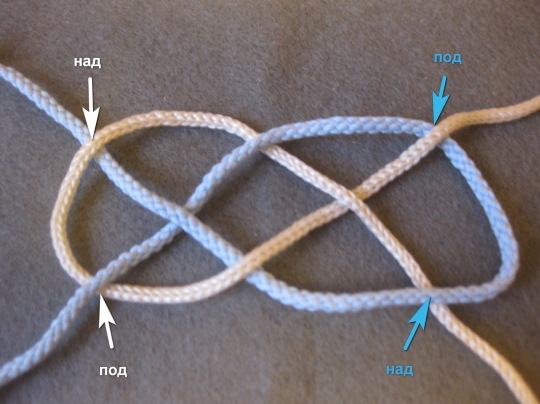
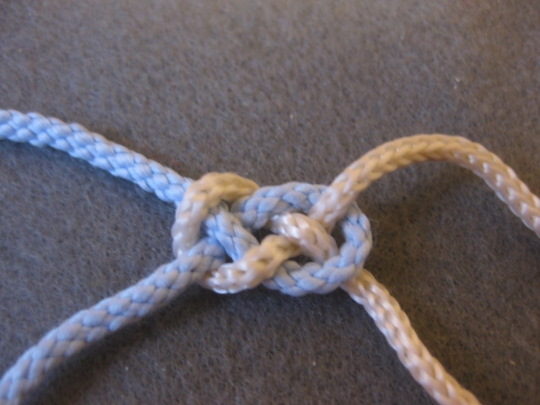
The loops are aligned as shown in the photo and tightened.
- After training, twist a knot from the knitted fabric and straighten all the curls. You can fix the knot in a couple of points so that it does not come apart, but this is usually not necessary.
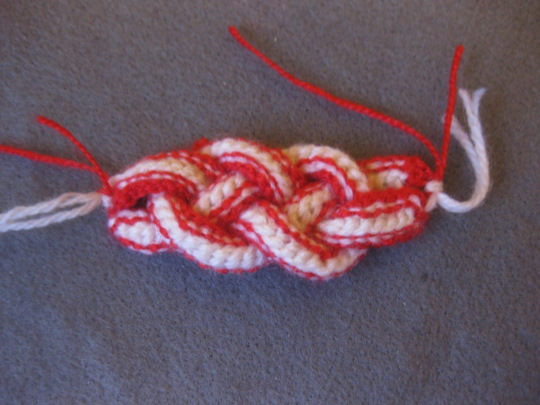
- You can buy special fittings for the strap or make it from a completely different material, but the easiest way to knit a strap is from air loops. Using the tails left over from knitting, connect the protruding ends of the ribbons, hide the threads inside the posts. You get two loops on the sides of the knot.
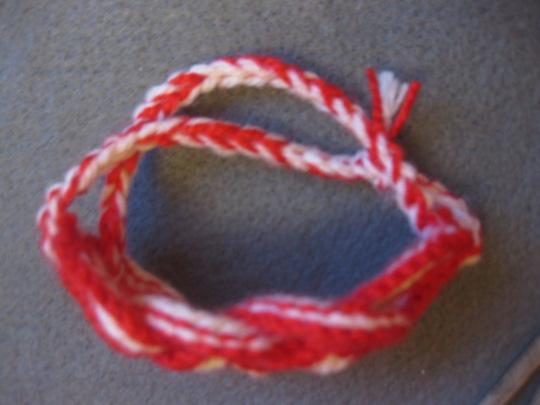
- Next, connect the white and red threads and knit a braid of 40 VP. Pull the chain through the loops of the bracelet and connect it with a ring.
Tips for Beginners
The half double crochet stitch is rarely considered a basic technique, for several reasons.
Beginner knitters should pay attention to the following points before choosing a half-column for knitting:
- The half-double crochet gives a very small growth of the product, so you will not be able to get a quick result. It is better to choose a very small souvenir for knitting with this technique.
- The half-column allows you to knit a fabric with a beautiful relief, reminiscent of machine knitting or woven fabric, especially if you do not turn the product over. However, this method gives an automatic very strong tightening, already on the 4th - 5th row it is visible that the length of the row is reduced, this can be corrected by adding columns in 1 loop, but it is very difficult to control.
- Therefore, it is better for beginners to knit in a circle using this technique without turning, as if tying the product, or to choose products that require a trapezoid, arc or cone at the exit - teapot warmers, bow ties, doll skirts, boho-style necklaces.
The master classes offered in the article prove that the half-double crochet allows you not only to connect items with a crochet hook, but also to create original gifts and souvenirs in a short time.
Author: Pichugina Stanislava
Videos about crochet
Half double crochet: