Preparing for a holiday with children can be a very exciting activity. A special place here is occupied by the creation of various crafts. There are various algorithms that help to make such products with your own hands.
What craft materials are suitable for holiday crafts?
Various materials can be used to create an interesting thing. Among others, bottles are often used. They can be used to make various vases, animal figures, or to make a frame for a forgery.
Every home often has various scraps of fabric left over. You can make a soft toy, potholders, or make some decorative elements out of them. Felt crafts look interesting. They make your home more cozy.
An important material when making various products is wire. It is also used to make a frame, as well as an independent decorative element. Wire can be beautifully bent or twisted, covered with matte paint and decorated with dried flowers or leaves.
In addition to the materials listed above, you can use any other available tools. This includes cocktail straws, wool threads, clay, dough, cardboard, paper, plastic plates, balls and discs.
Necessary tools
If children are involved in the work, it is important to pay attention to the safety of the devices:
| Dangerous tools (use only with adults) | Relatively safe |
|
|
Master class: how to make original crafts with your own hands for different holidays
Regularly creating something beautiful with your children with your own hands is very valuable. After all, in addition to acquiring new skills, this activity allows you to have a pleasant time with loved ones.
Christmas tree
An original three-dimensional Christmas tree will help create a New Year's mood and decorate your home.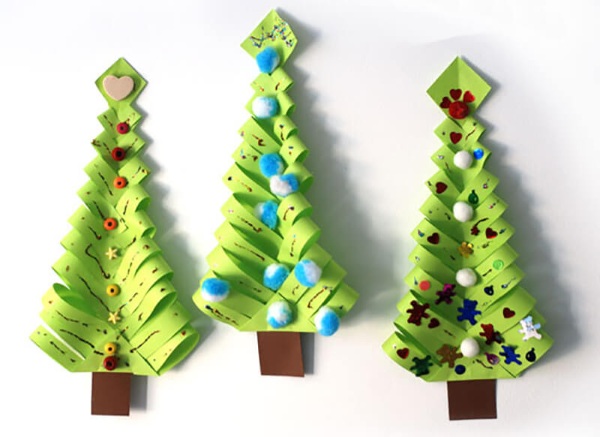
To make it, you need to prepare:
- colored paper in A4 format;
- ruler;
- scissors.
The creation process is a sequence of actions:
- Fold the sheet diagonally. Attach the smaller side to the larger side. Draw a line to make a square. Use scissors to cut off the unnecessary strip.
- Fold the sheet again, but along the opposite diagonal. Return the square to its original position. Fold the sheet in half, first on one side, then on the other. Run a ruler.
- Fold inward the triangles that remain as markings after the previous manipulations.
- Fold the outer sides to the center. Press down to draw a line. Fold it inward. Repeat the manipulation with all four sides.
- Cut off the bottom part with scissors.
- Make slits along the edges of the tree. You should leave space up to the middle of the future tree.
- Bend all the resulting sections diagonally. The direction should be the same. The exception in this case will be the crown, it should be left in its original position.
- Distribute evenly on all sides and open the tree.
Crown
The algorithm described below can help you make a crown with your own hands. The craft can be made for the birthday boy to make him stand out at the celebration. To make the crown, you need to stock up on yellow A4 sheets.
Their number depends on the size of the head. If the craft is made for a child, then most likely 2 pieces will be enough. An adult may need 4 sheets.
The instructions for creating a crown involve the following sequence of actions:
- Fold the sheet into a long rectangle by folding it in half.
- Divide the figure into 3 identical squares. Cut them with scissors to get 6 figures.
- Fold each small sheet diagonally. Fold 2 sides to the center. Fold the small triangle up from below. Fold the small corner down and fold the sheet again along the top side, which is the result of the manipulations performed.
- Repeat the actions from the previous step with all squares.
- Start assembling the crown. To do this, you need to connect the triangles to each other using the pockets that were made earlier. While working, you need to make sure that the first triangle is behind and the second one is in front. It is important to maintain this order.
- Roll the crown into a small roll so that all the paper holds its shape well and becomes more rounded.
- Start gluing the crown. Move each corner and coat it well with glue.
Firecrackers
With the help of a firecracker you can make any holiday more fun and memorable.
To make the craft you need to use the following materials:
- balloon (a deflated one will do);
- thread;
- sleeve;
- sticky tape;
- hole punch;
- glue;
- paper for decoration;
- scissors;
- old magazine.
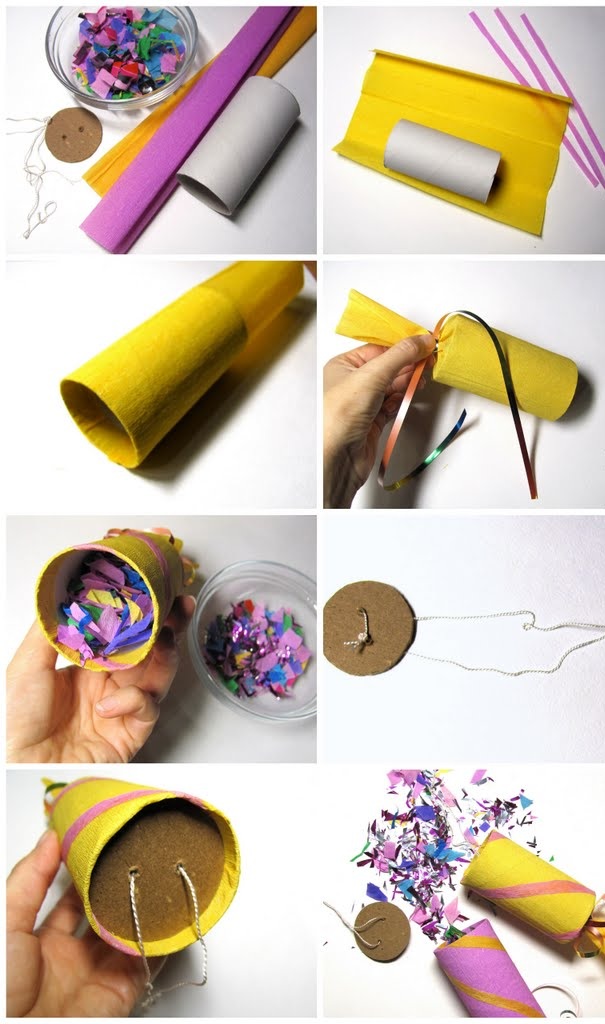
The algorithm for creating a firecracker is a set of the following steps:
- Cut the top of the ball. Pull it onto the sleeve.
- Secure the joint with adhesive tape. You can use scotch tape or masking tape.
- Make confetti. To do this, use a hole punch to cut out lots of small sheets of paper from an old magazine.
- Pour confetti into a popper. Cover it with decorative paper.
Father Frost
For the craft you will need double-sided paper of red and white colors. The size of the sheet should be 10*10 cm.
Algorithm for creating Santa Claus:
- Fold the square along two diagonals alternately. Straighten the figure.
- Fold the top corner to the center. Turn the corner back up to the edge. Turn the corner back to the resulting line. Make a hat.
- Fold the opposite triangle up. Then fold it to the bottom point.
- Turn the craft over. Fold the sides into a narrow strip. Fold both sides of the product to the middle line.
- Fold the white parts on both sides into an even angle. Bend the corner.
- On the back side, fold your hands into small white squares.
- Draw eyes and a nose with a felt-tip pen.
Snowman
The following algorithm for creating a snowman can tell you how to make a craft with your own hands together with a small child, and not use dangerous tools in the work. The product will contribute to the development of new skills for the baby.
To work you need:
- sock;
- stationery rubber bands;
- rice;
- strip of red fabric;
- scissors;
- liquid gun;
- decor.
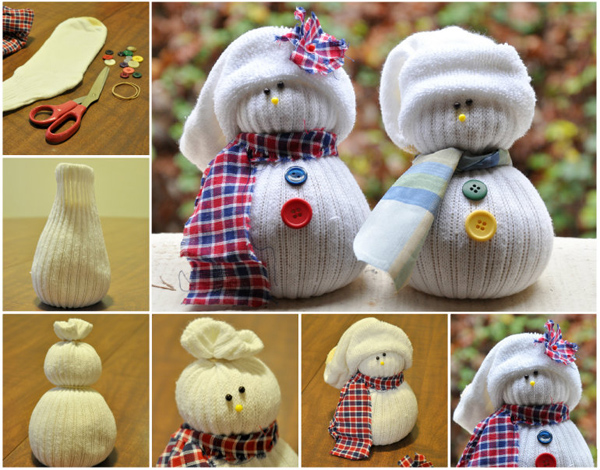
DIY crafts from scrap materials can be sold on specialized sites. Photo how to make a snowman
The process of creating the product is presented in the form of the following instructions:
- Cut 2 even parts from the sock. Take one of them and tie its end with an elastic band.
- Turn it inside out and stuff it with rice. Secure it again with an elastic band. Tie it in the middle to make the snowman's body.
- Cut off half of the remaining part of the sock. Fold one end and tie the other one. Put the resulting hat on the snowman's head.
- Cut two strips from the red fabric. Use them to mask the joints.
- Glue on eyes, nose, buttons and other decorative elements if necessary.
Champagne and Candy Pineapple
This craft can be presented as a gift.
To create it you need the following tools:
- bottle of champagne;
- hot gun;
- candies;
- corrugated green paper 22*22 cm and 10*12 cm;
- Aspedistra leaf.
Algorithm for creating a product:
- Glue the two ends of the corrugated paper together and place it on the bottle.
- Measure a leaf of aspedistra around the neck of the bottle. Cut and glue along the edge of the corrugated paper.
- Using glue, attach the ends of the candies to one side. Stick them to the main part of the bottle. Decorate the neck with artificial pineapple leaves. They should be made from aspedistrum leaves.
Panel of threads and nails
A great gift for Valentine's Day.
For preparation you will need:
- plywood;
- wood stain;
- white and red threads;
- varnish;
- brush;
- hammer;
- nails;
- scissors;
- gloves.
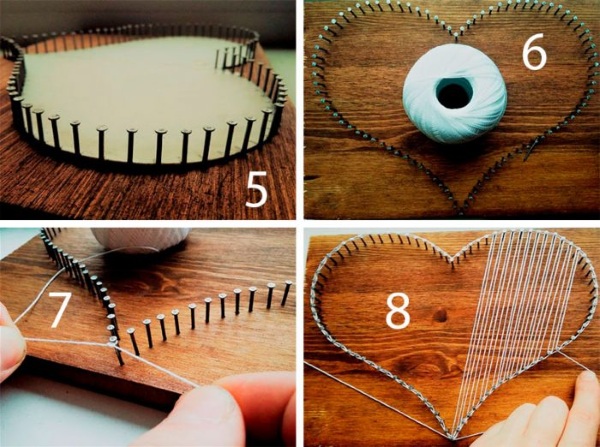
Algorithm for creating a fake:
- Cover the plywood with stain. Dry.
- Apply several layers of varnish. And also let it dry.
- Draw a heart on the plywood and nail it with nails. Tie the end of the threads to one nail and wrap them around the others.
Ribbon brooch
A beautiful brooch is an excellent gift option.
To make the decoration you need to prepare:
- strips of satin ribbon 16*4 cm 2pcs; 7.5*2.5 cm 4pcs; 14*2.5 cm; 22*2.5 cm; 18*4 cm;
- brooch decoration;
- thread and needle;
- safety pins;
- pin.
Afterwards, you need to do the following:
- Treat all edges of the pieces with fire.
- Fold two strips 16 cm long. Bend the corner, lift the tape up, bend it 90° and fold the bottom part of the strip back. Secure with a needle. Fold the second section symmetrically. Connect together with a thread and needle, pull to gather the seam.
- Fold the 7.5 cm pieces in half and secure with a pin. Glue the edges.
- Fold the 18 cm ribbon in half, mark the middle. Unfold and bend the edges, glue them. Use a thread and a needle to bend the edges in the middle by 0.5 cm.
- Repeat the manipulation with a 14 cm long section.
- Sew the 2 previous pieces together in the center. Glue the pieces made from 7.5 cm long ribbon to the back so that they stick out from under the base.
- Glue or sew the decorative center. Attach a pin to the back of the resulting brooch.
Balloon Decorations for Kids Birthday Party
One of the safest ways to create a festive mood is to decorate with balloons. To do this, you need to buy 1 small, 4 medium and 5 large balloons.
Afterwards you need to do the following:
- Inflate all the balloons.
- Tie the middle pieces together.
- Repeat the previous steps with large balls. Collect the chamomile.
Place cards
Such decorations will help guests to sit comfortably at the tables.
To create them, you will need the following materials:
- paper of different colors;
- printed names of guests;
- scissors;
- double-sided tape;
- hole punch.
After preparation, you should proceed to follow the following instructions:
- Take white thick paper, cut into rectangles. Fold the cards.
- Make a decorative element from colored paper. To do this, cut out small rectangles, process the edge with a hole punch. Glue to the base with double-sided tape.
- Cut out the names of the guests and attach them to the cards.
Stylish bracelet for a girlfriend
You can make a beautiful stylish bracelet yourself. To do this, you need to prepare a wide elastic band that easily fits your hand when pulled tight, beads of different sizes, a thread with a needle.
The creation process is a sequence of actions:
- Sew the edges of the elastic.
- Stretch an elastic band around any object.
- Using a thread and a needle, sew on the beads. They should be placed randomly to make the bracelet stylish.
How to make brooches for May 9 using kanzashi technique
The instructions below will tell you how to make a DIY brooch for May 9th.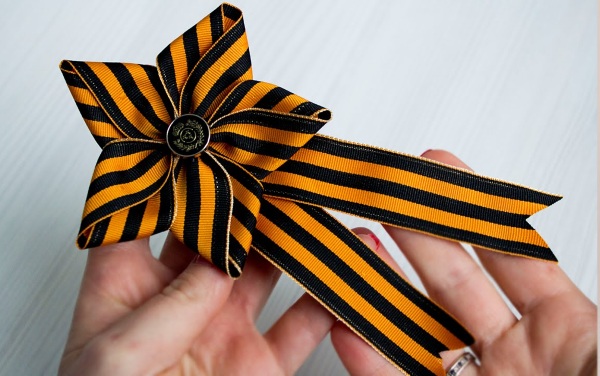
Before you begin, you need to prepare the following tools:
- St. George's ribbon, 26 cm long;
- pieces of satin ribbon: 3 white, 2 red, 2 blue;
- tweezers;
- lighter.
The process of creating the craft:
- Take a section. Fold it first in the middle at a 90® angle and bend it again. Clamp with tweezers. Fold it in half vertically. Heal and bend the bottom again. Finish the edge with a lighter. Make petals from all the remaining sections.
- Fold the St. George ribbon. Glue it in the middle.
- Glue the edges of petals of the same color.
- Form a spikelet from the previous blanks and glue it to the St. George ribbon.
Easter crafts from chenille wire
You can use beautiful little baskets as egg stands, which are easy to make yourself.
To create them you will need the following tools:
- Take the wire. Step back from the edge about 15 cm and twist. As a result, you should get a ring.
- Place a cocktail stick on the attachment point, pressing it tightly against the ring. Twist it to the end.
- Connect a new wire to the end of the previous one. Continue winding using the previous strategy. Continue manipulation until the entire ring is decorated.
- Attach 6 wires to the resulting base of the craft. They should be located symmetrically.
- Attach a drinking straw to each wire and make spirals.
- Step back from the spiral 2/3 of the length and connect it to the wire located next to it, leaving 1/3 at the base. Attach the end to the bottom. Process all the spirals in this way.
- Add another wire to the remaining tail. Make a handle for the basket. Attach another wire and wrap the handle to make it more voluminous.
Easter eggs made of paper and plasticine
The algorithm for creating products using origami will tell you how to make a craft with your own hands. At first glance, making an Easter egg using this technique may seem difficult. However, if you strictly follow all the instructions below, the process will seem easy. To create an egg, you need scissors and colored paper.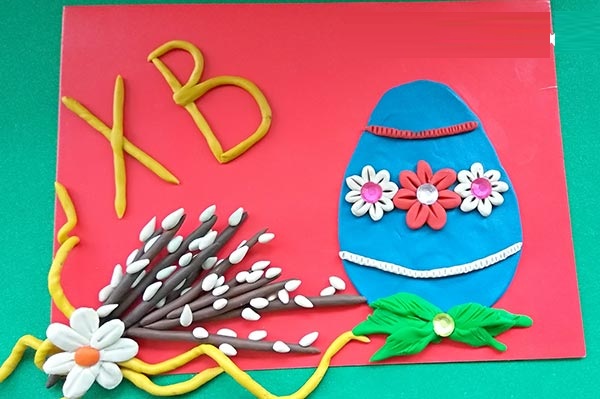
Next you need to follow the algorithm:
- Fold the sheet of paper in half. Cut. Repeat this manipulation with the already cut paper 3 more times.
- The resulting small leaves need to be folded in half lengthwise.
- Bend the previous piece along the width, unbend it. And fold the edges to the resulting mark so that you get a triangle.
- Fold the bottom corners, and then the entire base.
- Fold the triangle in half again.
- Place the two blanks together and connect them with another triangle, pushing their edges into the pocket. Attach the blank again and repeat the previous manipulation. In this case, the connection should lead to the formation of a third row.
- Using a similar method, you should make an egg.
It is easy to make a beautiful Easter card using plasticine.
The basic tools and materials you will need are:
- sheet of cardboard;
- marker;
- plasticine.
After that you need to follow the algorithm of actions:
- Cut out a sheet of paper in the shape of an egg. You can use colored cardboard.
- Using brown or yellow plasticine, mold a kulich and attach it to the paper. Make the top of the kulich white.
- Make many small eggs and place them near the Easter cake. If necessary, make a plate or a base.
- Make the letters "X" and "B" from plasticine. Also attach them to the workpiece.
Pop-up Valentine cards
To congratulate a loved one on Valentine's Day, you should make a beautiful 3D card. Such a greeting will bring more joy than a purchased product.
To create a postcard you will need the following materials:
- paper 10*10 cm;
- cardboard:
- 2 decorative ropes;
- small bow;
- glue;
- marker.
The process is presented in the form of instructions:
- Make markings. To do this, you need to fold the sheet in half first vertically and horizontally, and then diagonally.
- Fold two opposite corners so that the square folds with four edges toward the center.
- Fold the square again. On the resulting triangle, mark the drawing with a pencil and cut it off. Make 7 similar hearts.
- Glue all the pieces together.
- Make the base of the card from cardboard. Round off the edges a little with scissors.
- Glue the ropes inside the card. You can do this by cutting small squares of sticky tape.
- Glue a bow on the outside.
- Attach hearts inside the blank using glue. Add an inscription if necessary.
Postcard for mom on March 8
The instructions below will tell you how to make a craft with your own hands to congratulate your mother on International Women's Day.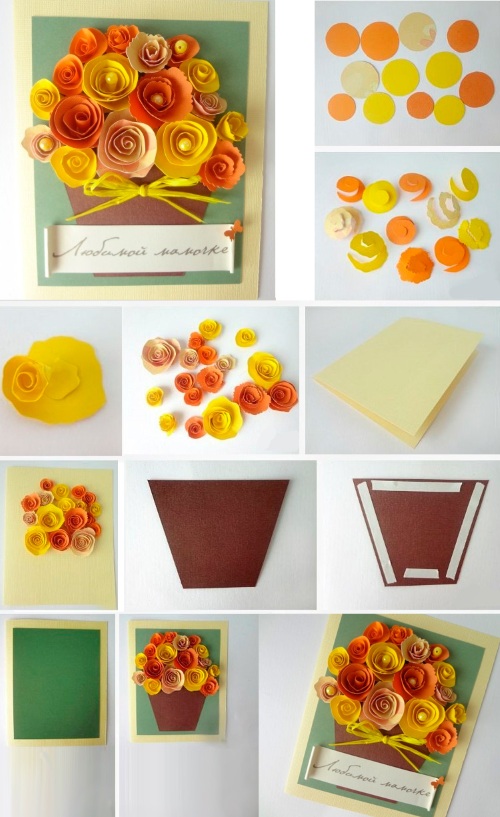
To create this craft you will need the following materials:
- scissors;
- A4 sheet;
- colored paper;
- decorative paper;
- glue.
The process of creating a greeting is a sequence of steps:
- Fold the A4 sheet in half. This will be the base of the card.
- Take a sheet of colored paper. It is desirable that it is pink or red. Using a regular lid and a pencil, mark 12 such circles.
- In 11 blanks you need to make a cut. Apply glue to the left of it and connect it to the right edge.
- Take the untouched circle in your hand. Glue 5 petals to it, which were obtained as a result of manipulations from the previous step.
- Make the next row. You need to glue 3 petals. They should be placed so that the joints are not visible. Glue 3 more petals on top.
- Use scissors to bend the edges of the petals.
- Cut out a pot from decorative paper. Make 2 leaves from a green leaf.
- Glue all the previous blanks to the cardboard one by one.
3D postcard
A beautiful unusual postcard made with your own hands can be a great addition to any gift. The main tools you need are a backing; 6 multi-colored sheets 4*15 cm; glue. It is easy to make a 3D postcard yourself.
To do this, you just need to follow the sequence of the following steps:
- Lay out the strips vertically. Apply glue to one side and fasten to the adjacent paper. Fold the resulting multi-colored sheet like an accordion. Pull it out vertically. Fold in half and apply glue to the middle.
- Take the base. Glue the accordion-folded paper to the top.
- Use a marker to draw a handle. You can add various stickers, pictures and inscriptions to the card.
The many algorithms described in the article will tell you how to make an interesting craft yourself.
Article formatting: Vladimir the Great
DIY Crafts Videos
32 decor ideas from improvised means: