Crafts made from colored paper are a wonderful form of creativity for the harmonious development of preschoolers and primary school students, allowing them to create colorful appliques, paintings, postcards and original gifts with their own hands.
Necessary materials and tools
To work with colored paper, you will need the following tools and materials:
- a set of paper of different colors and patterns (plain, with elements, glitter);
- colored cardboard (to create a strong base for the craft);
- classic and shaped scissors with blunt tips (for the safety of the child);
- a simple pencil and eraser (for drawing and sketching);
- stationery liquid glue or in the form of a pencil;
- liquid glue brush;
- felt-tip pens or colored pens (for drawing);
- ready-made eyes for handicrafts;
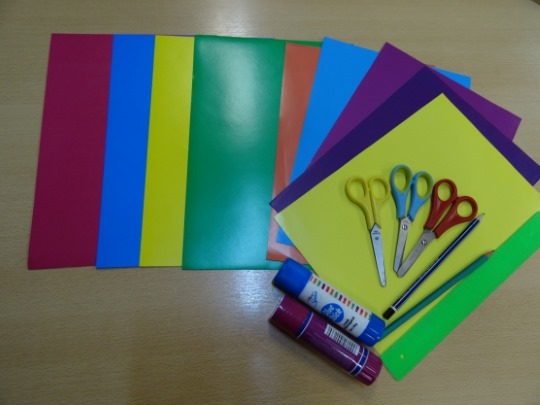
- double-sided tape (for creating three-dimensional elements);
- paper clips for fixing;
- stapler and staples (if necessary);
- rhinestones on velcro (for postcards).
Colored paper applications for preschoolers
Crafts made from colored paper are the best means for developing children's cognitive and mental abilities.
By creating appliques using templates, the child learns:
- distinguish colors;
- compare objects;
- identify different shapes;
- interact with scissors;
- hold small objects.
The process of cutting and gluing various parts actively develops fine motor skills of the hands, which has a positive effect on the speech development of the baby.
Any child can make an applique from colored pieces of paper, the main thing is that the technique is appropriate for his age.
Applications are:
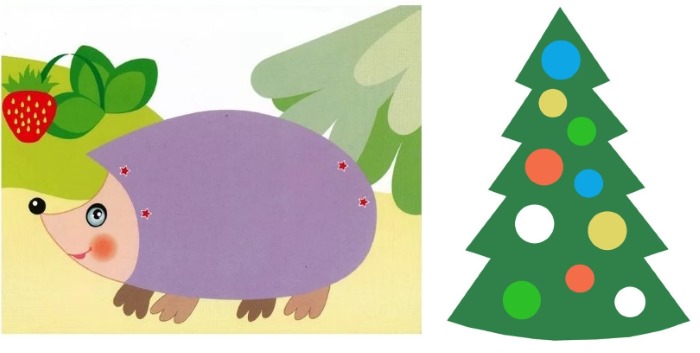
- Simple, flat for early development of small children 1-2 years old. Such crafts are usually created from several large and bright elements glued onto the background.
Examples of work for joint creativity of parents with children: a hedgehog, to which you need to glue needles cut out of black paper, or a New Year tree, which needs to be decorated (by gluing on multi-colored balls and a star).
The game requires the participation of adults, they should prepare the materials in advance, print the background in color, cut out all the details from paper, and ask the child to glue them, since working with scissors is not safe for young children.
Example of compositions in the photo:
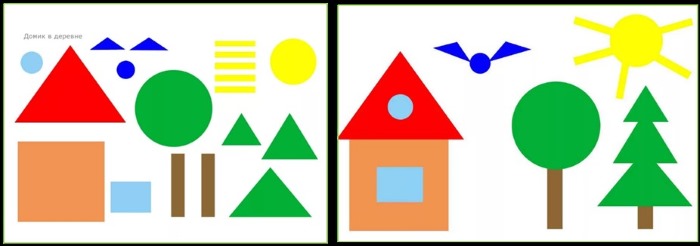
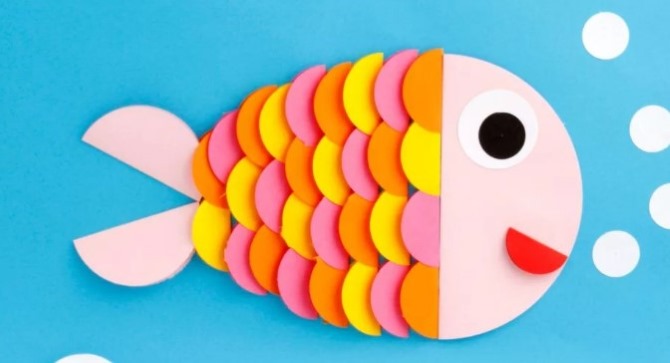
- Complex and multi-layered images from colored paper are great for children aged 2-4 years. At this age, children create appliques almost independently, using already cut out parts. In order for the child to understand the final result of his work, a template should be in front of his eyes.
At this age, shapes, colors and the relationship between two elements are actively learned, so it is recommended to select the appropriate appliques. For example, assemble and glue the composition "House in the Village", naming the shapes or make a fish from multi-colored circles, using blanks. Examples of work:
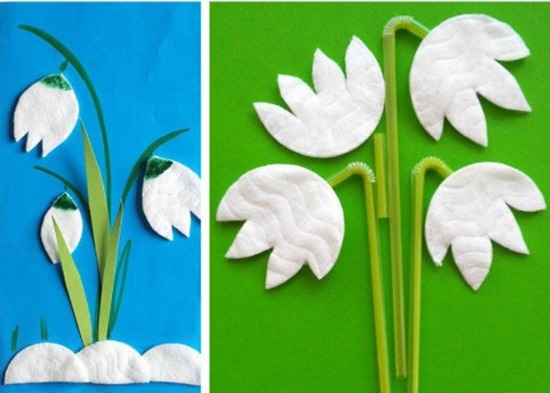
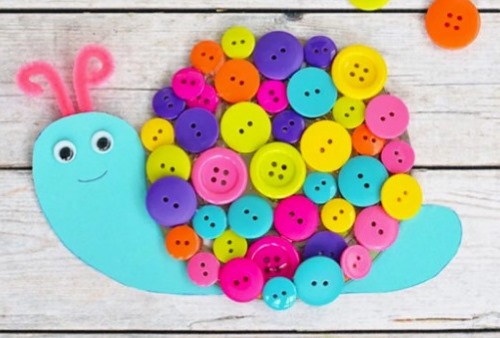
- Combined crafts made of paper with cotton wool, rhinestones, sticks, tubes, seeds, cereals are more complex, but no less interesting. The child has the opportunity to combine different structures into a single whole.
It is recommended to start making these applications from the age of 3 (at this age, children no longer taste everything and can build short logical chains). Examples of crafts - a composition "Snowdrops" from cotton pads, tubes and colored paper or "Snail" from colored cardboard and buttons, as in the photographs:
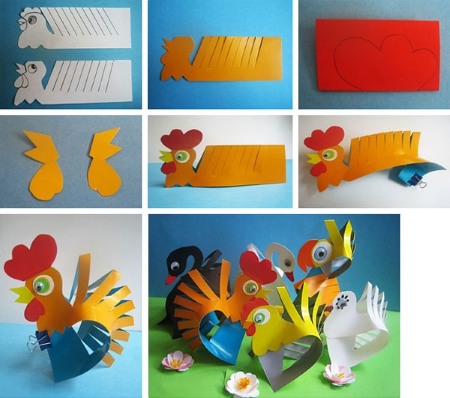
- Volumetric applications from colored paper - some of the most beautiful and memorable. They can be in the form of a bouquet of flowers, vehicles, dolls, landscapes. And are great as a gift to parents on a holiday.
Such works are recommended for preschoolers of senior groups in kindergarten. Three-dimensional crafts develop thinking, imagination, intelligence, logic and perseverance of the child.
- Origami – the ancient Chinese art of folding paper figures. This is a real treasure among educational activities. Since the folding technique requires attentiveness, patience and perseverance from the child, it is recommended to start at 4-5 years of age, creating large simple animal figures.
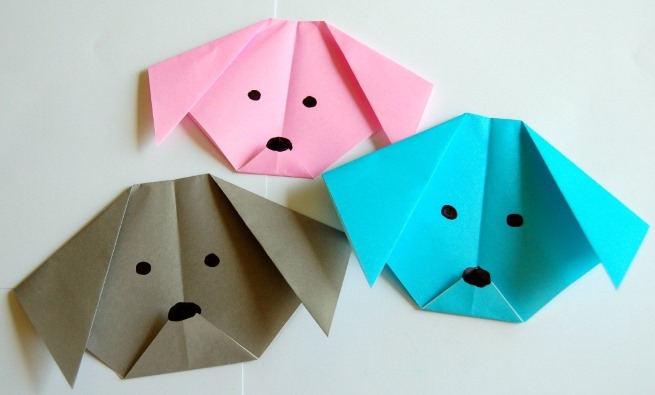
Example of figures in the image above.
Crafts from colored paper for children of grades 1-2
Crafts made from colored paper (for children this is the most multifaceted form of creativity) are studied in detail in elementary school classes in “technology”.
It is there that children learn the peculiarities of working with different types of paper, learn to create three-dimensional appliques, various figures and pictures. Children aged 7-8 years already have excellent skills in cutting with scissors, can independently draw a template and make any craft, if an adult helps a little.
Postcard "Owl"
To make it you will need:
- print the suggested template on white paper and cut it out with scissors;
- transfer the body template onto brown paper and trace it, make 2 parts;
- cut out the belly from lighter paper and glue it to the body;
- cut out the wings and the face with eyes, beak;
- glue all the parts onto the owl;
- connect the two bodies (the front and back of the card) and glue them together in the area of the owl’s head (between the ears);
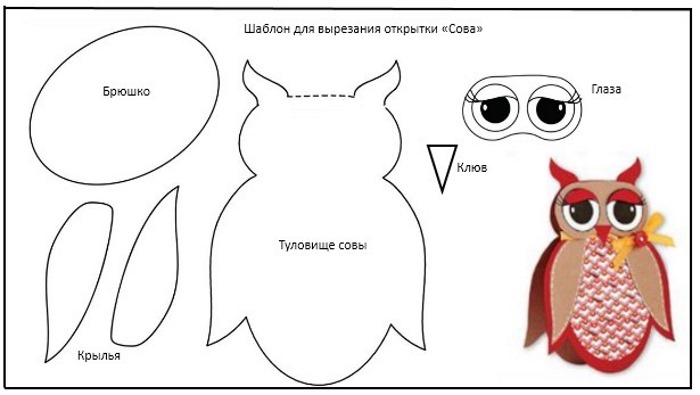
- cut out a strip of yellow paper, make a bow from it and glue it to the bird’s wing;
- All that's left is to sign the card and it's ready.
Multicolored paper slippers
This is another fun craft for primary school students. Moreover, you can make one slipper or two. Making two identical slippers will be a little more difficult for a child, but more interesting, since you need to repeat your own work.
To make them yourself, you will need:
- Trace the baby's foot (or both) onto a sheet of colored paper (cardboard) and cut out the footprints.
- From a different shade of paper, cut out several thin strips (or two wide ones) and glue each strip to the slipper on both sides (forming the toe of the slipper).
- Decorate the slippers with flowers, leaves, and hearts cut out of colored paper.
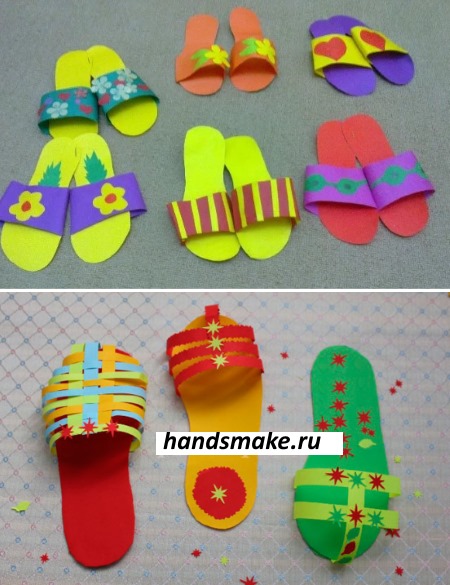
Such paper shoes can be stored for a long time in a family or children's photo album, reminding relatives of the periods of the baby's growth. The main thing is not to forget to sign the child's age and the size of his foot.
Step by step instructions for making colorful paper crafts for the holidays
The most valuable gift from a child is one made with your own hands. A postcard, a picture, a craft made from colored paper or cardboard sometimes requires a lot of effort and time to make, which further increases its importance for parents.
Moreover, involving children in creating handmade gifts for friends and relatives is a significant role in education. For each family member, the child is able to make the crafts recommended below using the attached templates, but the help of an adult will not be superfluous.
For mom
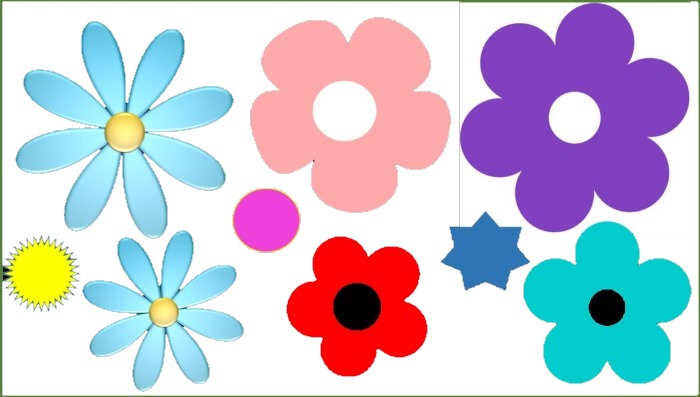
Crafts made from colored paper (for children, creating them is a fun and educational activity), especially in the form of bouquets of flowers, are a great way to congratulate your mother on her name day, birthday or Mother's Day.
Paper bouquets can be very diverse (from daisies, daffodils, calla lilies, cornflowers, tulips), but the most interesting and unusual idea is a bouquet of colored palms of a son or daughter (or both). Mom will want to keep such a gift for many years. This is how this work looks:
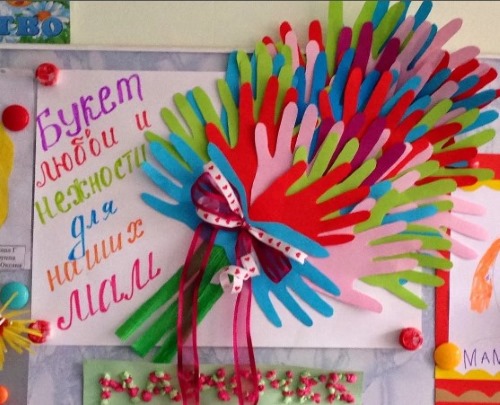
Algorithm for making a bouquet from children's "palms":
- Take several colors of paper, 2 sheets of each (red, pink, blue, light blue, green, yellow, orange), satin ribbon, a sheet of white cardboard, glue, paper clips, a pencil, scissors and felt-tip pens.
- Stack the sheets in a stack of 3 pieces and secure with staples along the edges on each side.
- On each stack of papers, draw a palm (place it on a sheet of paper and trace it with a pencil).
- Cut out the outline of the palm (thanks to folding the paper into stacks, the process of cutting out the palms will take a little time).
- Cut strips from green paper (these will be the stems of the flowers), 3-5 pieces in total.
- Place a sheet of white cardboard (or a sheet of Whatman paper) in front of you and glue the stems of the bouquet.
- Then glue 2 blue palm prints and gradually glue the rest of the "colored hands", moving upwards from the stems (as if expanding the bouquet). It is necessary to apply glue only to a small area of the workpiece so that the "fingers" remain unattached and create the effect of movement.
- At the end, attach a ribbon with a bow.
- Make an inscription in the form of a “message to mom”.
Such a composition will preserve the “warmth of the baby’s hands” for a long time and will decorate the interior if placed in a frame.
Another interesting gift option for mom is a three-dimensional combined craft made of colored paper, a paper egg container and cocktail straws called "Flowerbed". Photo of the composition:
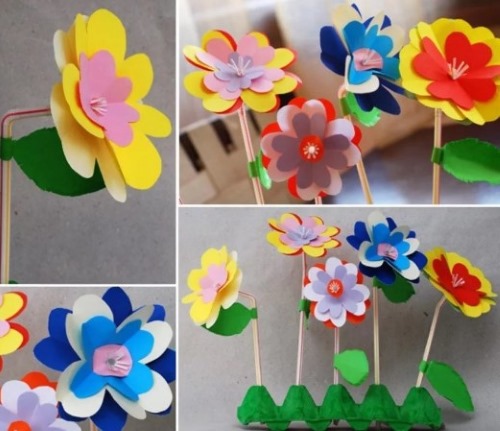
To repeat the composition, you will need:
- paints (watercolor or gouache);
- cocktail straws;
- colored paper (cardboard);
- manicure scissors;
- paper container from chicken eggs;
- pencil.
Manufacturing:
- Cut out the colored buds using the templates below. Cut a 5mm diameter hole in the center of the figures.
- Next, paint the paper container green and let it dry. Make small holes for the tubes.
- Cut out 10 leaves from green paper and glue 2 leaves to 5 tubes.
- Then assemble a bud of one flower from 3-4 blanks and put it on the tube. To prevent the bud from falling apart, the tip of the tube should be carefully cut with manicure scissors into several strips (these will be the stamens of the flower), and on the back of the bud, glue a strip of green paper around the tube at the base of the flower. Assemble 4 more flowers in the same way.
- Insert the finished flowers into the holes of the container. The craft is ready.
It turns out very beautiful, strong and stable.
For dad
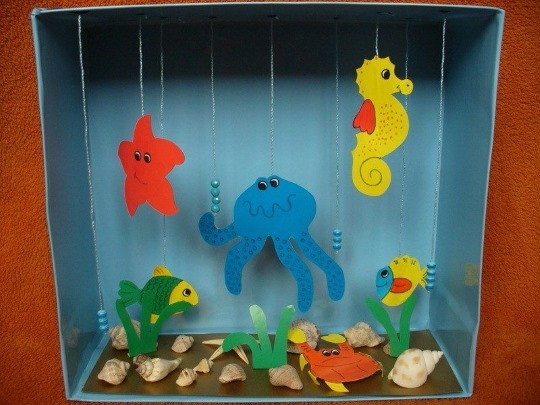
Most dads like to watch war movies, fishing, football and shows about cars. These are the ideas that are recommended for use in "male" compositions. For example, fishing enthusiasts will really like a three-dimensional work of a son or daughter in the form of fish in a pond or aquarium, as in the following photos:
To make a paper aquarium you will need:
- Colored paper and colored cardboard.
- Box.
- Glue.
- Scissors.
- Pencil.
- For decoration: beads, shells, buttons, threads, toothpicks or matches.
Step-by-step production:
- Cover the inside of the box with blue paper.
- Glue a strip of brown or beige paper (imitation sand) to the bottom of the aquarium.
- Cut out different fish from colored cardboard (using a template), draw eyes on them and hang them in a box (to do this, make a small hole in the fish and thread a string through the hole in the “roof” of the aquarium and tie it to a match).
- Cut out algae from green paper and glue them inside the aquarium.
- Decorate the bottom with shells and colored stones or buttons (it is better to glue them)
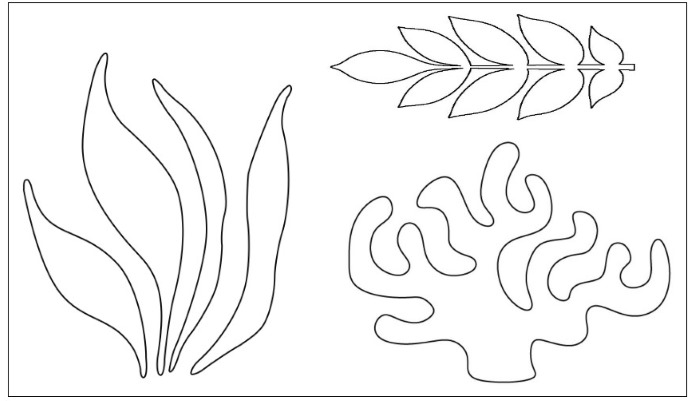
Templates for cutting out fish and seaweed:

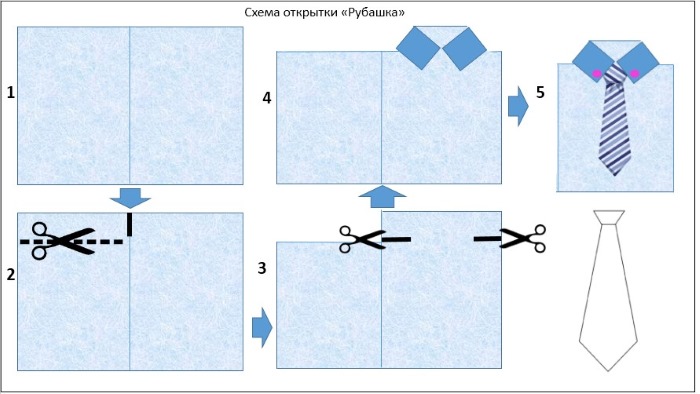
If dad works in a large company or is an office worker, he will appreciate a gift card in the form of a suit or shirt (the main elements of which should be a bright shirt and a colorful tie).
Making this card is as easy as pie if you follow the pattern:
- Fold a sheet of colored thick paper or cardboard in half (you can use double-sided scrapbooking paper).
- Cut a rectangle 7-8 cm wide from one half of the sheet.
- Make symmetrical cuts on the other part of the sheet.
- Fold the cut parts of the sheet inward (this will be the shirt collar).
- From another colored sheet, cut out a tie using the attached template and glue it, as well as 2 buttons to the edges of the collar.
- Fold the card and write a wish to dad.
The scheme described:
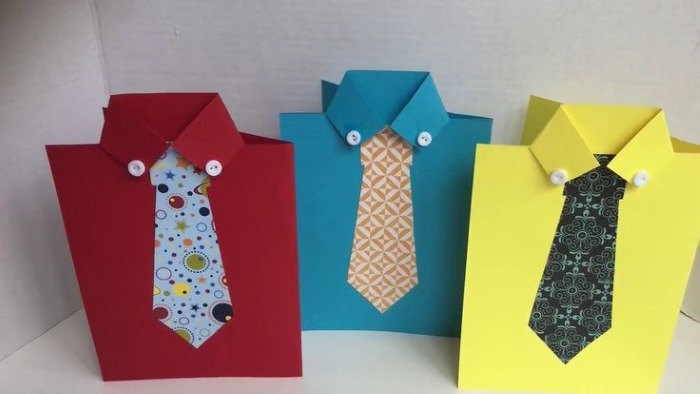
These are the kind of original postcards you can get.
For grandma
Crafts made from colored paper (for children this is an affordable opportunity to please their relatives every day) are a very pleasant sign of attention for grandparents.
Grandmothers, like mothers, love flowers and often grow them on the windowsill, so a wonderful gift would be a voluminous composition of paper plants, for example, “Forget-me-nots” or “Bouquet in a mug”, as in the photo:
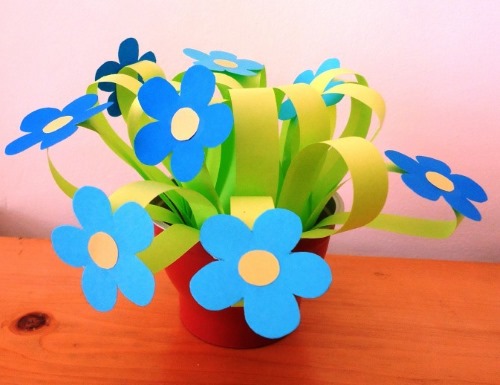
To make the Forget-Me-Nots craft you will need:
- blue, green and yellow paper;
- scissors and glue;
- empty yogurt jar;
- pencil.
Sequence of actions:
- Cut out large flower buds from blue paper, having first drawn them with a pencil (7-8 pieces).
- Cut out circles from yellow paper and glue them into the center of the forget-me-nots.
- Cut a sheet of green paper into equal strips (leave 5 cm without cutting all the way through).
- Fold the free edge of each strip inward and glue.
- Coat one edge of the green leaf with glue and roll it into a cylinder. The result should be a cylinder with a fluffy top.
- Glue forget-me-nots to the green stripes.
- Place the finished bouquet in a yogurt jar. The craft for grandma is ready.
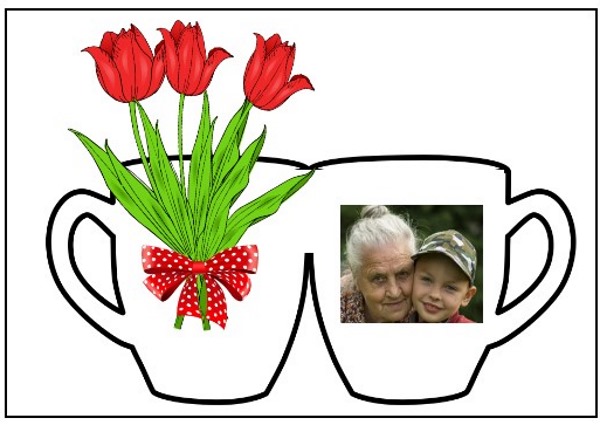
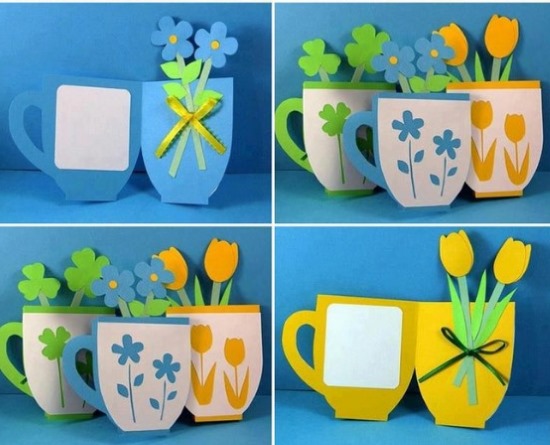
To make a “Bouquet in a Mug” card with your own hands, you need to prepare:
- set of colored paper (double-sided);
- a sheet of white paper;
- photo of the author of the work (which will be inside the postcard);
- satin ribbon;
- glue, scissors, pencil.
Step by step execution:
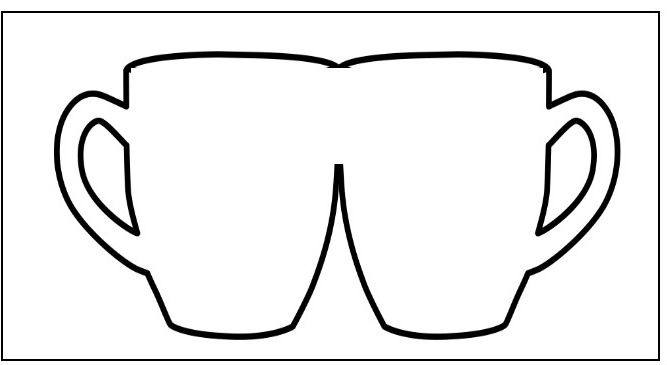
- Using the template, cut out a mug from a sheet of colored paper.
- Glue a photo of the author of the craft to the right side. And glue 3 paper flowers cut out of green (stems and leaves) and colored (buds) paper to the left side of the mug. Use the attached diagram as a guide:
- Fold the blank in the center so that the photo and bouquet remain inside the mug.
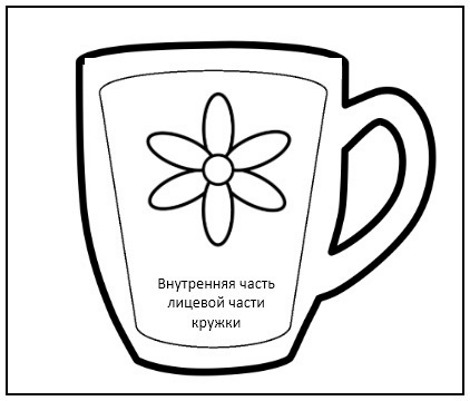
- Next, you need to decorate the front of the card. From a sheet of white paper, cut out the inner part of the front of the mug (in the central part of which you need to cut out flowers with small scissors), as in the drawing:
- Glue the white blank to the front of the card. A beautiful bouquet for grandma is ready.
For Grandpa
A craft made of colored paper for grandfather can be made similarly to the one for dad. It is better to slightly modify the card in the form of a shirt to look like a military uniform.
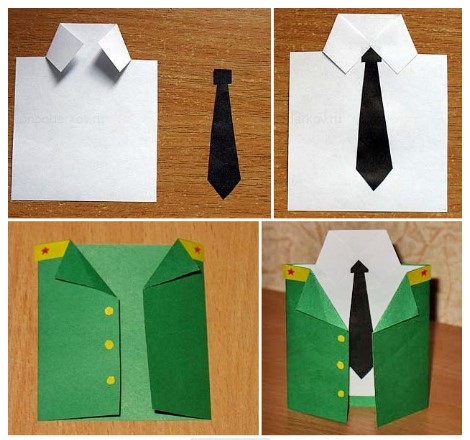
To do this:
- Make a white shirt with a black tie (step-by-step instructions are included above).
- Wrap it in a green "jacket" (cut out of green paper and decorated with yellow shoulder straps). You will get a "Military Uniform" postcard. Example of work:
For your birthday
Crafts from colored paper for children are a wonderful gift for the birthday of peers. They can be made in the form of a large cake or an unusual postcard with a surprise and wishes. To make the gift neat, it is recommended to make it together with an adult family member.
If your child likes the idea of a paper cake as a gift, you can suggest that he or she draw a sketch of the cake and make it themselves, or use the master class described below.
For the cake card (as in the photo) you should prepare:
- a set of colored paper or cardboard;
- double sided tape;
- stationery.
Photo of the postcard being made:
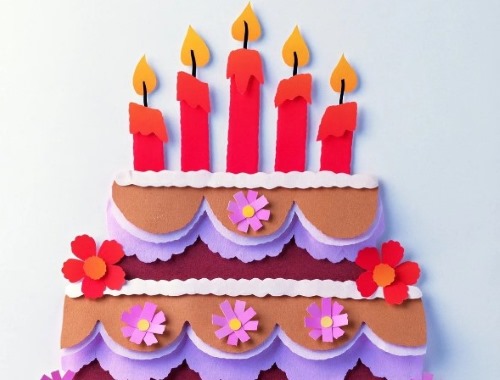
The process of making the cake:
- Make the base of the postcard from colored cardboard (to do this, take a sheet of double-sided cardboard or fold a large sheet in half).
- Cut out 2 rectangles from purple paper (one larger, the other slightly smaller), this will be the base of the cake.
- Glue the "purple cake layers" onto a piece of cardboard in the shape of a pyramid.
- Cut out “cream” stripes from lilac, white and beige paper, using the drawing as a guide.
- Glue the first layer of “lilac cream” to the “cakes” with glue, then use double-sided tape to glue the second and third layers (this will give the applique a three-dimensional look).
- Cut out candles from red or orange paper and glue them to the top layer with double-sided tape.
- Finish the cake by decorating it with flowers and narrow strips of “cream”, which should be glued on with glue.
- Write a congratulation and a wish with the signature of the author of the work. Now you can give it as a gift.
To make the cake more impressive, it is recommended to use paper with glitter and pictures in the work. The birthday boy will definitely want to eat such a gift.
Also for a birthday you can make an unusual card with many wishes on balloons, an example in the picture:
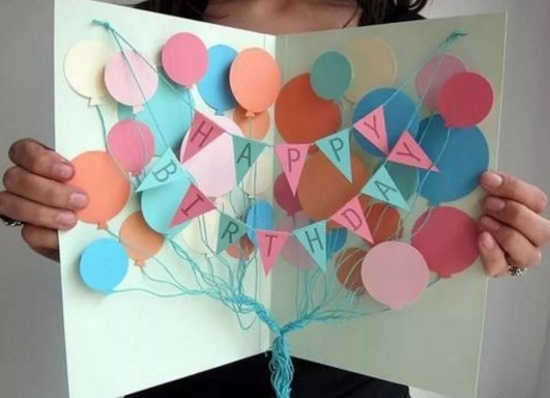
To make a card with balloons, you will need:
- Glue 2 sheets of white or colored cardboard together and fold them into a book-shaped postcard.
- Cut out a lot of balls from paper of different colors and write a wish for the birthday boy on each one.
- Glue some of the balloons to the inside of the card using glue, and attach a few balloons using double-sided tape (this will create an airy effect to the composition).
- Tie or glue a thread to each ball and collect them by tying them with a ribbon.
- Finally, make a "Happy Birthday" garland and glue it on top of the balloons.
- Sign the front of the card and the gift is ready.
New Year and Christmas crafts
Various crafts for the New Year are always joyfully made by children of all ages, as this creates a festive mood in anticipation of a miracle. For the main celebration of the year, a green fluffy tree with garlands and toys is needed. And this is exactly what children can make themselves, any size from colored paper, using their palms.
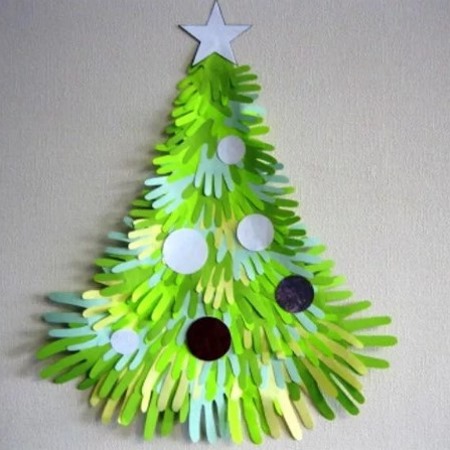
To make the tree bright and beautiful (as in the picture below), you need to:
- a sheet of Whatman paper and any newspaper;
- several shades of green and blue paper (5 sheets of each), as well as red (for the star);
- glue and brush;
- scissors and a pencil.
The process of making a Christmas tree:
- Place your palm on each sheet of green and blue paper and trace around it with a pencil.
- Cut out 30 paper palms.
- Glue a cone cut out of newspaper onto a sheet of Whatman paper (this will be the base of the tree).
- Glue the thick green palms in the shape of a Christmas tree onto the newspaper cone (glue should be applied only to the base of the paper palm, and the fingers should remain unglued, this will visually “revive” the composition).
- Glue a red star to the top.
- If desired, decorate the tree with paper toys and garlands.
On March 8th
For the International 8th of March holiday, it is customary to give mothers, grandmothers and classmates the first spring flowers (daffodils, tulips, snowdrops, mimosa). To congratulate loved ones, boys have a wonderful opportunity to make a paper basket of flowers using the following master class.
Options for greeting baskets made from colored paper are shown in the photographs:
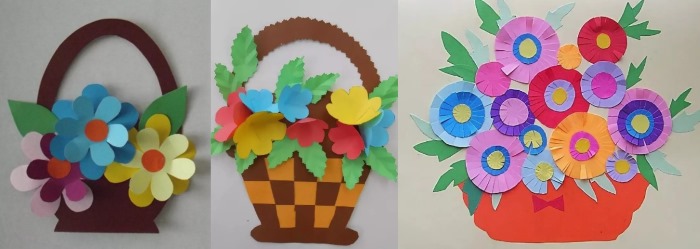
To create such a gift for March 8, you can draw your own sketch of a bouquet or use the suggested template. This will save time for the boys and make several similar gifts to congratulate all the women in the family.
Template for cutting out the composition details:
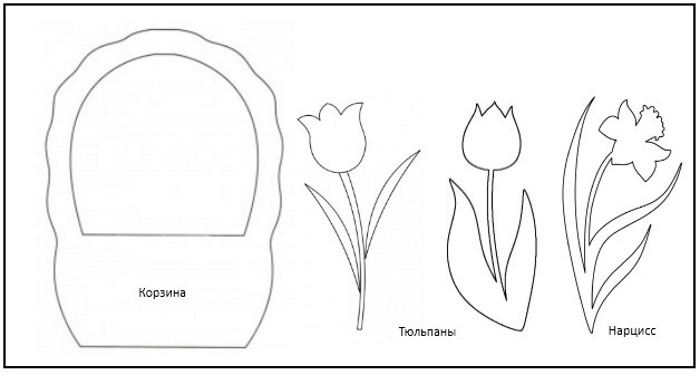
Instructions for the template:
- Cut out 2 basket parts from brown paper and draw weaving on both parts with a felt-tip pen.
- Cut out flower stems from green paper (3-5 stems per basket).
- Cut out tulip buds from red paper and daffodils from yellow paper.
- Glue a flower bud to each stem.
- Glue 3 or 5 flowers to the back of one basket piece.
- Connect the two parts of the basket and glue them along the outline.
- Make a bow from a strip of paper and glue it to the handle.
- Sign to whom the gift is intended.
By February 23rd
The best composition for congratulating classmates, dads and grandfathers on Defender of the Fatherland Day is a themed homemade craft (in the form of a tank, truck or the “Military Uniform” postcard, the description of which is given above).
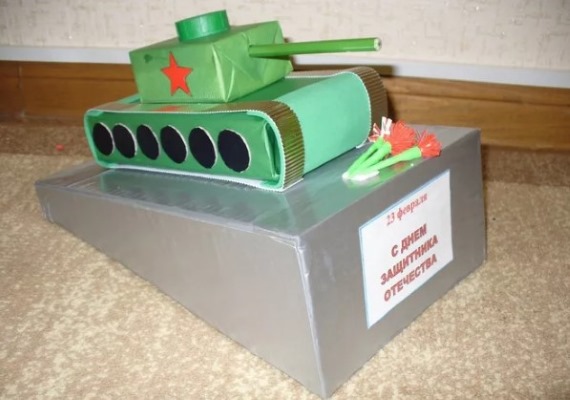
Step by step guide to making a tank:
- Prepare 3 boxes (different sizes), a plastic bottle cap, colored paper (green, black, gray and red) and a green pencil.
- Cover 2 boxes with green paper (tank base).
- Cut out 12 black circles (wheels) from black paper and glue them to the sides of the bottom box of the tank.
- To make the “tracks”, you will need to cut 2 strips from corrugated paper and wrap them around the bottom of the tank, securing them with glue.
- Glue a red star and a lid to the top of the tank and insert a pencil (barrel).
- Glue the two parts of the tank together.
- Make a pedestal by cutting out a trapezoidal shape from the third box and covering it with grey paper.
- Place the tank on a pedestal, securing it with double-sided tape.
- Place some paper flowers in front of the tank.
- Make a sign with congratulations and stick it on the composition. The craft is ready.
Paper colored crafts made by children are not only a fun activity, but also a great way to develop creativity in a child, which will help facilitate further learning at school.
Article formatting: Natalie Podolskaya
Video about crafts from colored paper
Crafts from colored paper for children - the best ideas in this video: