Anyone can quickly and beautifully create crafts from natural materials with their own hands. Nowadays, it is convenient, simple and practical, because natural materials are available to everyone.
Craft options
Crafts come in all sorts of varieties. Some of them require expensive materials bought in stores. You can make beautiful works from cheap or natural materials. The choice is huge: oshibana, straw figures or cutting out patterns from fruit, for example.
From natural materials
To make the craft, you will need different materials: leaves and grass, flowers and stones, pine cones and straw, as well as vegetables and fruits. All of this can be easily found outside, especially in the summer. For work, you will need scissors, a stationery knife, paper and glue.
From acorns
Acorns are usually found near any oak tree. Acorns themselves are very small, so it is worth stocking up on them right away to make large crafts. You can try making "eggs in nests". For this you will need acorn caps, plasticine (clay will also work), good superglue (not PVA), string and dried grass.
Grass can be imitated with green threads.
Manufacturing stages:
- Take some plasticine and mold it into balls that resemble eggs.
- Then put grass and balls into the acorn cap. All this is fastened with glue.
- You can glue a rope to the bottom of the hat to hang the decoration.
Acorn hats are also great for making pictures. You will also need paper and glue. It's simple: a figure is laid out on paper from the hats and glued. The picture is ready. The drawing can be simple - in the shape of a heart or a cat, for example.
Acorns are very easy to paint. To do this, take the inside of the acorn cap and paint it with acrylic or gouache. Acorns should first be dried (in the oven or in the sun).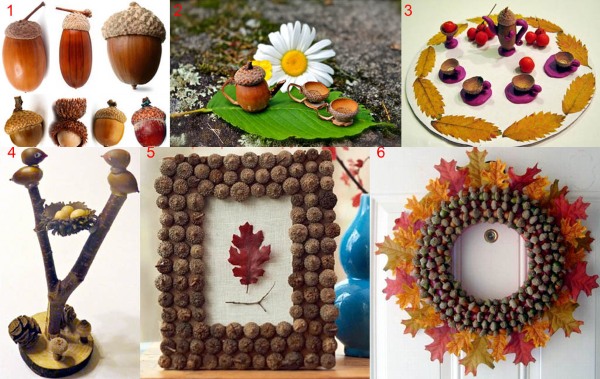
These crafts look very nice in some transparent vessel, where you can put pencils or flowers. Another option is to paint the inside of the hat, but immediately add PVA glue to the edges. The ingredients will begin to mix, and eventually a patterned picture will appear on the white glue. You can use hot glue to attach acorns to a vine wreath.
You can make another version of a small craft from natural materials with your own hands quickly and beautifully - cut off part of the acorn without touching the cap, and use the remaining recess for small objects or decorate it by putting a beaded flower there.
From chestnuts
Chestnut fruits are very similar to acorns, but have a more rounded shape. They do not have a cap, but it is very easy to make crafts from them. You can make beautiful figures with the help of plasticine and chestnuts. To make a snail, you need to mold a worm-like shape with a curved half from plasticine (it is worth making horns too - separate them with a knife or hands), and use a chestnut as a shell.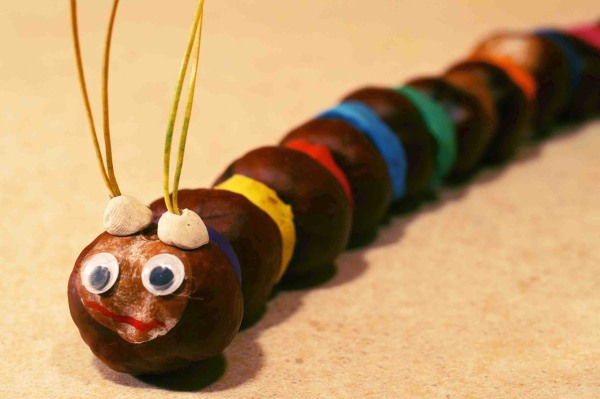
You can make a worm. It is made almost like a snail, but in this case you will need to take several fruits and put them on a worm made of plasticine or fasten chestnuts in the shape of a worm. If desired, you can mold eyes. Another interesting option: mushrooms from chestnut and acorn. The acorn in its shape is very similar to the stem of a mushroom. It can be glued to the chestnut using plasticine.
Topiary made of chestnuts is a very fascinating craft made from natural materials, quickly and beautifully made with your own hands, which is a small tree made from various materials, decorated with additional items.
To make it you will need:
- a stick, pencil or a thick roll of newspaper/paper wrapped with green or brown threads;
- flower pot;
- gypsum;
- ball (or any round object);
- chestnuts.
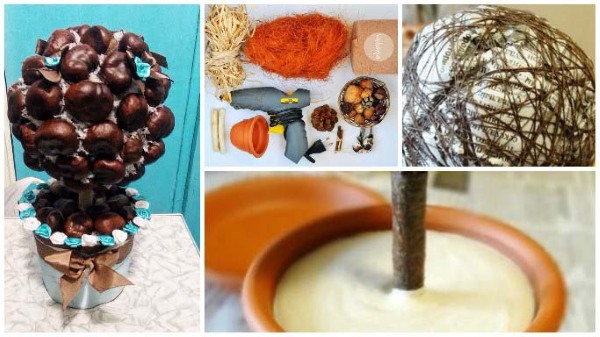
Manufacturing stages:
- First, the trunk is made: a stick or pencil needs to be wrapped in green threads and covered with green paper.
- A small ball is placed on the trunk, in which a cut is made in advance in order to connect it to the support stick.
- The resulting product is placed horizontally in a pot and filled with plaster so that the figure holds its shape.
- Then, using hot glue, cover the round top with chestnuts, shells, and acorns. The end result should be a craft that looks like a tree.
From flowers
Almost any flowers and leaves can be used to make herbariums. They are convenient to use for the ancient Japanese art of oshibana. The technique is "painting", but with flowers.
You will need:
- paper (preferably cardboard);
- any dried leaves and flowers (which you can dry yourself or buy at a craft store);
- scissors;
- glue.
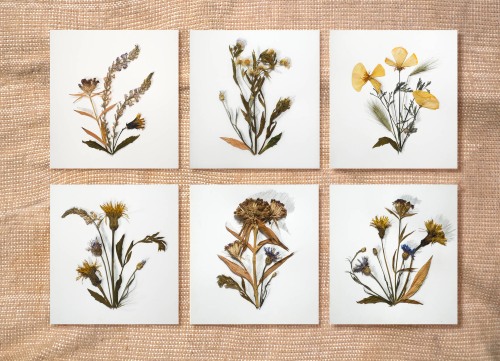
First of all, you need to come up with an image that needs to be "drawn" using plants and leaves. Then cut out the necessary shape, try it on paper and, if everything is OK, glue it.
Landscapes usually turn out well in the oshibana technique.
You can also use real flowers to make crafts. It is worth considering that the work will not last long. For this you will need floral sponges, scissors, flowers, glue and any fastener for the sponges. This can be a stick or a metal fishing line.
Stages of making the craft:
- Any desired shape is cut out of the sponge. For example, a heart.
- The form needs to be secured to a fishing line, a stand or a stick in a flower pot.
- Next, you can take any flowers and attach them all over the surface of the sponge.
From straw
Straw is a great material for making crafts from natural materials with your own hands. It is worth trying to make straw flowers quickly and beautifully. You just need to glue straw cuttings and crafts to the stems. To do this, you will first need straw ribbons, hot glue and scissors. Straw can be bought in a special store.
If desired, this natural material can be given almost any color:
- with the help of a hot iron, the golden straw changes color to brownish;
- boiling in a light solution of potassium permanganate promotes the appearance of a pinkish tint;
- baking soda diluted in water will make it even more golden;
- Hydrogen peroxide will lighten the yellow tint to a whitish color.
To make straw ribbons, simply smooth out the material with the blunt side of scissors.
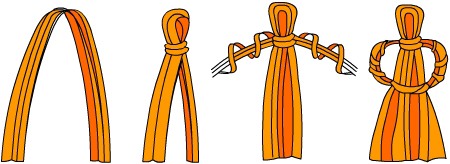
Straw can also be used for oshibana, for making "flowers" and dolls. To do this, take a straw, bend it in half, mark the head with wire, then mark the arms and legs and fasten them with fishing line. You will get a likeness of a person. For the craft, you can sew or knit clothes, make eyes from beads, and attach them to the wall.
From coffee beans
Roasted coffee beans are usually used to make flowers and paintings. You can also make a photo frame. You will need regular glue and any photo frame. It's simple: cover the entire surface with beans, and the craft is ready.
Coffee beans are also suitable for making a tree. The principle of execution is approximately the same as for a tree made of fresh flowers. Take foam plastic, which is covered with beans and attached to the trunk. The composition is decorated with ribbons, beads and many other decorative items.
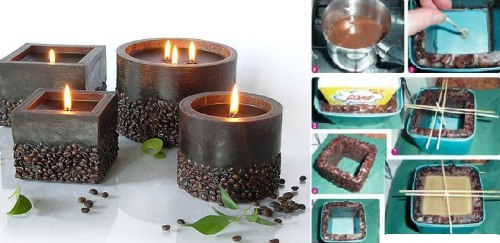
Coffee beans are often used to make soap or candles.
To make candles you will need:
- wax or paraffin in bars, which can be purchased at an art supply store (old household candles will also work);
- wick (cotton threads);
- coffee beans;
- cooking pot;
- stirring stick;
- candle mold;
- colors, flavors and other additives as desired.
Now you can move on to making coffee candles:
- Wax/paraffin bars or old candle remnants are cut into small pieces. This is necessary so that the mass cooks more easily and evenly. You can also grate the pieces.
- The resulting mass is placed on a steam bath, since the mass may burn under direct fire. You need to wait until the bars are completely melted. It is advisable to stir.
- Now you need to prepare the molds for future candles and wicks. In order to secure them, you need to take a pencil with a wick tied in the middle, put the pencil over the mold so that the thread is exactly in the middle, and the end reaches the bottom.
- Then you need to carefully pour the hot paraffin into the molds. Then you can add coffee beans (or before pouring). The main thing is that the mass is melted.
- Then you need to wait for it to harden completely. After that, take the candle out of the mold or, if that's what you originally planned, leave it in the vessel, then decorate everything as you wish. The candle is ready.
Almost the same can be done with soap making. To prepare it you need: soap base (even regular baby soap will do), coffee beans, oils (aromatic and/or vegetable), molds.
Preparation stage:
- The soap is grated.
- The mass with the addition of water is placed in a water bath. Everything is mixed until smooth.
- Once the soap base has melted, ground coffee beans, colorings/flavors, essential oils and any other ingredients are added and then mixed thoroughly.
- Now you need to pour it into molds and wait for it to harden. To speed up the process, you can put the molds in the refrigerator.
- When the mass hardens, it needs to be taken out, the soap is ready.
Paintings, panels
Panels are pictures made from salt dough. The advantage of such works over plasticine ones is that the dough hardens very strongly over time, and the work becomes durable.
Manufacturing stages:
- take 1 tablespoon of salt and 2 tablespoons of flour;
- add 120 ml of water;
- add 1 tablespoon of oil or cosmetic cream;
- the dough should not be sticky or too runny;
- add flour or butter if necessary;
- make a picture from the prepared dough;
- can be shaped using a stencil;
- then dry in the oven for 1 hour at a temperature of no more than 80 °C;
- The craft can be glued to hard cardboard, framed and hung on the wall.
The panel can be painted. Acrylic paints are suitable for this.
Doll
It is very interesting to make dolls from natural materials with your own hands. Such crafts are made quickly and turn out beautiful.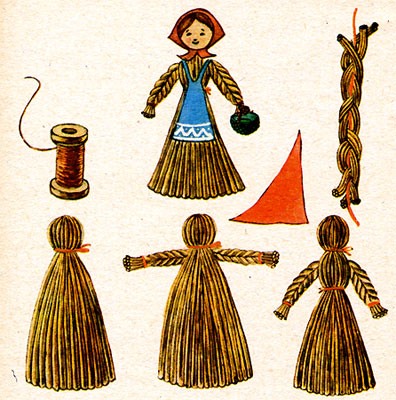
The dolls are made from straw or from oblong pine cones.. For the arms, legs and body, take one piece each. For the head, you will need a round cone. Each of the parts is placed in a piece of fabric and sewn up. Then the parts of the doll's body are connected to each other. You can attach hair made of threads to the head, and put a dress on the craft itself.
Roses from leaves
Fresh maple leaves are usually used to make roses, as they have the most convenient shape.
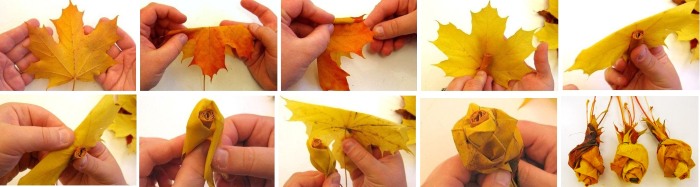
Execution:
- To begin, take one sheet and fold it in half, then roll it into a tube.
- Next, the core is made. To do this, take another maple leaf, insert the resulting tube into it and roll up the sharp edges, bending them around the core inward.
- Then repeat the procedure 4-6 times to make the rose lush. Each leaf is secured with threads around the core.
- The wrapping for such a bouquet can be made from maple: take several leaves, wrap them around the resulting roses and tie them with a thread.
Basket, monsters from cones
You will need to take one pine cone, wrap it with wire, then attach another pine cone and thus "knit" a basket of the desired size. You will need a lot of wire. The pine cones have a convenient shape, which allows the wire to firmly fasten the parts.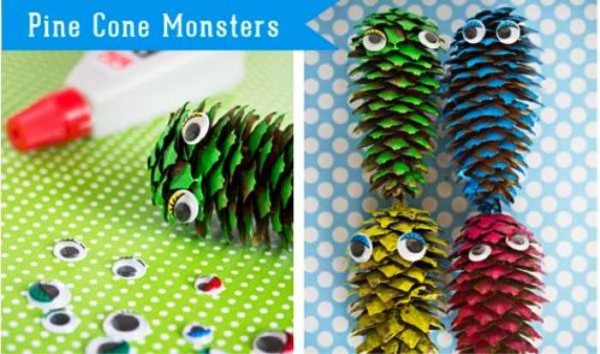
You can make monster-shaped figures from pine cones. You need to take a wire or a stick and make legs and arms from them, simply gluing them to the pine cone. You can attach eyes to the craft. It is advisable to choose elongated pine cones.
Seahorse made from branches
To make a craft in the form of a horse, you will need to take cardboard, cut out the shape and prepare many small branches of different sizes. 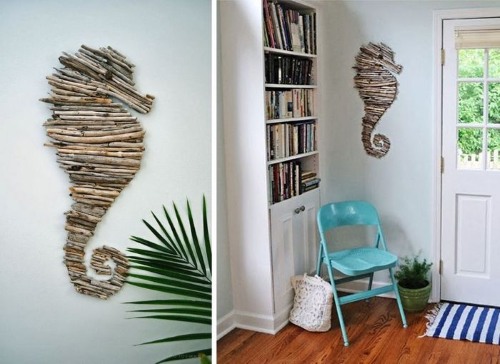 Then glue them horizontally to the entire surface of the form. This work is simple and beautiful, it can be hung on the wall as a decorative item.
Photo frame, decorations made of shells
Any frame can be decorated and turned into a beautiful craft made from natural materials with your own hands, very quickly decorated with shells.
To do this you will need:
- simple wooden frame;
- various shells;
- glue.
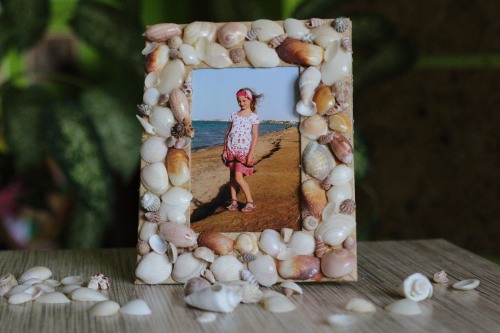
Each shell is attached to the frame with glue. It is important that there are no gaps, so it is advisable to choose shells of different shapes and sizes. From the same natural material, you can make an excellent painting on canvas on a stretcher. To do this, the desired composition is laid out from the shells and then fixed with glue.
Shells are also used to make necklaces.
Usually, in each shell, you need to make a small hole for the thread, then connect several of these shells together or experiment with shapes, sizes and other parameters. Figures are also made from shells. To make a craft, fasten the parts of the intended figure together and glue them.
You can also make great drawings from shells. You will need glue, very thick paper and shells. You need to draw something on cardboard (paper) - something three-dimensional will do, then glue the shells.
Strawberries from stones
For this craft you will need oblong-round stones, brushes, acrylic paints (they are suitable for painting on stones).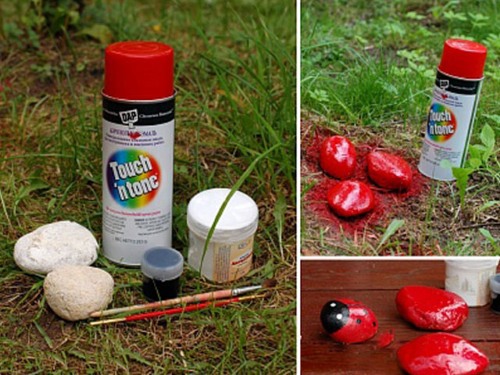
Execution:
- Before work, wash and dry the stones.
- Then cover the stones completely with red paint and let dry.
- Then draw small round dots of a yellowish color over the entire surface, and a small cap of leaves on top.
- The rock strawberry is ready!
New Year's toys
You can decorate your New Year tree with beautiful toys made of dough. In appearance, such crafts are not inferior to store-bought decorations. As with making a panel, take flour and salt in a 2:1 ratio, dilute with water and add a little butter or cream.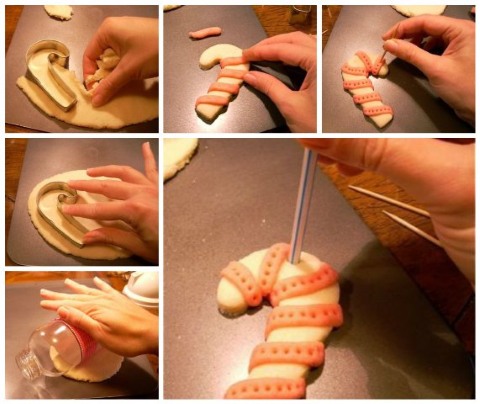
The required shape is made using molds or modeling in the form of a circle, heart, Christmas tree, snowman. You can add dye to the dough or paint it after drying for greater brightness of color. The resulting forms are left to dry in the sun or in the oven at 50-60 degrees until dry. The rope is attached either before the dough hardens, or a small hole is left for hanging.
The already mentioned beautiful DIY crafts made from natural materials are also suitable as New Year's toys: quickly made straw dolls and painted pine cones.
Any cones and nuts can be trimmed with lace and decorated with beads, then secured with ropes and hung.. You can also make a door pendant out of them. For this you will need pine cones, a long fishing line, decorations of your choice, and a string for hanging. Take two pine cones and fasten them with a fishing line, then continue until you get a circle that can be decorated.
From fruits and vegetables
These food materials have an undeniable advantage: vegetables and fruits can be easily shaped and cut into anything. But such crafts are short-lived.
Swan from an apple
A swan made from an apple is very easy to make:
- you need to take one apple and cut it into 2 parts;
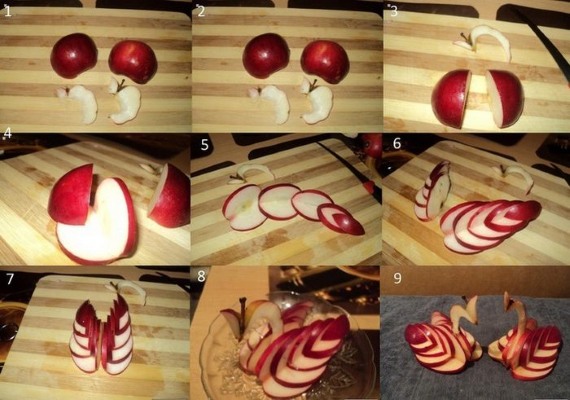
- Place one part flat on the board and cut out triangles in parallel on both sides (each half - horizontally and vertically), without reaching the board with the knife. It will be enough to make several such triangles and place them so that it looks like swan wings;
- cut out a swan's head and neck from the second half of the apple;
- everything is attached to the body.
Olive Penguin
This edible craft is made in the same way as canapés. To do this, you will need a toothpick, which you need to pierce two olives with. The penguin's legs can be made from carrots. To do this, you need to cut off a piece that should not be larger than the olives themselves, and give the shape of paws by cutting out triangles.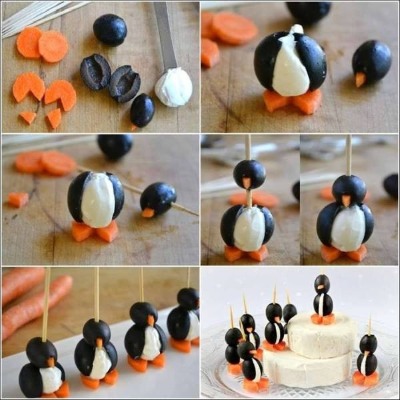
Then, use mayonnaise or sour cream to draw a white breast on the penguin. The eyes are also made using sour cream, and a piece of cheese or carrot can be inserted as a nose.
Banana Dog
To make a banana dog you will need 2 peppercorns, 2 bananas, toothpicks and a knife: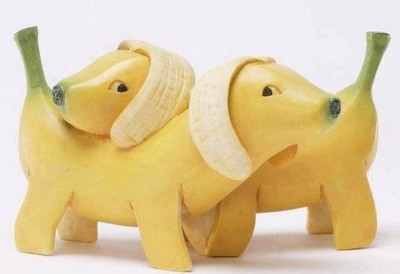
- Take one banana, cut out the legs from the peel, which need to be secured with toothpicks so that the figure can stand. The part of the banana where the tail is is the tail for the dog, and the opposite side is cut off.
- Then you need to take the second banana, cut out the ears, cut off the excess part (with the tail). The ears are also the skin of the fruit, not the pulp.
- Insert 2 peas for eyes.
- Fasten the body and head with toothpicks.
Carrot cone
On a small peeled carrot, you need to cut out identical scales in the form of triangles in several rows. 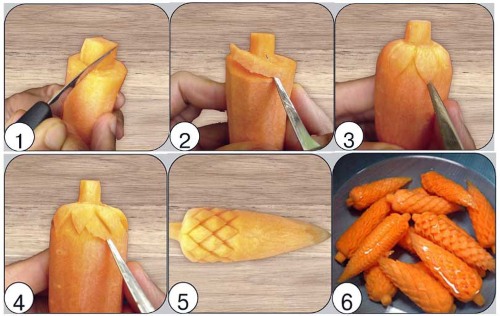 It is necessary to cut in a checkerboard pattern over the entire surface of the figure. Then put the carrots in cold water for 20 minutes.
Roses from radishes, cucumbers
To make roses from radishes or cucumbers, you need to prepare a special knife that is used to peel vegetables. Cut out strips. They should be so thin that they can bend without effort and breakage. Take one strip, roll it into a tube, then wrap it with another, bending the edges, and do this with 8-13 strips of vegetables until you get a bud.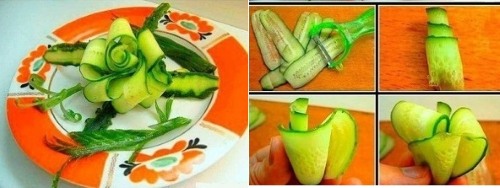
Secure everything with toothpicks. This craft can be served as an appetizer on the table. From the same cucumbers, you can cut out triangular leaves for "roses".
How different can be crafts made from natural materials with your own hands. You can make anything quickly, beautifully and qualitatively, from edible figures to decorative ornaments for the home. This is the advantage of natural materials.
They are accessible, so anyone can indulge in creativity and enjoy the process of creating unique crafts.
Video on how to make crafts from natural materials with your own hands
Interesting crafts made from natural materials, watch the video:
https://www.youtube.com/watch?v=_e7UjQsasCw
We make crafts from natural materials:
https://www.youtube.com/watch?v=A_39poFSyd8